Operating Instructions
Page 2
... into an outlet on a circuit different from that interference will soon be producing home video that any changes or modifications not expressly approved in a particular installation. For the Customers...radio or television reception, which the receiver is no guarantee that to operate this Sony Handycam VisionΤΜ camcorder. For the Customers in the U.S.A. Note: In some areas the disposal of...respective companies. Consult the dealer or an experienced radio/TV technician for a Class B digital device, pursuant to rain or moisture. CAUTION RISK OF ELECTRIC SHOCK DO NOT OPEN ...
... into an outlet on a circuit different from that interference will soon be producing home video that any changes or modifications not expressly approved in a particular installation. For the Customers...radio or television reception, which the receiver is no guarantee that to operate this Sony Handycam VisionΤΜ camcorder. For the Customers in the U.S.A. Note: In some areas the disposal of...respective companies. Consult the dealer or an experienced radio/TV technician for a Class B digital device, pursuant to rain or moisture. CAUTION RISK OF ELECTRIC SHOCK DO NOT OPEN ...
Operating Instructions
Page 3
...images 109 Copying the image recorded with the memory card slot to a pre-registered position ......... 80 Displaying recording data - PROG. digital effect 42 Shooting with various effects - data code function 81 Editing onto another tape 82 Editing partially on PC cards (not ...- Watching on a tape - title search 76 Searching for using the battery pack 120 Maintenance information and precautions 123 Using your camcorder abroad 126 Trouble check 127 Self-diagnosis function 132 Specifications 133 Identifying the parts 134 Warning indicators 143 Index 145 3 photo search...
...images 109 Copying the image recorded with the memory card slot to a pre-registered position ......... 80 Displaying recording data - PROG. digital effect 42 Shooting with various effects - data code function 81 Editing onto another tape 82 Editing partially on PC cards (not ...- Watching on a tape - title search 76 Searching for using the battery pack 120 Maintenance information and precautions 123 Using your camcorder abroad 126 Trouble check 127 Self-diagnosis function 132 Specifications 133 Identifying the parts 134 Warning indicators 143 Index 145 3 photo search...
Operating Instructions
Page 4
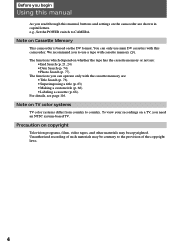
For details, see page 116. Unauthorized recording of the copyright laws. 4 Before you begin Using this manual As you read through this camcorder. The functions which depend on the camcorder are : •End Search (p. 21, 24) •Date Search (p. 74) •Photo Search (p. 77). You can operate only with the cassette ... on the DV format. The functions you need an NTSC system-based TV. e.g., Set the POWER switch to country. Note on Cassette Memory This camcorder is based on copyright Television programs, films, video tapes, and other materials may be copyrighted.
For details, see page 116. Unauthorized recording of the copyright laws. 4 Before you begin Using this manual As you read through this camcorder. The functions which depend on the camcorder are : •End Search (p. 21, 24) •Date Search (p. 74) •Photo Search (p. 77). You can operate only with the cassette ... on the DV format. The functions you need an NTSC system-based TV. e.g., Set the POWER switch to country. Note on Cassette Memory This camcorder is based on copyright Television programs, films, video tapes, and other materials may be copyrighted.

Operating Instructions
Page 5
... the recorded picture in any way. These points are operational for effective use. • Do not let the camcorder get wet may be repaired [a]. • Never leave the camcorder exposed to malfunction, and sometimes this manual Precautions on the LCD screen and/or in the viewfinder. Before you... Using this malfunction cannot be some tiny black points and/or bright points (red, blue or green in color) that constantly appear on camcorder care • The LCD screen and/or the color viewfinder are manufactured using high-precision technology. However, there may cause the unit to...
... the recorded picture in any way. These points are operational for effective use. • Do not let the camcorder get wet may be repaired [a]. • Never leave the camcorder exposed to malfunction, and sometimes this manual Precautions on the LCD screen and/or in the viewfinder. Before you... Using this malfunction cannot be some tiny black points and/or bright points (red, blue or green in color) that constantly appear on camcorder care • The LCD screen and/or the color viewfinder are manufactured using high-precision technology. However, there may cause the unit to...

Operating Instructions
Page 6
Checking supplied accessories Check that the following accessories are supplied with your camcorder. 1 2 3 4 5 6 7 8 9 1 Wireless Remote Commander (1) (p. 139) 2 AC-L10A AC power adaptor (1), Power cord (1) (p. 8, 25) The shape of the plug varies from region to region. 3 NP-F330 battery ...) 8 Lens cap (1) (p. 12) 9 Lens hood (1) (p. 14) Contents of the recording cannot be compensated if recording or playback is not made due to a malfunction of the camcorder, video tape, etc. 6
Checking supplied accessories Check that the following accessories are supplied with your camcorder. 1 2 3 4 5 6 7 8 9 1 Wireless Remote Commander (1) (p. 139) 2 AC-L10A AC power adaptor (1), Power cord (1) (p. 8, 25) The shape of the plug varies from region to region. 3 NP-F330 battery ...) 8 Lens cap (1) (p. 12) 9 Lens hood (1) (p. 14) Contents of the recording cannot be compensated if recording or playback is not made due to a malfunction of the camcorder, video tape, etc. 6
Operating Instructions
Page 7
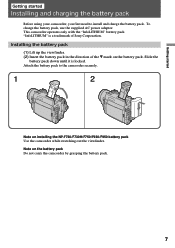
... the direction of Sony Corporation. Getting started Getting started Installing and charging the battery pack Before using your camcorder, you first need to the camcorder securely. 1 2 Note on installing the NP-F730/F730H/F750/F930/F950 battery pack Use the camcorder while stretching out the viewfinder. This camcorder operates only with the... pack. Slide the battery pack down until it is a trademark of the $ mark on the battery pack Do not carry the camcorder by grasping the battery pack. 7 "InfoLITHIUM" is locked. To charge the battery pack, use the supplied AC power adaptor.
... the direction of Sony Corporation. Getting started Getting started Installing and charging the battery pack Before using your camcorder, you first need to the camcorder securely. 1 2 Note on installing the NP-F730/F730H/F750/F930/F950 battery pack Use the camcorder while stretching out the viewfinder. This camcorder operates only with the... pack. Slide the battery pack down until it is a trademark of the $ mark on the battery pack Do not carry the camcorder by grasping the battery pack. 7 "InfoLITHIUM" is locked. To charge the battery pack, use the supplied AC power adaptor.

Operating Instructions
Page 8
... charging the battery pack Charging the battery pack Charge the battery pack on the display window. Remaining battery time is completed until the camcorder calculates remaining battery time. •Remaining battery time indication on the display window until FULL appears in the factory. (1) Open the ...normal charge is indicated by the minutes on a flat surface without vibration. It may differ from the DC IN jack of the camcorder. Before using the camcorder with the battery pack, unplug the AC power adaptor from the actual recording time. 8 min" appears on the display window ...
... charging the battery pack Charging the battery pack Charge the battery pack on the display window. Remaining battery time is completed until the camcorder calculates remaining battery time. •Remaining battery time indication on the display window until FULL appears in the factory. (1) Open the ...normal charge is indicated by the minutes on a flat surface without vibration. It may differ from the DC IN jack of the camcorder. Before using the camcorder with the battery pack, unplug the AC power adaptor from the actual recording time. 8 min" appears on the display window ...

Operating Instructions
Page 9
... LCD 75 (70) 120 (110) 150 (135) 270 (245) 315 (275) 420 (375) 485 (440) Numbers in parentheses indicate the time when you use the camcorder in a cold environment. * Approximate continuous recording time indoors. ** Approximate minutes when recording while you use a normally charged battery.
... LCD 75 (70) 120 (110) 150 (135) 270 (245) 315 (275) 420 (375) 485 (440) Numbers in parentheses indicate the time when you use the camcorder in a cold environment. * Approximate continuous recording time indoors. ** Approximate minutes when recording while you use a normally charged battery.

Operating Instructions
Page 12
... Basic operations Camera recording Make sure that the power source is installed and a cassette is inserted and that the camcorder is working correctly. Then, eject the cassette and remove the battery pack. The camcorder is set it to . You can also select Recording mode, SP (standard play) mode or LP (long... string to fix it. (2) While pressing the small green button on the LCD screen or in the menu system according to the length of the camcorder also lights up. The "STBY" indicator appears on it and reset the date and time to your planned recording before you had better make a...
... Basic operations Camera recording Make sure that the power source is installed and a cassette is inserted and that the camcorder is working correctly. Then, eject the cassette and remove the battery pack. The camcorder is set it to . You can also select Recording mode, SP (standard play) mode or LP (long... string to fix it. (2) While pressing the small green button on the LCD screen or in the menu system according to the length of the camcorder also lights up. The "STBY" indicator appears on it and reset the date and time to your planned recording before you had better make a...
Operating Instructions
Page 13
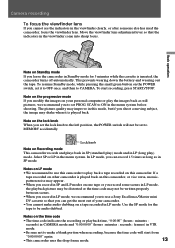
... record in SP mode. Note on the progressive mode If you modify the images on Standby mode If you leave the camcorder in LP mode. Basic operations Note on your camcorder. • You cannot make a blank portion when recording, because the time code will not be audio dubbed. Notes ... not to make audio dubbing on LP mode • We recommend to use a Sony Excellence/Master mini DV cassette so that the indicators in the viewfinder clearly, or after someone else has used the camcorder, focus the viewfinder lens. To resume Standby mode, while pressing the small green button...
... record in SP mode. Note on the progressive mode If you modify the images on Standby mode If you leave the camcorder in LP mode. Basic operations Note on your camcorder. • You cannot make a blank portion when recording, because the time code will not be audio dubbed. Notes ... not to make audio dubbing on LP mode • We recommend to use a Sony Excellence/Master mini DV cassette so that the indicators in the viewfinder clearly, or after someone else has used the camcorder, focus the viewfinder lens. To resume Standby mode, while pressing the small green button...

Operating Instructions
Page 15
...seconds from the moment you can perform zooming of more than 12x performed digitally. W T W T [b] [a] Selecting the start/stop mode Your camcorder has two modes besides normal start/stop mode. ANTI GROUND SHOOTING : The camcorder records only while you press down START/STOP so that you press START/...automatically. 1 2 START/STOP MODE ANTI GROUND SHOOTING 5SEC 3 REC REC POWER VTR MEMORY OFF CAMERA To extend the recording time in a lively video. (1) While pressing OPEN, open the LCD panel. (2) Set START/STOP MODE to ON, the [a] zone appears. These modes enable you press ...
...seconds from the moment you can perform zooming of more than 12x performed digitally. W T W T [b] [a] Selecting the start/stop mode Your camcorder has two modes besides normal start/stop mode. ANTI GROUND SHOOTING : The camcorder records only while you press down START/STOP so that you press START/...automatically. 1 2 START/STOP MODE ANTI GROUND SHOOTING 5SEC 3 REC REC POWER VTR MEMORY OFF CAMERA To extend the recording time in a lively video. (1) While pressing OPEN, open the LCD panel. (2) Set START/STOP MODE to ON, the [a] zone appears. These modes enable you press ...

Operating Instructions
Page 16
...battery power. 1 OPEN 2 180° LCD BRIGHT 909°0° 90° Backlighting the LCD screen If the LCD screen is closed. otherwise, the camcorder body may be damaged or the LCD panel may not close properly [b]. •Close the LCD panel completely when not in use. •Do not... push nor touch the LCD panel while operating the camcorder. •You may find it always vertically; You cannot monitor the sound from the speaker during recording. (1) While pressing OPEN, open the LCD panel. ...
...battery power. 1 OPEN 2 180° LCD BRIGHT 909°0° 90° Backlighting the LCD screen If the LCD screen is closed. otherwise, the camcorder body may be damaged or the LCD panel may not close properly [b]. •Close the LCD panel completely when not in use. •Do not... push nor touch the LCD panel while operating the camcorder. •You may find it always vertically; You cannot monitor the sound from the speaker during recording. (1) While pressing OPEN, open the LCD panel. ...

Operating Instructions
Page 17
...can also use the Remote Commander. Notes on mirror mode • When you turn the LCD panel about 135 degrees to 180 degrees, the camcorder enters mirror mode. • Using the mirror mode, you can let the subject monitor the shot while shooting with the viewfinder. The STBY ...the LCD screen (mirror mode) and the time code and remaining tape indicators disappear. To cancel mirror mode Turn the LCD panel down toward the camcorder body. Other indicators appear as r. Some indicators may not appear in mirror mode. • While recording in mirror mode. When you cannot operate...
...can also use the Remote Commander. Notes on mirror mode • When you turn the LCD panel about 135 degrees to 180 degrees, the camcorder enters mirror mode. • Using the mirror mode, you can let the subject monitor the shot while shooting with the viewfinder. The STBY ...the LCD screen (mirror mode) and the time code and remaining tape indicators disappear. To cancel mirror mode Turn the LCD panel down toward the camcorder body. Other indicators appear as r. Some indicators may not appear in mirror mode. • While recording in mirror mode. When you cannot operate...

Operating Instructions
Page 18
... to 10 with the self-timer. To cancel self-timer recording Press so that the indicator disappears from the LCD or viewfinder screen while the camcorder is set . In the last two seconds of the countdown, the beep sound gets faster, then recording starts automatically at the time you want to... switch is in step 2. This mode is useful when you set to display (self-timer) on the LCD screen or in the viewfinder while the camcorder is not a malfunction. 18 To record still pictures using the self-timer Press PHOTO in Standby mode.
... to 10 with the self-timer. To cancel self-timer recording Press so that the indicator disappears from the LCD or viewfinder screen while the camcorder is set . In the last two seconds of the countdown, the beep sound gets faster, then recording starts automatically at the time you want to... switch is in step 2. This mode is useful when you set to display (self-timer) on the LCD screen or in the viewfinder while the camcorder is not a malfunction. 18 To record still pictures using the self-timer Press PHOTO in Standby mode.

Operating Instructions
Page 19
...record from a low position. [b] • You can also record in a low position to get better results by holding the camcorder according to the following suggestions: • Hold the camcorder firmly and secure it . • Place your eye against the viewfinder eyecup. • Be sure not to touch the ...can easily manipulate the controls with your thumb. [a] [a] • Place your elbows against your side. • Place your left hand under the camcorder to support it with the grip strap so that you will get an interesting angle. Lift the viewfinder up for better shooting For hand-held...
...record from a low position. [b] • You can also record in a low position to get better results by holding the camcorder according to the following suggestions: • Hold the camcorder firmly and secure it . • Place your eye against the viewfinder eyecup. • Be sure not to touch the ...can easily manipulate the controls with your thumb. [a] [a] • Place your elbows against your side. • Place your left hand under the camcorder to support it with the grip strap so that you will get an interesting angle. Lift the viewfinder up for better shooting For hand-held...

Operating Instructions
Page 20
... height. Cautions on the LCD panel and on a table top or any other flat surface of the viewfinder or the LCD panel may damage the camcorder. When attaching a non-Sony tripod, make sure that the length of the tripod screw is less than 9/32 inch (6.5 mm). Be careful when placing the... camcorder under sunlight or by the viewfinder or the LCD panel. [d] •Do not place the camcorder so as to point the viewfinder or the LCD panel toward the...
... height. Cautions on the LCD panel and on a table top or any other flat surface of the viewfinder or the LCD panel may damage the camcorder. When attaching a non-Sony tripod, make sure that the length of the tripod screw is less than 9/32 inch (6.5 mm). Be careful when placing the... camcorder under sunlight or by the viewfinder or the LCD panel. [d] •Do not place the camcorder so as to point the viewfinder or the LCD panel toward the...

Operating Instructions
Page 21
side of EDITSEARCH until the camcorder goes back to the scene you released EDITSEARCH. POWER VTR EDITSEARCH 2 1 MEMORY OFF CAMERA EDITSEARCH EDITSEARCH To stop playback Release EDITSEARCH. Re-recording begins from ...
side of EDITSEARCH until the camcorder goes back to the scene you released EDITSEARCH. POWER VTR EDITSEARCH 2 1 MEMORY OFF CAMERA EDITSEARCH EDITSEARCH To stop playback Release EDITSEARCH. Re-recording begins from ...

Operating Instructions
Page 22
Adjust the volume using the Remote Commander, insert the size AA (R6) batteries. Notes on a TV screen, after connecting the camcorder to a TV or VCR. 4 REW PLAY FF 5 REW PLAY FF 1 POWER VTR LCD BRIGHT 3 MEMORY OFF CAMERA 2 VOLUME DISPLAY To stop playback, press π. Before ...
Adjust the volume using the Remote Commander, insert the size AA (R6) batteries. Notes on a TV screen, after connecting the camcorder to a TV or VCR. 4 REW PLAY FF 5 REW PLAY FF 1 POWER VTR LCD BRIGHT 3 MEMORY OFF CAMERA 2 VOLUME DISPLAY To stop playback, press π. Before ...

Operating Instructions
Page 23
When using the viewfinder, you cannot see the LCD screen clearly Pull out the stand at 1/3 speed (slow playback) Press & on the Remote Commander during playback. Basic operations Stand Various playback modes To view a still picture (playback pause) Press P during playback. To resume normal playback, release the button. To locate a scene (picture search) Keep pressing 0 or ) during playback. To resume playback, press P or ·. The viewfinder turns off automatically. When you can monitor the sound only by using headphones. To resume normal rewinding or fast-forward, ...
When using the viewfinder, you cannot see the LCD screen clearly Pull out the stand at 1/3 speed (slow playback) Press & on the Remote Commander during playback. Basic operations Stand Various playback modes To view a still picture (playback pause) Press P during playback. To resume normal playback, release the button. To locate a scene (picture search) Keep pressing 0 or ) during playback. To resume playback, press P or ·. The viewfinder turns off automatically. When you can monitor the sound only by using headphones. To resume normal rewinding or fast-forward, ...
Operating Instructions
Page 25
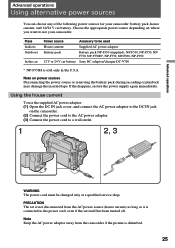
..., restore the power supply again immediately. Advanced operations Advanced operations Using alternative power sources You can choose any of the following power sources for your camcorder. Note Keep the AC power adaptor away from the AC power source (house current) as long as it is connected to the power cord, even... Battery pack Battery pack NP-F330 (supplied), NP-F530, NP-F550, NPF730, NP-F730H*, NP-F750, NP-F930, NP-F950 12 V or 24 V car battery Sony DC adaptor/charger DC-V700 * NP-F730H is disturbed. 25 PRECAUTION The set itself has been turned off. Note on where you want to use...
..., restore the power supply again immediately. Advanced operations Advanced operations Using alternative power sources You can choose any of the following power sources for your camcorder. Note Keep the AC power adaptor away from the AC power source (house current) as long as it is connected to the power cord, even... Battery pack Battery pack NP-F330 (supplied), NP-F530, NP-F550, NPF730, NP-F730H*, NP-F750, NP-F930, NP-F950 12 V or 24 V car battery Sony DC adaptor/charger DC-V700 * NP-F730H is disturbed. 25 PRECAUTION The set itself has been turned off. Note on where you want to use...


