
Operating Instructions
Page 6
...your camcorder. 1 2 3 4 5 6 7 8 9 1 Wireless Remote Commander (1) (p. 139) 2 AC-L10A AC power adaptor (1), Power cord (1) (p. 8, 25) The shape of the plug varies from region to region. 3 NP-F330 battery pack (1) (p. 7) 4 Size AA (R6) battery for Remote Commander (2) (p. 139) 5 Floppy disk adapter (1)... (p. 91) 6 A/V connecting cable (1) (p. 70, 82) 7 Shoulder strap (1) (p. 140) 8 Lens cap (1) (p. 12) 9 Lens hood (1) (p. 14) Contents of the recording cannot be compensated if recording or playback is not made due to a malfunction of the camcorder, video tape, etc...
...your camcorder. 1 2 3 4 5 6 7 8 9 1 Wireless Remote Commander (1) (p. 139) 2 AC-L10A AC power adaptor (1), Power cord (1) (p. 8, 25) The shape of the plug varies from region to region. 3 NP-F330 battery pack (1) (p. 7) 4 Size AA (R6) battery for Remote Commander (2) (p. 139) 5 Floppy disk adapter (1)... (p. 91) 6 A/V connecting cable (1) (p. 70, 82) 7 Shoulder strap (1) (p. 140) 8 Lens cap (1) (p. 12) 9 Lens hood (1) (p. 14) Contents of the recording cannot be compensated if recording or playback is not made due to a malfunction of the camcorder, video tape, etc...

Operating Instructions
Page 92
... of speakers and televisions, permanent erasure of image MVC00001.jpg: if saved on a PC card MVC-0001.jpg: if saved on the using the AC power adaptor. 92 In this unit •Size : 3.5 inch •Type : 2HD •Capacity : 1.44 MB •Format : MS-DOS format (512 bytes x 18 ...sector) When using the camcorder. On file format (JPEG) This unit compresses image data in areas subject to get the adapter wet The floppy disk adapter does not function when it using a 3.5 inch, 2HD floppy disk other than that described above, format...
... of speakers and televisions, permanent erasure of image MVC00001.jpg: if saved on a PC card MVC-0001.jpg: if saved on the using the AC power adaptor. 92 In this unit •Size : 3.5 inch •Type : 2HD •Capacity : 1.44 MB •Format : MS-DOS format (512 bytes x 18 ...sector) When using the camcorder. On file format (JPEG) This unit compresses image data in areas subject to get the adapter wet The floppy disk adapter does not function when it using a 3.5 inch, 2HD floppy disk other than that described above, format...

Operating Instructions
Page 93
...remaining battery indicator This camcorder displays remaining recording/playback time on playback compatibility This camcorder is not guaranteed to go out. Power supply When using a video light (not supplied) or similar equipment connected to increased power consumption. Note on...video light to properly play back images shot with other functions. When using a battery case When using the memory card slot, the correct remaining time may result in a temporary power shortage in the viewfinder. Connecting the floppy disk adapter or PC card With the upper side of the camcorder...
...remaining battery indicator This camcorder displays remaining recording/playback time on playback compatibility This camcorder is not guaranteed to go out. Power supply When using a video light (not supplied) or similar equipment connected to increased power consumption. Note on...video light to properly play back images shot with other functions. When using a battery case When using the memory card slot, the correct remaining time may result in a temporary power shortage in the viewfinder. Connecting the floppy disk adapter or PC card With the upper side of the camcorder...

Operating Instructions
Page 96
Details are shooting. Data volume before stored into the floppy disk adapter. Formatting (initializing) a PC card or a floppy disk (1) When you format a PC card, insert the card into the memory card slot. (2) Set the POWER switch to MEMORY. The display shows "EXECUTE." (7) Press the control dial again. When you format a floppy disk, insert...
Details are shooting. Data volume before stored into the floppy disk adapter. Formatting (initializing) a PC card or a floppy disk (1) When you format a PC card, insert the card into the memory card slot. (2) Set the POWER switch to MEMORY. The display shows "EXECUTE." (7) Press the control dial again. When you format a floppy disk, insert...

Operating Instructions
Page 98
... screen or in the viewfinder. The recording is flashing Never shake or strike the unit. As well do not turn the power off , eject a PC card/floppy disk adapter or remove the battery pack. Recording does not start yet. (4) Press PHOTO deeper. Otherwise, the image data breakdown may occur.... "CAPTURE" appears on the mini DV tape is played back. (3) Keep pressing PHOTO lightly until a picture from a mini DV tape as a still image This camcorder can...
... screen or in the viewfinder. The recording is flashing Never shake or strike the unit. As well do not turn the power off , eject a PC card/floppy disk adapter or remove the battery pack. Recording does not start yet. (4) Press PHOTO deeper. Otherwise, the image data breakdown may occur.... "CAPTURE" appears on the mini DV tape is played back. (3) Keep pressing PHOTO lightly until a picture from a mini DV tape as a still image This camcorder can...

Operating Instructions
Page 100
... stops. The still image from step 1. 100 Insert another floppy disk or PC card and repeat the procedure from the mini DV tape is completed. 1 POWER VTR MEMORY OFF CAMERA 2 MENU 3 5 PHOTO PHOTO SAVE 0 : 00 : 00 : 00 4 / 15 SFN SAV I NG 0 [ MENU ] : END MEMORY S E T QUA L I TY P RO T E C .... Before operation •Insert a recorded mini DV tape and rewind the tape. •Connect the floppy disk adapter (with a disk inside) or insert a PC card to the unit. (1) Set the POWER switch to VTR. (2) Press MENU to display the menu. (3) Turn the control dial to select , then ...
... stops. The still image from step 1. 100 Insert another floppy disk or PC card and repeat the procedure from the mini DV tape is completed. 1 POWER VTR MEMORY OFF CAMERA 2 MENU 3 5 PHOTO PHOTO SAVE 0 : 00 : 00 : 00 4 / 15 SFN SAV I NG 0 [ MENU ] : END MEMORY S E T QUA L I TY P RO T E C .... Before operation •Insert a recorded mini DV tape and rewind the tape. •Connect the floppy disk adapter (with a disk inside) or insert a PC card to the unit. (1) Set the POWER switch to VTR. (2) Press MENU to display the menu. (3) Turn the control dial to select , then ...

Operating Instructions
Page 101
photo save When the access lamp is flashing Never shake or strike the unit. Otherwise, the image data breakdown may occur. To record all the way and start copying. As well do not turn the power off, eject a PC card/floppy disk adapter or remove the battery pack. When you change floppy disks in the middle of copying The unit resumes copying from a mini DV tape - Memory card slot operations Copying still images from the last image recorded on the mini DV tape Rewind the tape all the images recorded on the previous disk. 101
photo save When the access lamp is flashing Never shake or strike the unit. Otherwise, the image data breakdown may occur. To record all the way and start copying. As well do not turn the power off, eject a PC card/floppy disk adapter or remove the battery pack. When you change floppy disks in the middle of copying The unit resumes copying from a mini DV tape - Memory card slot operations Copying still images from the last image recorded on the mini DV tape Rewind the tape all the images recorded on the previous disk. 101

Operating Instructions
Page 105
...back images using the LASER LINK function. • When operating memory photo playback on a TV screen • Connect this camcorder. 105 You cannot play them back with this camcorder to the right (unlock) position. (2) While pressing OPEN, open the LCD panel. (3) Press MEMORY PLAY. memory photo ...to the TV with a disk inside) or insert a PC card into the unit. (1) Set the POWER switch to select the desired still image. Before operation Connect the floppy disk adapter (with the supplied A/V connecting cable before operation, or there may be able to have deteriorated. The ...
...back images using the LASER LINK function. • When operating memory photo playback on a TV screen • Connect this camcorder. 105 You cannot play them back with this camcorder to the right (unlock) position. (2) While pressing OPEN, open the LCD panel. (3) Press MEMORY PLAY. memory photo ...to the TV with a disk inside) or insert a PC card into the unit. (1) Set the POWER switch to select the desired still image. Before operation Connect the floppy disk adapter (with the supplied A/V connecting cable before operation, or there may be able to have deteriorated. The ...

Operating Instructions
Page 110
... control dial to MEMORY. Before operation Connect the floppy disk adapter (with a disk inside) or insert a PC card into the unit. (1) Set the POWER switch to select EXECUTE, then press the dial. When all the unprotected images in a floppy disk or PC card. POWER VTR 1 1 MEMORY OFF CAMERA 2 MENU 3 4 5 6 110 MEMORY S E T CONT I NUOUS...
... control dial to MEMORY. Before operation Connect the floppy disk adapter (with a disk inside) or insert a PC card into the unit. (1) Set the POWER switch to select EXECUTE, then press the dial. When all the unprotected images in a floppy disk or PC card. POWER VTR 1 1 MEMORY OFF CAMERA 2 MENU 3 4 5 6 110 MEMORY S E T CONT I NUOUS...

Operating Instructions
Page 112
...Press r REC to set the mini DV tape to recording pause mode. (4) Play back the still image you have more to copy, repeat steps 4 and 5. 1 POWER VTR MEMORY OFF CAMERA 4 PLAY 2 3 REC 5 PAUSE 112 To stop . (6) If you want to record the desired still image. Before operation •Insert a ...mini DV tape for recording. •Connect the floppy disk adapter (with the memory card slot and record them to stop copying in the middle Press π. Copying the image recorded with the memory card slot...
...Press r REC to set the mini DV tape to recording pause mode. (4) Play back the still image you have more to copy, repeat steps 4 and 5. 1 POWER VTR MEMORY OFF CAMERA 4 PLAY 2 3 REC 5 PAUSE 112 To stop . (6) If you want to record the desired still image. Before operation •Insert a ...mini DV tape for recording. •Connect the floppy disk adapter (with the memory card slot and record them to stop copying in the middle Press π. Copying the image recorded with the memory card slot...

Operating Instructions
Page 114
... play back the images using MEMORY +/- The unit plays back the images recorded on TV Connect this camcorder to a TV with a disk inside) or insert a PC card into the unit. (1) Set the POWER switch to select SLIDE SHOW, then press the dial. (5) Press MEMORY PLAY. buttons before operation. ... recorded images on a floppy disk or PC card in a pause. This function is set it in sequence. Before operation Connect the floppy disk adapter (with the supplied A/V connecting cable before step 2. When all the images have been played back, the display shows the first image again and ...
... play back the images using MEMORY +/- The unit plays back the images recorded on TV Connect this camcorder to a TV with a disk inside) or insert a PC card into the unit. (1) Set the POWER switch to select SLIDE SHOW, then press the dial. (5) Press MEMORY PLAY. buttons before operation. ... recorded images on a floppy disk or PC card in a pause. This function is set it in sequence. Before operation Connect the floppy disk adapter (with the supplied A/V connecting cable before step 2. When all the images have been played back, the display shows the first image again and ...

Operating Instructions
Page 123
...Sony DVM12CL cleaning cassette (not supplied). How to prevent moisture condensation When bringing the camcorder from a cold place to a warm place, moisture may condense inside the camcorder... playback pictures do not use the camcorder for about 1 hour. If this condition, the tape may not operate correctly. Turn off the power and do not appear • the...video heads. Additional information Maintenance information and precautions Moisture condensation If the camcorder is brought directly from a cold place to a warm place, put the camcorder in a plastic bag and allow it to adapt...
...Sony DVM12CL cleaning cassette (not supplied). How to prevent moisture condensation When bringing the camcorder from a cold place to a warm place, moisture may condense inside the camcorder... playback pictures do not use the camcorder for about 1 hour. If this condition, the tape may not operate correctly. Turn off the power and do not appear • the...video heads. Additional information Maintenance information and precautions Moisture condensation If the camcorder is brought directly from a cold place to a warm place, put the camcorder in a plastic bag and allow it to adapt...
Operating Instructions
Page 133
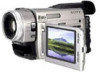
...Charge Coupled Device 1/4") Viewfinder Electric viewfinder (color) Lens Combined power zoom lens, 48x (Digital), 12x (Optical) Focal distance f =3/16 to 2 ...) Mass Approx. 13.4 oz (380 g) Power requirements Supplied from the camcorder. Design and specifications are subject to EIAJ (....) 9.8 oz (280 g) excluding power code Floppy disk adapter General Power requirements 7.2 V (battery insertion input) 8.4 V (DC IN jack) Average power consumption 4.1 W during camera recording ...184,580 (839 x 220) Input and output connectors S video input/output Input/output auto switch 4-pin mini DIN Luminance ...
...Charge Coupled Device 1/4") Viewfinder Electric viewfinder (color) Lens Combined power zoom lens, 48x (Digital), 12x (Optical) Focal distance f =3/16 to 2 ...) Mass Approx. 13.4 oz (380 g) Power requirements Supplied from the camcorder. Design and specifications are subject to EIAJ (....) 9.8 oz (280 g) excluding power code Floppy disk adapter General Power requirements 7.2 V (battery insertion input) 8.4 V (DC IN jack) Average power consumption 4.1 W during camera recording ...184,580 (839 x 220) Input and output connectors S video input/output Input/output auto switch 4-pin mini DIN Luminance ...

Operating Instructions
Page 138
... mm). The l control jack is used for Local Application Control Bus System. Floppy disk adapter 1 1 Memory slot connector (p. 93) 2 Floppy disk eject button (p. 94) 138 ...camcorder. ^º ^¡ ^™ ^£ ^¢ %•Stand %ª MEMORY RELEASE lever ^º 2 (headphones) jack (p. 22) ^¡ AUDIO/VIDEO jack (p. 70, 82) ^™ S VIDEO jack (p. 34, 70, 82) ^£ Camera recording lamp ^¢ MIC jack (PLUG IN POWER... of Sony Corporation and indicates that this product is i.LINK compatible. %¶ Tripod receptacle (p. 20) Make sure that the length of video equipment ...
... mm). The l control jack is used for Local Application Control Bus System. Floppy disk adapter 1 1 Memory slot connector (p. 93) 2 Floppy disk eject button (p. 94) 138 ...camcorder. ^º ^¡ ^™ ^£ ^¢ %•Stand %ª MEMORY RELEASE lever ^º 2 (headphones) jack (p. 22) ^¡ AUDIO/VIDEO jack (p. 70, 82) ^™ S VIDEO jack (p. 34, 70, 82) ^£ Camera recording lamp ^¢ MIC jack (PLUG IN POWER... of Sony Corporation and indicates that this product is i.LINK compatible. %¶ Tripod receptacle (p. 20) Make sure that the length of video equipment ...
Operating Instructions
Page 145
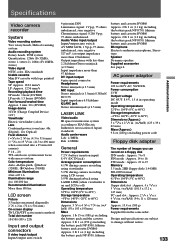
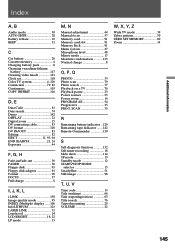
...26 Cassette memory 4 Charging battery pack 8 Charging vanadium-lithium battery 117 Cleaning video heads 123 Clock set 118 Color TV system 4, 126 Connection 70, 82...D, E Data Code 81 Date search 74 Demo 142 DISPLAY 22 Digital zoom 15 DV connecting cable 83 DV format 116 DV IN/OUT... F, G, H Fade-in/fade-out 36 FADER 36 Floppy disk 91 Floppy disk adapter 91 Format 96 FOCUS 57 Full charge 8 I, J, K, L i.LINK 138 Image...scan 79 Photo search 77 Playback on a TV 70 Playback pause 23 Power sources 25 Power zoom 14 PROGRAM AE 54 Progressive 35 PROG. SCAN 35 R Remaining battery...
...26 Cassette memory 4 Charging battery pack 8 Charging vanadium-lithium battery 117 Cleaning video heads 123 Clock set 118 Color TV system 4, 126 Connection 70, 82...D, E Data Code 81 Date search 74 Demo 142 DISPLAY 22 Digital zoom 15 DV connecting cable 83 DV format 116 DV IN/OUT... F, G, H Fade-in/fade-out 36 FADER 36 Floppy disk 91 Floppy disk adapter 91 Format 96 FOCUS 57 Full charge 8 I, J, K, L i.LINK 138 Image...scan 79 Photo search 77 Playback on a TV 70 Playback pause 23 Power sources 25 Power zoom 14 PROGRAM AE 54 Progressive 35 PROG. SCAN 35 R Remaining battery...


