
Operating Instructions
Page 9
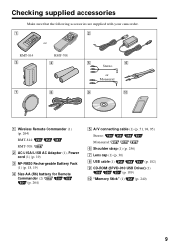
Checking supplied accessories Make sure that the following accessories are supplied with your camcorder. 1 2 or RMT-814 3 RMT-708 4 5 6 Stereo or Monaural 7 8 9 q; 1 Wireless Remote Commander (1) (p. 264) RMT-814: RMT-708: 2 AC-L15A/L15B AC Adaptor (1), Power cord (1) (p. 19) 3 NP-FM30 Rechargeable Battery Pack (1) (p. 18, 19) 4 Size AA (R6) battery for Remote Commander (2) (p. 264) 5 A/V connecting...
Checking supplied accessories Make sure that the following accessories are supplied with your camcorder. 1 2 or RMT-814 3 RMT-708 4 5 6 Stereo or Monaural 7 8 9 q; 1 Wireless Remote Commander (1) (p. 264) RMT-814: RMT-708: 2 AC-L15A/L15B AC Adaptor (1), Power cord (1) (p. 19) 3 NP-FM30 Rechargeable Battery Pack (1) (p. 18, 19) 4 Size AA (R6) battery for Remote Commander (2) (p. 264) 5 A/V connecting...

Operating Instructions
Page 10
... plug with the cassette window facing up . Connecting the power cord (p. 24) Use the battery pack when using your camcorder. After the cassette compartment goes down completely, close the lid. Open the DC IN jack cover. See the page in the ... center of the cassette back and insert the cassette properly with its v mark facing up . 3 Close the cassette compartment by pressing on a tape of your camcorder outdoors (p. 18). AC Adaptor (supplied) Inserting a cassette (p. 28) 1 Slide OPEN/ EJECT in parentheses "( )" for more information. Recording on a tape This chapter...
... plug with the cassette window facing up . Connecting the power cord (p. 24) Use the battery pack when using your camcorder. After the cassette compartment goes down completely, close the lid. Open the DC IN jack cover. See the page in the ... center of the cassette back and insert the cassette properly with its v mark facing up . 3 Close the cassette compartment by pressing on a tape of your camcorder outdoors (p. 18). AC Adaptor (supplied) Inserting a cassette (p. 28) 1 Slide OPEN/ EJECT in parentheses "( )" for more information. Recording on a tape This chapter...

Operating Instructions
Page 12
.... AC Adaptor (supplied) Inserting a "Memory Stick" (p. 127) Insert a "Memory Stick" in parentheses "( )" for more information. Connecting the power cord (p. 24) Use the battery pack when using your camcorder. Power cord Connect the plug with the b mark facing the LCD panel as illustrated. "Memory Stick" slot b mark When ejecting the "Memory Stick," press the "Memory Stick" once...
.... AC Adaptor (supplied) Inserting a "Memory Stick" (p. 127) Insert a "Memory Stick" in parentheses "( )" for more information. Connecting the power cord (p. 24) Use the battery pack when using your camcorder. Power cord Connect the plug with the b mark facing the LCD panel as illustrated. "Memory Stick" slot b mark When ejecting the "Memory Stick," press the "Memory Stick" once...
Operating Instructions
Page 19
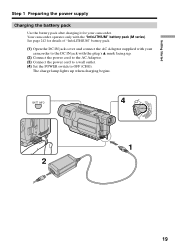
Your camcorder operates only with the plug's v mark facing up when charging begins. The charge lamp lights up . (2) Connect the power cord to the AC Adaptor. (3) Connect the power cord to a wall outlet. (4) Set the POWER switch to the DC IN jack with the "InfoLITHIUM" battery pack (M series). Getting Started Step 1 Preparing the power supply Charging the battery...
Your camcorder operates only with the plug's v mark facing up when charging begins. The charge lamp lights up . (2) Connect the power cord to the AC Adaptor. (3) Connect the power cord to a wall outlet. (4) Set the POWER switch to the DC IN jack with the "InfoLITHIUM" battery pack (M series). Getting Started Step 1 Preparing the power supply Charging the battery...
Operating Instructions
Page 24
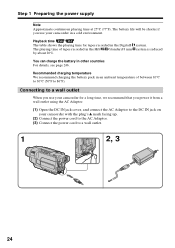
... pack in an ambient temperature of between 10°C to 30°C (50°F to a wall outlet When you use your camcorder for tapes recorded in the Digital8 The playing time of tapes recorded in other countries For details, see page 246. system is reduced You can charge the battery in... life will be shorter if you power it from a wall outlet using the AC Adaptor. (1) Open the DC IN jack cover, and connect the AC Adaptor to the DC IN jack on your camcorder with the plug's v mark facing up. (2) Connect the power cord to the AC Adaptor. (3) Connect the power cord to a wall outlet. 1 2, 3 ...
... pack in an ambient temperature of between 10°C to 30°C (50°F to a wall outlet When you use your camcorder for tapes recorded in the Digital8 The playing time of tapes recorded in other countries For details, see page 246. system is reduced You can charge the battery in... life will be shorter if you power it from a wall outlet using the AC Adaptor. (1) Open the DC IN jack cover, and connect the AC Adaptor to the DC IN jack on your camcorder with the plug's v mark facing up. (2) Connect the power cord to the AC Adaptor. (3) Connect the power cord to a wall outlet. 1 2, 3 ...

Operating Instructions
Page 25
Using a car battery Use Sony Car Battery Adaptor (optional). This means that the battery pack cannot supply any trouble occurs with this unit, disconnect the plug from the AC power source (house current) as long as it is connected to the wall outlet, even if the set is not disconnected ... instructions of the Car Battery Adaptor for further information. 25 While using the AC Adaptor, if any power if the power cord is connected to the DC IN jack, even when the power cord is attached to your camcorder. •The DC IN jack has "source priority." Refer to cut off . Notes •The...
Using a car battery Use Sony Car Battery Adaptor (optional). This means that the battery pack cannot supply any trouble occurs with this unit, disconnect the plug from the AC power source (house current) as long as it is connected to the wall outlet, even if the set is not disconnected ... instructions of the Car Battery Adaptor for further information. 25 While using the AC Adaptor, if any power if the power cord is connected to the DC IN jack, even when the power cord is attached to your camcorder. •The DC IN jack has "source priority." Refer to cut off . Notes •The...
Operating Instructions
Page 230
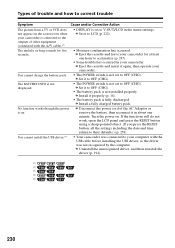
The melody or beep sounds for at least one minute. c Set it in about one hour to OFF (CHG). c Disconnect the power cord of other equipment (connected with the USB cable before installing the USB driver, so the driver was not recognized by the computer. If... cable).*3) • DISPLAY is set to OFF (CHG). You cannot charge the battery pack. • The POWER switch is not set to V-OUT/LCD in your camcorder. The BATTERY INFO is not displayed. • The POWER switch is not set to acclimatize (p. 247). • Some trouble has occurred in the menu settings. c ...
The melody or beep sounds for at least one minute. c Set it in about one hour to OFF (CHG). c Disconnect the power cord of other equipment (connected with the USB cable before installing the USB driver, so the driver was not recognized by the computer. If... cable).*3) • DISPLAY is set to OFF (CHG). You cannot charge the battery pack. • The POWER switch is not set to V-OUT/LCD in your camcorder. The BATTERY INFO is not displayed. • The POWER switch is not set to acclimatize (p. 247). • Some trouble has occurred in the menu settings. c ...
Operating Instructions
Page 232
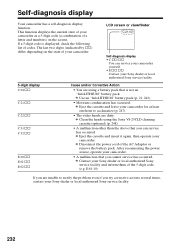
... cannot service has occurred. LCD screen or viewfinder C:21:00 Self-diagnosis display • C:ss:ss You can service has occurred. c Eject the cassette and leave your Sony dealer or local authorized Sony service facility and inform them of the 5-digit code. (e.g. c Disconnect the power cord of codes. Self-diagnosis display Your camcorder has a self-diagnosis...
... cannot service has occurred. LCD screen or viewfinder C:21:00 Self-diagnosis display • C:ss:ss You can service has occurred. c Eject the cassette and leave your Sony dealer or local authorized Sony service facility and inform them of the 5-digit code. (e.g. c Disconnect the power cord of codes. Self-diagnosis display Your camcorder has a self-diagnosis...
Operating Instructions
Page 251
...from occurring, periodically perform the above 60°C (140°F), such as the seaside •Store the lens in use . To disconnect the power cord, pull it . AM receivers and video equipment disturb AM reception and video operation. •The unit becomes warm during use , particularly during charging... if the unit has been dropped or damaged. •Do not bend the power cord forcibly, or place a heavy object on and operating your camcorder about once per month to keep your camcorder in a cool, dry place. •Do not expose the Rechargeable Battery Pack to any mechanical shock. ...
...from occurring, periodically perform the above 60°C (140°F), such as the seaside •Store the lens in use . To disconnect the power cord, pull it . AM receivers and video equipment disturb AM reception and video operation. •The unit becomes warm during use , particularly during charging... if the unit has been dropped or damaged. •Do not bend the power cord forcibly, or place a heavy object on and operating your camcorder about once per month to keep your camcorder in a cool, dry place. •Do not expose the Rechargeable Battery Pack to any mechanical shock. ...
Operating Instructions
Page 255
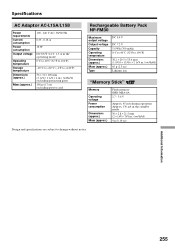
...176;F) 56 × 31 × 100 mm (2 1/4 × 1 1/4 × 4 in.) (w/h/d) excluding projecting parts 190 g (6.7 oz) excluding power cord Rechargeable Battery Pack NP-FM30 Maximum output voltage Output voltage Capacity Operating temperature Dimensions (approx.) Mass (approx.) Type DC 8.4 V DC 7.2 V 5.0 Wh (700 ...215; 55.6 mm (1 9/16 × 13/16 × 2 1/4 in.) (w/h/d) 65 g (2.3 oz) Lithium ion "Memory Stick" Memory Operating voltage Power consumption Dimensions (approx.) Mass (approx.) Flash memory 8MB: MSA-8A 2.7 - 3.6 V Approx. 45 mA during operation Approx. 130 µA in the ...
...176;F) 56 × 31 × 100 mm (2 1/4 × 1 1/4 × 4 in.) (w/h/d) excluding projecting parts 190 g (6.7 oz) excluding power cord Rechargeable Battery Pack NP-FM30 Maximum output voltage Output voltage Capacity Operating temperature Dimensions (approx.) Mass (approx.) Type DC 8.4 V DC 7.2 V 5.0 Wh (700 ...215; 55.6 mm (1 9/16 × 13/16 × 2 1/4 in.) (w/h/d) 65 g (2.3 oz) Lithium ion "Memory Stick" Memory Operating voltage Power consumption Dimensions (approx.) Mass (approx.) Flash memory 8MB: MSA-8A 2.7 - 3.6 V Approx. 45 mA during operation Approx. 130 µA in the ...


