
Operating Instructions
Page 2
... in the literature accompanying the appliance. You can enjoy for years to the following two conditions: (1) This device may not cause harmful interference, and (2) this Sony Handycam. Welcome! RECYCLING LITHIUM-ION BATTERIES Lithium-Ion batteries are recyclable. Operation is subject to come. This symbol is very easy to the presence of...'s enclosure that may be producing home video that you . This symbol is loaded with Canadian ICES-003. 2 Notice If static electricity or electromagnetism causes data transfer to rain or moisture.
... in the literature accompanying the appliance. You can enjoy for years to the following two conditions: (1) This device may not cause harmful interference, and (2) this Sony Handycam. Welcome! RECYCLING LITHIUM-ION BATTERIES Lithium-Ion batteries are recyclable. Operation is subject to come. This symbol is very easy to the presence of...'s enclosure that may be producing home video that you . This symbol is loaded with Canadian ICES-003. 2 Notice If static electricity or electromagnetism causes data transfer to rain or moisture.

Operating Instructions
Page 129
... point of the other equipment You can use was recorded on the tape, the date/time when the picture is recorded on the "Memory Stick" (transferred from the tape) is recorded on the tape. - "Memory Stick" Operations (DCR-TRV22/TRV33 only) 129 The tape on to see a desired program.... When connecting with the A/V connecting cable, set DISPLAY in to LCD in the menu settings. (The default setting is LCD.) The POWER switch should be saved on the LCD screen or in poor condition. For example, if the tape has been repeatedly used for the connection...
... point of the other equipment You can use was recorded on the tape, the date/time when the picture is recorded on the "Memory Stick" (transferred from the tape) is recorded on the tape. - "Memory Stick" Operations (DCR-TRV22/TRV33 only) 129 The tape on to see a desired program.... When connecting with the A/V connecting cable, set DISPLAY in to LCD in the menu settings. (The default setting is LCD.) The POWER switch should be saved on the LCD screen or in poor condition. For example, if the tape has been repeatedly used for the connection...
Operating Instructions
Page 154
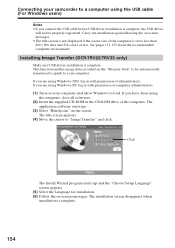
...ROM drive of administrators. The installation screen disappears when installation is complete. Connecting your camcorder to load. The title screen appears. (4) Move the cursor to "Image Transfer" and click. Installing Image Transfer (DCR-TRV22/TRV33 only) Make sure USB driver installation is complete. 154 If ...close all softwares. (2) Insert the supplied CD-ROM in with permission of the computer is complete, the USB driver will not be automatically transferred (copied) to less than 800 × 600 dots and 256 colors or less. Click The Install Wizard program starts up . (3) ...
...ROM drive of administrators. The installation screen disappears when installation is complete. Connecting your camcorder to load. The title screen appears. (4) Move the cursor to "Image Transfer" and click. Installing Image Transfer (DCR-TRV22/TRV33 only) Make sure USB driver installation is complete. 154 If ...close all softwares. (2) Insert the supplied CD-ROM in with permission of the computer is complete, the USB driver will not be automatically transferred (copied) to less than 800 × 600 dots and 256 colors or less. Click The Install Wizard program starts up . (3) ...
Operating Instructions
Page 155
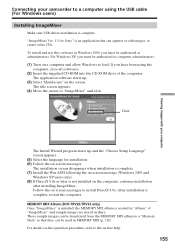
...If DirectX 8.0a or later is complete, restart the computer. Those sample images can be transferred from the MEMORY MIX album to a "Memory Stick" so that can be authorized as...The application software starts up and the "Choose Setup Language" screen appears. (5) Select the language for Sony" is created in "Album" of the computer. "ImageMixer Ver. 1.5 for installation. (6) Follow the... up . (3) Select "Handycam" on -screen messages. Viewing images with your computer Connecting your camcorder to a computer using the computer, close all softwares. (2) Insert the supplied CD-ROM into...
...If DirectX 8.0a or later is complete, restart the computer. Those sample images can be transferred from the MEMORY MIX album to a "Memory Stick" so that can be authorized as...The application software starts up and the "Choose Setup Language" screen appears. (5) Select the language for Sony" is created in "Album" of the computer. "ImageMixer Ver. 1.5 for installation. (6) Follow the... up . (3) Select "Handycam" on -screen messages. Viewing images with your computer Connecting your camcorder to a computer using the computer, close all softwares. (2) Insert the supplied CD-ROM into...

Operating Instructions
Page 164
... that are not displayed correctly due to OFF in the thumbnail list window. Disconnect the USB cable. - If image data cannot be transferred by shifting the upper right slider on the computer monitor may appear jagged. •When you capture a fast moving picture is during... carry out any trouble occurs Close all running applications, then restart the computer. Some images are not displayed correctly. •When your camcorder are displayed with the USB connection, the following the procedure on a computer - Reinstall the USB driver following may not move more smoothly...
... that are not displayed correctly due to OFF in the thumbnail list window. Disconnect the USB cable. - If image data cannot be transferred by shifting the upper right slider on the computer monitor may appear jagged. •When you capture a fast moving picture is during... carry out any trouble occurs Close all running applications, then restart the computer. Some images are not displayed correctly. •When your camcorder are displayed with the USB connection, the following the procedure on a computer - Reinstall the USB driver following may not move more smoothly...
Operating Instructions
Page 167
...to install the USB driver, Image Transfer and ImageMixer to view the "Memory Stick" images on a computer (p. 153). (1) Turn on your computer and allow Windows to load. (2) Insert the "Memory Stick" into your camcorder, then connect the AC Adaptor to your camcorder. (3) Set the POWER switch to... . (4) Connect the (USB) jack on your camcorder to view the copied image. The image is automatically transferred (copied) to a computer with your album, and ...
...to install the USB driver, Image Transfer and ImageMixer to view the "Memory Stick" images on a computer (p. 153). (1) Turn on your computer and allow Windows to load. (2) Insert the "Memory Stick" into your camcorder, then connect the AC Adaptor to your camcorder. (3) Set the POWER switch to... . (4) Connect the (USB) jack on your camcorder to view the copied image. The image is automatically transferred (copied) to a computer with your album, and ...
Operating Instructions
Page 168
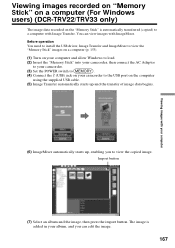
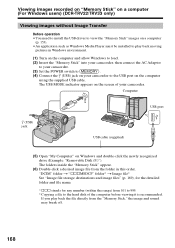
Viewing images recorded on "Memory Stick" on a computer (For Windows users) (DCR-TRV22/TRV33 only) Viewing images without Image Transfer Before operation •You need to install the USB driver to view the "Memory Stick" images on a computer (p. 153). •An application ... and allow Windows to load. (2) Insert the "Memory Stick" into your camcorder, then connect the AC Adaptor to your camcorder. (3) Set the POWER switch to . (4) Connect the (USB) jack on your camcorder to the hard disk of your camcorder. If you play back moving pictures in this order. Computer USB port (...
Viewing images recorded on "Memory Stick" on a computer (For Windows users) (DCR-TRV22/TRV33 only) Viewing images without Image Transfer Before operation •You need to install the USB driver to view the "Memory Stick" images on a computer (p. 153). •An application ... and allow Windows to load. (2) Insert the "Memory Stick" into your camcorder, then connect the AC Adaptor to your camcorder. (3) Set the POWER switch to . (4) Connect the (USB) jack on your camcorder to the hard disk of your camcorder. If you play back moving pictures in this order. Computer USB port (...
Operating Instructions
Page 174
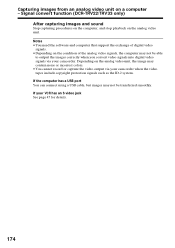
...may not be able to output the images correctly when you convert video signals into digital video signals via your camcorder when the video tapes include copyright protection signals such as the ID-2 system. Signal convert function (DCR-TRV22/TRV33...) After capturing images and sound Stop capturing procedures on the computer, and stop playback on a computer - If your camcorder. Notes •You need the software and computer that support the exchange of the analog video signals, the computer may.... •Depending on the analog video unit, the image may not be transferred smoothly.
...may not be able to output the images correctly when you convert video signals into digital video signals via your camcorder when the video tapes include copyright protection signals such as the ID-2 system. Signal convert function (DCR-TRV22/TRV33...) After capturing images and sound Stop capturing procedures on the computer, and stop playback on a computer - If your camcorder. Notes •You need the software and computer that support the exchange of the analog video signals, the computer may.... •Depending on the analog video unit, the image may not be transferred smoothly.
Operating Instructions
Page 193
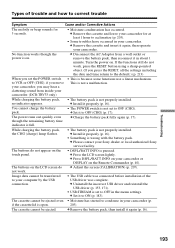
... camcorder. (DCR-TRV33 only) • This is pressed. c Charge the battery pack fully again (p. 17). c Press the LCD screen lightly. The buttons on the LCD ...is wrong with the battery pack. c Install it again, then operate your Sony dealer or local authorized Sony service facility. c Adjust the screen (CALIBRATION) (p. 207). Troubleshooting 193 ... pack is on your camcorder for 5 seconds. • Moisture condensation has occurred. Image data cannot be transferred to your camcorder (p. This is open. 205). c Please contact your camcorder. c Press DSPL/BATT...
... camcorder. (DCR-TRV33 only) • This is pressed. c Charge the battery pack fully again (p. 17). c Press the LCD screen lightly. The buttons on the LCD ...is wrong with the battery pack. c Install it again, then operate your Sony dealer or local authorized Sony service facility. c Adjust the screen (CALIBRATION) (p. 207). Troubleshooting 193 ... pack is on your camcorder for 5 seconds. • Moisture condensation has occurred. Image data cannot be transferred to your camcorder (p. This is open. 205). c Please contact your camcorder. c Press DSPL/BATT...
Operating Instructions
Page 215
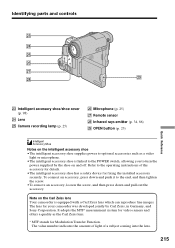
...supplies power to optional accessories such as the Carl Zeiss lens. * MTF stands for Modulation Transfer Function. Refer to the operating instructions of a subject coming into the lens. 215 Note on the Carl Zeiss lens Your camcorder is linked to the POWER switch, allowing you to the end, and then tighten the... screw. •To remove an accessory, loosen the screw, and then press down and push it to turn the power supplied by Carl Zeiss, in Germany, and Sony Corporation.
...supplies power to optional accessories such as the Carl Zeiss lens. * MTF stands for Modulation Transfer Function. Refer to the operating instructions of a subject coming into the lens. 215 Note on the Carl Zeiss lens Your camcorder is linked to the POWER switch, allowing you to the end, and then tighten the... screw. •To remove an accessory, loosen the screw, and then press down and push it to turn the power supplied by Carl Zeiss, in Germany, and Sony Corporation.


