Operating Guide
Page 8
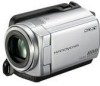
...; USB cable (1) Rechargeable battery pack Only for DCR-SR47/SR48/SR67: NP-FH30 (1) Only for DCR-SR87: NP-FH50 (1) CD-ROM "Handycam Application Software" (1) (p. 25) "PMB" (software) including "PMB Guide" "Handycam Handbook" (PDF) "Operating Guide" (This manual) (1) See... or an experienced radio/ TV technician for a digital device pursuant to the camcorder. In this case, a message appears on the LCD screen (p. 47). Do not turn on the camcorder, due to insert the connector plug in ( ) are lit or flashing....
...; USB cable (1) Rechargeable battery pack Only for DCR-SR47/SR48/SR67: NP-FH30 (1) Only for DCR-SR87: NP-FH50 (1) CD-ROM "Handycam Application Software" (1) (p. 25) "PMB" (software) including "PMB Guide" "Handycam Handbook" (PDF) "Operating Guide" (This manual) (1) See... or an experienced radio/ TV technician for a digital device pursuant to the camcorder. In this case, a message appears on the LCD screen (p. 47). Do not turn on the camcorder, due to insert the connector plug in ( ) are lit or flashing....
Operating Guide
Page 9
...lost, save all your recorded images on the operating system of the camcorder, recording media, etc. TV color systems differ depending on the LCD screen. Images cannot be copyrighted. About this manual The images of the LCD screen used for the contents of recordings cannot be some type of external... view your recordings on a TV, you save the image data on a disc such as "Memory Stick PRO Duo" media. You will find the "Handycam Handbook" (PDF) on the recording media. If you can save your image data using a DVD writer, VCR, or DVD/HDD recorder.
...lost, save all your recorded images on the operating system of the camcorder, recording media, etc. TV color systems differ depending on the LCD screen. Images cannot be copyrighted. About this manual The images of the LCD screen used for the contents of recordings cannot be some type of external... view your recordings on a TV, you save the image data on a disc such as "Memory Stick PRO Duo" media. You will find the "Handycam Handbook" (PDF) on the recording media. If you can save your image data using a DVD writer, VCR, or DVD/HDD recorder.
Operating Guide
Page 13
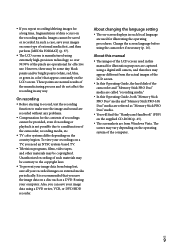
...CHG (charge) lamp turns off your camcorder by closing the LCD screen. 2 Attach the battery pack by sliding it in the direction of the arrow until it to your camcorder. You cannot attach any "InfoLITHIUM" battery pack other than the H series to your camcorder. See page 52 on the...charge the "InfoLITHIUM" battery pack (H series) after attaching it clicks. 3 Connect the AC Adaptor and the power cord (mains lead) to your camcorder. 1 Turn off when the battery pack is fully charged. 4 When the battery is facing down. The CHG (charge) lamp lights up and charging starts...
...CHG (charge) lamp turns off your camcorder by closing the LCD screen. 2 Attach the battery pack by sliding it in the direction of the arrow until it to your camcorder. You cannot attach any "InfoLITHIUM" battery pack other than the H series to your camcorder. See page 52 on the...charge the "InfoLITHIUM" battery pack (H series) after attaching it clicks. 3 Connect the AC Adaptor and the power cord (mains lead) to your camcorder. 1 Turn off when the battery pack is fully charged. 4 When the battery is facing down. The CHG (charge) lamp lights up and charging starts...
Operating Guide
Page 14
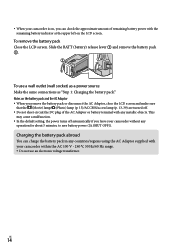
When your camcorder is on the LCD screen. Notes on the battery pack and the AC Adaptor When you remove the battery pack or disconnect the AC Adaptor, close the LCD screen and make sure that the (Movie) lamp/ (Photo) lamp (p. 15)/ACCESS/access lamp (p. 13, 39) ...Charging the battery pack." Charging the battery pack abroad You can check the approximate amount of the AC Adaptor or battery terminal with your camcorder without any countries/regions using the AC Adaptor supplied with any metallic objects. To use an electronic voltage transformer. US 14 To remove ...
When your camcorder is on the LCD screen. Notes on the battery pack and the AC Adaptor When you remove the battery pack or disconnect the AC Adaptor, close the LCD screen and make sure that the (Movie) lamp/ (Photo) lamp (p. 15)/ACCESS/access lamp (p. 13, 39) ...Charging the battery pack." Charging the battery pack abroad You can check the approximate amount of the AC Adaptor or battery terminal with your camcorder without any countries/regions using the AC Adaptor supplied with any metallic objects. To use an electronic voltage transformer. US 14 To remove ...
Operating Guide
Page 15
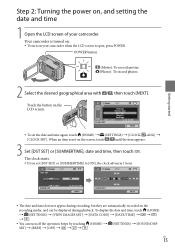
Touch the button on the LCD screen. To set [DST SET] or [SUMMERTIME] to [ON], the clock advances 1 hour. The date and...; [BEEP] [OFF US 15 Getting started Step 2: Turning the power on, and setting the date and time 1 Open the LCD screen of your camcorder when the LCD screen is open, press POWER. To display the date and time, touch (HOME) (SETTINGS) [VIEW IMAGES SET] ...SET]. POWER button (Movie): To record movies (Photo): To record photos 2 Select the desired geographical area with / , then touch [NEXT]. Your camcorder is not on your...
Touch the button on the LCD screen. To set [DST SET] or [SUMMERTIME] to [ON], the clock advances 1 hour. The date and...; [BEEP] [OFF US 15 Getting started Step 2: Turning the power on, and setting the date and time 1 Open the LCD screen of your camcorder when the LCD screen is open, press POWER. To display the date and time, touch (HOME) (SETTINGS) [VIEW IMAGES SET] ...SET]. POWER button (Movie): To record movies (Photo): To record photos 2 Select the desired geographical area with / , then touch [NEXT]. Your camcorder is not on your...
Operating Guide
Page 16
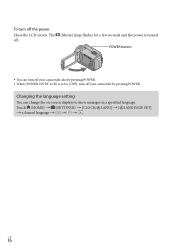
Touch (HOME) (SETTINGS) [CLOCK/ LANG] [ LANGUAGE SET] a desired language US 16 To turn off your camcorder by pressing POWER. When [POWER ON BY LCD] is turned POWER button You can change the on-screen displays to [OFF], turn off the power Close the LCD screen. Changing the language setting You can turn off . (Movie) lamp flashes for a few seconds and the power is set to show messages in a specified language. The off your camcorder also by pressing POWER.
Touch (HOME) (SETTINGS) [CLOCK/ LANG] [ LANGUAGE SET] a desired language US 16 To turn off your camcorder by pressing POWER. When [POWER ON BY LCD] is turned POWER button You can change the on-screen displays to [OFF], turn off the power Close the LCD screen. Changing the language setting You can turn off . (Movie) lamp flashes for a few seconds and the power is set to show messages in a specified language. The off your camcorder also by pressing POWER.
Operating Guide
Page 17
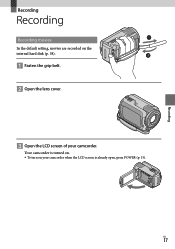
Your camcorder is turned on. To turn on the internal hard disk (p. 38). Fasten the grip belt. Open the lens cover. Open the LCD screen of your camcorder when the LCD screen is already open, press POWER (p. 15). US 17 Recording Recording Recording Recording movies In the default setting, movies are recorded on your camcorder.
Your camcorder is turned on. To turn on the internal hard disk (p. 38). Fasten the grip belt. Open the lens cover. Open the LCD screen of your camcorder when the LCD screen is already open, press POWER (p. 15). US 17 Recording Recording Recording Recording movies In the default setting, movies are recorded on your camcorder.
Operating Guide
Page 18
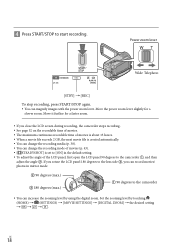
...180 degrees to the lens side , you close the LCD screen during recording, the camcorder stops recording. See page 52 on the recordable ...ON] in mirror mode. 90 degrees (max.) 180 degrees (max.) 90 degrees to the camcorder You can magnify images with the power zoom lever. Power zoom lever Wide Telephoto [STBY] [REC] To... setting. To adjust the angle of the LCD panel, first open the LCD panel 90 degrees to start recording. Press START/STOP to the camcorder , and then adjust the angle . US...
...180 degrees to the lens side , you close the LCD screen during recording, the camcorder stops recording. See page 52 on the recordable ...ON] in mirror mode. 90 degrees (max.) 180 degrees (max.) 90 degrees to the camcorder You can magnify images with the power zoom lever. Power zoom lever Wide Telephoto [STBY] [REC] To... setting. To adjust the angle of the LCD panel, first open the LCD panel 90 degrees to start recording. Press START/STOP to the camcorder , and then adjust the angle . US...
Operating Guide
Page 19
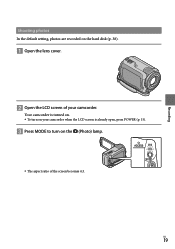
Your camcorder is already open, press POWER (p. 15). Press MODE to turn on the (Photo) lamp. The aspect ratio of the screen becomes 4:3. US 19 Recording Shooting photos In the default setting, photos are recorded on the hard disk (p. 38). Open the lens cover. Open the LCD screen of your camcorder when the LCD screen is turned on. To turn on your camcorder.
Your camcorder is already open, press POWER (p. 15). Press MODE to turn on the (Photo) lamp. The aspect ratio of the screen becomes 4:3. US 19 Recording Shooting photos In the default setting, photos are recorded on the hard disk (p. 38). Open the lens cover. Open the LCD screen of your camcorder when the LCD screen is turned on. To turn on your camcorder.
Operating Guide
Page 20
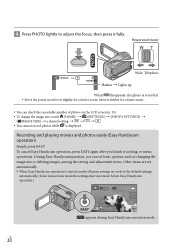
... for a slower zoom. US 20 During Easy Handycamoperation, you finish recording, or menu operations. To cancel Easy Handycam operation, press EASY again after you can check the recordable number of photos on the LCD screen (p. 55). To change the image size, touch (HOME) (SETTINGS) ...changing the image size or deleting images, among the setting and adjustment items. Other items are set automatically. When Easy Handycam operation is started, nearly all menu settings are reset to the default settings automatically. (Some menu items retain the settings that were...
... for a slower zoom. US 20 During Easy Handycamoperation, you finish recording, or menu operations. To cancel Easy Handycam operation, press EASY again after you can check the recordable number of photos on the LCD screen (p. 55). To change the image size, touch (HOME) (SETTINGS) ...changing the image size or deleting images, among the setting and adjustment items. Other items are set automatically. When Easy Handycam operation is started, nearly all menu settings are reset to the default settings automatically. (Some menu items retain the settings that were...

Operating Guide
Page 21
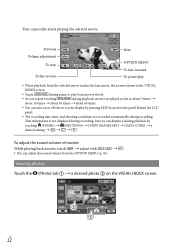
... screen by a certain interval (Film Roll Index) Previous To the index screen of face scenes (Face Index) To the list of your camcorder when the LCD screen is already open, press POWER (p. 15). Press (VIEW IMAGES). Playback The VISUAL INDEX screen appears after some seconds. ...; You can continue playback from the previous time. ( appears on the photo recorded on the LCD screen as well. Touch the (Movie) tab a desired movie . To the index screen of scenes by pressing...
... screen by a certain interval (Film Roll Index) Previous To the index screen of face scenes (Face Index) To the list of your camcorder when the LCD screen is already open, press POWER (p. 15). Press (VIEW IMAGES). Playback The VISUAL INDEX screen appears after some seconds. ...; You can continue playback from the previous time. ( appears on the photo recorded on the LCD screen as well. Touch the (Movie) tab a desired movie . To the index screen of scenes by pressing...
Operating Guide
Page 22
Viewing photos Touch the (Photo) tab a desired photo on the panel behind the LCD panel. The recording date, time, and shooting conditions are recorded automatically during playback, movies are played as fast as about 5 times about 10 ...-screen display by pressing DISP located on the VISUAL INDEX screen. This information is not displayed during recording, but you repeat touching / during recording. Your camcorder starts playing the selected movie.
Viewing photos Touch the (Photo) tab a desired photo on the panel behind the LCD panel. The recording date, time, and shooting conditions are recorded automatically during playback, movies are played as fast as about 5 times about 10 ...-screen display by pressing DISP located on the VISUAL INDEX screen. This information is not displayed during recording, but you repeat touching / during recording. Your camcorder starts playing the selected movie.

Operating Guide
Page 32
... Be sure to save. To play back a disc on the DVD writer. appears. The movies on the disc appear as VISUAL INDEX on the camcorder screen. Press the play back movies on the screen, insert another disc of the same contents, insert a new disc and touch [CREATE SAME DISC... [DISC BURN failed.] appears on the TV screen by date. Touch [YES] on the camcorder. Touch to return to the previous screen. By touching date, you want to burn on the LCD screen to confirm the image. The [EXTERNAL DRIVE] screen appears. You can use [DISC BURN OPTION...
... Be sure to save. To play back a disc on the DVD writer. appears. The movies on the disc appear as VISUAL INDEX on the camcorder screen. Press the play back movies on the screen, insert another disc of the same contents, insert a new disc and touch [CREATE SAME DISC... [DISC BURN failed.] appears on the TV screen by date. Touch [YES] on the camcorder. Touch to return to the previous screen. By touching date, you want to burn on the LCD screen to confirm the image. The [EXTERNAL DRIVE] screen appears. You can use [DISC BURN OPTION...
Operating Guide
Page 36
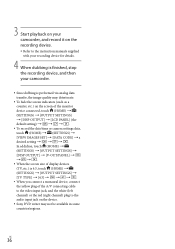
... with your recording device for details. 4 When dubbing is finished, stop the recording device, and then your camcorder. Since dubbing is performed via analog data transfer, the image quality may deteriorate. To...of the monitor device connected, touch (HOME) (SETTINGS) [OUTPUT SETTINGS] [DISP OUTPUT] [LCD PANEL] (the default setting To record the date/time or camera settings data, touch (HOME) (SETTINGS) ...audio input jack on the device. Sony DVD writer may not be available in some countries/regions. US 36
... with your recording device for details. 4 When dubbing is finished, stop the recording device, and then your camcorder. Since dubbing is performed via analog data transfer, the image quality may deteriorate. To...of the monitor device connected, touch (HOME) (SETTINGS) [OUTPUT SETTINGS] [DISP OUTPUT] [LCD PANEL] (the default setting To record the date/time or camera settings data, touch (HOME) (SETTINGS) ...audio input jack on the device. Sony DVD writer may not be available in some countries/regions. US 36
Operating Guide
Page 37
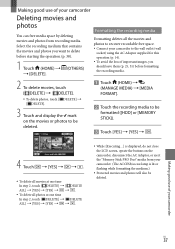
...] [YES] [YES] . To delete all the movies and photos to recover recordable free space. Connect your camcorder to the wall outlet (wall socket) using the AC Adaptor supplied for this operation (p. 14). To avoid the loss of important images, you want... movies and photos You can free media space by deleting movies and photos from your camcorder. (The ACCESS/access lamp is displayed, do not close the LCD screen, oprate the buttons on the movies or photos to be deleted. Formatting the recording media Formatting deletes all ...
...] [YES] [YES] . To delete all the movies and photos to recover recordable free space. Connect your camcorder to the wall outlet (wall socket) using the AC Adaptor supplied for this operation (p. 14). To avoid the loss of important images, you want... movies and photos You can free media space by deleting movies and photos from your camcorder. (The ACCESS/access lamp is displayed, do not close the LCD screen, oprate the buttons on the movies or photos to be deleted. Formatting the recording media Formatting deletes all ...
Operating Guide
Page 43
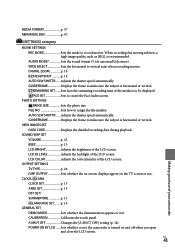
... shutter speed automatically. p. 16 GENERAL SET DEMO MODE Sets whether the demonstration appears or not. POWER ON BY LCD........ Sets whether or not the camcorder is recommended. FACE SET Sets to assign the file number. GUIDEFRAME Displays the frame to make sure the subject is... create the Face Index screen. Sets how the remaining recording time of your camcorder WIDE SELECT Sets the horizontal to record movies. Adjusts the shutter speed automatically. LCD COLOR Adjusts the color intensity of the LCD screen. MEDIA FORMAT p. 37 REPAIR IMG.DB F p. 47 (SETTINGS) ...
... shutter speed automatically. p. 16 GENERAL SET DEMO MODE Sets whether the demonstration appears or not. POWER ON BY LCD........ Sets whether or not the camcorder is recommended. FACE SET Sets to assign the file number. GUIDEFRAME Displays the frame to make sure the subject is... create the Face Index screen. Sets how the remaining recording time of your camcorder WIDE SELECT Sets the horizontal to record movies. Adjusts the shutter speed automatically. LCD COLOR Adjusts the color intensity of the LCD screen. MEDIA FORMAT p. 37 REPAIR IMG.DB F p. 47 (SETTINGS) ...
Operating Guide
Page 47
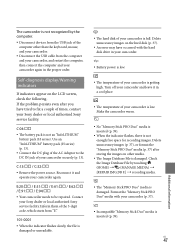
... problem persists even after storing the images on the LCD screen, check the following. C:13: / C:32: Remove the power source. Turn off your camcorder and leave it and operate your camcorder again. Delete unnecessary images (p. 37), or format...61: / E:62: / E:91: / E:94: Your camcorder needs to the DC IN jack of your Sony dealer or local authorized Sony service facility. US 47 Additional information Use an "InfoLITHIUM" battery pack (H series) (p. 13). Connect ...
... problem persists even after storing the images on the LCD screen, check the following. C:13: / C:32: Remove the power source. Turn off your camcorder and leave it and operate your camcorder again. Delete unnecessary images (p. 37), or format...61: / E:62: / E:91: / E:94: Your camcorder needs to the DC IN jack of your Sony dealer or local authorized Sony service facility. US 47 Additional information Use an "InfoLITHIUM" battery pack (H series) (p. 13). Connect ...
Operating Guide
Page 49
...Keep metal contacts clean. If the battery electrolytic liquid has leaked: Consult your local authorized Sony service facility. Wash off any liquid gets in your camcorder in optimum state for a long time, turn it may occur. On a sandy beach or ...DC or AC operation, use the accessories recommended in the sun. Use cleaning paper moistened with plenty of the LCD screen. Operate your camcorder gets wet, it . The camcorder may malfunction or become deformed. Near strong magnetic fields or mechanical vibration. This is soiled, clean ...
...Keep metal contacts clean. If the battery electrolytic liquid has leaked: Consult your local authorized Sony service facility. Wash off any liquid gets in your camcorder in optimum state for a long time, turn it may occur. On a sandy beach or ...DC or AC operation, use the accessories recommended in the sun. Use cleaning paper moistened with plenty of the LCD screen. Operate your camcorder gets wet, it . The camcorder may malfunction or become deformed. Near strong magnetic fields or mechanical vibration. This is soiled, clean ...
Operating Guide
Page 50
...substances on a computer. Also, when you dispose of the lens clean with the LCD screen closed for a long period of time About care and storage of the lens Wipe the surface of the camcorder, it is recommended that you are fingerprints on page 45.) to salty air such... when you dispose of the "Memory Stick PRO Duo" media, it is recommended that you perform [ EMPTY] (See "Getting detailed information from the "Handycam Handbook" " on the lens surface In hot or humid locations When the lens is always charged while your data. The preinstalled rechargeable ...
...substances on a computer. Also, when you dispose of the lens clean with the LCD screen closed for a long period of time About care and storage of the lens Wipe the surface of the camcorder, it is recommended that you are fingerprints on page 45.) to salty air such... when you dispose of the "Memory Stick PRO Duo" media, it is recommended that you perform [ EMPTY] (See "Getting detailed information from the "Handycam Handbook" " on the lens surface In hot or humid locations When the lens is always charged while your data. The preinstalled rechargeable ...
Operating Guide
Page 51
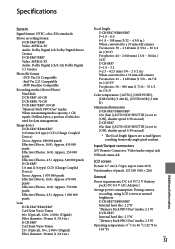
... : DCF Ver.2.0 Compatible : Exif Ver.2.21 Compatible : MPF Baseline Compatible Recording media (Movie/Photo) Hard disk: DCR-SR47: 60 GB DCR-SR48: 70 GB DCR-SR67/SR87: 80 GB "Memory Stick PRO Duo" media When measureing media capacity, 1 GB equals 1 billion bytes,...: DC 6.8 V/7.2 V (battery pack) DC 8.4 V (AC Adaptor) Average power consumption: During camera recording, using LCD screen at normal brightness: DCR-SR47/SR48/SR67 Internal hard disc: 2.2 W "Memory Stick PRO Duo" media: 2.1 W DCR-SR87 Internal hard disc: 2.5 W "Memory Stick PRO Duo" media: 2.3 W Operating temperature: 0 C to...
... : DCF Ver.2.0 Compatible : Exif Ver.2.21 Compatible : MPF Baseline Compatible Recording media (Movie/Photo) Hard disk: DCR-SR47: 60 GB DCR-SR48: 70 GB DCR-SR67/SR87: 80 GB "Memory Stick PRO Duo" media When measureing media capacity, 1 GB equals 1 billion bytes,...: DC 6.8 V/7.2 V (battery pack) DC 8.4 V (AC Adaptor) Average power consumption: During camera recording, using LCD screen at normal brightness: DCR-SR47/SR48/SR67 Internal hard disc: 2.2 W "Memory Stick PRO Duo" media: 2.1 W DCR-SR87 Internal hard disc: 2.5 W "Memory Stick PRO Duo" media: 2.3 W Operating temperature: 0 C to...


