Operating Guide
Page 6
...58320; Do not incinerate or dispose of used rechargeable batteries to it has been UL Listed. You can help preserve our environment by Sony. Dispose of in the instructions. The UL Mark on it for future reference. Battery pack This device complies with Part ...the AC Adaptor. For customers in the U.S.A. This Class B digital apparatus complies with the specified type only. Read this before operating your camcorder Before operating the unit, please read this device must accept any interference received, including interference that can charge the battery pack. ...
...58320; Do not incinerate or dispose of used rechargeable batteries to it has been UL Listed. You can help preserve our environment by Sony. Dispose of in the instructions. The UL Mark on it for future reference. Battery pack This device complies with Part ...the AC Adaptor. For customers in the U.S.A. This Class B digital apparatus complies with the specified type only. Read this before operating your camcorder Before operating the unit, please read this device must accept any interference received, including interference that can charge the battery pack. ...
Operating Guide
Page 8
...(1) USB cable (1) Rechargeable battery pack Only for DCR-SR47/SR48/SR67: NP-FH30 (1) Only for DCR-SR87: NP-FH50 (1) CD-ROM "Handycam Application Software" (1) (p. 25) "PMB" (software) including "PMB Guide" "Handycam Handbook" (PDF) "Operating Guide" (This manual) (1) See page 39... could occur. ejecting "Memory Stick PRO Duo" media removing the battery pack or AC Adaptor from the camcorder Do not apply shock or vibration to record or play movies and photos. Do not use with the ...
...(1) USB cable (1) Rechargeable battery pack Only for DCR-SR47/SR48/SR67: NP-FH30 (1) Only for DCR-SR87: NP-FH50 (1) CD-ROM "Handycam Application Software" (1) (p. 25) "PMB" (software) including "PMB Guide" "Handycam Handbook" (PDF) "Operating Guide" (This manual) (1) See page 39... could occur. ejecting "Memory Stick PRO Duo" media removing the battery pack or AC Adaptor from the camcorder Do not apply shock or vibration to record or play movies and photos. Do not use with the ...
Operating Guide
Page 9
... 99.99% of the pixels are operational for illustration purposes are captured using a digital still camera, and therefore may be some type of the camcorder, recording media, etc. TV color systems differ depending on the country/region. Change the screen language before using a DVD writer, VCR...your computer. If you save the image data on a disc such as "Memory Stick PRO Duo" media. You will find the "Handycam Handbook" (PDF) on the supplied CD-ROM (p. 45). The screenshots are from being lost, save all your image data from Windows Vista. Images...
... 99.99% of the pixels are operational for illustration purposes are captured using a digital still camera, and therefore may be some type of the camcorder, recording media, etc. TV color systems differ depending on the country/region. Change the screen language before using a DVD writer, VCR...your computer. If you save the image data on a disc such as "Memory Stick PRO Duo" media. You will find the "Handycam Handbook" (PDF) on the supplied CD-ROM (p. 45). The screenshots are from being lost, save all your image data from Windows Vista. Images...
Operating Guide
Page 10
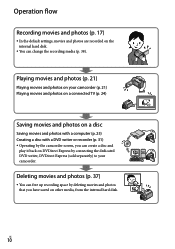
... You can create a disc and play it back on DVDirect Express by connecting the dedicated DVD writer, DVDirect Express (sold separately) to your camcorder (p. 21) Playing movies and photos on a connected TV (p. 24) Saving movies and photos on a disc Saving movies and photos with a computer ...(p. 25) Creating a disc with a DVD writer or recorder (p. 31) Operating by the camcorder screen, you can change the recording media (p. 38). Operation flow Recording movies and photos (p. 17) In the default settings, movies and photos...
... You can create a disc and play it back on DVDirect Express by connecting the dedicated DVD writer, DVDirect Express (sold separately) to your camcorder (p. 21) Playing movies and photos on a connected TV (p. 24) Saving movies and photos on a disc Saving movies and photos with a computer ...(p. 25) Creating a disc with a DVD writer or recorder (p. 31) Operating by the camcorder screen, you can change the recording media (p. 38). Operation flow Recording movies and photos (p. 17) In the default settings, movies and photos...
Operating Guide
Page 11
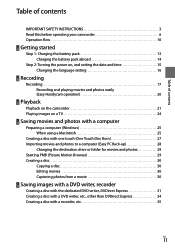
Table of contents Table of contents IMPORTANT SAFETY INSTRUCTIONS 3 Read this before operating your camcorder 6 Operation flow 10 Getting started Step 1: Charging the battery pack 13 Charging the battery pack abroad 14 Step 2: Turning the power on, and ...setting the date and time 15 Changing the language setting 16 Recording Recording 17 Recording and playing movies and photos easily (Easy Handycam operation 20 Playback Playback on the camcorder 21 Playing images on a TV 24 Saving movies and photos with a computer Preparing a computer (Windows 25 When using a Macintosh 25 Creating...
Table of contents Table of contents IMPORTANT SAFETY INSTRUCTIONS 3 Read this before operating your camcorder 6 Operation flow 10 Getting started Step 1: Charging the battery pack 13 Charging the battery pack abroad 14 Step 2: Turning the power on, and ...setting the date and time 15 Changing the language setting 16 Recording Recording 17 Recording and playing movies and photos easily (Easy Handycam operation 20 Playback Playback on the camcorder 21 Playing images on a TV 24 Saving movies and photos with a computer Preparing a computer (Windows 25 When using a Macintosh 25 Creating...
Operating Guide
Page 12
Making good use of your camcorder Deleting movies and photos 37 Coping with shooting conditions 38 Changing the recording medium 38 To check the recording media settings 39 Dubbing or copying movies and photos from the internal hard disk to "Memory Stick PRO Duo" media 40 Customizing your camcorder with menus 41 Using the HELP function 41 Getting detailed information from the "Handycam Handbook 45 Additional information Troubleshooting 46 Precautions 49 Specifications 51 Screen indicators 55 Parts and controls 56 Index 58 US 12
Making good use of your camcorder Deleting movies and photos 37 Coping with shooting conditions 38 Changing the recording medium 38 To check the recording media settings 39 Dubbing or copying movies and photos from the internal hard disk to "Memory Stick PRO Duo" media 40 Customizing your camcorder with menus 41 Using the HELP function 41 Getting detailed information from the "Handycam Handbook 45 Additional information Troubleshooting 46 Precautions 49 Specifications 51 Screen indicators 55 Parts and controls 56 Index 58 US 12
Operating Guide
Page 13
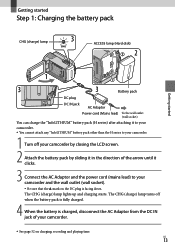
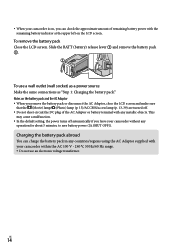
... pack by sliding it in the direction of the arrow until it clicks. 3 Connect the AC Adaptor and the power cord (mains lead) to your camcorder. 1 Turn off when the battery pack is fully charged. 4 When the battery is charged, disconnect the AC Adaptor from the DC IN jack of your... camcorder and the wall outlet (wall socket). Be sure that the mark on charging, recording and playing time. US 13 The CHG (charge) lamp ...
... pack by sliding it in the direction of the arrow until it clicks. 3 Connect the AC Adaptor and the power cord (mains lead) to your camcorder. 1 Turn off when the battery pack is fully charged. 4 When the battery is charged, disconnect the AC Adaptor from the DC IN jack of your... camcorder and the wall outlet (wall socket). Be sure that the mark on charging, recording and playing time. US 13 The CHG (charge) lamp ...
Operating Guide
Page 14
... malfunction. In the default setting, the power turns off . Do not short-circuit the DC plug of remaining battery power with your camcorder without any countries/regions using the AC Adaptor supplied with the remaining battery indicator at the upper left on the LCD screen. To remove the... battery pack Close the LCD screen. When your camcorder is on, you leave your camcorder within the AC 100 V - 240 V, 50 Hz/60 Hz range. Do not use a wall outlet (wall socket) as a ...
... malfunction. In the default setting, the power turns off . Do not short-circuit the DC plug of remaining battery power with your camcorder without any countries/regions using the AC Adaptor supplied with the remaining battery indicator at the upper left on the LCD screen. To remove the... battery pack Close the LCD screen. When your camcorder is on, you leave your camcorder within the AC 100 V - 240 V, 50 Hz/60 Hz range. Do not use a wall outlet (wall socket) as a ...
Operating Guide
Page 15
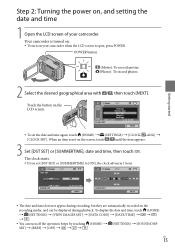
... [DATE/TIME You can be displayed during recording, but they are automatically recorded on the recording media, and can turn on your camcorder. POWER button (Movie): To record movies (Photo): To record photos 2 Select the desired geographical area with / , then touch [NEXT]. Touch the button...starts. If you set the date and time again, touch (HOME) (SETTINGS) [CLOCK/ LANG] [CLOCK SET]. Your camcorder is turned on the LCD screen. To set [DST SET] or [SUMMERTIME] to [ON], the clock advances 1 hour. The date and time...
... [DATE/TIME You can be displayed during recording, but they are automatically recorded on the recording media, and can turn on your camcorder. POWER button (Movie): To record movies (Photo): To record photos 2 Select the desired geographical area with / , then touch [NEXT]. Touch the button...starts. If you set the date and time again, touch (HOME) (SETTINGS) [CLOCK/ LANG] [CLOCK SET]. Your camcorder is turned on the LCD screen. To set [DST SET] or [SUMMERTIME] to [ON], the clock advances 1 hour. The date and time...
Operating Guide
Page 16
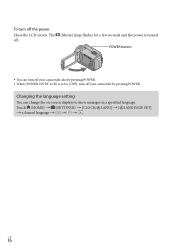
Touch (HOME) (SETTINGS) [CLOCK/ LANG] [ LANGUAGE SET] a desired language US 16 To turn off your camcorder by pressing POWER. The off. (Movie) lamp flashes for a few seconds and the power is turned POWER button You can change the on-screen displays to [OFF], turn off your camcorder also by pressing POWER. When [POWER ON BY LCD] is set to show messages in a specified language. Changing the language setting You can turn off the power Close the LCD screen.
Touch (HOME) (SETTINGS) [CLOCK/ LANG] [ LANGUAGE SET] a desired language US 16 To turn off your camcorder by pressing POWER. The off. (Movie) lamp flashes for a few seconds and the power is turned POWER button You can change the on-screen displays to [OFF], turn off your camcorder also by pressing POWER. When [POWER ON BY LCD] is set to show messages in a specified language. Changing the language setting You can turn off the power Close the LCD screen.
Operating Guide
Page 17
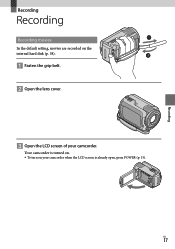
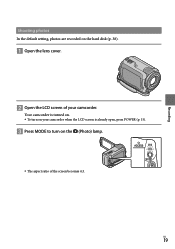
Your camcorder is turned on. To turn on the internal hard disk (p. 38). Fasten the grip belt. Open the lens cover. Open the LCD screen of your camcorder when the LCD screen is already open, press POWER (p. 15). US 17 Recording Recording Recording Recording movies In the default setting, movies are recorded on your camcorder.
Your camcorder is turned on. To turn on the internal hard disk (p. 38). Fasten the grip belt. Open the lens cover. Open the LCD screen of your camcorder when the LCD screen is already open, press POWER (p. 15). US 17 Recording Recording Recording Recording movies In the default setting, movies are recorded on your camcorder.
Operating Guide
Page 18
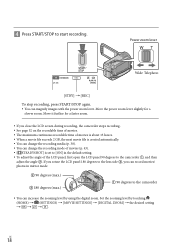
Set the zooming level by using the digital zoom. US 18 Press START/STOP to the camcorder , and then adjust the angle . Move the power zoom lever slightly for a faster zoom. If you can record movies/ photos in the ... setting . If you rotate the LCD panel 180 degrees to the lens side , you close the LCD screen during recording, the camcorder stops recording. See page 52 on the recordable time of movies. The maximum continuous recordable time of movies is about 13 hours. ...
Set the zooming level by using the digital zoom. US 18 Press START/STOP to the camcorder , and then adjust the angle . Move the power zoom lever slightly for a faster zoom. If you can record movies/ photos in the ... setting . If you rotate the LCD panel 180 degrees to the lens side , you close the LCD screen during recording, the camcorder stops recording. See page 52 on the recordable time of movies. The maximum continuous recordable time of movies is about 13 hours. ...
Operating Guide
Page 19
US 19 Recording Shooting photos In the default setting, photos are recorded on the (Photo) lamp. The aspect ratio of your camcorder when the LCD screen is already open, press POWER (p. 15). Press MODE to turn on the hard disk (p. 38). Open the lens cover. Open the LCD screen of the screen becomes 4:3. Your camcorder is turned on. To turn on your camcorder.
US 19 Recording Shooting photos In the default setting, photos are recorded on the (Photo) lamp. The aspect ratio of your camcorder when the LCD screen is already open, press POWER (p. 15). Press MODE to turn on the hard disk (p. 38). Open the lens cover. Open the LCD screen of the screen becomes 4:3. Your camcorder is turned on. To turn on your camcorder.

Operating Guide
Page 21
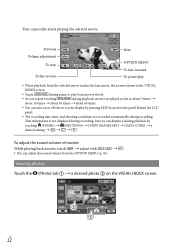
...already open, press POWER (p. 15). Press (VIEW IMAGES). To the index screen of scenes by pressing (VIEW IMAGES) on your camcorder. Playback Playback on the camcorder In the default setting, movies and photos on the "Memory Stick PRO Duo" media.) US 21 Playing movies Open the LCD ... the VISUAL INDEX screen by a certain interval (Film Roll Index) Previous To the index screen of face scenes (Face Index) To the list of your camcorder when the LCD screen is turned on. To turn on the LCD screen as well. Touch the (Movie) tab ...
...already open, press POWER (p. 15). Press (VIEW IMAGES). To the index screen of scenes by pressing (VIEW IMAGES) on your camcorder. Playback Playback on the camcorder In the default setting, movies and photos on the "Memory Stick PRO Duo" media.) US 21 Playing movies Open the LCD ... the VISUAL INDEX screen by a certain interval (Film Roll Index) Previous To the index screen of face scenes (Face Index) To the list of your camcorder when the LCD screen is turned on. To turn on the LCD screen as well. Touch the (Movie) tab ...
Operating Guide
Page 22
... To stop To fast-reverse Next OPTION MENU To fast-forward To pause/play When playback from the OPTION MENU (p. 41). US 22 Your camcorder starts playing the selected movie. Viewing photos Touch the (Photo) tab a desired photo on the panel behind the LCD panel. The...
... To stop To fast-reverse Next OPTION MENU To fast-forward To pause/play When playback from the OPTION MENU (p. 41). US 22 Your camcorder starts playing the selected movie. Viewing photos Touch the (Photo) tab a desired photo on the panel behind the LCD panel. The...
Operating Guide
Page 23
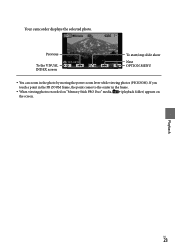
Previous To the VISUAL INDEX screen To start/stop slide show Next OPTION MENU You can zoom in the frame. When viewing photos recorded on "Memory Stick PRO Duo" media, (playback folder) appears on the screen. Your camcorder displays the selected photo. Playback US 23 If you touch a point in the PB ZOOM frame, the point comes to the center in the photo by moving the power zoom lever while viewing photos (PB ZOOM).
Previous To the VISUAL INDEX screen To start/stop slide show Next OPTION MENU You can zoom in the frame. When viewing photos recorded on "Memory Stick PRO Duo" media, (playback folder) appears on the screen. Your camcorder displays the selected photo. Playback US 23 If you touch a point in the PB ZOOM frame, the point comes to the center in the photo by moving the power zoom lever while viewing photos (PB ZOOM).
Operating Guide
Page 24
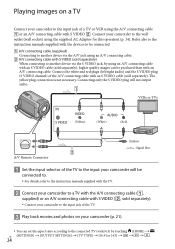
... A/V connecting cable (supplied) Connecting to another device via the A/V jack using the supplied AC Adaptor for this operation (p. 14). Connect your camcorder to a TV with the A/V connecting cable (, supplied) or an A/V connecting cable with S VIDEO (, sold separately). Connect the ... only the S VIDEO plug will be connected to. For details, refer to the instruction manuals supplied with the TV. Connect your camcorder to another device via the S VIDEO jack, by touching (HOME) US (SETTINGS) [OUTPUT SETTINGS] [TV TYPE] ...
... A/V connecting cable (supplied) Connecting to another device via the A/V jack using the supplied AC Adaptor for this operation (p. 14). Connect your camcorder to a TV with the A/V connecting cable (, supplied) or an A/V connecting cable with S VIDEO (, sold separately). Connect the ... only the S VIDEO plug will be connected to. For details, refer to the instruction manuals supplied with the TV. Connect your camcorder to another device via the S VIDEO jack, by touching (HOME) US (SETTINGS) [OUTPUT SETTINGS] [TV TYPE] ...
Operating Guide
Page 25
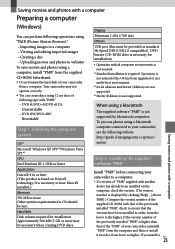
...necessary to have been installed in order, from the lower to the higher. http://guide.d-imaging.sony.co.jp/mac/ ms/us/ Step 2 Installing the supplied software "PMB" Install "PMB" before connecting your camcorder to a computer. If a version of "PMB" supplied with another device has ...using a computer, install "PMB" from the supplied CD-ROM beforehand. Do not format the hard disk of following website. Your camcorder may be necessary when creating DVD discs. Hard disk Disk volume required for installation: Approximately 500 MB (5 GB or more Other system requirements ...
...necessary to have been installed in order, from the lower to the higher. http://guide.d-imaging.sony.co.jp/mac/ ms/us/ Step 2 Installing the supplied software "PMB" Install "PMB" before connecting your camcorder to a computer. If a version of "PMB" supplied with another device has ...using a computer, install "PMB" from the supplied CD-ROM beforehand. Do not format the hard disk of following website. Your camcorder may be necessary when creating DVD discs. Hard disk Disk volume required for installation: Approximately 500 MB (5 GB or more Other system requirements ...

Operating Guide
Page 26
...the software. Depending on the computer, you may not work correctly. See page 45 on the "Handycam Handbook". Confirm that your camcorder is not connected to the computer. Turn on the computer. Log on as an Administrator for installation.... [Computer] (in the disc drive of the license agreement carefully. US 26 The [USB SELECT] screen appears on the camcorder screen automatically. Touch [ USB CONNECT] on the camcorder screen. If the [USB SELECT] screen does not appear, touch (HOME) (OTHERS) [USB ...
...the software. Depending on the computer, you may not work correctly. See page 45 on the "Handycam Handbook". Confirm that your camcorder is not connected to the computer. Turn on the computer. Log on as an Administrator for installation.... [Computer] (in the disc drive of the license agreement carefully. US 26 The [USB SELECT] screen appears on the camcorder screen automatically. Touch [ USB CONNECT] on the camcorder screen. If the [USB SELECT] screen does not appear, touch (HOME) (OTHERS) [USB ...

Operating Guide
Page 27
... have not yet been saved with a computer US 27 To disconnect your camcorder from your computer. Other icons may appear. No icon may appear depending on the installation procedure. The "Handycam Handbook" is completed, following icons will appear. When the installation is not installed in this operation (p. 14). ...
... have not yet been saved with a computer US 27 To disconnect your camcorder from your computer. Other icons may appear. No icon may appear depending on the installation procedure. The "Handycam Handbook" is completed, following icons will appear. When the installation is not installed in this operation (p. 14). ...


