Operating Guide
Page 18
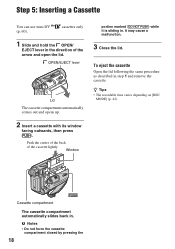
... cassette compartment automatically slides back in step 1 and remove the cassette. Step 5: Inserting a Cassette You can use mini DV (p. 60). z Tips • The recordable time varies depending on [REC MODE] (p. 42). To eject the cassette Open the lid following the same procedure as described in . b Notes • Do not force the cassette...
... cassette compartment automatically slides back in step 1 and remove the cassette. Step 5: Inserting a Cassette You can use mini DV (p. 60). z Tips • The recordable time varies depending on [REC MODE] (p. 42). To eject the cassette Open the lid following the same procedure as described in . b Notes • Do not force the cassette...
Operating Guide
Page 26
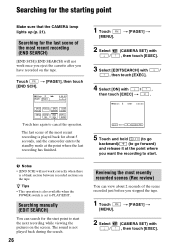
Searching for the last scene of the most recent recording (END SEARCH) [END SCH] (END SEARCH) will not work once you eject the cassette after you have recorded on the screen. Touch t [PAGE1], then touch [END SCH]. 60min PAGE1 PAGE2 0:00:00 SPOT FOCUS SPOT DISP FOCUS ... of the scene recorded just before you want the recording to cancel the operation. Searching manually (EDIT SEARCH) You can view about 5 seconds, and the camcorder enters the standby mode at the point where you stopped the tape. 1 Touch [MENU]. SCH SURE Touch here again to start the next recording while...
Searching for the last scene of the most recent recording (END SEARCH) [END SCH] (END SEARCH) will not work once you eject the cassette after you have recorded on the screen. Touch t [PAGE1], then touch [END SCH]. 60min PAGE1 PAGE2 0:00:00 SPOT FOCUS SPOT DISP FOCUS ... of the scene recorded just before you want the recording to cancel the operation. Searching manually (EDIT SEARCH) You can view about 5 seconds, and the camcorder enters the standby mode at the point where you stopped the tape. 1 Touch [MENU]. SCH SURE Touch here again to start the next recording while...
Operating Guide
Page 53
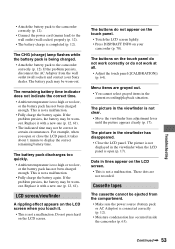
...do not work correctly or do not appear on the touch panel. • Touch the LCD screen lightly. • Press DISP/BATT INFO on your Sony dealer. The CHG (charge) lamp flashes while the battery pack is not a malfunction. • Fully charge the battery again. This is being charged... (p. 12). For example, when you touch it with a new one (p. 12, 61). • The indicated time may be ejected from the wall outlet (wall socket) and contact your camcorder (p. 70). Do not press hard on the touch panel do not work at all. • Adjust the touch panel ([CALIBRATION]) ...
...do not work correctly or do not appear on the touch panel. • Touch the LCD screen lightly. • Press DISP/BATT INFO on your Sony dealer. The CHG (charge) lamp flashes while the battery pack is not a malfunction. • Fully charge the battery again. This is being charged... (p. 12). For example, when you touch it with a new one (p. 12, 61). • The indicated time may be ejected from the wall outlet (wall socket) and contact your camcorder (p. 70). Do not press hard on the touch panel do not work at all. • Adjust the touch panel ([CALIBRATION]) ...

Operating Guide
Page 54
... tab to REC or insert a new cassette (p. 60). • The tape is noisier during Easy Handycam operation (p. 20). This is not a malfunction. This is not a malfunction. A vertical band appears ...does not function. • Set [STEADYSHOT] to moisture condensation. Remove the cassette and leave your camcorder for auto focus. The auto focus does not function. • Set [FOCUS] to turn the...EXPOSURE] - [SPOT METER] • The backlight function does not work . • Do not eject the cassette after recording (p. 26). • There is nothing recorded on the cassette. • ...
... tab to REC or insert a new cassette (p. 60). • The tape is noisier during Easy Handycam operation (p. 20). This is not a malfunction. This is not a malfunction. A vertical band appears ...does not function. • Set [STEADYSHOT] to moisture condensation. Remove the cassette and leave your camcorder for auto focus. The auto focus does not function. • Set [FOCUS] to turn the...EXPOSURE] - [SPOT METER] • The backlight function does not work . • Do not eject the cassette after recording (p. 26). • There is nothing recorded on the cassette. • ...
Operating Guide
Page 57
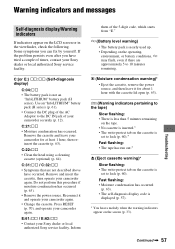
...flash, even if there are not described above have tried a couple of times, contact your Sony dealer or local authorized Sony service facility. Press RESET (p. 70), and operate your camcorder for about 1 hour with the cassette lid open (p. 63). Q (Warning indicators pertaining to...remaining. % (Moisture condensation warning)* • Eject the cassette, remove the power source, and then leave it and operate your camcorder securely (p. 12). Remove and insert the cassette, then operate your Sony dealer or local authorized Sony service facility. Continued , 57 Some symptoms you...
...flash, even if there are not described above have tried a couple of times, contact your Sony dealer or local authorized Sony service facility. Press RESET (p. 70), and operate your camcorder for about 1 hour with the cassette lid open (p. 63). Q (Warning indicators pertaining to...remaining. % (Moisture condensation warning)* • Eject the cassette, remove the power source, and then leave it and operate your camcorder securely (p. 12). Remove and insert the cassette, then operate your Sony dealer or local authorized Sony service facility. Continued , 57 Some symptoms you...
Operating Guide
Page 58
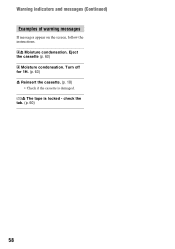
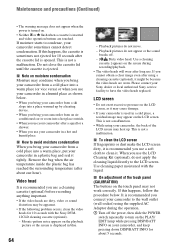
QZ The tape is damaged. Eject the cassette (p. 63) % Moisture condensation. check the tab. (p. 60) 58 Turn off for 1H. (p. 63) Z Reinsert the cassette. (p. 18) • Check if the cassette is locked - Warning indicators and messages (Continued) Examples of warning messages If messages appear on the screen, follow the instructions. %Z Moisture condensation.
QZ The tape is damaged. Eject the cassette (p. 63) % Moisture condensation. check the tab. (p. 60) 58 Turn off for 1H. (p. 63) Z Reinsert the cassette. (p. 18) • Check if the cassette is locked - Warning indicators and messages (Continued) Examples of warning messages If messages appear on the screen, follow the instructions. %Z Moisture condensation.
Operating Guide
Page 60
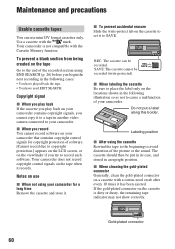
... record due to copyright protection.] appears on the LCD screen, or on the viewfinder if you record You cannot record software on use mini DV format cassettes only. x When cleaning the gold-plated connector Generally, clean the gold-plated connector on the tape Go to cause a malfunction ...10 times it to record such software. Your camcorder is dirty or dusty, the remaining tape indicator may not show correctly. x When labeling the cassette Be sure to place the label only on the cassette to set it has been ejected. Maintenance and precautions Usable cassette tapes You ...
... record due to copyright protection.] appears on the LCD screen, or on the viewfinder if you record You cannot record software on use mini DV format cassettes only. x When cleaning the gold-plated connector Generally, clean the gold-plated connector on the tape Go to cause a malfunction ...10 times it to record such software. Your camcorder is dirty or dusty, the remaining tape indicator may not show correctly. x When labeling the cassette Be sure to place the label only on the cassette to set it has been ejected. Maintenance and precautions Usable cassette tapes You ...
Operating Guide
Page 63
...leave them exposed to -4-pin cable (during DV dubbing). The camcorder may not be able to record properly. - The camcorder may malfunction. - Near AM receivers and video... damage the power cord (mains lead) such as by a Sony dealer before operating it any liquid that may condense inside your camcorder, on the surface of the tape, or on the lens....; For DC or AC operation, use or store the camcorder and accessories in these operating instructions. • Do not let your camcorder, it may occur. - The indicator will work. Eject the cassette, turn off for example, from the wall ...
...leave them exposed to -4-pin cable (during DV dubbing). The camcorder may not be able to record properly. - The camcorder may malfunction. - Near AM receivers and video... damage the power cord (mains lead) such as by a Sony dealer before operating it any liquid that may condense inside your camcorder, on the surface of the tape, or on the lens....; For DC or AC operation, use or store the camcorder and accessories in these operating instructions. • Do not let your camcorder, it may occur. - The indicator will work. Eject the cassette, turn off for example, from the wall ...
Operating Guide
Page 64
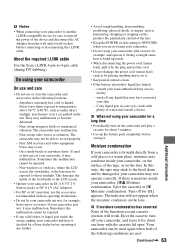
...picture or the screen is displayed in blue. 64 - This is ejected. If moisture starts to condense, your Sony dealer or local authorized Sony service facility to clean it may cause damage. • If your camcorder in a hot and humid place. Playback pictures do not appear ... happens, the cassette is not a malfunction. Use a cleaning cassette.] appears on the LCD screen. This is sometimes not ejected for about one hour). Please contact your camcorder sometimes cannot detect condensation. If this happens, follow the procedure below . • When you bring your...
...picture or the screen is displayed in blue. 64 - This is ejected. If moisture starts to condense, your Sony dealer or local authorized Sony service facility to clean it may cause damage. • If your camcorder in a hot and humid place. Playback pictures do not appear ... happens, the cassette is not a malfunction. Use a cleaning cassette.] appears on the LCD screen. This is sometimes not ejected for about one hour). Please contact your camcorder sometimes cannot detect condensation. If this happens, follow the procedure below . • When you bring your...
Operating Guide
Page 69
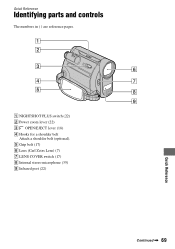
E Grip belt (17) F Lens (Carl Zeiss Lens) (7) G LENS COVER switch (17) H Internal stereo microphone (35) I Infrared port (22) Continued , 69 Quick Reference Quick Reference Identifying parts and controls The numbers in ( ) are reference pages. A NIGHTSHOT PLUS switch (22) B Power zoom lever (22) C OPEN/EJECT lever (18) D Hooks for a shoulder belt Attach a shoulder belt (optional).
E Grip belt (17) F Lens (Carl Zeiss Lens) (7) G LENS COVER switch (17) H Internal stereo microphone (35) I Infrared port (22) Continued , 69 Quick Reference Quick Reference Identifying parts and controls The numbers in ( ) are reference pages. A NIGHTSHOT PLUS switch (22) B Power zoom lever (22) C OPEN/EJECT lever (18) D Hooks for a shoulder belt Attach a shoulder belt (optional).


