
Operating Guide
Page 3
...any kind on or pinched by items placed upon or against them . Power cord (Mains lead) Protection Route the power cord (mains lead) so that could result in the cabinet are not sure of the type of electrical power supplied to operate from the type of the set, and to protect it... before cleaning or polishing it. If you are provided for future reference. Never block the slots and openings by the manufacturer. Do not use power-line operated sets near a swimming pool, etc. Never place the set on the marking label. For those sets designed to your home, consult...
...any kind on or pinched by items placed upon or against them . Power cord (Mains lead) Protection Route the power cord (mains lead) so that could result in the cabinet are not sure of the type of electrical power supplied to operate from the type of the set, and to protect it... before cleaning or polishing it. If you are provided for future reference. Never block the slots and openings by the manufacturer. Do not use power-line operated sets near a swimming pool, etc. Never place the set on the marking label. For those sets designed to your home, consult...

Operating Guide
Page 9
...of Contents IMPORTANT SAFEGUARDS..........3 Read this first 5 Notes on use 6 Getting Started Step 1: Checking supplied items 11 Step 2: Charging the battery pack 12 Step 3: Turning the power on and setting the date and time 15 Changing the language setting 16 Step 4: Making setting ...adjustments before recording 17 Step 5: Inserting a Cassette ......... 18 Recording/Playback Easy Recording/Playback (Easy Handycam 19 Recording 21 Zooming 22 Recording...
...of Contents IMPORTANT SAFEGUARDS..........3 Read this first 5 Notes on use 6 Getting Started Step 1: Checking supplied items 11 Step 2: Charging the battery pack 12 Step 3: Turning the power on and setting the date and time 15 Changing the language setting 16 Step 4: Making setting ...adjustments before recording 17 Step 5: Inserting a Cassette ......... 18 Recording/Playback Easy Recording/Playback (Easy Handycam 19 Recording 21 Zooming 22 Recording...
Operating Guide
Page 11
AC Adaptor (1) (p. 12) USB cable (1) (DCR-HC54) (p. 70) Rechargeable battery pack NP-FH30 (1) (p. 12, 61) Power cord (Mains lead) (1) (p. 12) A/V connecting cable (1) (p. 28, 44) CD-ROM "Handycam Application Software" (1) (DCR-HC54)(p. 48) Operating Guide (This manual) (1) Getting Started 11 The number in the parentheses indicates the number of that you have following items supplied with your camcorder. Getting Started Step 1: Checking supplied items Make sure that item supplied.
AC Adaptor (1) (p. 12) USB cable (1) (DCR-HC54) (p. 70) Rechargeable battery pack NP-FH30 (1) (p. 12, 61) Power cord (Mains lead) (1) (p. 12) A/V connecting cable (1) (p. 28, 44) CD-ROM "Handycam Application Software" (1) (DCR-HC54)(p. 48) Operating Guide (This manual) (1) Getting Started 11 The number in the parentheses indicates the number of that you have following items supplied with your camcorder. Getting Started Step 1: Checking supplied items Make sure that item supplied.
Operating Guide
Page 13
...85 min VIEWFINDER : 99 min Recording capacity (approx.) You can check the remaining battery charge on the LCD screen. Battery pack NP-FH30 (supplied) NP-FH50 NP-FH70 NP-FH100 Charging time 115 135 170 390 After a while, the approximate recordable time and battery information appear for ...The battery pack will stop soon. To remove the battery pack 1 Turn off the power, then press PUSH. 2 Remove the battery pack in this case. Getting Started To use an outside power source You can operate your camcorder using the power from the wall outlet (wall socket) by Continued , 13
...85 min VIEWFINDER : 99 min Recording capacity (approx.) You can check the remaining battery charge on the LCD screen. Battery pack NP-FH30 (supplied) NP-FH50 NP-FH70 NP-FH100 Charging time 115 135 170 390 After a while, the approximate recordable time and battery information appear for ...The battery pack will stop soon. To remove the battery pack 1 Turn off the power, then press PUSH. 2 Remove the battery pack in this case. Getting Started To use an outside power source You can operate your camcorder using the power from the wall outlet (wall socket) by Continued , 13

Operating Guide
Page 14
...you use your camcorder, even when the power cord (mains lead) is connected to 86 °F) is recommended.) • The recording and playback time will be shorter depending on /off , AC power (house current) is worn-out (for Battery Info only). • The power will not be supplied from the battery... as long as between a wall and furniture. • Do not short-circuit the DC plug of your camcorder. The battery pack is damaged. 14 -...
...you use your camcorder, even when the power cord (mains lead) is connected to 86 °F) is recommended.) • The recording and playback time will be shorter depending on /off , AC power (house current) is worn-out (for Battery Info only). • The power will not be supplied from the battery... as long as between a wall and furniture. • Do not short-circuit the DC plug of your camcorder. The battery pack is damaged. 14 -...

Operating Guide
Page 42
...on other than CAMERA. z Tips • The demonstration will be suspended in situations such as those described below . - The indicators in the supplied CDROM for about 8 seconds in situations such as those described below . • When you set to 1.5 times the SP mode (Long Play).... LANGUAGE You can view the pictures displayed on the screen of your camcorder on your camcorder, and slide the POWER switch repeatedly to view the demonstration about 10 minutes.) - When you touch the screen during the demonstration. (The demonstration ...
...on other than CAMERA. z Tips • The demonstration will be suspended in situations such as those described below . - The indicators in the supplied CDROM for about 8 seconds in situations such as those described below . • When you set to 1.5 times the SP mode (Long Play).... LANGUAGE You can view the pictures displayed on the screen of your camcorder on your camcorder, and slide the POWER switch repeatedly to view the demonstration about 10 minutes.) - When you touch the screen during the demonstration. (The demonstration ...
Operating Guide
Page 45
...POWER switch repeatedly to turn on the device. • When you are connecting your camcorder to a monaural device, connect the yellow plug of the recording device. 4 Start playback on the camcorder, and recording on the device or application. 45 Dubbing/Editing b Notes • When you connect a device via the DV...the appropriate input (such as video input1, video input2). 3 Connect your camcorder and the recording device. Insert the recorded cassette. Refer to the operating instructions supplied with your recording device for playback. Indicators - If your recording device ...
...POWER switch repeatedly to turn on the device. • When you are connecting your camcorder to a monaural device, connect the yellow plug of the recording device. 4 Start playback on the camcorder, and recording on the device or application. 45 Dubbing/Editing b Notes • When you connect a device via the DV...the appropriate input (such as video input1, video input2). 3 Connect your camcorder and the recording device. Insert the recorded cassette. Refer to the operating instructions supplied with your recording device for playback. Indicators - If your recording device ...
Operating Guide
Page 46
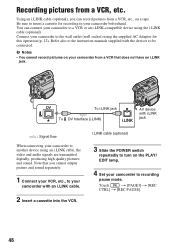
... for recording in your camcorder beforehand. i.LINK cable (optional) 3 Slide the POWER switch repeatedly to turn on your camcorder from a VCR that you can connect your camcorder to be connected. b Notes • You cannot record pictures on the PLAY/ EDIT lamp. 4 Set your camcorder to the instruction manuals supplied with i.LINK To DV Interface (i.LINK) jack i.LINK...
... for recording in your camcorder beforehand. i.LINK cable (optional) 3 Slide the POWER switch repeatedly to turn on your camcorder from a VCR that you can connect your camcorder to be connected. b Notes • You cannot record pictures on the PLAY/ EDIT lamp. 4 Set your camcorder to the instruction manuals supplied with i.LINK To DV Interface (i.LINK) jack i.LINK...
Operating Guide
Page 49
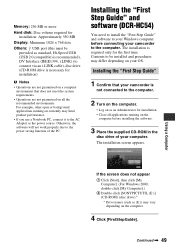
.... • Log on as an Administrator for the first time. Otherwise, the software will not work properly due to the power saving function of your camcorder to the computer. The installation is required only for installation. • Close all the recommended environments. The installation screen appears.... may differ depending on your OS. Contents to be provided as standard, Hi-Speed USB (USB 2.0 compatible) is recommended), DV Interface (IEEE1394, i.LINK) (to your Windows computer before installing the software. 3 Place the supplied CD-ROM in the disc drive of the PC.
.... • Log on as an Administrator for the first time. Otherwise, the software will not work properly due to the power saving function of your camcorder to the computer. The installation is required only for installation. • Close all the recommended environments. The installation screen appears.... may differ depending on your OS. Contents to be provided as standard, Hi-Speed USB (USB 2.0 compatible) is recommended), DV Interface (IEEE1394, i.LINK) (to your Windows computer before installing the software. 3 Place the supplied CD-ROM in the disc drive of the PC.
Operating Guide
Page 59
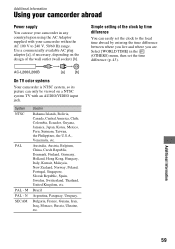
... Brazil Argentina, Paraguay, Uruguay. Simple setting of the wall outlet (wall socket) [b]. AC-L200/L200B [a] [b] On TV color systems Your camcorder is NTSC system, so its picture can easily set the time difference (p. 43). Use a commercially available AC plug adaptor [a], if necessary,... Jamaica, Japan, Korea, Mexico, Peru, Surinam, Taiwan, the Philippines, the U.S.A., Venezuela, etc. Additional Information Using your camcorder abroad Power supply You can use your camcorder within the AC 100 V to the local time abroad by time difference You can only be viewed on the design of ...
... Brazil Argentina, Paraguay, Uruguay. Simple setting of the wall outlet (wall socket) [b]. AC-L200/L200B [a] [b] On TV color systems Your camcorder is NTSC system, so its picture can easily set the time difference (p. 43). Use a commercially available AC plug adaptor [a], if necessary,... Jamaica, Japan, Korea, Mexico, Peru, Surinam, Taiwan, the Philippines, the U.S.A., Venezuela, etc. Additional Information Using your camcorder abroad Power supply You can use your camcorder within the AC 100 V to the local time abroad by time difference You can only be viewed on the design of ...
Operating Guide
Page 64
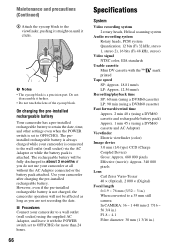
... pictures do not appear or the sound breaks off the power, then slide the POWER switch repeatedly to clean it may cause damage. • If your Sony dealer or local authorized Sony service facility to the LCD screen. Use a cleaning cassette...Sony DVM12CLD cleaning cassette (optional). - Please contact your camcorder is inserted and video operation buttons are worn. This is recommended you use your camcorder in a humid place as it . This is recommended you use your camcorder after the cassette lid is opened. It is not a malfunction. • While using the supplied...
... pictures do not appear or the sound breaks off the power, then slide the POWER switch repeatedly to clean it may cause damage. • If your Sony dealer or local authorized Sony service facility to the LCD screen. Use a cleaning cassette...Sony DVM12CLD cleaning cassette (optional). - Please contact your camcorder is inserted and video operation buttons are worn. This is recommended you use your camcorder in a humid place as it . This is recommended you use your camcorder after the cassette lid is opened. It is not a malfunction. • While using the supplied...
Operating Guide
Page 66
... 2), 16 bits (Fs 48 kHz, stereo) Video signal NTSC color, EIA standards Usable cassette Mini DV cassette with the POWER switch set to OFF(CHG). Use your camcorder to a wall outlet (wall socket) using the supplied AC Adaptor, and leave it with the mark printed Tape speed SP: Approx. 18.81 mm/s... pre-installed rechargeable battery to retain the date, time, and other settings even when the POWER switch is not charged, the camcorder operation will be affected as long as you do not use your camcorder is connected to the wall outlet (wall socket) via the AC Adaptor or while the ...
... 2), 16 bits (Fs 48 kHz, stereo) Video signal NTSC color, EIA standards Usable cassette Mini DV cassette with the POWER switch set to OFF(CHG). Use your camcorder to a wall outlet (wall socket) using the supplied AC Adaptor, and leave it with the mark printed Tape speed SP: Approx. 18.81 mm/s... pre-installed rechargeable battery to retain the date, time, and other settings even when the POWER switch is not charged, the camcorder operation will be affected as long as you do not use your camcorder is connected to the wall outlet (wall socket) via the AC Adaptor or while the ...
Operating Guide
Page 67
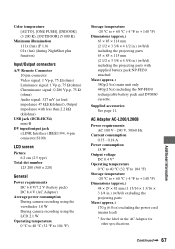
Supplied accessories See page 11. AC Adaptor AC-L200/L200B Power requirements AC 100 V - 240 V, 50/60 Hz Current consumption 0.35 - 0.18 A Power consumption 18 W Output voltage DC 8.4 V* Operating temperature 0 °C to 40 °C (32 °F to 104 °F) Storage temperature -20 °C to ...mm (2 1/2 × 3 3/8 × 4 5/8 in.) (w/h/d) including the projecting parts with less than 2.2 kΩ (kilohms) USB jack (DCR-HC54) mini-B DV input/output jack i.LINK Interface (IEEE1394, 4-pin connector S100) LCD screen Picture 6.2 cm (2.5 type) Total dot number 123 200 (560 × 220) General...
Supplied accessories See page 11. AC Adaptor AC-L200/L200B Power requirements AC 100 V - 240 V, 50/60 Hz Current consumption 0.35 - 0.18 A Power consumption 18 W Output voltage DC 8.4 V* Operating temperature 0 °C to 40 °C (32 °F to 104 °F) Storage temperature -20 °C to ...mm (2 1/2 × 3 3/8 × 4 5/8 in.) (w/h/d) including the projecting parts with less than 2.2 kΩ (kilohms) USB jack (DCR-HC54) mini-B DV input/output jack i.LINK Interface (IEEE1394, 4-pin connector S100) LCD screen Picture 6.2 cm (2.5 type) Total dot number 123 200 (560 × 220) General...


