
Operating Guide
Page 9
... setting 16 Step 4: Making setting adjustments before recording 17 Step 5: Inserting a Cassette ......... 18 Recording/Playback Easy Recording/Playback (Easy Handycam 19 Recording 21 Zooming 22 Recording in dark places (NightShot plus 22 Adjusting the exposure for backlit subjects 23 Recording in mirror mode... 26 Searching for the last scene of the most recent recording (END SEARCH 26 Searching manually (EDIT SEARCH 26 Reviewing the most recently recorded scenes (Rec review 26 Playing the picture on a TV .......... 28 Using the Menu Using the menu items .......... 29 Operation button ...
... setting 16 Step 4: Making setting adjustments before recording 17 Step 5: Inserting a Cassette ......... 18 Recording/Playback Easy Recording/Playback (Easy Handycam 19 Recording 21 Zooming 22 Recording in dark places (NightShot plus 22 Adjusting the exposure for backlit subjects 23 Recording in mirror mode... 26 Searching for the last scene of the most recent recording (END SEARCH 26 Searching manually (EDIT SEARCH 26 Reviewing the most recently recorded scenes (Rec review 26 Playing the picture on a TV .......... 28 Using the Menu Using the menu items .......... 29 Operation button ...
Operating Guide
Page 26
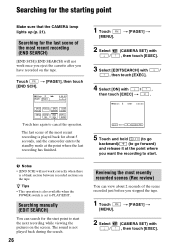
...Touch and hold (to go backward)/ (to cancel the operation. Searching manually (EDIT SEARCH) You can view about 5 seconds, and the camcorder enters the standby mode at the point where you have recorded on the screen. SEL. Searching for the start point to start the next...[PAGE1] t 2 Select / (CAMERA SET) with , then touch [EXEC]. 3 Select [EDITSEARCH] with / , then touch [EXEC]. 4 Select [ON] with , then touch [EXEC]. Reviewing the most recent recording (END SEARCH) [END SCH] (END SEARCH) will not work once you eject the cassette after you want the recording to start .
...Touch and hold (to go backward)/ (to cancel the operation. Searching manually (EDIT SEARCH) You can view about 5 seconds, and the camcorder enters the standby mode at the point where you have recorded on the screen. SEL. Searching for the start point to start the next...[PAGE1] t 2 Select / (CAMERA SET) with , then touch [EXEC]. 3 Select [EDITSEARCH] with / , then touch [EXEC]. 4 Select [ON] with , then touch [EXEC]. Reviewing the most recent recording (END SEARCH) [END SCH] (END SEARCH) will not work once you eject the cassette after you want the recording to start .
Operating Guide
Page 39
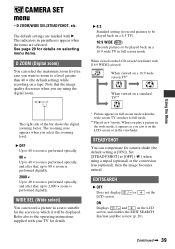
D ZOOM/WIDE SEL/STEADYSHOT, etc. The zooming zone appears when you saw it on the LCD screen, and enables the EDIT SEARCH function and Rec review (p. 26). STEADYSHOT You can compensate for details on a tape. When viewed on a standard TV** The right side of the bar shows the digital zooming factor. ...
D ZOOM/WIDE SEL/STEADYSHOT, etc. The zooming zone appears when you saw it on the LCD screen, and enables the EDIT SEARCH function and Rec review (p. 26). STEADYSHOT You can compensate for details on a tape. When viewed on a standard TV** The right side of the bar shows the digital zooming factor. ...
Operating Guide
Page 75
..., 73 DATE/TIME 15, 34, 73 DEMO MODE 42 DISP GUIDE (Display guide 73 DISP OUT (Display output 43 Display indicators 72 Dubbing 44 E Easy Handycam 19, 29 EDITSEARCH 26, 39 END SCH (END SEARCH 26, 54 EXPOSURE 32 F FADER 32 First Step Guide 48, 51 Flexible spot meter 31 FOCUS... Motion Browser .......48 Playback 20, 24, 55 Playing time 14 PORTRAIT (Soft portrait) ...31 R REC CTRL (Recording control 46 REC MODE (Recording mode 42 Rec review 26 Recording 19, 21, 54 Continued , 75 Quick Reference
..., 73 DATE/TIME 15, 34, 73 DEMO MODE 42 DISP GUIDE (Display guide 73 DISP OUT (Display output 43 Display indicators 72 Dubbing 44 E Easy Handycam 19, 29 EDITSEARCH 26, 39 END SCH (END SEARCH 26, 54 EXPOSURE 32 F FADER 32 First Step Guide 48, 51 Flexible spot meter 31 FOCUS... Motion Browser .......48 Playback 20, 24, 55 Playing time 14 PORTRAIT (Soft portrait) ...31 R REC CTRL (Recording control 46 REC MODE (Recording mode 42 Rec review 26 Recording 19, 21, 54 Continued , 75 Quick Reference


