Operating Guide
Page 2
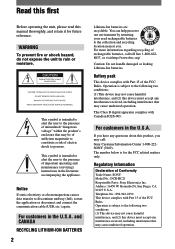
...that may call toll free 1-800-8228837, or visit http://www.rbrc.org/ Caution: Do not handle damaged or leaking Lithium-Ion batteries. Battery pack This device complies with Part 15 of electric shock to the following two conditions: (1) This device may not cause harmful interference... with Canadian ICES-003. The number below is subject to the presence of the FCC Rules. Regulatory Information Declaration of rechargeable batteries, call : Sony Customer Information Center 1-800-222SONY (7669). Operation is intended to alert the user to the following two conditions: (1) This ...
...that may call toll free 1-800-8228837, or visit http://www.rbrc.org/ Caution: Do not handle damaged or leaking Lithium-Ion batteries. Battery pack This device complies with Part 15 of electric shock to the following two conditions: (1) This device may not cause harmful interference... with Canadian ICES-003. The number below is subject to the presence of the FCC Rules. Regulatory Information Declaration of rechargeable batteries, call : Sony Customer Information Center 1-800-222SONY (7669). Operation is intended to alert the user to the following two conditions: (1) This ...
Operating Guide
Page 3
...Sony dealer regarding this product. Owner's Record The model and serial numbers are designed to correct the interference by the following measures: - Refer to these numbers whenever you insert the connector plug forcibly in the wrong direction, the terminal may cause a malfunction of your camcorder... the limits for a Class B digital device, pursuant to Part 15 of FCC Rules. Viewfinder LCD Panel Battery pack • Before connecting your camcorder. If you call your authority to comply with Cassette Memory are incompatible) (p. 78). Continued 3 Reorient or...
...Sony dealer regarding this product. Owner's Record The model and serial numbers are designed to correct the interference by the following measures: - Refer to these numbers whenever you insert the connector plug forcibly in the wrong direction, the terminal may cause a malfunction of your camcorder... the limits for a Class B digital device, pursuant to Part 15 of FCC Rules. Viewfinder LCD Panel Battery pack • Before connecting your camcorder. If you call your authority to comply with Cassette Memory are incompatible) (p. 78). Continued 3 Reorient or...
Operating Guide
Page 6
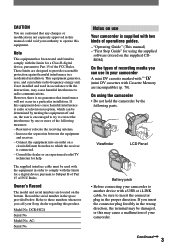
Table of Contents Getting Started Step 1: Checking supplied items 9 Step 2: Charging the battery pack 10 Step 3: Turning the power on and holding your camcorder firmly ...........13 Step 4: Adjusting the LCD panel and viewfinder 14 Step 5: ...Using the touch panel 15 Changing the language setting 15 Checking the screen indicators (Display Guide 15 Step 6: Setting the date and time 16 Step 7: Inserting a cassette 17 Recording/Playback Recording/Playback with ease (Easy Handycam...
Table of Contents Getting Started Step 1: Checking supplied items 9 Step 2: Charging the battery pack 10 Step 3: Turning the power on and holding your camcorder firmly ...........13 Step 4: Adjusting the LCD panel and viewfinder 14 Step 5: ...Using the touch panel 15 Changing the language setting 15 Checking the screen indicators (Display Guide 15 Step 6: Setting the date and time 16 Step 7: Inserting a cassette 17 Recording/Playback Recording/Playback with ease (Easy Handycam...

Operating Guide
Page 8
Creating a DVD (Direct Access to "Click to DVD 60 Troubleshooting Troubleshooting 63 Warning indicators and messages 74 Additional Information Using your camcorder abroad 77 Usable cassette tapes 78 About the "InfoLITHIUM" battery pack 79 About i.LINK 80 Maintenance and precautions 81 Using the Strap Belt as a wrist strap 84 Attaching the Shoulder Strap 85 Specifications 85 Index...87 8
Creating a DVD (Direct Access to "Click to DVD 60 Troubleshooting Troubleshooting 63 Warning indicators and messages 74 Additional Information Using your camcorder abroad 77 Usable cassette tapes 78 About the "InfoLITHIUM" battery pack 79 About i.LINK 80 Maintenance and precautions 81 Using the Strap Belt as a wrist strap 84 Attaching the Shoulder Strap 85 Specifications 85 Index...87 8
Operating Guide
Page 9
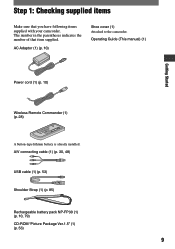
... already installed. A/V connecting cable (1) (p. 30, 48) USB cable (1) (p. 53) Shoulder Strap (1) (p. 85) Rechargeable battery pack NP-FP30 (1) (p. 10, 79) CD-ROM "Picture Package Ver.1.5" (1) (p. 53) 9 AC Adaptor (1) (p. 10) Shoe cover (1) Attached to the camcorder. Step 1: Checking supplied items Make sure that item supplied. The number in the parentheses indicates the number of...
... already installed. A/V connecting cable (1) (p. 30, 48) USB cable (1) (p. 53) Shoulder Strap (1) (p. 85) Rechargeable battery pack NP-FP30 (1) (p. 10, 79) CD-ROM "Picture Package Ver.1.5" (1) (p. 53) 9 AC Adaptor (1) (p. 10) Shoe cover (1) Attached to the camcorder. Step 1: Checking supplied items Make sure that item supplied. The number in the parentheses indicates the number of...

Operating Guide
Page 10
... by sliding it in the direction of the arrow until it to your camcorder. 10 To remove the battery pack Turn off when the battery is fully charged. POWER switch DC IN jack DC plug DC IN jack With the mark facing down 4 Connect the power cord to the ...AC Adaptor and the wall outlet. Step 2: Charging the battery pack You can charge the "InfoLITHIUM" battery pack (P series) (p. 79) after attaching it clicks. 2 Slide the POWER switch up to OFF (CHG). (The default setting.) The CHG (charge) lamp...
... by sliding it in the direction of the arrow until it to your camcorder. 10 To remove the battery pack Turn off when the battery is fully charged. POWER switch DC IN jack DC plug DC IN jack With the mark facing down 4 Connect the power cord to the ...AC Adaptor and the wall outlet. Step 2: Charging the battery pack You can charge the "InfoLITHIUM" battery pack (P series) (p. 79) after attaching it clicks. 2 Slide the POWER switch up to OFF (CHG). (The default setting.) The CHG (charge) lamp...
Operating Guide
Page 11
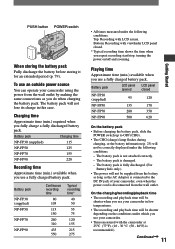
...stop, turning the power on the conditions under which you use your camcorder. • Times measured with the camcorder at 25°C (77°F). (10 - 30 °C (50 - 86°F) is recommended.) Continued 11 Getting Started Battery pack NP-FP30 (supplied) NP-FP50 NP-FP70 NP-FP90 Continuous... making the same connections as you use an outside power source You can operate your camcorder in low temperatures. • The recording and playback time will not lose its charge in this case. Battery pack LCD panel LCD panel opened closed . * Typical recording time shows the time ...
...stop, turning the power on the conditions under which you use your camcorder. • Times measured with the camcorder at 25°C (77°F). (10 - 30 °C (50 - 86°F) is recommended.) Continued 11 Getting Started Battery pack NP-FP30 (supplied) NP-FP50 NP-FP70 NP-FP90 Continuous... making the same connections as you use an outside power source You can operate your camcorder in low temperatures. • The recording and playback time will not lose its charge in this case. Battery pack LCD panel LCD panel opened closed . * Typical recording time shows the time ...
Operating Guide
Page 12
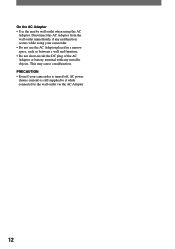
... any metallic objects. PRECAUTION • Even if your camcorder. • Do not use the AC Adaptor placed in a narrow space, such as between a wall and furniture. • Do not short-circuit the DC plug of the AC Adaptor or battery terminal with any malfunction occurs while using the AC Adaptor.... This may cause a malfunction. On the AC Adaptor • Use the nearby wall outlet when using your camcorder is turned off, AC power (house current) is still supplied ...
... any metallic objects. PRECAUTION • Even if your camcorder. • Do not use the AC Adaptor placed in a narrow space, such as between a wall and furniture. • Do not short-circuit the DC plug of the AC Adaptor or battery terminal with any malfunction occurs while using the AC Adaptor.... This may cause a malfunction. On the AC Adaptor • Use the nearby wall outlet when using your camcorder is turned off, AC power (house current) is still supplied ...
Operating Guide
Page 13
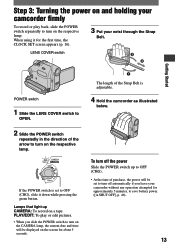
... COVER switch to OPEN. 2 Slide the POWER switch repeatedly in the direction of the arrow to turn on the screen for approximately 5 minutes, to save battery power. ([A.SHUT OFF], p. 46). 13 Lamps that light up to OFF (CHG). • At the time of the Strap Belt is set to OFF (CHG...), slide it for the first time, the CLOCK SET screen appears (p. 16). 3 Put your camcorder without any operation attempted for about 5 seconds. PLAY/EDIT: To play back, slide the POWER switch repeatedly to turn on a tape. The length of purchase...
... COVER switch to OPEN. 2 Slide the POWER switch repeatedly in the direction of the arrow to turn on the screen for approximately 5 minutes, to save battery power. ([A.SHUT OFF], p. 46). 13 Lamps that light up to OFF (CHG). • At the time of the Strap Belt is set to OFF (CHG...), slide it for the first time, the CLOCK SET screen appears (p. 16). 3 Put your camcorder without any operation attempted for about 5 seconds. PLAY/EDIT: To play back, slide the POWER switch repeatedly to turn on a tape. The length of purchase...
Operating Guide
Page 14
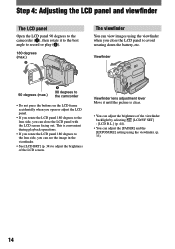
Viewfinder 90 degrees (max.) 1 90 degrees to the camcorder • Do not press the buttons on the LCD frame accidentally when you open or adjust the LCD panel. • If you rotate the LCD ... viewfinder. (p. 33) 14 Step 4: Adjusting the LCD panel and viewfinder The LCD panel Open the LCD panel 90 degrees to the camcorder (), then rotate it until the picture is convenient during playback operations. • If you rotate the LCD panel 180 degrees to the lens side...
Viewfinder 90 degrees (max.) 1 90 degrees to the camcorder • Do not press the buttons on the LCD frame accidentally when you open or adjust the LCD panel. • If you rotate the LCD ... viewfinder. (p. 33) 14 Step 4: Adjusting the LCD panel and viewfinder The LCD panel Open the LCD panel 90 degrees to the camcorder (), then rotate it until the picture is convenient during playback operations. • If you rotate the LCD panel 180 degrees to the lens side...

Operating Guide
Page 16
...), [D] (day), [H] (hour) and [M] (minute), then touch . Step 6: Setting the date and time Set the date and time when using this camcorder for about 3 months, the built-in rechargeable battery gets discharged and the date and time settings may be cleared from the memory. POWER switch Skip to 12:00 AM. For... SETUP MENU CLOCK SET USB STREAM LANGUAGE DEMO MODE --:--:-- In that case, charge the rechargeable battery and then set the date and time, the CLOCK SET screen appears every time you turn on your camcorder. • If you set it to step 4 when you do not set the date and...
...), [D] (day), [H] (hour) and [M] (minute), then touch . Step 6: Setting the date and time Set the date and time when using this camcorder for about 3 months, the built-in rechargeable battery gets discharged and the date and time settings may be cleared from the memory. POWER switch Skip to 12:00 AM. For... SETUP MENU CLOCK SET USB STREAM LANGUAGE DEMO MODE --:--:-- In that case, charge the rechargeable battery and then set the date and time, the CLOCK SET screen appears every time you turn on your camcorder. • If you set it to step 4 when you do not set the date and...
Operating Guide
Page 23
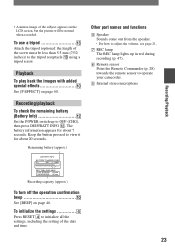
... during recording (p. 47). Remote sensor Point the Remote Commander (p. 28) towards the remote sensor to operate your camcorder. Internal stereo microphone 23 The battery information appears for about 7 seconds. Remaining battery (approx.) BATTERY INFO BATTERY CHARGE LEVEL 0% 50% 100% REC TIME AVAILABLE LCD SCREEN : 64 min VIEWFINDER : 84 min Recording capacity (approx.) To...
... during recording (p. 47). Remote sensor Point the Remote Commander (p. 28) towards the remote sensor to operate your camcorder. Internal stereo microphone 23 The battery information appears for about 7 seconds. Remaining battery (approx.) BATTERY INFO BATTERY CHARGE LEVEL 0% 50% 100% REC TIME AVAILABLE LCD SCREEN : 64 min VIEWFINDER : 84 min Recording capacity (approx.) To...
Operating Guide
Page 24
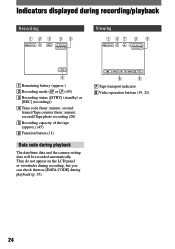
Indicators displayed during recording/playback Recording 12 3 45 Viewing 1 27 4 5 6 Remaining battery (approx.) Recording mode ( or ) (45) Recording status ([STBY] (standby) or [REC] (recording)) Time code (hour: minute: second: frame)/...
Indicators displayed during recording/playback Recording 12 3 45 Viewing 1 27 4 5 6 Remaining battery (approx.) Recording mode ( or ) (45) Recording status ([STBY] (standby) or [REC] (recording)) Time code (hour: minute: second: frame)/...
Operating Guide
Page 28
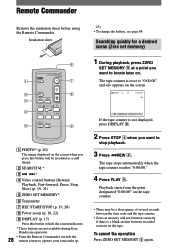
Insulation sheet 23). • To change the battery, see page 84. The tape counter is reset to "0:00:00" and appears on the screen. 60min 0:00:00 FN If the tape counter is a ... screen when you press this button to hide the screen indicators. * These buttons are not available during Easy Handycam operation. • Point the Remote Commander towards the 28 remote sensor to operate your camcorder (p. 1 During playback, press ZERO SET MEMORY at a point you want to stop playback. 3 Press REW ...
Insulation sheet 23). • To change the battery, see page 84. The tape counter is reset to "0:00:00" and appears on the screen. 60min 0:00:00 FN If the tape counter is a ... screen when you press this button to hide the screen indicators. * These buttons are not available during Easy Handycam operation. • Point the Remote Commander towards the 28 remote sensor to operate your camcorder (p. 1 During playback, press ZERO SET MEMORY at a point you want to stop playback. 3 Press REW ...
Operating Guide
Page 34
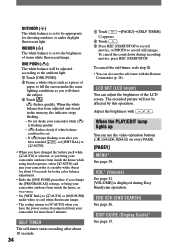
... quickly. Adjust the brightness with the Remote Commander (p. 28). To cancel the count down during Easy Handycam operation. VOL* (Volume) See page 21. [VOLUME] is set to the brightness of the LCD...press REC START/STOP. SELF TIMER The self-timer starts recording after you have changed the battery pack while [ AUTO] is set to be appropriate for more than 5 minutes. LCD BRT...• The setting returns to [ AUTO] when you have the power source disconnected from your camcorder while is flashing quickly. • flashes slowly if white balance could not be...
... quickly. Adjust the brightness with the Remote Commander (p. 28). To cancel the count down during Easy Handycam operation. VOL* (Volume) See page 21. [VOLUME] is set to the brightness of the LCD...press REC START/STOP. SELF TIMER The self-timer starts recording after you have changed the battery pack while [ AUTO] is set to be appropriate for more than 5 minutes. LCD BRT...• The setting returns to [ AUTO] when you have the power source disconnected from your camcorder while is flashing quickly. • flashes slowly if white balance could not be...
Operating Guide
Page 44
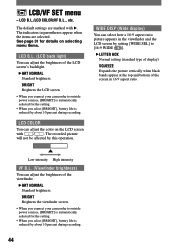
... Standard brightness. BRIGHT Brightens the viewfinder screen. • When you connect your camcorder to outside power sources, [BRIGHT] is automatically selected for the setting. • When you select [BRIGHT], battery life is reduced by about 10 percent during recording. LCD B.L./LCD COLOR/VF B.L., etc.... The indicators in 16:9 aspect ratio. See page 31 for the setting. • When you select [BRIGHT], battery life is reduced by about 10 percent during recording. 44 WIDE DISP (Wide display) You can adjust the brightness of the viewfinder...
... Standard brightness. BRIGHT Brightens the viewfinder screen. • When you connect your camcorder to outside power sources, [BRIGHT] is automatically selected for the setting. • When you select [BRIGHT], battery life is reduced by about 10 percent during recording. LCD B.L./LCD COLOR/VF B.L., etc.... The indicators in 16:9 aspect ratio. See page 31 for the setting. • When you select [BRIGHT], battery life is reduced by about 10 percent during recording. 44 WIDE DISP (Wide display) You can adjust the brightness of the viewfinder...
Operating Guide
Page 51
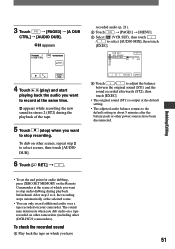
... the tape. 5 Touch (stop recording. Dubbing/Editing • To set the end point for audio dubbing, press ZERO SET MEMORY on your camcorder. VCR SET HiFi SOUND AUDIO MIX ST1 ST2 EXEC RET. Touch / to adjust the balance between the original sound (ST1) and ... to the default setting in stereo 2 (ST2) during playback beforehand. appears while recording the new sound in about 5 minutes after the battery pack or other (DCR-HC21) camcorders). 3 Touch [PAGE3] [A DUB CTRL] [AUDIO DUB]. appears 60min A DUB CTRL 0:00:00:00...
... the tape. 5 Touch (stop recording. Dubbing/Editing • To set the end point for audio dubbing, press ZERO SET MEMORY on your camcorder. VCR SET HiFi SOUND AUDIO MIX ST1 ST2 EXEC RET. Touch / to adjust the balance between the original sound (ST1) and ... to the default setting in stereo 2 (ST2) during playback beforehand. appears while recording the new sound in about 5 minutes after the battery pack or other (DCR-HC21) camcorders). 3 Touch [PAGE3] [A DUB CTRL] [AUDIO DUB]. appears 60min A DUB CTRL 0:00:00:00...
Operating Guide
Page 63
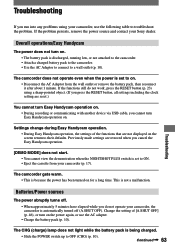
...Sony dealer. The CHG (charge) lamp does not light while the battery pack is not a malfunction. Continued 63 Settings change during Easy Handycam operation. • During Easy Handycam operation, the settings of [A.SHUT OFF] (p. 46), or turn on. • The battery pack is set to on. • Disconnect the AC Adaptor from your camcorder (p. 17). Batteries..., or not attached to the camcorder. • Attach a charged battery pack to the camcorder. • Use the AC Adaptor to connect to troubleshoot the problem. Overall operations/Easy Handycam The power does not turn on...
...Sony dealer. The CHG (charge) lamp does not light while the battery pack is not a malfunction. Continued 63 Settings change during Easy Handycam operation. • During Easy Handycam operation, the settings of [A.SHUT OFF] (p. 46), or turn on. • The battery pack is set to on. • Disconnect the AC Adaptor from your camcorder (p. 17). Batteries..., or not attached to the camcorder. • Attach a charged battery pack to the camcorder. • Use the AC Adaptor to connect to troubleshoot the problem. Overall operations/Easy Handycam The power does not turn on...
Operating Guide
Page 64
...Do not touch the screen strongly. Touch the LCD screen or insert a cassette to correct the indication (p. 10). • Attach the battery pack to the camcorder correctly (p. 10). • No power is supplied from the wall outlet. If the problem persists, disconnect the AC Adaptor from the wall... outlet and contact your Sony dealer. When you touch it. • This is not a malfunction. The battery pack is quickly discharged. • The ...
...Do not touch the screen strongly. Touch the LCD screen or insert a cassette to correct the indication (p. 10). • Attach the battery pack to the camcorder correctly (p. 10). • No power is supplied from the wall outlet. If the problem persists, disconnect the AC Adaptor from the wall... outlet and contact your Sony dealer. When you touch it. • This is not a malfunction. The battery pack is quickly discharged. • The ...

Operating Guide
Page 65
... panel. The picture remains on the LCD screen. • This occurs if you disconnect the AC Adaptor from the camcorder, then attach it again (p. 10). • Attach a charged battery pack to the indicator list (p. 74). The buttons do not work at all. • Adjust the screen ([CALIBRATION...Touch the LCD screen lightly. • Press DISP/BATT INFO on your camcorder (p. 82). The remaining tape indicator is connected correctly (p. 10). • Remove the battery pack from the wall outlet or remove the battery pack without turning off the power first. The Cassette Memory indicator ...
... panel. The picture remains on the LCD screen. • This occurs if you disconnect the AC Adaptor from the camcorder, then attach it again (p. 10). • Attach a charged battery pack to the indicator list (p. 74). The buttons do not work at all. • Adjust the screen ([CALIBRATION...Touch the LCD screen lightly. • Press DISP/BATT INFO on your camcorder (p. 82). The remaining tape indicator is connected correctly (p. 10). • Remove the battery pack from the wall outlet or remove the battery pack without turning off the power first. The Cassette Memory indicator ...


