
Operating Guide
Page 2
... This set may touch dangerous voltage points or short out parts that may be equipped with a polarized ac power cord plug (a plug having one described in the operating instructions and adhere to have a suitable outlet installed. Polarization This set should still fail to fit,...a safety feature. For those sets designed to operate from the type of any kind into the set . IMPORTANT SAFEGUARDS For your dealer or local power company. WARNING To reduce fire or shock hazard, do not expose the unit to the operating instructions. Attachments Do not use attachments not recommended by...
... This set may touch dangerous voltage points or short out parts that may be equipped with a polarized ac power cord plug (a plug having one described in the operating instructions and adhere to have a suitable outlet installed. Polarization This set should still fail to fit,...a safety feature. For those sets designed to operate from the type of any kind into the set . IMPORTANT SAFEGUARDS For your dealer or local power company. WARNING To reduce fire or shock hazard, do not expose the unit to the operating instructions. Attachments Do not use attachments not recommended by...
Operating Guide
Page 3
... operated sets near a swimming pool, etc. Power-Cord Protection Route the power cord so that it is provided. - The set may expose you to determine ... a child or an adult, and serious damage to the plugs, receptacles, and the point where the cord exits from the wall outlet before cleaning or polishing it. Replacement parts When replacement parts are specified in ...or against them, paying particular attention to the set does not operate normally when following conditions: - When the power cord or plug is not likely to be blocked or covered. - If the set . When the set yourself as...
... operated sets near a swimming pool, etc. Power-Cord Protection Route the power cord so that it is provided. - The set may expose you to determine ... a child or an adult, and serious damage to the plugs, receptacles, and the point where the cord exits from the wall outlet before cleaning or polishing it. Replacement parts When replacement parts are specified in ...or against them, paying particular attention to the set does not operate normally when following conditions: - When the power cord or plug is not likely to be blocked or covered. - If the set . When the set yourself as...
Operating Guide
Page 20
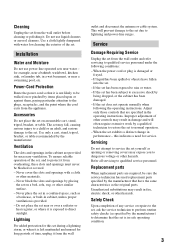
AC Adaptor (1) (p. 21) Rechargeable battery pack NP-FH40 (1) (p. 21) Power cord (mains lead) (1) (p. 21) CD-ROM "Handycam Application Software" (1) (p. 97) - Getting Started Step 1: Checking supplied items Make sure that item supplied. PMB Guide Operating Guide (This manual) (1) A/V connecting cable (1) (p. 48, 62) USB ... already installed. 20 Picture Motion Browser (Software) - The number in the parentheses indicates the number of that you have the following items supplied with your camcorder.
AC Adaptor (1) (p. 21) Rechargeable battery pack NP-FH40 (1) (p. 21) Power cord (mains lead) (1) (p. 21) CD-ROM "Handycam Application Software" (1) (p. 97) - Getting Started Step 1: Checking supplied items Make sure that item supplied. PMB Guide Operating Guide (This manual) (1) A/V connecting cable (1) (p. 48, 62) USB ... already installed. 20 Picture Motion Browser (Software) - The number in the parentheses indicates the number of that you have the following items supplied with your camcorder.
Operating Guide
Page 21
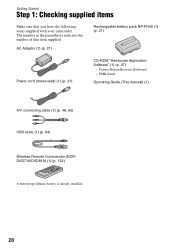
... Jack cover DC plug AC Adaptor To the wall outlet (wall socket) Power cord (mains lead) You can charge the "InfoLITHIUM" battery pack (H series) (p. 119) after attaching it to your camcorder. 4 Connect the power cord (mains lead) to the DC IN jack of your camcorder. The CHG (charge) lamp lights up and charging starts. 5 The CHG...
... Jack cover DC plug AC Adaptor To the wall outlet (wall socket) Power cord (mains lead) You can charge the "InfoLITHIUM" battery pack (H series) (p. 119) after attaching it to your camcorder. 4 Connect the power cord (mains lead) to the DC IN jack of your camcorder. The CHG (charge) lamp lights up and charging starts. 5 The CHG...

Operating Guide
Page 24
.... - Disconnect the AC Adaptor from the battery as long as between a wall and furniture. • Do not short-circuit the DC plug of your camcorder, even when the power cord (mains lead) is worn-out (for selecting the media. On the battery pack • Before changing the battery pack, turn the... closed 135 140 155 300 330 680 745 DCR-DVD710/DVD810 Battery pack NP-FH40 (supplied) NP-FH50 NP-FH70 NP-FH100 LCD panel opened* 115 LCD panel closed 135 135 155 290 330 650 745 * When the LCD backlight is recommended that you use your camcorder. This may cause a malfunction. ...
.... - Disconnect the AC Adaptor from the battery as long as between a wall and furniture. • Do not short-circuit the DC plug of your camcorder, even when the power cord (mains lead) is worn-out (for selecting the media. On the battery pack • Before changing the battery pack, turn the... closed 135 140 155 300 330 680 745 DCR-DVD710/DVD810 Battery pack NP-FH40 (supplied) NP-FH50 NP-FH70 NP-FH100 LCD panel opened* 115 LCD panel closed 135 135 155 290 330 650 745 * When the LCD backlight is recommended that you use your camcorder. This may cause a malfunction. ...
Operating Guide
Page 72
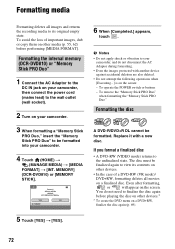
...VIDEO mode) returns to its contents on other devices.* * To create the DVD menu on the screen: - The disc must be formatted into your camcorder. 3 When formatting a "Memory Stick PRO Duo," insert the "Memory Stick PRO Duo" to be finalized again to finalize the disc again before ... (DCR-DVD810) or "Memory Stick PRO Duo" 1 Connect the AC Adaptor to the DC IN jack on your camcorder, then connect the power cord (mains lead) to the wall outlet (wall socket). 2 Turn on your camcorder. 4 Touch (HOME) t (MANAGE MEDIA) t [MEDIA FORMAT] t [INT. To remove the "Memory Stick PRO Duo"...
...VIDEO mode) returns to its contents on other devices.* * To create the DVD menu on the screen: - The disc must be formatted into your camcorder. 3 When formatting a "Memory Stick PRO Duo," insert the "Memory Stick PRO Duo" to be finalized again to finalize the disc again before ... (DCR-DVD810) or "Memory Stick PRO Duo" 1 Connect the AC Adaptor to the DC IN jack on your camcorder, then connect the power cord (mains lead) to the wall outlet (wall socket). 2 Turn on your camcorder. 4 Touch (HOME) t (MANAGE MEDIA) t [MEDIA FORMAT] t [INT. To remove the "Memory Stick PRO Duo"...
Operating Guide
Page 73
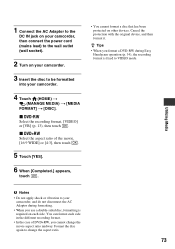
... you cannot change the aspect ratio. 73 Utilizing Media b Notes • Do not apply shock or vibration to your camcorder, and do not disconnect the AC Adaptor during Easy Handycam operation (p. 34), the recording format is required on each side in the different recording format. • In the case...DVD-RW Select the recording format, [VIDEO] or [VR] (p. 13), then touch . 1 Connect the AC Adaptor to the DC IN jack on your camcorder, then connect the power cord (mains lead) to the wall outlet (wall socket). 2 Turn on other devices. x DVD+RW Select the aspect ratio of DVD+RW, you use a...
... you cannot change the aspect ratio. 73 Utilizing Media b Notes • Do not apply shock or vibration to your camcorder, and do not disconnect the AC Adaptor during Easy Handycam operation (p. 34), the recording format is required on each side in the different recording format. • In the case...DVD-RW Select the recording format, [VIDEO] or [VR] (p. 13), then touch . 1 Connect the AC Adaptor to the DC IN jack on your camcorder, then connect the power cord (mains lead) to the wall outlet (wall socket). 2 Turn on other devices. x DVD+RW Select the aspect ratio of DVD+RW, you use a...
Operating Guide
Page 74
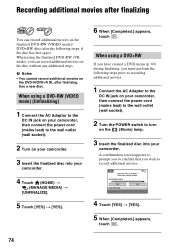
...following steps prior to recording additional movies. 1 Connect the AC Adaptor to the DC IN jack on your camcorder, then connect the power cord (mains lead) to the wall outlet (wall socket). 2 Turn the POWER switch to confirm that you must perform the following steps, if the disc has free space. Use a new... mode)/ DVD+RW discs after finalizing. When using a DVD-RW (VIDEO mode) (Unfinalizing) 1 Connect the AC Adaptor to the DC IN jack on your camcorder, then connect the power cord (mains lead) to record additional movies. 4 Touch [YES] t [YES]. 5 When [Completed.] appears, touch . 74
...following steps prior to recording additional movies. 1 Connect the AC Adaptor to the DC IN jack on your camcorder, then connect the power cord (mains lead) to the wall outlet (wall socket). 2 Turn the POWER switch to confirm that you must perform the following steps, if the disc has free space. Use a new... mode)/ DVD+RW discs after finalizing. When using a DVD-RW (VIDEO mode) (Unfinalizing) 1 Connect the AC Adaptor to the DC IN jack on your camcorder, then connect the power cord (mains lead) to record additional movies. 4 Touch [YES] t [YES]. 5 When [Completed.] appears, touch . 74
Operating Guide
Page 77
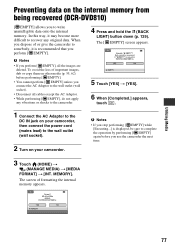
... somebody, it may become more difficult to recover any vibrations or shocks to the wall outlet (wall socket). 2 Turn on your camcorder, then connect the power cord (mains lead) to the camcorder. 4 Press and hold the . (BACK LIGHT) button down (p. 129). To avoid the loss of formatting the internal memory appears. b Notes • If... [ EMPTY], do not apply any original data. The screen of important images, dub or copy them on other media (p. 55, 62) before you use the camcorder the next time. 3 Touch (HOME) t (MANAGE MEDIA) t [MEDIA FORMAT] t [INT.
... somebody, it may become more difficult to recover any vibrations or shocks to the wall outlet (wall socket). 2 Turn on your camcorder, then connect the power cord (mains lead) to the camcorder. 4 Press and hold the . (BACK LIGHT) button down (p. 129). To avoid the loss of formatting the internal memory appears. b Notes • If... [ EMPTY], do not apply any original data. The screen of important images, dub or copy them on other media (p. 55, 62) before you use the camcorder the next time. 3 Touch (HOME) t (MANAGE MEDIA) t [MEDIA FORMAT] t [INT.
Operating Guide
Page 103
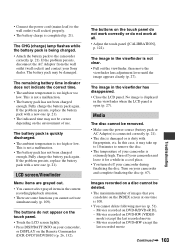
...the power cord (mains lead) to the camcorder correctly (p. 21). If the problem persists, replace the battery pack with fingerprints, etc. The image in the viewfinder when the LCD panel is open (p. 27). Media The disc cannot be deleted. • The maximum number of use. Turn on your Sony ...dealer. Movies recorded on DVD+RW except the last recorded movie Continued , 103 Troubleshooting The battery pack may be correct depending on a disc cannot be removed. • Make sure the power source (battery pack or AC Adaptor) is ...
...the power cord (mains lead) to the camcorder correctly (p. 21). If the problem persists, replace the battery pack with fingerprints, etc. The image in the viewfinder when the LCD panel is open (p. 27). Media The disc cannot be deleted. • The maximum number of use. Turn on your Sony ...dealer. Movies recorded on DVD+RW except the last recorded movie Continued , 103 Troubleshooting The battery pack may be correct depending on a disc cannot be removed. • Make sure the power source (battery pack or AC Adaptor) is ...

Operating Guide
Page 121
...mechanical vibration. The camcorder may malfunction or become deformed. - Near strong radio waves or radiation. Sometimes this malfunction cannot be able to your local authorized Sony service facility. - Be particularly careful of the lens. • Keep the POWER switch setting to...• Keep the Remote Commander and button-type battery out of children's reach. The camcorder may be repaired. - consult your camcorder. Noise may condense inside . • When disconnecting the power cord (mains lead), pull it by playing back or recording images for example, from a ...
...mechanical vibration. The camcorder may malfunction or become deformed. - Near strong radio waves or radiation. Sometimes this malfunction cannot be able to your local authorized Sony service facility. - Be particularly careful of the lens. • Keep the POWER switch setting to...• Keep the Remote Commander and button-type battery out of children's reach. The camcorder may be repaired. - consult your camcorder. Noise may condense inside . • When disconnecting the power cord (mains lead), pull it by playing back or recording images for example, from a ...
Operating Guide
Page 127
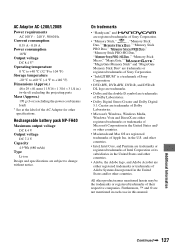
...Handycam" and are registered trademarks of Sony Corporation. • "Memory Stick," , "Memory Stick Duo," " ," "Memory Stick PRO Duo," " ," "Memory Stick PRO-HG Duo," " ," "Memory Stick Micro," "MagicGate," " ," "MagicGate Memory Stick" and "MagicGate Memory Stick Duo" are trademarks or registered trademarks of Sony Corporation. • "InfoLITHIUM" is a trademark of Sony... 1/4 in.) (w×h×d) excluding the projecting parts Mass (Approx.) 170 g (6 oz) excluding the power cord (mains lead) * See at the label of the AC Adaptor for other product names mentioned herein may ...
...Handycam" and are registered trademarks of Sony Corporation. • "Memory Stick," , "Memory Stick Duo," " ," "Memory Stick PRO Duo," " ," "Memory Stick PRO-HG Duo," " ," "Memory Stick Micro," "MagicGate," " ," "MagicGate Memory Stick" and "MagicGate Memory Stick Duo" are trademarks or registered trademarks of Sony Corporation. • "InfoLITHIUM" is a trademark of Sony... 1/4 in.) (w×h×d) excluding the projecting parts Mass (Approx.) 170 g (6 oz) excluding the power cord (mains lead) * See at the label of the AC Adaptor for other product names mentioned herein may ...

Operating Guide
Page 137
... effect 96, 109 Playback 35, 43 Playback zoom 46 Playing time 23 Playlist Creating 59 Divide 61 Erase 60 Move 61 Playback 60 PORTRAIT 94 Power cord (mains lead) ...... 21 Precautions 117 Preparation 21 Print 64 Protect 113 Q QUICK ON 41 QUICK ON STBY 89 R REC MODE (Recording mode 80 Recording 34...
... effect 96, 109 Playback 35, 43 Playback zoom 46 Playing time 23 Playlist Creating 59 Divide 61 Erase 60 Move 61 Playback 60 PORTRAIT 94 Power cord (mains lead) ...... 21 Precautions 117 Preparation 21 Print 64 Protect 113 Q QUICK ON 41 QUICK ON STBY 89 R REC MODE (Recording mode 80 Recording 34...


