Operating Guide
Page 1
...Video Camera Recorder Operating Guide DCR-DVD408/DVD508/ DVD808/DVD908 Enjoying with your camcorder 12 Getting Started 21 Recording/Playback 31 Editing 50 Utilizing recording media 59 Customizing your 64 camcorder Using a Computer 83 Troubleshooting 88 Additional 101 Information Quick 114 Reference Spanish... Quick Guide/ 125 Guia rapida en espanol © 2007 Sony Corporation http://www.sony.net/ Printed on this product and answers to...
...Video Camera Recorder Operating Guide DCR-DVD408/DVD508/ DVD808/DVD908 Enjoying with your camcorder 12 Getting Started 21 Recording/Playback 31 Editing 50 Utilizing recording media 59 Customizing your 64 camcorder Using a Computer 83 Troubleshooting 88 Additional 101 Information Quick 114 Reference Spanish... Quick Guide/ 125 Guia rapida en espanol © 2007 Sony Corporation http://www.sony.net/ Printed on this product and answers to...

Operating Guide
Page 5
...model and serial numbers are recyclable. ACNo. For customers in the U.S.A. Regulatory Information Declaration of Conformity Trade Name: SONY Model No.: DCR-DVD408 Responsible Party:Sony Electronics Inc. Telephone No.: 858-942-2230 This device complies with the specified type only. Address: 16530 Via ...product. For more information regarding this product, you call upon your camcorder Before operating the unit, please read this manual thoroughly, and retain it for the FCC related matters only. DCR-DVD Serial No. You can help preserve our environment by returning your...
...model and serial numbers are recyclable. ACNo. For customers in the U.S.A. Regulatory Information Declaration of Conformity Trade Name: SONY Model No.: DCR-DVD408 Responsible Party:Sony Electronics Inc. Telephone No.: 858-942-2230 This device complies with the specified type only. Address: 16530 Via ...product. For more information regarding this product, you call upon your camcorder Before operating the unit, please read this manual thoroughly, and retain it for the FCC related matters only. DCR-DVD Serial No. You can help preserve our environment by returning your...
Operating Guide
Page 6
...interference, and (2) this device must be able to remove the disc from that you use the following discs only. - 8cm DVD-RW - 8cm DVD+RW - 8cm DVD-R - 8cm DVD+R DL Use the discs with marks listed below. Notes on , the user is supplied with the limits for a 6 ...handling may cause undesired operation. For reliability durability of Conformity Trade Name: SONY Model No.: DCR-DVD508 Responsible Party:Sony Electronics Inc. Operation is no guarantee that may apply. "First Step Guide" for your camcorder You can radiate radio frequency energy and, if not installed and used...
...interference, and (2) this device must be able to remove the disc from that you use the following discs only. - 8cm DVD-RW - 8cm DVD+RW - 8cm DVD-R - 8cm DVD+R DL Use the discs with marks listed below. Notes on , the user is supplied with the limits for a 6 ...handling may cause undesired operation. For reliability durability of Conformity Trade Name: SONY Model No.: DCR-DVD508 Responsible Party:Sony Electronics Inc. Operation is no guarantee that may apply. "First Step Guide" for your camcorder You can radiate radio frequency energy and, if not installed and used...

Operating Guide
Page 7
...; A menu item that appear constantly on a "Memory Stick Duo" or a Memory Stick Duo Adaptor. Types of "Memory Stick" you can use in your camcorder.) • You cannot use any type of memory card except "Memory Stick Duo." • "Memory Stick PRO" and "Memory Stick PRO Duo" can be... See "About handling of the pixels are manufactured using a "Memory Stick Duo" with or (p. 104). However, there may result in a malfunction of your camcorder to another device with a USB cable, be used only with "Memory Stick PRO" compatible equipment. • Do not attach a label or the like on...
...; A menu item that appear constantly on a "Memory Stick Duo" or a Memory Stick Duo Adaptor. Types of "Memory Stick" you can use in your camcorder.) • You cannot use any type of memory card except "Memory Stick Duo." • "Memory Stick PRO" and "Memory Stick PRO Duo" can be... See "About handling of the pixels are manufactured using a "Memory Stick Duo" with or (p. 104). However, there may result in a malfunction of your camcorder to another device with a USB cable, be used only with "Memory Stick PRO" compatible equipment. • Do not attach a label or the like on...

Operating Guide
Page 8
.... To view your camcorder to suppress unwanted reflections and faithfully reproduce colors. Doing so might cause your recordings on a TV, you record them on a DVD-R/DVD+R DL. About language setting The on-screen displays in each local language are used in Germany, and Sony Corporation, and produces superior... images. About the Carl Zeiss lens Your camcorder is not possible due to indicate the type of...
.... To view your camcorder to suppress unwanted reflections and faithfully reproduce colors. Doing so might cause your recordings on a TV, you record them on a DVD-R/DVD+R DL. About language setting The on-screen displays in each local language are used in Germany, and Sony Corporation, and produces superior... images. About the Carl Zeiss lens Your camcorder is not possible due to indicate the type of...

Operating Guide
Page 9
... for recording 27 Step 5: Inserting a disc or a "Memory Stick Duo 28 Recording/Playback Recording and playing back with ease (Easy Handycam 31 Recording 34 Zooming 36 Recording sound with more presence (5.1ch surround recording 36 Using the flash 36 Recording high quality still images during...PB zoom 43 Playing back a series of Contents Read this before operating your camcorder 5 Subject examples and solutions 11 Enjoying with your camcorder What you can do with playback on other devices or DVD drives (Finalizing 46 Editing (OTHERS) category 50 Deleting images 50 Dividing the image...
... for recording 27 Step 5: Inserting a disc or a "Memory Stick Duo 28 Recording/Playback Recording and playing back with ease (Easy Handycam 31 Recording 34 Zooming 36 Recording sound with more presence (5.1ch surround recording 36 Using the flash 36 Recording high quality still images during...PB zoom 43 Playing back a series of Contents Read this before operating your camcorder 5 Subject examples and solutions 11 Enjoying with your camcorder What you can do with playback on other devices or DVD drives (Finalizing 46 Editing (OTHERS) category 50 Deleting images 50 Dividing the image...

Operating Guide
Page 10
Table of Contents (Continued) Customizing your camcorder What you can do with the (SETTINGS) category of the HOME MENU 64 Using the HOME MENU 64 List of the (SETTINGS) category items 65 ... Guide" and software 85 Viewing "First Step Guide 87 Using a Macintosh computer 87 Troubleshooting Troubleshooting 88 Warning indicators and messages 97 Additional Information Using your camcorder abroad 101 Maintenance and precautions 103 Specifications 110 Quick Reference Identifying parts and controls 114 Indicators displayed during recording/playback 118 Glossary 121 Index 122...
Table of Contents (Continued) Customizing your camcorder What you can do with the (SETTINGS) category of the HOME MENU 64 Using the HOME MENU 64 List of the (SETTINGS) category items 65 ... Guide" and software 85 Viewing "First Step Guide 87 Using a Macintosh computer 87 Troubleshooting Troubleshooting 88 Warning indicators and messages 97 Additional Information Using your camcorder abroad 101 Maintenance and precautions 103 Specifications 110 Quick Reference Identifying parts and controls 114 Indicators displayed during recording/playback 118 Glossary 121 Index 122...

Operating Guide
Page 12
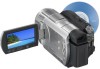
...shooting any time you desire. The precious moments you have to do with your camcorder What you can record high quality widescreen images on 8cm DVD*. Enjoying with your camcorder Your camcorder records image data on a wide LCD screen that valuable recordings are stored in empty...• Still images can start recording (p.31, 34) Recorded images are accidentally overwritten. All you can be directly recorded onto the disc. * DVD (Digital Versatile Disc) is more convenient than video tape and far more versatile. Realistic 5.1ch surround sound can find a scene quickly using a...
...shooting any time you desire. The precious moments you have to do with your camcorder What you can record high quality widescreen images on 8cm DVD*. Enjoying with your camcorder Your camcorder records image data on a wide LCD screen that valuable recordings are stored in empty...• Still images can start recording (p.31, 34) Recorded images are accidentally overwritten. All you can be directly recorded onto the disc. * DVD (Digital Versatile Disc) is more convenient than video tape and far more versatile. Realistic 5.1ch surround sound can find a scene quickly using a...
Operating Guide
Page 13
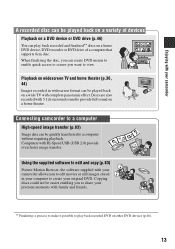
... to provide full sound on a home theater. When finalizing the disc, you can play back recorded DVD on other DVD devices (p.46). 13 Discs are also recorded with your camcorder A recorded disc can be quickly transferred to share your precious moments with Hi-Speed USB (USB ... you to a computer without requiring playback. Copying discs could not be played back on a home DVD device, DVD recorder or DVD drive of a computer that supports 8cm disc. Connecting camcorder to play back recorded and finalized** discs on a wide TV with complete panoramic effect. Computers with...
... to provide full sound on a home theater. When finalizing the disc, you can play back recorded DVD on other DVD devices (p.46). 13 Discs are also recorded with your camcorder A recorded disc can be quickly transferred to share your precious moments with Hi-Speed USB (USB ... you to a computer without requiring playback. Copying discs could not be played back on a home DVD device, DVD recorder or DVD drive of a computer that supports 8cm disc. Connecting camcorder to play back recorded and finalized** discs on a wide TV with complete panoramic effect. Computers with...

Operating Guide
Page 14
... Figures such as . A recording format that is compatible with 8cm DVD-RW, DVD+RW, DVD-R and DVD+R DL. Recording format for Mbps. • If you use a DVD-RW, you can be played back in the recording time of a disc. Your camcorder uses the VBR (Variable Bit Rate) format to automatically adjust image ...9M and 6M in the table show the average bit rate. Choosing a disc Your camcorder is compatible with most recent image can record on both sides of the disc (p.103). M stands for DVD-RW When you use a double-sided disc, you can be erased. In VIDEO mode...
... Figures such as . A recording format that is compatible with 8cm DVD-RW, DVD+RW, DVD-R and DVD+R DL. Recording format for Mbps. • If you use a DVD-RW, you can be played back in the recording time of a disc. Your camcorder uses the VBR (Variable Bit Rate) format to automatically adjust image ...9M and 6M in the table show the average bit rate. Choosing a disc Your camcorder is compatible with most recent image can record on both sides of the disc (p.103). M stands for DVD-RW When you use a double-sided disc, you can be erased. In VIDEO mode...

Operating Guide
Page 15
... 16:9 (wide) and 4:3 movie can be recorded on other devices (46) z *1z*1 *-*3 z z Creating the DVD menu when you finalize the disc z (49) - Finalizing required to its original empty state (p.61). z - - - Enjoying with your camcorder (50) - DVD-RW DVD+RW DVD-R DVD+R DL Symbols used in parentheses ( ) indicate page numbers. Using a disc repeatedly even if the disc...
... 16:9 (wide) and 4:3 movie can be recorded on other devices (46) z *1z*1 *-*3 z z Creating the DVD menu when you finalize the disc z (49) - Finalizing required to its original empty state (p.61). z - - - Enjoying with your camcorder (50) - DVD-RW DVD+RW DVD-R DVD+R DL Symbols used in parentheses ( ) indicate page numbers. Using a disc repeatedly even if the disc...

Operating Guide
Page 16
... your needs. z Tips • You can also connect it to delete or edit images on your camcorder? Yes No Do you can do with your camcorder depends on the type of disc (p.15). 3Viewing on your camcorder (See pages 32 and 41) You can select the disc from [DISC SELECT GUIDE] (p.60). 2Recording... a TV for viewing (p.44). Yes No For long recording * Select the recording format and format the disc on the next page 16 Continued on your camcorder (p.28). Using your camcorder 1Preparing (See page 21 to delete images and reuse the disc?
... your needs. z Tips • You can also connect it to delete or edit images on your camcorder? Yes No Do you can do with your camcorder depends on the type of disc (p.15). 3Viewing on your camcorder (See pages 32 and 41) You can select the disc from [DISC SELECT GUIDE] (p.60). 2Recording... a TV for viewing (p.44). Yes No For long recording * Select the recording format and format the disc on the next page 16 Continued on your camcorder (p.28). Using your camcorder 1Preparing (See page 21 to delete images and reuse the disc?

Operating Guide
Page 17
.... The features of the disc is required in most DVD devices after finalizing. But finalizing is , the more it first. Refer to the instruction manual supplied with your DVD device or consult your camcorder on other DVD devices, you to add recordings (p.62). Playback compatibility... Playback compatibility with any DVD device is free space left. The disc can be played back without unfinalizing...
.... The features of the disc is required in most DVD devices after finalizing. But finalizing is , the more it first. Refer to the instruction manual supplied with your DVD device or consult your camcorder on other DVD devices, you to add recordings (p.62). Playback compatibility... Playback compatibility with any DVD device is free space left. The disc can be played back without unfinalizing...

Operating Guide
Page 18
... DISC/MEMORY) category Items Page FINALIZE* 46 DISC SELECT GUIDE 60 FORMAT* 61 FORMAT* 62 UNFINALIZE 62 DISC INFO 59 (SETTINGS) category To customize your camcorder (HELP) Displays a description of the item (p. 19) Category B Categories and items of menus " HOME MENU" - For items available in the (SETTINGS) category, see page 64...
... DISC/MEMORY) category Items Page FINALIZE* 46 DISC SELECT GUIDE 60 FORMAT* 61 FORMAT* 62 UNFINALIZE 62 DISC INFO 59 (SETTINGS) category To customize your camcorder (HELP) Displays a description of the item (p. 19) Category B Categories and items of menus " HOME MENU" - For items available in the (SETTINGS) category, see page 64...

Operating Guide
Page 19
To hide the HOME MENU screen Touch . Example: (OTHERS) category 2 Touch (HELP). Enjoying with your camcorder. 4 Touch the item you want to use . When you want to know something about the function of the turns orange. (HELP) button Continued , 19 The bottom of each item on your camcorder Using the HOME MENU 1 Turn the POWER switch to turn on the HOME MENU - HELP 1 Press (HOME). The HOME MENU appears. (HOME) A 3 Touch the category you want to use . Example: [EDIT] 2 Press (HOME) A (or B). (HOME) B 5 Continue operation by following the guidance on the screen.
To hide the HOME MENU screen Touch . Example: (OTHERS) category 2 Touch (HELP). Enjoying with your camcorder. 4 Touch the item you want to use . When you want to know something about the function of the turns orange. (HELP) button Continued , 19 The bottom of each item on your camcorder Using the HOME MENU 1 Turn the POWER switch to turn on the HOME MENU - HELP 1 Press (HOME). The HOME MENU appears. (HOME) A 3 Touch the category you want to use . Example: [EDIT] 2 Press (HOME) A (or B). (HOME) B 5 Continue operation by following the guidance on the screen.
Operating Guide
Page 21
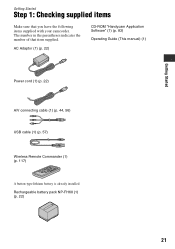
Getting Started Getting Started Step 1: Checking supplied items Make sure that item supplied. AC Adaptor (1) (p. 22) CD-ROM "Handycam Application Software" (1) (p. 83) Operating Guide (This manual) (1) Power cord (1) (p. 22) A/V connecting cable (1) (p. 44, 56) USB cable (1) (p. 57) Wireless Remote Commander (1) (p. 117) A button-type lithium battery is already installed. Rechargeable battery pack NP-FH60 (1) (p. 22) 21 The number in the parentheses indicates the number of that you have the following items supplied with your camcorder.
Getting Started Getting Started Step 1: Checking supplied items Make sure that item supplied. AC Adaptor (1) (p. 22) CD-ROM "Handycam Application Software" (1) (p. 83) Operating Guide (This manual) (1) Power cord (1) (p. 22) A/V connecting cable (1) (p. 44, 56) USB cable (1) (p. 57) Wireless Remote Commander (1) (p. 117) A button-type lithium battery is already installed. Rechargeable battery pack NP-FH60 (1) (p. 22) 21 The number in the parentheses indicates the number of that you have the following items supplied with your camcorder.

Operating Guide
Page 22
... CHG (charge) lamp turns off when the battery is fully charged. 5 Disconnect the AC Adaptor from the DC IN jack holding both the camcorder and the DC plug. 3 Connect the AC Adaptor to the DC IN jack of the AC Adaptor. The CHG (charge) lamp lights up the viewfinder... in the direction of the arrow until it clicks. b Notes • You can charge the "InfoLITHIUM" battery pack (H series) (p. 106) after attaching it to your camcorder. 22 Step 2: Charging the battery pack 2 POWER switch 1 Battery DC IN jack 3 DC plug AC Adaptor Jack cover 4 CHG (charge) lamp Power cord 4 To the...
... CHG (charge) lamp turns off when the battery is fully charged. 5 Disconnect the AC Adaptor from the DC IN jack holding both the camcorder and the DC plug. 3 Connect the AC Adaptor to the DC IN jack of the AC Adaptor. The CHG (charge) lamp lights up the viewfinder... in the direction of the arrow until it clicks. b Notes • You can charge the "InfoLITHIUM" battery pack (H series) (p. 106) after attaching it to your camcorder. 22 Step 2: Charging the battery pack 2 POWER switch 1 Battery DC IN jack 3 DC plug AC Adaptor Jack cover 4 CHG (charge) lamp Power cord 4 To the...

Operating Guide
Page 24
... 120 160 255 590 On the battery pack • Before changing the battery pack, Turn the POWER switch to the DC IN jack of your camcorder, even when the power cord is connected to OFF (CHG) and turn off the (Movie) lamp/ (Still) lamp (p. 25). • The CHG (charge) ... the conditions under the following conditions: Top: When the LCD backlight turns on . On the charging/recording/playback time • Times measured when using the camcorder at 25 °C (77 °F) (10 °C to 30 °C (50 °F to 86 °F) is damaged. - Step 2: Charging the battery pack (Continued) DCR...
... 120 160 255 590 On the battery pack • Before changing the battery pack, Turn the POWER switch to the DC IN jack of your camcorder, even when the power cord is connected to OFF (CHG) and turn off the (Movie) lamp/ (Still) lamp (p. 25). • The CHG (charge) ... the conditions under the following conditions: Top: When the LCD backlight turns on . On the charging/recording/playback time • Times measured when using the camcorder at 25 °C (77 °F) (10 °C to 30 °C (50 °F to 86 °F) is damaged. - Step 2: Charging the battery pack (Continued) DCR...

Operating Guide
Page 25
.... POWER switch Getting Started 1 While pressing the green button, turn on , and setting the date and time Set the date and time when using your camcorder is turned off, AC power (house current) is still supplied to it while connected to the wall outlet via the AC Adaptor. This may cause... a malfunction. • Even if your camcorder. • Do not use the AC Adaptor placed in the direction of the AC Adaptor or battery terminal with v/V, then touch [NEXT]. 3 Set [DST SET...
.... POWER switch Getting Started 1 While pressing the green button, turn on , and setting the date and time Set the date and time when using your camcorder is turned off, AC power (house current) is still supplied to it while connected to the wall outlet via the AC Adaptor. This may cause... a malfunction. • Even if your camcorder. • Do not use the AC Adaptor placed in the direction of the AC Adaptor or battery terminal with v/V, then touch [NEXT]. 3 Set [DST SET...

Operating Guide
Page 26
... change the on . To turn off automatically if you do not work correctly, adjust the LCD screen ([CALIBRATION], p. 108). You cannot operate your camcorder for approximately 5 minutes, to show messages in a specified language. Step 3: Turning the power on the touch panel do not use your... shoot after the power is turned on. Changing the language setting You can be displayed during this time. 26 b Notes • If you leave your camcorder to be cleared from the memory. For midnight, set the date and time again (p. 109). • It takes a few seconds for information concerning ...
... change the on . To turn off automatically if you do not work correctly, adjust the LCD screen ([CALIBRATION], p. 108). You cannot operate your camcorder for approximately 5 minutes, to show messages in a specified language. Step 3: Turning the power on the touch panel do not use your... shoot after the power is turned on. Changing the language setting You can be displayed during this time. 26 b Notes • If you leave your camcorder to be cleared from the memory. For midnight, set the date and time again (p. 109). • It takes a few seconds for information concerning ...


