
Operating Guide
Page 7
to apply mechanical shock or vibration to the camcorder. • When connecting your camcorder to another device with your camcorder.) Viewfinder LCD screen "Memory Stick" (You cannot use it in your camcorder" (p. 107). • To prevent discs from being lost, do not do the following parts... and lens • A menu item that appear constantly on the LCD screen and the Continued , 7 Battery • The camcorder is not available under the current recording or playback conditions. • The LCD screen and the viewfinder are manufactured using a "Memory Stick Duo" with "Memory ...
to apply mechanical shock or vibration to the camcorder. • When connecting your camcorder to another device with your camcorder.) Viewfinder LCD screen "Memory Stick" (You cannot use it in your camcorder" (p. 107). • To prevent discs from being lost, do not do the following parts... and lens • A menu item that appear constantly on the LCD screen and the Continued , 7 Battery • The camcorder is not available under the current recording or playback conditions. • The LCD screen and the viewfinder are manufactured using a "Memory Stick Duo" with "Memory ...

Operating Guide
Page 8
... Also, the lens for your camcorder if necessary (p. 26). About the...screen, the viewfinder, or the lens to a malfunction of disc you record them on a DVD-R/DVD+R DL. Use a DVD-RW/DVD...+RW for trial recording (p. 14). • Compensation for the contents of time may look different from a subject coming into the lens. About language setting The on-screen displays in this before using your camcorder.... Change the screen language before operating your camcorder to 8cm DVD discs. On ...camcorder (Continued) viewfinder. The number value indicates the amount ...
... Also, the lens for your camcorder if necessary (p. 26). About the...screen, the viewfinder, or the lens to a malfunction of disc you record them on a DVD-R/DVD+R DL. Use a DVD-RW/DVD...+RW for trial recording (p. 14). • Compensation for the contents of time may look different from a subject coming into the lens. About language setting The on-screen displays in this before using your camcorder.... Change the screen language before operating your camcorder to 8cm DVD discs. On ...camcorder (Continued) viewfinder. The number value indicates the amount ...

Operating Guide
Page 10
... still images) VIEW IMAGES SET 71 (Items to customize the display) SOUND/DISP SET 72 (Items to adjust beep and the screen) OUTPUT SETTINGS 74 (Items for when connecting other devices) CLOCK/ LANG 74 (Items to set clock and language) GENERAL SET 75..."First Step Guide 87 Using a Macintosh computer 87 Troubleshooting Troubleshooting 88 Warning indicators and messages 97 Additional Information Using your camcorder abroad 101 Maintenance and precautions 103 Specifications 110 Quick Reference Identifying parts and controls 114 Indicators displayed during recording/playback 118 ...
... still images) VIEW IMAGES SET 71 (Items to customize the display) SOUND/DISP SET 72 (Items to adjust beep and the screen) OUTPUT SETTINGS 74 (Items for when connecting other devices) CLOCK/ LANG 74 (Items to set clock and language) GENERAL SET 75..."First Step Guide 87 Using a Macintosh computer 87 Troubleshooting Troubleshooting 88 Warning indicators and messages 97 Additional Information Using your camcorder abroad 101 Maintenance and precautions 103 Specifications 110 Quick Reference Identifying parts and controls 114 Indicators displayed during recording/playback 118 ...

Operating Guide
Page 11
Subject examples and solutions Shooting Checking your golf swing B SMTH SLW REC 39 Capturing still images during movie recording B Dual Rec 37 Flowers in close-up Getting a good shot of a ski slope or beach B BACK LIGHT 38 B BEACH 80 B SNOW 80 A child on the stage under a spot light B SPOTLIGHT 80 Fireworks with all its splendor B PORTRAIT 80 B FOCUS 78 B TELE MACRO 78 Focusing on the dog on the left side of the screen B FOCUS 78 B SPOT FOCUS 78 B FIREWORKS 79 B FOCUS 78 A sleeping child under dim light B NightShot 38 B COLOR SLOW SHTR 81 11
Subject examples and solutions Shooting Checking your golf swing B SMTH SLW REC 39 Capturing still images during movie recording B Dual Rec 37 Flowers in close-up Getting a good shot of a ski slope or beach B BACK LIGHT 38 B BEACH 80 B SNOW 80 A child on the stage under a spot light B SPOTLIGHT 80 Fireworks with all its splendor B PORTRAIT 80 B FOCUS 78 B TELE MACRO 78 Focusing on the dog on the left side of the screen B FOCUS 78 B SPOT FOCUS 78 B FIREWORKS 79 B FOCUS 78 A sleeping child under dim light B NightShot 38 B COLOR SLOW SHTR 81 11

Operating Guide
Page 12
...capacity optical disc. 12 Realistic 5.1ch surround sound can be directly recorded onto the disc. * DVD (Digital Versatile Disc) is touch the scene you can record high quality widescreen images on a wide LCD screen that valuable recordings are stored in empty areas on disc last for a long time. b Notes... on 8cm DVD*. The disc does not wear out no risk that shows the same 16:9 angle of view as a wide TV. You can find a scene quickly using a VISUAL INDEX screen (p.32, 41) The VISUAL INDEX screen allows you have to do with your camcorder Your camcorder records image data...
...capacity optical disc. 12 Realistic 5.1ch surround sound can be directly recorded onto the disc. * DVD (Digital Versatile Disc) is touch the scene you can record high quality widescreen images on a wide LCD screen that valuable recordings are stored in empty areas on disc last for a long time. b Notes... on 8cm DVD*. The disc does not wear out no risk that shows the same 16:9 angle of view as a wide TV. You can find a scene quickly using a VISUAL INDEX screen (p.32, 41) The VISUAL INDEX screen allows you have to do with your camcorder Your camcorder records image data...

Operating Guide
Page 19
To hide the HOME MENU screen Touch . Example: (OTHERS) category 2 Touch (HELP). The bottom of each item on your camcorder Using the HOME MENU 1 Turn the POWER switch to turn on the HOME MENU - Enjoying with your camcorder. 4 Touch the item you want to use . HELP 1 Press (HOME). When you want to use . The HOME MENU appears. (HOME) A 3 Touch the category you want to know something about the function of the turns orange. (HELP) button Continued , 19 Example: [EDIT] 2 Press (HOME) A (or B). (HOME) B 5 Continue operation by following the guidance on the screen.
To hide the HOME MENU screen Touch . Example: (OTHERS) category 2 Touch (HELP). The bottom of each item on your camcorder Using the HOME MENU 1 Turn the POWER switch to turn on the HOME MENU - Enjoying with your camcorder. 4 Touch the item you want to use . HELP 1 Press (HOME). When you want to use . The HOME MENU appears. (HOME) A 3 Touch the category you want to know something about the function of the turns orange. (HELP) button Continued , 19 Example: [EDIT] 2 Press (HOME) A (or B). (HOME) B 5 Continue operation by following the guidance on the screen.

Operating Guide
Page 20
" HOME" and " OPTION" (Continued) 3 Touch the item you touch an item, its explanation appears on the screen during recording or playback displays the functions available at that moment. MOVIE Records a movie. YES NO When you want to make various settings. To deactivate the HELP Touch (HELP) again in step 2. To apply the option, touch [YES], otherwise, touch [NO]. See page 76 for further details. (OPTION) 20 Using the OPTION MENU Just a touch on the screen. Activate? You will find it easy to know the content.
" HOME" and " OPTION" (Continued) 3 Touch the item you touch an item, its explanation appears on the screen during recording or playback displays the functions available at that moment. MOVIE Records a movie. YES NO When you want to make various settings. To deactivate the HELP Touch (HELP) again in step 2. To apply the option, touch [YES], otherwise, touch [NO]. See page 76 for further details. (OPTION) 20 Using the OPTION MENU Just a touch on the screen. Activate? You will find it easy to know the content.

Operating Guide
Page 25
...switch Getting Started 1 While pressing the green button, turn on , and setting the date and time Set the date and time when using your camcorder. • Do not use the AC Adaptor placed in the direction of the AC Adaptor or battery terminal with v/V, then touch [NEXT]. ... lamp lights up. (Movie): To record movies (Still): To record still images The [CLOCK SET] screen appears. 2 Select the desired geographical area with any malfunction occurs while using this camcorder for the first time. wall outlet immediately if any metallic objects. This may cause a malfunction. •...
...switch Getting Started 1 While pressing the green button, turn on , and setting the date and time Set the date and time when using your camcorder. • Do not use the AC Adaptor placed in the direction of the AC Adaptor or battery terminal with v/V, then touch [NEXT]. ... lamp lights up. (Movie): To record movies (Still): To record still images The [CLOCK SET] screen appears. 2 Select the desired geographical area with any malfunction occurs while using this camcorder for the first time. wall outlet immediately if any metallic objects. This may cause a malfunction. •...

Operating Guide
Page 26
... LANG] t [CLOCK SET], and set it to 12:00 AM. You cannot operate your camcorder for information concerning "World time difference." • If the buttons on the touch panel do not work correctly, adjust the LCD screen ([CALIBRATION], p. 108). For midday, set the date and time. It closes when the playback...on the disc, and can be cleared from the memory. b Notes • If you leave your camcorder to be ready to shoot after the power is turned on. You can change the on-screen displays to show messages in a specified language. Step 3: Turning the power on, and setting the ...
... LANG] t [CLOCK SET], and set it to 12:00 AM. You cannot operate your camcorder for information concerning "World time difference." • If the buttons on the touch panel do not work correctly, adjust the LCD screen ([CALIBRATION], p. 108). For midday, set the date and time. It closes when the playback...on the disc, and can be cleared from the memory. b Notes • If you leave your camcorder to be ready to shoot after the power is turned on. You can change the on-screen displays to show messages in a specified language. Step 3: Turning the power on, and setting the ...

Operating Guide
Page 27
... lever Move it to the best angle to record or play (2). 190 degrees to the 290 degrees camcorder (max.) • The information is poor. z Tips • You can close the LCD panel with the LCD screen facing out. b Notes • Do not press the buttons on the LCD backlight, press and ...(SETTINGS) t [SOUND/DISP SET] t [LCD BRIGHT] (p. 72) to save battery power. Step 4: Preparing for recording LCD panel Open the LCD panel 90 degrees to the camcorder (1), then rotate it until the image becomes clear. To turn off the LCD backlight to make the battery last longer Press and hold DISP/ BATT...
... lever Move it to the best angle to record or play (2). 190 degrees to the 290 degrees camcorder (max.) • The information is poor. z Tips • You can close the LCD panel with the LCD screen facing out. b Notes • Do not press the buttons on the LCD backlight, press and ...(SETTINGS) t [SOUND/DISP SET] t [LCD BRIGHT] (p. 72) to save battery power. Step 4: Preparing for recording LCD panel Open the LCD panel 90 degrees to the camcorder (1), then rotate it until the image becomes clear. To turn off the LCD backlight to make the battery last longer Press and hold DISP/ BATT...

Operating Guide
Page 28
... camcorder to step 5. x DVD-RW/DVD+RW A window appears to ask whether you on the screen. x DVD-RW Select the recording format, [VIDEO] or [VR] (p. 14), then touch . x DVD-R/DVD+R DL You can start recording immediately after step 5. b Notes • Remove dust or fingerprints from the LCD screen.... Disc cover OPEN switch Pickup lens Set the disc with the recording side facing your camcorder is required for you will use it ...
... camcorder to step 5. x DVD-RW/DVD+RW A window appears to ask whether you on the screen. x DVD-RW Select the recording format, [VIDEO] or [VR] (p. 14), then touch . x DVD-R/DVD+R DL You can start recording immediately after step 5. b Notes • Remove dust or fingerprints from the LCD screen.... Disc cover OPEN switch Pickup lens Set the disc with the recording side facing your camcorder is required for you will use it ...
Operating Guide
Page 29
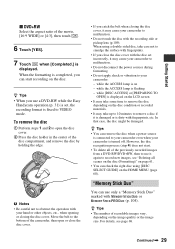
... when your hand or other objects, etc., when opening or closing the disc cover, it is damaged or is displayed on the LCD screen • It may take some time to remove the disc depending on the image quality or the image size. while the ACCESS lamp is displayed. ... your camcorder is flashing - To remove the disc 1 Perform steps 1 and 2 to malfunction. • Do not touch the disc with fingerprints, etc. z Tips • When you close the disc cover. • If you catch the belt when closing the disc cover. z Tips • You can use a DVD-RW while the Easy Handycam operation...
... when your hand or other objects, etc., when opening or closing the disc cover, it is damaged or is displayed on the LCD screen • It may take some time to remove the disc depending on the image quality or the image size. while the ACCESS lamp is displayed. ... your camcorder is flashing - To remove the disc 1 Perform steps 1 and 2 to malfunction. • Do not touch the disc with fingerprints, etc. z Tips • When you close the disc cover. • If you catch the belt when closing the disc cover. z Tips • You can use a DVD-RW while the Easy Handycam operation...
Operating Guide
Page 31
... still image. * Movies are recorded in the [SP] recording mode. ** Still images are recorded with ease (Easy Handycam) Easy Handycam operation makes nearly all settings automatic so that you can perform recording or playing back operation without detailed settings. Recording/Playback ...appears on . 2 Press EASY B. 2 Press EASY B. Recording/Playback Recording and playing back with the [FINE] quality on the LCD screen. 3 Press...
... still image. * Movies are recorded in the [SP] recording mode. ** Still images are recorded with ease (Easy Handycam) Easy Handycam operation makes nearly all settings automatic so that you can perform recording or playing back operation without detailed settings. Recording/Playback ...appears on . 2 Press EASY B. 2 Press EASY B. Recording/Playback Recording and playing back with the [FINE] quality on the LCD screen. 3 Press...

Operating Guide
Page 32
...(to view. The VISUAL INDEX screen appears on the LCD screen. (It may take some time to display the VISUAL INDEX screen.) Returns to the recording screen Previous 6 images Next 6 images Returns to the recording screen Displays the movies Disc type Appears with ease (Easy Handycam) (Continued) Viewing recorded movies... Stop (go to the VISUAL INDEX screen) Toggles Play or Pause as you want to the VISUAL INDEX screen) Beginning of the tab that was lastly played back/recorded (B for the still image). Recording and playing back with the image on your camcorder. 2 Press (VIEW IMAGES) F ...
...(to view. The VISUAL INDEX screen appears on the LCD screen. (It may take some time to display the VISUAL INDEX screen.) Returns to the recording screen Previous 6 images Next 6 images Returns to the recording screen Displays the movies Disc type Appears with ease (Easy Handycam) (Continued) Viewing recorded movies... Stop (go to the VISUAL INDEX screen) Toggles Play or Pause as you want to the VISUAL INDEX screen) Beginning of the tab that was lastly played back/recorded (B for the still image). Recording and playing back with the image on your camcorder. 2 Press (VIEW IMAGES) F ...

Operating Guide
Page 33
.... • Most of some buttons/functions during Easy Handycam operation since they are attempted. Slide show button (page 43) Previous/Next Recording/Playback z Tips • The screen returns to the VISUAL INDEX screen when the movies from the screen. b Notes • For DVD-R, DVD+R DL, you cannot reuse the disc or record additional movies onto the...
.... • Most of some buttons/functions during Easy Handycam operation since they are attempted. Slide show button (page 43) Previous/Next Recording/Playback z Tips • The screen returns to the VISUAL INDEX screen when the movies from the screen. b Notes • For DVD-R, DVD+R DL, you cannot reuse the disc or record additional movies onto the...

Operating Guide
Page 36
...the LCD frame. • The minimum possible distance between camcorder and subject while maintaining sharp focus is converted to 10 times the original size with the power zoom lever or the zoom buttons below the LCD screen. Dolby Digital 5.1 Creator, 5.1ch surround sound Glossary (p....feet) for a slower zoom. z Tips • Using [DIGITAL ZOOM] (p. 66) let you move your finger on the screen during 5.1ch recording/playback. Your camcorder has Dolby Digital 5.1 Creator installed for a faster zoom. Recording (Continued) Zooming You can magnify images with the power zoom lever ...
...the LCD frame. • The minimum possible distance between camcorder and subject while maintaining sharp focus is converted to 10 times the original size with the power zoom lever or the zoom buttons below the LCD screen. Dolby Digital 5.1 Creator, 5.1ch surround sound Glossary (p....feet) for a slower zoom. z Tips • Using [DIGITAL ZOOM] (p. 66) let you move your finger on the screen during 5.1ch recording/playback. Your camcorder has Dolby Digital 5.1 Creator installed for a faster zoom. Recording (Continued) Zooming You can magnify images with the power zoom lever ...
Operating Guide
Page 38
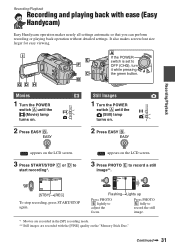
... objects, and remove the conversion lens (optional). • Adjust the focus manually ([FOCUS], p. 78) when it 180 degrees to select the desired screen aspect ratio. Recording (Continued) Recording in dark places (NightShot) Infrared port Recording in bright places. z Tips • To record an image brighter,... SHTR] function (p. 81). To cancel the back light function, press BACK LIGHT again. 38 Open the LCD panel 90 degrees to the camcorder (1), then rotate it is hard to focus automatically. • Do not use the NightShot and Super NightShot functions in mirror mode Set the...
... objects, and remove the conversion lens (optional). • Adjust the focus manually ([FOCUS], p. 78) when it 180 degrees to select the desired screen aspect ratio. Recording (Continued) Recording in dark places (NightShot) Infrared port Recording in bright places. z Tips • To record an image brighter,... SHTR] function (p. 81). To cancel the back light function, press BACK LIGHT again. 38 Open the LCD panel 90 degrees to the camcorder (1), then rotate it is hard to focus automatically. • Do not use the NightShot and Super NightShot functions in mirror mode Set the...

Operating Guide
Page 39
... (wide) pictures with [TV TYPE] set to [4:3], pictures may appear rough depending on the camcorder. 5 Press START/STOP. Recording the fast action in slow-motion (SMTH SLW REC) Fast ...superimpose sounds such as conversation on the slow motion pictures. (The default setting is [OFF].) Your camcorder records sounds for about 12 seconds while [Recording...] is pressed. z Tips • See page 69...or tennis swing. (HOME) B (HOME) A 1 Turn the POWER switch to select the desired screen aspect ratio. Recording/Playback To select the aspect ratio of recordable still images. b Notes • ...
... (wide) pictures with [TV TYPE] set to [4:3], pictures may appear rough depending on the camcorder. 5 Press START/STOP. Recording the fast action in slow-motion (SMTH SLW REC) Fast ...superimpose sounds such as conversation on the slow motion pictures. (The default setting is [OFF].) Your camcorder records sounds for about 12 seconds while [Recording...] is pressed. z Tips • See page 69...or tennis swing. (HOME) B (HOME) A 1 Turn the POWER switch to select the desired screen aspect ratio. Recording/Playback To select the aspect ratio of recordable still images. b Notes • ...

Operating Guide
Page 41
... the POWER switch A to display 6 or 12 images on your camcorder. The VISUAL INDEX screen appears on the LCD screen. (It may take some time to display the VISUAL INDEX screen.) Returns to the recording screen Previous 6 images Next 6 images Returns to the recording screen Disc type Appears with the image on each of the tab...
... the POWER switch A to display 6 or 12 images on your camcorder. The VISUAL INDEX screen appears on the LCD screen. (It may take some time to display the VISUAL INDEX screen.) Returns to the recording screen Previous 6 images Next 6 images Returns to the recording screen Disc type Appears with the image on each of the tab...

Operating Guide
Page 42
... playback from the selected movie until the last movie is completed. Return (to the VISUAL INDEX screen) Beginning of the scene/ previous scene Stop (go to the VISUAL INDEX screen) Toggles Play or Pause as you touch Next scene (OPTION) Reverse/ Forward Still Images Touch... the movie volume Touch (OPTION) t tab t [VOLUME], then adjust it approximately 10 times* faster. * Approximately 8 times faster using a DVD+RW 42 Return (to the VISUAL INDEX screen) Slide show button (page 43) Go to the VISUAL INDEX screen To switch to be played back. z Tips • Touch / movie slowly.
... playback from the selected movie until the last movie is completed. Return (to the VISUAL INDEX screen) Beginning of the scene/ previous scene Stop (go to the VISUAL INDEX screen) Toggles Play or Pause as you touch Next scene (OPTION) Reverse/ Forward Still Images Touch... the movie volume Touch (OPTION) t tab t [VOLUME], then adjust it approximately 10 times* faster. * Approximately 8 times faster using a DVD+RW 42 Return (to the VISUAL INDEX screen) Slide show button (page 43) Go to the VISUAL INDEX screen To switch to be played back. z Tips • Touch / movie slowly.


