Operating Instructions
Page 3
... 65 Using your own titles 103 Labeling a cassette 105 Erasing the cassette memory data 107 Customizing Your Camcorder Playback - Date search 68 Quick Reference Searching for picture quality - Cut recording .. 62 Additional Information ...light function 24 Self-timer recording 25 Checking the recording - Table of recorded tape by frame recording - Picture effect 40 - Memory Photo recording 121 - Custom preset 54 Preventing accidental erasure Using the PROGRAM AE function 56 - Insert editing 93 Audio dubbing 95 Superimposing a title 99 Making your camcorder...
... 65 Using your own titles 103 Labeling a cassette 105 Erasing the cassette memory data 107 Customizing Your Camcorder Playback - Date search 68 Quick Reference Searching for picture quality - Cut recording .. 62 Additional Information ...light function 24 Self-timer recording 25 Checking the recording - Table of recorded tape by frame recording - Picture effect 40 - Memory Photo recording 121 - Custom preset 54 Preventing accidental erasure Using the PROGRAM AE function 56 - Insert editing 93 Audio dubbing 95 Superimposing a title 99 Making your camcorder...

Operating Instructions
Page 7
... sunlight [b]. •Be careful when placing the camera near a window or outdoors. Precautions on the LCD screen and the finder. Take pictures of the camcorder, video tape, etc. 7 Sometimes this manual Note on a TV, you need an NTSC system-based TV. Copyright precautions Television programs, films, video tapes..., and other materials may be some tiny black points and/or bright points (white, red, blue or green in low light conditions such as in a car parked in any way. •Do not directly shoot the sun. These points are manufactured using extremely high-...
... sunlight [b]. •Be careful when placing the camera near a window or outdoors. Precautions on the LCD screen and the finder. Take pictures of the camcorder, video tape, etc. 7 Sometimes this manual Note on a TV, you need an NTSC system-based TV. Copyright precautions Television programs, films, video tapes..., and other materials may be some tiny black points and/or bright points (white, red, blue or green in low light conditions such as in a car parked in any way. •Do not directly shoot the sun. These points are manufactured using extremely high-...
Operating Instructions
Page 16
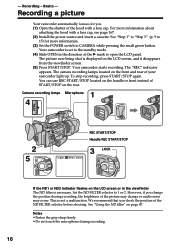
... not a malfunction. The "REC" indicator appears. You can use REC START/STOP located on the handle or front instead of your camcorder light up. We recommend that you change or audio noise may change the position during recording. 16 See "Using the ND filter" on the... firmly. •Do not touch the microphone during recording, the brightness of the B mark to open the LCD panel. Recording a picture Your camcorder automatically focuses for more information about attaching the hood with a lens cap. Set the ND FILTER selector to CAMERA while pressing the small green button...
... not a malfunction. The "REC" indicator appears. You can use REC START/STOP located on the handle or front instead of your camcorder light up. We recommend that you change or audio noise may change the position during recording. 16 See "Using the ND filter" on the... firmly. •Do not touch the microphone during recording, the brightness of the B mark to open the LCD panel. Recording a picture Your camcorder automatically focuses for more information about attaching the hood with a lens cap. Set the ND FILTER selector to CAMERA while pressing the small green button...

Operating Instructions
Page 23
... You can check the recording date/time during shooting, however, it is not displayed during playback by pressing DATA CODE. Press BACK LIGHT in VCR mode. indicator appears on the tape. You cannot rewrite only the time code. Note on recording date/time Recording date/time... The backlight function will be displayed accurately depending on the LCD screen or in the viewfinder. Your camcorder uses the drop frame mode. Recording - The . FADER BACK LIGHT SPOT LIGHT BACK LIGHT If you manually adjust the exposure You cannot use the backlight function. To cancel, press BACK...
... You can check the recording date/time during shooting, however, it is not displayed during playback by pressing DATA CODE. Press BACK LIGHT in VCR mode. indicator appears on the tape. You cannot rewrite only the time code. Note on recording date/time Recording date/time... The backlight function will be displayed accurately depending on the LCD screen or in the viewfinder. Your camcorder uses the drop frame mode. Recording - The . FADER BACK LIGHT SPOT LIGHT BACK LIGHT If you manually adjust the exposure You cannot use the backlight function. To cancel, press BACK...

Operating Instructions
Page 24
...or memory mode. You cannot use the spot light function. Press SPOT LIGHT in the viewfinder. To cancel, press SPOT LIGHT again. Old movie - FADER BACK LIGHT SPOT LIGHT SPOT LIGHT If you manually adjust the exposure You cannot use the spot light mode while in the theater. Shutter speed ...value of the PROGRAM AE function 24 Recording a picture Using the spot light function This function prevents...
...or memory mode. You cannot use the spot light function. Press SPOT LIGHT in the viewfinder. To cancel, press SPOT LIGHT again. Old movie - FADER BACK LIGHT SPOT LIGHT SPOT LIGHT If you manually adjust the exposure You cannot use the spot light mode while in the theater. Shutter speed ...value of the PROGRAM AE function 24 Recording a picture Using the spot light function This function prevents...
Operating Instructions
Page 27
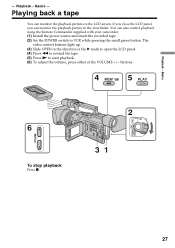
... can also control playback using the Remote Commander supplied with your camcorder. (1) Install the power source and insert the recorded tape. (2) Set the POWER switch to start playback. (6) To adjust the volume, press either of the VOLUME +/- The video control buttons light up. (3) Slide OPEN in the viewfinder. buttons . 4 REW 5 PLAY VOLUME...
... can also control playback using the Remote Commander supplied with your camcorder. (1) Install the power source and insert the recorded tape. (2) Set the POWER switch to start playback. (6) To adjust the volume, press either of the VOLUME +/- The video control buttons light up. (3) Slide OPEN in the viewfinder. buttons . 4 REW 5 PLAY VOLUME...

Operating Instructions
Page 32
...is set or in Tape Photo recording When playing back the image by pressing PHOTO lightly. The recorded image may be blurred. When shooting a moving object in use . •Do not shake the camcorder during those seven seconds is also recorded. Recording does not start yet. The ...freezes. To change the mode or setting. •The PHOTO button does not work: - See page 34 for about seven seconds and your camcorder can record about 510 images in the viewfinder by another unit, the image may be blurred. Press PHOTO deeper. Advanced Recording Operations - The ...
...is set or in Tape Photo recording When playing back the image by pressing PHOTO lightly. The recorded image may be blurred. When shooting a moving object in use . •Do not shake the camcorder during those seven seconds is also recorded. Recording does not start yet. The ...freezes. To change the mode or setting. •The PHOTO button does not work: - See page 34 for about seven seconds and your camcorder can record about 510 images in the viewfinder by another unit, the image may be blurred. Press PHOTO deeper. Advanced Recording Operations - The ...

Operating Instructions
Page 34
...(Flicker phenomenon). Note on tapes in normal mode, and thus are more suitable for analyzing high-speed action such as sports scenes. (Since this camcorder takes in an image every 1/15 of a second in progressive recording mode, moving object to stop this way are more stable than in standby mode...the SEL/PUSH EXEC dial to select , then press the dial. (3) Turn the SEL/PUSH EXEC dial to record in which the screen lights up . 1 MENU 5 MENU PROG. This camcorder is not a malfunction. Digital zooming - SCAN MANUAL SET AUTO SHTR PROG. If you record in an image every 1/15 of focus....
...(Flicker phenomenon). Note on tapes in normal mode, and thus are more suitable for analyzing high-speed action such as sports scenes. (Since this camcorder takes in an image every 1/15 of a second in progressive recording mode, moving object to stop this way are more stable than in standby mode...the SEL/PUSH EXEC dial to select , then press the dial. (3) Turn the SEL/PUSH EXEC dial to record in which the screen lights up . 1 MENU 5 MENU PROG. This camcorder is not a malfunction. Digital zooming - SCAN MANUAL SET AUTO SHTR PROG. If you record in an image every 1/15 of focus....

Operating Instructions
Page 40
Picture effect You can digitally process images to obtain special effects like an illustration. SOLARIZE [b] : The light intensity is emphatic, and the picture looks like those in the menu settings You cannot select SLIM and STRETCH. 40 The picture effect indicator changes ...
Picture effect You can digitally process images to obtain special effects like an illustration. SOLARIZE [b] : The light intensity is emphatic, and the picture looks like those in the menu settings You cannot select SLIM and STRETCH. 40 The picture effect indicator changes ...

Operating Instructions
Page 42
... is to be adjusted STILL FLASH LUMI. and TRAIL. 1 DIGITAL EFFECT 3 LUMI. 4 2 LUMI. The digital effect indicator changes as follows: STILL y FLASH y LUMI. The indicator lights up and the bar appears.
... is to be adjusted STILL FLASH LUMI. and TRAIL. 1 DIGITAL EFFECT 3 LUMI. 4 2 LUMI. The digital effect indicator changes as follows: STILL y FLASH y LUMI. The indicator lights up and the bar appears.

Operating Instructions
Page 43
Digital effect Notes •The following functions do not work in digital effect mode: - Wide mode - Picture effect - Spot light mode - Tape Photo recording - Advanced Recording Operations Using special effects - Low lux mode of PROGRAM AE - Shutter speed adjustment When you turn the power off The digital effect function will be automatically canceled. 43 Shutter speed (1/30 or smaller) adjustment •The following functions do not work in old movie mode: - PROGRAM AE - Fader -
Digital effect Notes •The following functions do not work in digital effect mode: - Wide mode - Picture effect - Spot light mode - Tape Photo recording - Advanced Recording Operations Using special effects - Low lux mode of PROGRAM AE - Shutter speed adjustment When you turn the power off The digital effect function will be automatically canceled. 43 Shutter speed (1/30 or smaller) adjustment •The following functions do not work in old movie mode: - PROGRAM AE - Fader -
Operating Instructions
Page 44
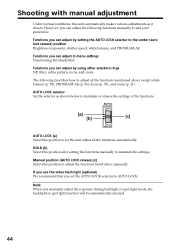
... or release the settings of the functions. AUTO LOCK selector Set the selector as it shoots. If you use the video flash light (optional) We recommend that you can adjust the following describes how to adjust all the functions automatically. However, you set the...Note When you can adjust in menu settings Deactivating the SteadyShot Functions you manually adjust the exposure during backlight or spot light mode, the backlight or spot light function will be automatically canceled. 44 HOLD [b] Select this position to maintain the settings. Manual position (AUTO LOCK release...
... or release the settings of the functions. AUTO LOCK selector Set the selector as it shoots. If you use the video flash light (optional) We recommend that you can adjust the following describes how to adjust all the functions automatically. However, you set the...Note When you can adjust in menu settings Deactivating the SteadyShot Functions you manually adjust the exposure during backlight or spot light mode, the backlight or spot light function will be automatically canceled. 44 HOLD [b] Select this position to maintain the settings. Manual position (AUTO LOCK release...

Operating Instructions
Page 45
...Shooting with manual adjustment Adjusting exposure Adjust the exposure manually under the following cases. •The background is too bright (back lighting) •Insufficient light: most of the picture is dark •Bright subject and dark background •To record the darkness faithfully (1) Set the...The exposure indicator appears on the LCD screen or in the viewfinder. (3) Turn the EXPOSURE dial to the center (auto lock release) position while the camcorder is in standby, recording, or memory mode. (2) Press EXPOSURE. To brighten the picture, adjust the level to the + side. 2 •...
...Shooting with manual adjustment Adjusting exposure Adjust the exposure manually under the following cases. •The background is too bright (back lighting) •Insufficient light: most of the picture is dark •Bright subject and dark background •To record the darkness faithfully (1) Set the...The exposure indicator appears on the LCD screen or in the viewfinder. (3) Turn the EXPOSURE dial to the center (auto lock release) position while the camcorder is in standby, recording, or memory mode. (2) Press EXPOSURE. To brighten the picture, adjust the level to the + side. 2 •...

Operating Instructions
Page 46
... When shooting under fluorescent light or light bulbs, a rare phenomenon may be lost. Shooting with manual adjustment Adjusting the shutter speed (1) Set the AUTO LOCK selector to the center (auto lock release) position while the camcorder is lit, press PROGRAM AE repeatedly until the indicator disappears from the LCD or viewfinder screen. (3) Press...
... When shooting under fluorescent light or light bulbs, a rare phenomenon may be lost. Shooting with manual adjustment Adjusting the shutter speed (1) Set the AUTO LOCK selector to the center (auto lock release) position while the camcorder is lit, press PROGRAM AE repeatedly until the indicator disappears from the LCD or viewfinder screen. (3) Press...

Operating Instructions
Page 47
... off the small aperture may occur. Using the ND filter will reduce influence of such phenomenon, and you can record a picture clearly by adjusting light amounts, even if you can attain a better shooting condition. When ND OFF flashes on the LCD screen or in the viewfinder. We recommend that... quite common with manual adjustment Using the ND filter Using the ND filter (the ND filter 1 setting corresponds to 1/4 of the quantity of light and the ND filter 2 setting corresponds to another positions during recording, the picture may be blurred or audio noise may cause slight off set ...
... off the small aperture may occur. Using the ND filter will reduce influence of such phenomenon, and you can record a picture clearly by adjusting light amounts, even if you can attain a better shooting condition. When ND OFF flashes on the LCD screen or in the viewfinder. We recommend that... quite common with manual adjustment Using the ND filter Using the ND filter (the ND filter 1 setting corresponds to 1/4 of the quantity of light and the ND filter 2 setting corresponds to another positions during recording, the picture may be blurred or audio noise may cause slight off set ...

Operating Instructions
Page 50
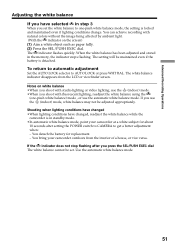
...Shooting conditions • Adjusting the white balance according to the light source. This operation is in the viewfinder. (3) Turn the SEL/PUSH EXEC dial to the center (auto lock release) position while the camcorder is not available during recording. You can obtain better results... by adjusting the white balance manually when lighting conditions change quickly or when recording outdoors: e.g., neon signs, fireworks. (1) Set...
...Shooting conditions • Adjusting the white balance according to the light source. This operation is in the viewfinder. (3) Turn the SEL/PUSH EXEC dial to the center (auto lock release) position while the camcorder is not available during recording. You can obtain better results... by adjusting the white balance manually when lighting conditions change quickly or when recording outdoors: e.g., neon signs, fireworks. (1) Set...
Operating Instructions
Page 51
... AUTO LOCK selector to get a better adjustment when: - Shooting when lighting conditions have changed •When lighting conditions have selected in standby mode. •In automatic white balance mode, point your camcorder outdoors from the LCD or viewfinder screen. The indicator flashes quickly. Notes... on white balance •When you shoot with studio lighting or video lighting, use the automatic white balance mode. Use the automatic...
... AUTO LOCK selector to get a better adjustment when: - Shooting when lighting conditions have changed •When lighting conditions have selected in standby mode. •In automatic white balance mode, point your camcorder outdoors from the LCD or viewfinder screen. The indicator flashes quickly. Notes... on white balance •When you shoot with studio lighting or video lighting, use the automatic white balance mode. Use the automatic...

Operating Instructions
Page 56
... or neon signs : Low lux mode For recording a subject in accordance with the aperture value to the following description. The exposure value changes in insufficient light. Subject becomes bright. 56 Using the PROGRAM AE function You can select from five PROGRAM AE (Auto Exposure) modes to suit your shooting situation, referring...
... or neon signs : Low lux mode For recording a subject in accordance with the aperture value to the following description. The exposure value changes in insufficient light. Subject becomes bright. 56 Using the PROGRAM AE function You can select from five PROGRAM AE (Auto Exposure) modes to suit your shooting situation, referring...

Operating Instructions
Page 58
...focus in telephoto You cannot choose F1.6 and F2. This is because your camcorder is set to focus only on subjects in the middle to far distance. •In sunset & moon mode, ...your camcorder is the in-focus range, measured from the distance behind a subject to focus only on distant...Dot - When you cannot take close (High F value) Wide (W) 58 Overlap - Zooming in sports lesson mode. Spot light mode •While shooting in memory mode, the low lux and sports lesson modes do not work . (The indicator flashes...
...focus in telephoto You cannot choose F1.6 and F2. This is because your camcorder is set to focus only on subjects in the middle to far distance. •In sunset & moon mode, ...your camcorder is the in-focus range, measured from the distance behind a subject to focus only on distant...Dot - When you cannot take close (High F value) Wide (W) 58 Overlap - Zooming in sports lesson mode. Spot light mode •While shooting in memory mode, the low lux and sports lesson modes do not work . (The indicator flashes...

Operating Instructions
Page 61
... POWER switch to +/- 6 frames from the selected time. The interval recording indicator flashes. (8) Press START/STOP to erase the menu display. The interval recording indicator lights up to OFF (CHG), VCR or MEMORY. You can perform normal recording only once. Advanced Recording Operations Interval recording (6) Turn the SEL/PUSH EXEC dial...
... POWER switch to +/- 6 frames from the selected time. The interval recording indicator flashes. (8) Press START/STOP to erase the menu display. The interval recording indicator lights up to OFF (CHG), VCR or MEMORY. You can perform normal recording only once. Advanced Recording Operations Interval recording (6) Turn the SEL/PUSH EXEC dial...


