Operating Instructions
Page 2
.... For the customers in a Lithium-Ion batteries are designed to persons. and CANADA Part 15 of important operating and maintenance (servicing) Trade Name: SONY Model No.: DCR-VX2100 Responsible Party: Sony Electronics Inc. Connect the equipment into an outlet on , the user is encouraged to...in the literature accompanying the appliance. Increase the separation between the equipment and receiver. - If this Sony Digital Handycam camcorder. With your used in a residential installation. instructions in order to the presence of the FCC Rules. Your Digital...
.... For the customers in a Lithium-Ion batteries are designed to persons. and CANADA Part 15 of important operating and maintenance (servicing) Trade Name: SONY Model No.: DCR-VX2100 Responsible Party: Sony Electronics Inc. Connect the equipment into an outlet on , the user is encouraged to...in the literature accompanying the appliance. Increase the separation between the equipment and receiver. - If this Sony Digital Handycam camcorder. With your used in a residential installation. instructions in order to the presence of the FCC Rules. Your Digital...
Operating Instructions
Page 3
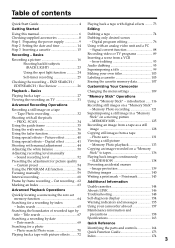
...tape 74 Dubbing only desired scenes - Sound recording level 52 Playing back images continuously Presetting the adjustment for a photo Identifying the parts and controls 164 - Signal convert function 88 Recording video or TV programs 89 Inserting a scene from a tape Using special effects...own titles 103 Labeling a cassette 105 Erasing the cassette memory data 107 Customizing Your Camcorder Playback - Insert editing 93 Audio dubbing 95 Superimposing a title 99 Making your camcorder abroad 157 Searching the boundaries of contents Quick Start Guide 4 Playing back a ...
...tape 74 Dubbing only desired scenes - Sound recording level 52 Playing back images continuously Presetting the adjustment for a photo Identifying the parts and controls 164 - Signal convert function 88 Recording video or TV programs 89 Inserting a scene from a tape Using special effects...own titles 103 Labeling a cassette 105 Erasing the cassette memory data 107 Customizing Your Camcorder Playback - Insert editing 93 Audio dubbing 95 Superimposing a title 99 Making your camcorder abroad 157 Searching the boundaries of contents Quick Start Guide 4 Playing back a ...
Operating Instructions
Page 10
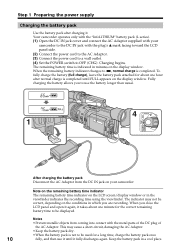
...longer than usual. 4 POWER VCR 1 MEMORY OFF CAMERA (CHG) After charging the battery pack Disconnect the AC Adaptor from coming into contact with the metal parts of the DC plug of the AC Adaptor. The indicator may cause a short-circuit, damaging the AC Adaptor. •Keep the battery pack dry. •... the battery pack is not to OFF (CHG). Keep the battery pack in which you close the LCD panel and open it again, it . Your camcorder operates only with the "InfoLITHIUM" battery pack (L series). (1) Open the DC IN jack cover and connect the AC Adaptor supplied with the plug's v mark ...
...longer than usual. 4 POWER VCR 1 MEMORY OFF CAMERA (CHG) After charging the battery pack Disconnect the AC Adaptor from coming into contact with the metal parts of the DC plug of the AC Adaptor. The indicator may cause a short-circuit, damaging the AC Adaptor. •Keep the battery pack dry. •... the battery pack is not to OFF (CHG). Keep the battery pack in which you close the LCD panel and open it again, it . Your camcorder operates only with the "InfoLITHIUM" battery pack (L series). (1) Open the DC IN jack cover and connect the AC Adaptor supplied with the plug's v mark ...

Operating Instructions
Page 15
When you press any part of the cassette to close the cover firmly. 15 Note The cassette lid will not be closed when you use mini DV cassettes with the ...
When you press any part of the cassette to close the cover firmly. 15 Note The cassette lid will not be closed when you use mini DV cassettes with the ...
Operating Instructions
Page 20
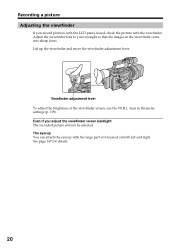
... eyecup You can attach the eyecup with the viewfinder. Even if you record pictures with the LCD panel closed, check the picture with the large part of the viewfinder screen, use the VF B.L. Viewfinder adjustment lever To adjust the brightness of it located on both left and right. See page 167...
... eyecup You can attach the eyecup with the viewfinder. Even if you record pictures with the LCD panel closed, check the picture with the large part of the viewfinder screen, use the VF B.L. Viewfinder adjustment lever To adjust the brightness of it located on both left and right. See page 167...

Operating Instructions
Page 85
The CUT-IN point of the first program is set, then the bottom part of the program mark changes to light blue. (9) Repeat steps 5 to 8, then set the program. The CUT-OUT point of the first program is set ... on the tape is set, the program mark changes to light blue. (7) Search for the end of the tape You cannot set , and the top part of the program mark changes to light blue. Editing Dubbing only desired scenes - Digital program editing (6) Press the SEL/PUSH EXEC dial, or MARK on...
The CUT-IN point of the first program is set, then the bottom part of the program mark changes to light blue. (9) Repeat steps 5 to 8, then set the program. The CUT-OUT point of the first program is set ... on the tape is set, the program mark changes to light blue. (7) Search for the end of the tape You cannot set , and the top part of the program mark changes to light blue. Editing Dubbing only desired scenes - Digital program editing (6) Press the SEL/PUSH EXEC dial, or MARK on...

Operating Instructions
Page 100
... title is set . If the tape has a blank portion in step 2. To use the custom title, select in the middle of the recorded parts The title may be displayed correctly. In standby mode: The "TITLE" indicator appears. Slide the write-protect tab to OFF in the menu settings ...(p. 109). 100 The titles superimposed with your camcorder •They are displayed only on that portion. If the tape has a blank portion You cannot superimpose a title on the DV format video equipment...
... title is set . If the tape has a blank portion in step 2. To use the custom title, select in the middle of the recorded parts The title may be displayed correctly. In standby mode: The "TITLE" indicator appears. Slide the write-protect tab to OFF in the menu settings ...(p. 109). 100 The titles superimposed with your camcorder •They are displayed only on that portion. If the tape has a blank portion You cannot superimpose a title on the DV format video equipment...

Operating Instructions
Page 104
... C ], then press the dial. We recommend setting the operation in playback or playback pause mode or removing the cassette so that your camcorder does not automatically turn off The characters you have stored In step 3, select CUSTOM1 SET or CUSTOM2 SET, depending on which title you have... entered remain stored in your camcorder, the power automatically goes off while you are entering title characters. To enter a space Select [ ], then select the blank part. 104 The last character is erased. To erase a character Turn the SEL/...
... C ], then press the dial. We recommend setting the operation in playback or playback pause mode or removing the cassette so that your camcorder does not automatically turn off The characters you have stored In step 3, select CUSTOM1 SET or CUSTOM2 SET, depending on which title you have... entered remain stored in your camcorder, the power automatically goes off while you are entering title characters. To enter a space Select [ ], then select the blank part. 104 The last character is erased. To erase a character Turn the SEL/...

Operating Instructions
Page 106
... cassette When the label is displayed, up to four titles also appear. The last character is full. To enter a space Select [ ], then select the blank part. 106 Labeling a cassette To change the label you have superimposed titles in the same way as you do to make a new label. Slide the write...
... cassette When the label is displayed, up to four titles also appear. The last character is full. To enter a space Select [ ], then select the blank part. 106 Labeling a cassette To change the label you have superimposed titles in the same way as you do to make a new label. Slide the write...

Operating Instructions
Page 116
...protection technology that uses "MagicGate" technology cannot be damaged in the following types of the connecting section. •Stick its label on your camcorder. introduction The "Memory Stick" is set to corrosive gases. •When you use following cases: - Dsc00001.jpg: As displayed on...Memory Stick" near static electricity or magnetic fields. •Prevent metallic objects or your camcorder. Using a "Memory Stick" - If you carry or store a "Memory Stick," put it into contact with the metal parts of "Memory Stick" on the "Memory Stick" is a new light and small ...
...protection technology that uses "MagicGate" technology cannot be damaged in the following types of the connecting section. •Stick its label on your camcorder. introduction The "Memory Stick" is set to corrosive gases. •When you use following cases: - Dsc00001.jpg: As displayed on...Memory Stick" near static electricity or magnetic fields. •Prevent metallic objects or your camcorder. Using a "Memory Stick" - If you carry or store a "Memory Stick," put it into contact with the metal parts of "Memory Stick" on the "Memory Stick" is a new light and small ...

Operating Instructions
Page 126
...or last composed image appears on the Remote Commander. or +/- on the lower part of the screen as follows: M. LUMI 100-0019 M. or - CHROM y M. The still image is superimposed on a moving picture, and your camcorder. (1) Set the POWER switch to CAMERA. (2) Press MEMORY MIX in standby ...mode. (6) Turn the SEL/PUSH EXEC dial to adjust the effect. (7) Press START/STOP to be recorded into your camcorder is in standby mode. LUMI I 100-0019 6 M. Superimposing a still image in a "Memory Stick" on the moving picture - CHROM 7 VCR POWER...
...or last composed image appears on the Remote Commander. or +/- on the lower part of the screen as follows: M. LUMI 100-0019 M. or - CHROM y M. The still image is superimposed on a moving picture, and your camcorder. (1) Set the POWER switch to CAMERA. (2) Press MEMORY MIX in standby ...mode. (6) Turn the SEL/PUSH EXEC dial to adjust the effect. (7) Press START/STOP to be recorded into your camcorder is in standby mode. LUMI I 100-0019 6 M. Superimposing a still image in a "Memory Stick" on the moving picture - CHROM 7 VCR POWER...

Operating Instructions
Page 161
.... Extremely hot or cold - If this malfunction cannot be damaged. •Always keep it from coming into contact with the metal parts of the connecting section. Vibrating Rechargeable battery pack •Use only the specified charger or video equipment with the charging function. •...the battery terminals. •Keep the rechargeable battery pack away from a short circuit, do not allow metal objects to come into your camcorder to water. AM receivers and video equipment disturb AM reception and video operation. •The unit becomes warm during charging, keep metal ...
.... Extremely hot or cold - If this malfunction cannot be damaged. •Always keep it from coming into contact with the metal parts of the connecting section. Vibrating Rechargeable battery pack •Use only the specified charger or video equipment with the charging function. •...the battery terminals. •Keep the rechargeable battery pack away from a short circuit, do not allow metal objects to come into your camcorder to water. AM receivers and video equipment disturb AM reception and video operation. •The unit becomes warm during charging, keep metal ...
Operating Instructions
Page 163
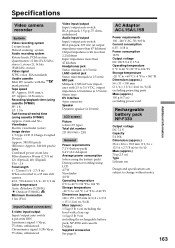
...;C (-4 °F to +140 °F) Dimensions (approx.) 56 × 31 × 100 mm (2 1/4 × 1 1/4 × 4 in) (w/h/d) excluding projecting parts Mass (approx.) 190 g (6.7 oz) excluding power cord Rechargeable battery pack NP-F330 Output voltage DC 7.2 V Capacity 5.0 Wh Dimensions (approx.) 38.4 × 20.6 ×... using cassette DVM60) Approx. 2 min and 30 s Viewfinder Electric viewfinder (color) Image device 1/3 type CCD (3 Charge Coupled Device) Approx. 380 000 pixels (Effective: Approx. 340 000 pixels) Lens Combined power zoom lens Filter diameter 58 mm (2 3/8 in) 12× (Optical), 48...
...;C (-4 °F to +140 °F) Dimensions (approx.) 56 × 31 × 100 mm (2 1/4 × 1 1/4 × 4 in) (w/h/d) excluding projecting parts Mass (approx.) 190 g (6.7 oz) excluding power cord Rechargeable battery pack NP-F330 Output voltage DC 7.2 V Capacity 5.0 Wh Dimensions (approx.) 38.4 × 20.6 ×... using cassette DVM60) Approx. 2 min and 30 s Viewfinder Electric viewfinder (color) Image device 1/3 type CCD (3 Charge Coupled Device) Approx. 380 000 pixels (Effective: Approx. 340 000 pixels) Lens Combined power zoom lens Filter diameter 58 mm (2 3/8 in) 12× (Optical), 48...

Operating Instructions
Page 164
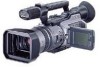
Identifying the parts and controls Camcorder 1 2 3 4 5 6 7 8 1 INDEX MARK button (p. 63) 2 Zoom ring (p. 21) 3 Focus ring (p. 59) 4 ND FILTER selector (p. 47) 5 FOCUS selector (p. 59) 6 PUSH AUTO button (p. 59) 7 FADER button (p. 39) 9 0 qa ...
Identifying the parts and controls Camcorder 1 2 3 4 5 6 7 8 1 INDEX MARK button (p. 63) 2 Zoom ring (p. 21) 3 Focus ring (p. 59) 4 ND FILTER selector (p. 47) 5 FOCUS selector (p. 59) 6 PUSH AUTO button (p. 59) 7 FADER button (p. 39) 9 0 qa ...

Operating Instructions
Page 165
...) wg (self-timer) button (p. 25, 33, 124) wh Battery pack (p. 9) wj ZEBRA selector (p. 48) wk RESET button (p. 153) wl MEMORY INDEX button (p. 134) e; Identifying the parts and controls qh qj wh qk wj ql wk w; MEMORY DELETE button (p. 140) ea MEMORY + button (p. 126, 133) es MEMORY MIX button (p. 126) ed PICTURE...
...) wg (self-timer) button (p. 25, 33, 124) wh Battery pack (p. 9) wj ZEBRA selector (p. 48) wk RESET button (p. 153) wl MEMORY INDEX button (p. 134) e; Identifying the parts and controls qh qj wh qk wj ql wk w; MEMORY DELETE button (p. 140) ea MEMORY + button (p. 126, 133) es MEMORY MIX button (p. 126) ed PICTURE...

Operating Instructions
Page 166
... light up when you set the POWER switch to VCR. ek Handle REC START/STOP button (p. 19) el Remote sensor/infrared ray emitter r; Identifying the parts and controls eg eh ej SLOW REC STOP REW PLAY AUDIO DUB FF PAUSE ek el r;
... light up when you set the POWER switch to VCR. ek Handle REC START/STOP button (p. 19) el Remote sensor/infrared ray emitter r; Identifying the parts and controls eg eh ej SLOW REC STOP REW PLAY AUDIO DUB FF PAUSE ek el r;

Operating Instructions
Page 167
Identifying the parts and controls Attaching/removing the eyecup •When removing the eyecup, pull lightly the upper edge of the hood with a lens cap, slide the knob to your fingers [a], insert a finger into the gap that you use Sony made filters. 167 To remove the hood with a lens cap, loosen the lower.... [a] [b] [c] Quick Reference Attaching/removing the hood with a lens cap To attach the hood with a lens cap counterclockwise. When attaching the eyecup, fit it onto the camcorder slide it all the way along grooves until it .
Identifying the parts and controls Attaching/removing the eyecup •When removing the eyecup, pull lightly the upper edge of the hood with a lens cap, slide the knob to your fingers [a], insert a finger into the gap that you use Sony made filters. 167 To remove the hood with a lens cap, loosen the lower.... [a] [b] [c] Quick Reference Attaching/removing the hood with a lens cap To attach the hood with a lens cap counterclockwise. When attaching the eyecup, fit it onto the camcorder slide it all the way along grooves until it .

Operating Instructions
Page 168
... (p. 16) ys SHUTTER SPEED button (p. 46) yd Access lamp (p. 118) Fastening the grip strap Attaching the shoulder strap Attach the shoulder strap supplied with your camcorder to the hooks for shoulder strap rh Power zoom lever (p. 21) rj PHOTO button (p. 32, 121) rk BATT (battery) RELEASE lever (p. 9) rl PROGRAM AE button... EXEC dial (p. 109) tg Memory Stick slot (p. 118) th Cassette lid (p. 15) tj PUSH button (p. 15) tk Grip strap tl LOCK switch (p. 16) y; Identifying the parts and controls rg th rh rj rk rl tj t;
... (p. 16) ys SHUTTER SPEED button (p. 46) yd Access lamp (p. 118) Fastening the grip strap Attaching the shoulder strap Attach the shoulder strap supplied with your camcorder to the hooks for shoulder strap rh Power zoom lever (p. 21) rj PHOTO button (p. 32, 121) rk BATT (battery) RELEASE lever (p. 9) rl PROGRAM AE button... EXEC dial (p. 109) tg Memory Stick slot (p. 118) th Cassette lid (p. 15) tj PUSH button (p. 15) tk Grip strap tl LOCK switch (p. 16) y; Identifying the parts and controls rg th rh rj rk rl tj t;

Operating Instructions
Page 169
...74, 89, 96) i; DV Interface (p. 75, 91, 130) This "i.LINK" mark is used as CONTROL L or REMOTE. The LANC control jack is a trademark of Sony Corporation and indicates that the length of video equipment and peripherals connected to it to the "plug-in agreement with IEEE 13941995 specifications and their... for Local Application Control Bus System. is i (headphones) jack When you cannot attach the tripod securely and the screw may damage your camcorder is i.LINK compatible. Identifying the parts and controls yf ud yg uf yh ug yj uh yk uj yl uk u; ul ua i;
...74, 89, 96) i; DV Interface (p. 75, 91, 130) This "i.LINK" mark is used as CONTROL L or REMOTE. The LANC control jack is a trademark of Sony Corporation and indicates that the length of video equipment and peripherals connected to it to the "plug-in agreement with IEEE 13941995 specifications and their... for Local Application Control Bus System. is i (headphones) jack When you cannot attach the tripod securely and the screw may damage your camcorder is i.LINK compatible. Identifying the parts and controls yf ud yg uf yh ug yj uh yk uj yl uk u; ul ua i;

Operating Instructions
Page 170
Identifying the parts and controls Remote Commander The buttons that have the same name on the Remote Commander as on your camcorder function identically to the buttons on your camcorder. 1 2 9 3 0 4 5 qa 6 qs 7 8 qd 1 Transmitter Point toward the remote sensor to control your camcorder after turning on your camcorder. 2 ZERO SET MEMORY button (p. 64) 3 PHOTO button (p. 32...
Identifying the parts and controls Remote Commander The buttons that have the same name on the Remote Commander as on your camcorder function identically to the buttons on your camcorder. 1 2 9 3 0 4 5 qa 6 qs 7 8 qd 1 Transmitter Point toward the remote sensor to control your camcorder after turning on your camcorder. 2 ZERO SET MEMORY button (p. 64) 3 PHOTO button (p. 32...


