Operating Instructions
Page 3
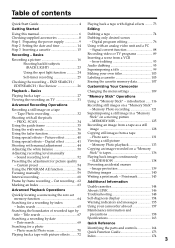
... Stick" - Digital effect 41 Viewing a still picture Shooting with digital effects ......... 73 Getting Started Editing Using this manual 6 Checking supplied accessories 8 Step 1 Preparing the power supply 9 Step 2 Setting the date and time 14 Step 3 Inserting a cassette 15 Recording - Index...own titles 103 Labeling a cassette 105 Erasing the cassette memory data 107 Customizing Your Camcorder Playback - Insert editing 93 Audio dubbing 95 Superimposing a title 99 Making your camcorder abroad 157 Searching the boundaries of contents Quick Start Guide 4 Playing back a ...
... Stick" - Digital effect 41 Viewing a still picture Shooting with digital effects ......... 73 Getting Started Editing Using this manual 6 Checking supplied accessories 8 Step 1 Preparing the power supply 9 Step 2 Setting the date and time 14 Step 3 Inserting a cassette 15 Recording - Index...own titles 103 Labeling a cassette 105 Erasing the cassette memory data 107 Customizing Your Camcorder Playback - Insert editing 93 Audio dubbing 95 Superimposing a title 99 Making your camcorder abroad 157 Searching the boundaries of contents Quick Start Guide 4 Playing back a ...

Operating Instructions
Page 8
Checking supplied accessories Make sure that the following accessories are supplied with your camcorder. 1 2 3 4 5 6 7 8 1 Wireless Remote Commander (1) (p. 170) 2 AC-L15A/L15B AC Adaptor (1), Power cord (1) (p. 10) 3 NP-F330 rechargeable battery pack (1) (p. 9, 10) 4 Size AA (R6) battery for Remote Commander (2) (p. 171) 5 "Memory Stick" (1) (p. 116) 6 A/V connecting cable (1) (p. 31, 74) 7 Shoulder strap (1) (p. 168) 8 Hood with a lens cap (1) (p. 167) 8
Checking supplied accessories Make sure that the following accessories are supplied with your camcorder. 1 2 3 4 5 6 7 8 1 Wireless Remote Commander (1) (p. 170) 2 AC-L15A/L15B AC Adaptor (1), Power cord (1) (p. 10) 3 NP-F330 rechargeable battery pack (1) (p. 9, 10) 4 Size AA (R6) battery for Remote Commander (2) (p. 171) 5 "Memory Stick" (1) (p. 116) 6 A/V connecting cable (1) (p. 31, 74) 7 Shoulder strap (1) (p. 168) 8 Hood with a lens cap (1) (p. 167) 8

Operating Instructions
Page 96
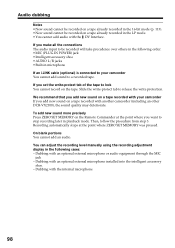
... dubbed, with headphones. • You can monitor the sound using AUDIO MIX in 96 the menu settings. Audio dubbing Connecting the microphone with the intelligent accessory shoe Microphone (optional) Dubbing with the supplied microphone No connection is necessary. Notes • When dubbing with the built-in microphone or an external one...
... dubbed, with headphones. • You can monitor the sound using AUDIO MIX in 96 the menu settings. Audio dubbing Connecting the microphone with the intelligent accessory shoe Microphone (optional) Dubbing with the supplied microphone No connection is necessary. Notes • When dubbing with the built-in microphone or an external one...
Operating Instructions
Page 98
...adjustment display in the following order. •MIC (PLUG IN POWER) jack •Intelligent accessory shoe •AUDIO L/R jacks •Built-in microphone If an i.LINK cable (optional) is connected to your camcorder If you add new sound on a tape recorded with the DV Interface. Dubbing with ...The audio input to be recorded on the Remote Commander at the point where ZERO SET MEMORY was pressed. Dubbing with another camcorder (including an other DCR-VX2100), the sound quality may deteriorate. If you want to lock You cannot record on a tape recorded with an optional external ...
...adjustment display in the following order. •MIC (PLUG IN POWER) jack •Intelligent accessory shoe •AUDIO L/R jacks •Built-in microphone If an i.LINK cable (optional) is connected to your camcorder If you add new sound on a tape recorded with the DV Interface. Dubbing with ...The audio input to be recorded on the Remote Commander at the point where ZERO SET MEMORY was pressed. Dubbing with another camcorder (including an other DCR-VX2100), the sound quality may deteriorate. If you want to lock You cannot record on a tape recorded with an optional external ...

Operating Instructions
Page 124
... is finished. - The POWER switch is set to the right (unlock) position. (2) Press (self-timer) in standby mode. This mode is set to the intelligent accessory shoe. The (self-timer) indicator appears on a "Memory Stick" - Self-timer recording is automatically canceled when: - In the last two seconds of the countdown, the...
... is finished. - The POWER switch is set to the right (unlock) position. (2) Press (self-timer) in standby mode. This mode is set to the intelligent accessory shoe. The (self-timer) indicator appears on a "Memory Stick" - Self-timer recording is automatically canceled when: - In the last two seconds of the countdown, the...

Operating Instructions
Page 135
... read. •If you want to display on a computer screen. This indicates the order in the JPEG format. Files modified with your accessory. •Do not modify the directory of the file that is compressed in which images are different from the data file names. Note When...to the operating instructions of your computer and the Memory Stick Reader/Writer, PC card adaptor for Memory Stick, or floppy disk adaptor for this camcorder. 135 For details, refer to the normal playback screen (single screen) Press MEMORY +/- Viewing the recorded images using a personal computer The ...
... read. •If you want to display on a computer screen. This indicates the order in the JPEG format. Files modified with your accessory. •Do not modify the directory of the file that is compressed in which images are different from the data file names. Note When...to the operating instructions of your computer and the Memory Stick Reader/Writer, PC card adaptor for Memory Stick, or floppy disk adaptor for this camcorder. 135 For details, refer to the normal playback screen (single screen) Press MEMORY +/- Viewing the recorded images using a personal computer The ...

Operating Instructions
Page 160
...Sony dealer before operating it any type of solvent which may heat up inside the casing, unplug your camcorder with a towel, for more than 24 hours. •Or install the fully charged rechargeable battery pack on 7.2 V (battery pack) or 8.4 V (AC Adaptor). •For DC or AC operation, use the accessories... recommended in about three minutes when your camcorder is used in or out. •Do not open the tape protect cover or touch the tape. •Avoid touching or ...
...Sony dealer before operating it any type of solvent which may heat up inside the casing, unplug your camcorder with a towel, for more than 24 hours. •Or install the fully charged rechargeable battery pack on 7.2 V (battery pack) or 8.4 V (AC Adaptor). •For DC or AC operation, use the accessories... recommended in about three minutes when your camcorder is used in or out. •Do not open the tape protect cover or touch the tape. •Avoid touching or ...
Operating Instructions
Page 163
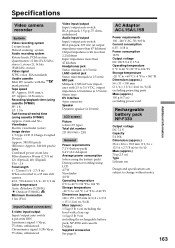
...) SP: 1 h LP: 1.5 h Fast-forward/rewind time (using cassette DVM60) Approx. 2 min and 30 s Viewfinder Electric viewfinder (color) Image device 1/3 type CCD (3 Charge Coupled Device) Approx. 380 000 pixels (Effective: Approx. 340 000 pixels) Lens Combined power zoom lens Filter diameter 58 mm (2 3/8 in) 12× (Optical), 48× (Digital) F1.6 - 2.4 Focal...; 2.5 mm) MIC jack Minijack, 0.388 mV low impedance with a lens cap 1.6 kg (3 lb 9 oz) including the rechargeable battery pack, NP-F330 and cassette DVM60 Supplied accessories See page 8.
...) SP: 1 h LP: 1.5 h Fast-forward/rewind time (using cassette DVM60) Approx. 2 min and 30 s Viewfinder Electric viewfinder (color) Image device 1/3 type CCD (3 Charge Coupled Device) Approx. 380 000 pixels (Effective: Approx. 340 000 pixels) Lens Combined power zoom lens Filter diameter 58 mm (2 3/8 in) 12× (Optical), 48× (Digital) F1.6 - 2.4 Focal...; 2.5 mm) MIC jack Minijack, 0.388 mV low impedance with a lens cap 1.6 kg (3 lb 9 oz) including the rechargeable battery pack, NP-F330 and cassette DVM60 Supplied accessories See page 8.

Operating Instructions
Page 164
Quick Reference - Identifying the parts and controls Camcorder 1 2 3 4 5 6 7 8 1 INDEX MARK button (p. 63) 2 Zoom ring (p. 21) 3 Focus ring (p. 59) 4 ND FILTER selector (p. 47) 5 FOCUS selector (p. 59) 6 PUSH AUTO button (p. 59) 7 FADER button (p. 39) 9 0 qa ... down and push it to turn the power supplied by the shoe on the intelligent accessory shoe •The intelligent accessory shoe supplies power to optional accessories such as a video light or microphone. •The intelligent accessory shoe is linked to the POWER switch, allowing you to the end, and then tighten the screw...
Quick Reference - Identifying the parts and controls Camcorder 1 2 3 4 5 6 7 8 1 INDEX MARK button (p. 63) 2 Zoom ring (p. 21) 3 Focus ring (p. 59) 4 ND FILTER selector (p. 47) 5 FOCUS selector (p. 59) 6 PUSH AUTO button (p. 59) 7 FADER button (p. 39) 9 0 qa ... down and push it to turn the power supplied by the shoe on the intelligent accessory shoe •The intelligent accessory shoe supplies power to optional accessories such as a video light or microphone. •The intelligent accessory shoe is linked to the POWER switch, allowing you to the end, and then tighten the screw...

Operating Instructions
Page 169
...is less than 6.5 mm (9/32 inch). Otherwise, you use headphones, the speaker on your camcorder. The DV Interface is used as CONTROL L or REMOTE. The LANC control jack is .... 169 Quick Reference DV Interface (p. 75, 91, 130) This "i.LINK" mark is a trademark of Sony Corporation and indicates that the length of video equipment and peripherals connected to LINE. uh Microphone (p. 96)... 74, 89, 96) i; ia LANC jack LANC stands for removing the viewfinder (p. 159) u; ud Intelligent accessory shoe uf MIC/LINE switch (p. 95) ug MIC jack (PLUG IN POWER) (p. 95) The MIC jack ...
...is less than 6.5 mm (9/32 inch). Otherwise, you use headphones, the speaker on your camcorder. The DV Interface is used as CONTROL L or REMOTE. The LANC control jack is .... 169 Quick Reference DV Interface (p. 75, 91, 130) This "i.LINK" mark is a trademark of Sony Corporation and indicates that the length of video equipment and peripherals connected to LINE. uh Microphone (p. 96)... 74, 89, 96) i; ia LANC jack LANC stands for removing the viewfinder (p. 159) u; ud Intelligent accessory shoe uf MIC/LINE switch (p. 95) ug MIC jack (PLUG IN POWER) (p. 95) The MIC jack ...

Operating Instructions
Page 174
... SOUND 111 I, J, K, L i.LINK 146 Image protection 139 Image quality mode 119 INDEX MARK 63 INDEX (Multiple) display 134 Index search 65 "InfoLITHIUM" battery ...... 10 Intelligent accessory shoe .... 96 Interval recording 60 JPEG 116 Labeling a cassette 105 LANC 169 LCD screen 18 LUMINANCEKEY 41 M, N Main sound 111 Manual adjustment 44 Manual focus...
... SOUND 111 I, J, K, L i.LINK 146 Image protection 139 Image quality mode 119 INDEX MARK 63 INDEX (Multiple) display 134 Index search 65 "InfoLITHIUM" battery ...... 10 Intelligent accessory shoe .... 96 Interval recording 60 JPEG 116 Labeling a cassette 105 LANC 169 LCD screen 18 LUMINANCEKEY 41 M, N Main sound 111 Manual adjustment 44 Manual focus...

