Operation Manual
Page 5
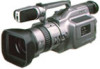
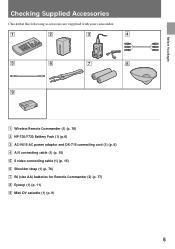
Before You Begin Checking Supplied Accessories Check that the following accessories are supplied with your camcorder. 1 2 3 4 5 6 7 8 9 1 Wireless Remote Commander (1) (p. 76) 2 NP-720/F730 Battery Pack (1) (p.6) 3 AC-V615 AC power adaptor and DK-715 connecting cord (1) (p. 6) 4 A/V connecting cable (1) (p. 15) 5 S video connecting cable (1) (p. 15) 6 Shoulder strap (1) (p. 76) 7 R6 (size AA) batteries for Remote Commander (2) (p. 77) 8 Eyecup (1) (p. 11) 9 Mini DV cassette (1) (p. 9) 5
Before You Begin Checking Supplied Accessories Check that the following accessories are supplied with your camcorder. 1 2 3 4 5 6 7 8 9 1 Wireless Remote Commander (1) (p. 76) 2 NP-720/F730 Battery Pack (1) (p.6) 3 AC-V615 AC power adaptor and DK-715 connecting cord (1) (p. 6) 4 A/V connecting cable (1) (p. 15) 5 S video connecting cable (1) (p. 15) 6 Shoulder strap (1) (p. 76) 7 R6 (size AA) batteries for Remote Commander (2) (p. 77) 8 Eyecup (1) (p. 11) 9 Mini DV cassette (1) (p. 9) 5

Operation Manual
Page 9
... with the red mark exposed, the and 6 indicators flash in the viewfinder because the camcorder is inserted. (1) Slide EJECT. You cannot eject the cassette while C MEMORY appears in the viewfinder, and you cannot record on the cassette to the mini DV cassette-mounted cassette memory (p. 83). To rerecord on this case, the cassette compartment...
... with the red mark exposed, the and 6 indicators flash in the viewfinder because the camcorder is inserted. (1) Slide EJECT. You cannot eject the cassette while C MEMORY appears in the viewfinder, and you cannot record on the cassette to the mini DV cassette-mounted cassette memory (p. 83). To rerecord on this case, the cassette compartment...

Operation Manual
Page 54
... other DV, mini DV, h 8 mm, H Hi8, j VHS, k S-VHS, VHSC, K S-VHSC, l Betamax, or ¬ ED Beta VCR that has video/audio inputs. Use this camcorder as a player. Using the DV connecting cable Simply connect the DV connecting cable to DV IN/OUT and DV products to LINE. Before Editing Connect the camcorder to the VCR using the DV connecting cable. DV IN...
... other DV, mini DV, h 8 mm, H Hi8, j VHS, k S-VHS, VHSC, K S-VHSC, l Betamax, or ¬ ED Beta VCR that has video/audio inputs. Use this camcorder as a player. Using the DV connecting cable Simply connect the DV connecting cable to DV IN/OUT and DV products to LINE. Before Editing Connect the camcorder to the VCR using the DV connecting cable. DV IN...

Operation Manual
Page 61
...the highest quality cassette. You cannot use the mini DV cassette only. When You Record You cannot use an ME cassette You can play back sound recorded in the viewfinder if you cannot play back signal of software. Audio mode The camcorder records sound in stereo 1 only in 12-bit ...kHz). Copyright Signal When You Play Back Using this camcorder, you try to play back such a tape. Video Cassettes Usable Cassettes You can also play back sound recorded in the viewfinder if the play back a tape that has recorded the copyright control signals for copyright protection of software....
...the highest quality cassette. You cannot use the mini DV cassette only. When You Record You cannot use an ME cassette You can play back sound recorded in the viewfinder if you cannot play back signal of software. Audio mode The camcorder records sound in stereo 1 only in 12-bit ...kHz). Copyright Signal When You Play Back Using this camcorder, you try to play back such a tape. Video Cassettes Usable Cassettes You can also play back sound recorded in the viewfinder if the play back a tape that has recorded the copyright control signals for copyright protection of software....

Operation Manual
Page 62
..., and store it in an upright position. [a] [b] To record Slide out to the connector, the camcorder may malfunction when using the cassette memory functions, such as not to cause malfunction of the mini DV cassette gets dirty or dust sticks to prevent accidental erasure. [c] 62 Video Cassettes Notes on only the location as illustrated below...
..., and store it in an upright position. [a] [b] To record Slide out to the connector, the camcorder may malfunction when using the cassette memory functions, such as not to cause malfunction of the mini DV cassette gets dirty or dust sticks to prevent accidental erasure. [c] 62 Video Cassettes Notes on only the location as illustrated below...
Operation Manual
Page 68
... or use a new one . (p. 16) • Set the POWER switch to a wall outlet. (p. 18) • While being operated in CAMERA mode, the camcorder has been in the Standby mode for more than 5 minutes. The cassette cannot be recharged. The STEADY SHOT function does not active. The autofocus... • Insert the battery pack. (p. 7) • The battery is not on the cassette is updating the cassette memory data (The cassette memory mounted mini-DV cassette only). m Eject the cassette after C MEMORY indicator disappears. (p. 9) • Set the STEADY SHOT to ON. (p. 48) • Set ...
... or use a new one . (p. 16) • Set the POWER switch to a wall outlet. (p. 18) • While being operated in CAMERA mode, the camcorder has been in the Standby mode for more than 5 minutes. The cassette cannot be recharged. The STEADY SHOT function does not active. The autofocus... • Insert the battery pack. (p. 7) • The battery is not on the cassette is updating the cassette memory data (The cassette memory mounted mini-DV cassette only). m Eject the cassette after C MEMORY indicator disappears. (p. 9) • Set the STEADY SHOT to ON. (p. 48) • Set ...


