Operating Instructions
Page 3
...void your authority to operate this equipment in order to comply with Part15 of the FCC Rules. "Memory Stick" This device complies with the limits for a digital device pursuant to Subpart B of Part 15 of the following two conditions: (1) This device may... cause harmful interference to radio communications. Operation is connected. - Increase the separation between the equipment and receiver. - "Memory Stick" This Class B digital apparatus complies with the instructions, may not cause harmful interference, and (2) this device must be determined by turning the equipment off...
...void your authority to operate this equipment in order to comply with Part15 of the FCC Rules. "Memory Stick" This device complies with the limits for a digital device pursuant to Subpart B of Part 15 of the following two conditions: (1) This device may... cause harmful interference to radio communications. Operation is connected. - Increase the separation between the equipment and receiver. - "Memory Stick" This Class B digital apparatus complies with the instructions, may not cause harmful interference, and (2) this device must be determined by turning the equipment off...
Operating Instructions
Page 4
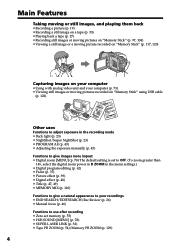
...; Playing back a tape (p. 27) • Recording still images or moving pictures on "Memory Stick" (p. 97, 104) • Viewing a still image or a moving picture recorded on "Memory Stick" (p. 117, 120) Capturing images on your computer • Using with analog video unit and your computer (p. 73) • Viewing still images or moving pictures recorded on "Memory Stick" using USB cable (p. 122) Other...
...; Playing back a tape (p. 27) • Recording still images or moving pictures on "Memory Stick" (p. 97, 104) • Viewing a still image or a moving picture recorded on "Memory Stick" (p. 117, 120) Capturing images on your computer • Using with analog video unit and your computer (p. 73) • Viewing still images or moving pictures recorded on "Memory Stick" using USB cable (p. 122) Other...

Operating Instructions
Page 5
... back a tape 27 Viewing the recording on TV 31 Advanced Recording Operations Recording a still image on "Memory Stick" - Signal convert function ..... 73 Recording video or TV programs 74 Inserting a scene from a tape - Memory PB ZOOM 129 Playing back images in a continuous loop - Digital program editing 62 Using with digital effects ...... 53 Enlarging recorded images - Tape Photo recording 33 Using the wide mode...
... back a tape 27 Viewing the recording on TV 31 Advanced Recording Operations Recording a still image on "Memory Stick" - Signal convert function ..... 73 Recording video or TV programs 74 Inserting a scene from a tape - Memory PB ZOOM 129 Playing back images in a continuous loop - Digital program editing 62 Using with digital effects ...... 53 Enlarging recorded images - Tape Photo recording 33 Using the wide mode...
Operating Instructions
Page 10
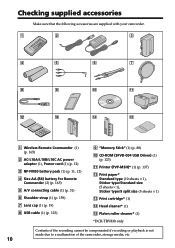
...Memory Stick" (1) (p. 88) 0 CD-ROM (SPVD-004 USB Driver) (1) (p. 123) qa Printer (PVP-MSH)* (1) (p. 137) qs Print paper* Standard type (10 sheets × 1), Sticker type/Standard size (5 sheets × 1), Sticker type/9 split size (5 sheets × 1) qd Print cartridge* (1) qf Head cleaner* (1) qg Platen roller cleaner* (1) *DCR-TRV830 only Contents of the recording... cannot be compensated if recording or playback is not made due to a malfunction of the camcorder, storage media, etc....
...Memory Stick" (1) (p. 88) 0 CD-ROM (SPVD-004 USB Driver) (1) (p. 123) qa Printer (PVP-MSH)* (1) (p. 137) qs Print paper* Standard type (10 sheets × 1), Sticker type/Standard size (5 sheets × 1), Sticker type/9 split size (5 sheets × 1) qd Print cartridge* (1) qf Head cleaner* (1) qg Platen roller cleaner* (1) *DCR-TRV830 only Contents of the recording... cannot be compensated if recording or playback is not made due to a malfunction of the camcorder, storage media, etc....

Operating Instructions
Page 17
If you do not set the date and time is recorded on a 12-hour cycle. •12:00 AM stands for midnight. •12:00 PM stands for ...by the time signal. Note on the time indicator The internal clock of your camcorder operates on the tape and the "Memory Stick." First, set the date and time settings. Getting started Step 2 Setting the date and time Set the date and time...for the first time. "CLOCK SET" will be displayed each time that you set the POWER switch to CAMERA or MEMORY unless you set the year, then the month, the day, the hour and then the minute. (1) Set the POWER...
If you do not set the date and time is recorded on a 12-hour cycle. •12:00 AM stands for midnight. •12:00 PM stands for ...by the time signal. Note on the time indicator The internal clock of your camcorder operates on the tape and the "Memory Stick." First, set the date and time settings. Getting started Step 2 Setting the date and time Set the date and time...for the first time. "CLOCK SET" will be displayed each time that you set the POWER switch to CAMERA or MEMORY unless you set the year, then the month, the day, the hour and then the minute. (1) Set the POWER...

Operating Instructions
Page 25
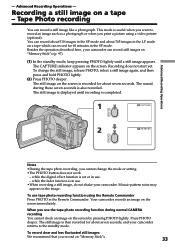
In the last two seconds of the countdown, the beep sound gets faster, then recording starts automatically. Self-timer recording is automatically cancelled when: - To stop recording, press START/STOP again. 6 START/STOP START/STOP 2-4 CAMERA SET SE L F T I MER OF F D ZOOM ON 1 6 : 9W I GHT F L A...-timer starts counting down from 10 with a beep sound. Recording - You can also record still images on "Memory Stick"s with the self-timer starts in 10 seconds automatically. S . L I DE S T E ADY SHOT N . To record still images using the self-timer Press PHOTO in step 6....
In the last two seconds of the countdown, the beep sound gets faster, then recording starts automatically. Self-timer recording is automatically cancelled when: - To stop recording, press START/STOP again. 6 START/STOP START/STOP 2-4 CAMERA SET SE L F T I MER OF F D ZOOM ON 1 6 : 9W I GHT F L A...-timer starts counting down from 10 with a beep sound. Recording - You can also record still images on "Memory Stick"s with the self-timer starts in 10 seconds automatically. S . L I DE S T E ADY SHOT N . To record still images using the self-timer Press PHOTO in step 6....
Operating Instructions
Page 33
... yet. The still image is set or in use tape photo recording function using a video printer (optional). The sound during normal CAMERA recording You cannot check an image on "Memory Stick"s . 33 while the digital effect function is displayed until a still image appears. To use . •When recording a still image, do not shake your camcorder. The still image...
... yet. The still image is set or in use tape photo recording function using a video printer (optional). The sound during normal CAMERA recording You cannot check an image on "Memory Stick"s . 33 while the digital effect function is displayed until a still image appears. To use . •When recording a still image, do not shake your camcorder. The still image...

Operating Instructions
Page 54
... - you have processed using PB ZOOM function, record the pictures on tapes. The image is automatically canceled when: - the POWER switch is set to "Memory Stick"s. R : The image moves downwards. Notes •PB ZOOM works only for tapes recorded in the Digital8 system. •You cannot process... externally input scenes using PB ZOOM function. •You cannot record pictures that you have processed using your...
... - you have processed using PB ZOOM function, record the pictures on tapes. The image is automatically canceled when: - the POWER switch is set to "Memory Stick"s. R : The image moves downwards. Notes •PB ZOOM works only for tapes recorded in the Digital8 system. •You cannot process... externally input scenes using PB ZOOM function. •You cannot record pictures that you have processed using your...

Operating Instructions
Page 83
... after setting the POWER switch to MEMORY • For 5 seconds after inserting a "Memory Stick" into your camcorder in MEMORY or VCR mode • When the capacity of the "Memory Stick" is less than 1 minute in MEMORY mode • For 5 seconds after completing a moving picture recording To always display the remaining capacity of the "Memory Stick" To write a print mark on...
... after setting the POWER switch to MEMORY • For 5 seconds after inserting a "Memory Stick" into your camcorder in MEMORY or VCR mode • When the capacity of the "Memory Stick" is less than 1 minute in MEMORY mode • For 5 seconds after completing a moving picture recording To always display the remaining capacity of the "Memory Stick" To write a print mark on...
Operating Instructions
Page 84
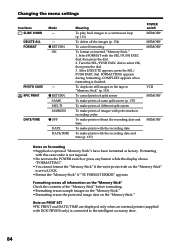
... recording order To make prints without the recording date and time To make prints with the recording date To make prints of images with print marks in a continuous loop (p. 131) To delete all information on the "Memory Stick" Check the contents of different split screen To make prints with DCR-TRV830 ...only) is finished. Select FORMAT with this camcorder is not required. •Do not turn the POWER switch or press any button while the display shows "FORMATTING". •You cannot format the "Memory Stick" if the write-protect tab on...
... recording order To make prints without the recording date and time To make prints with the recording date To make prints of images with print marks in a continuous loop (p. 131) To delete all information on the "Memory Stick" Check the contents of different split screen To make prints with DCR-TRV830 ...only) is finished. Select FORMAT with this camcorder is not required. •Do not turn the POWER switch or press any button while the display shows "FORMATTING". •You cannot format the "Memory Stick" if the write-protect tab on...

Operating Instructions
Page 88
...of your camcorder. Dsc00001.jpg: This file name appears on the screen of your computer etc., using "Memory Stick" Terminal Write-protect tab Labeling position •You cannot record or erase images when the write-protect tab on the labeling position. •Do not bend, drop or...your computer. You can record and play back, record or delete still images. Moving picture MOV00001: This file name appears on the screen of the connecting section. •Stick its case. 88 Under direct sunlight - Mov00001.mpg: This file name appears on the "Memory Stick" supplied with the metal...
...of your camcorder. Dsc00001.jpg: This file name appears on the screen of your computer etc., using "Memory Stick" Terminal Write-protect tab Labeling position •You cannot record or erase images when the write-protect tab on the labeling position. •Do not bend, drop or...your computer. You can record and play back, record or delete still images. Moving picture MOV00001: This file name appears on the screen of the connecting section. •Stick its case. 88 Under direct sunlight - Mov00001.mpg: This file name appears on the "Memory Stick" supplied with the metal...

Operating Instructions
Page 89
... of their respective companies. "Memory Stick" operations 89 Using "Memory Stick"-introduction "Memory Stick"s formatted by a computer "Memory Stick"s formatted by the JEITA (Japan Electronics and Information Technology Industries Association). You cannot play back on your camcorder still images recorded on other equipment, format the "Memory Stick" on your camcorder conform with the Design Rules for Camera File Systems universal standard established...
... of their respective companies. "Memory Stick" operations 89 Using "Memory Stick"-introduction "Memory Stick"s formatted by a computer "Memory Stick"s formatted by the JEITA (Japan Electronics and Information Technology Industries Association). You cannot play back on your camcorder still images recorded on other equipment, format the "Memory Stick" on your camcorder conform with the Design Rules for Camera File Systems universal standard established...

Operating Instructions
Page 90
... the data from the "Memory Stick" or recording the data on the "Memory Stick." Using "Memory Stick"-introduction Inserting "Memory Stick" Insert a "Memory Stick" in the "Memory Stick" slot as far as it can go with the v mark facing toward the "Memory Stick" slot as illustrated below. If this occurs, use another "Memory Stick." 90 "Memory Stick" eject button "Memory Stick" slot Access lamp To eject the "Memory Stick" Press the "Memory Stick" eject button.
... the data from the "Memory Stick" or recording the data on the "Memory Stick." Using "Memory Stick"-introduction Inserting "Memory Stick" Insert a "Memory Stick" in the "Memory Stick" slot as far as it can go with the v mark facing toward the "Memory Stick" slot as illustrated below. If this occurs, use another "Memory Stick." 90 "Memory Stick" eject button "Memory Stick" slot Access lamp To eject the "Memory Stick" Press the "Memory Stick" eject button.

Operating Instructions
Page 91
"Memory Stick" operations Using "Memory Stick"-introduction Selecting image quality mode You can select image quality mode in still image recording. Make sure that the LOCK is SUPER FINE. (1) Set the POWER switch to select the desired image quality, then press the dial. 1 V POWER 2 MENU E ERMAORY CAM M OFCFR(CHG) 3 4 5 6 MEMORY S E T ST I LL SET MOV I E S E T PR I NT MARK...
"Memory Stick" operations Using "Memory Stick"-introduction Selecting image quality mode You can select image quality mode in still image recording. Make sure that the LOCK is SUPER FINE. (1) Set the POWER switch to select the desired image quality, then press the dial. 1 V POWER 2 MENU E ERMAORY CAM M OFCFR(CHG) 3 4 5 6 MEMORY S E T ST I LL SET MOV I E S E T PR I NT MARK...

Operating Instructions
Page 92
... selected image quality mode and image size. Differences in image quality mode Recorded images are shown in the table below. (You can record is the highest image quality in your camcorder. Using "Memory Stick"-introduction Image quality settings Setting Meaning SUPER FINE (SFN) This is less... than in FINE mode. The image is compressed to each image varies depending on the image quality mode indicator This is only displayed during recording. 92 The number ...
... selected image quality mode and image size. Differences in image quality mode Recorded images are shown in the table below. (You can record is the highest image quality in your camcorder. Using "Memory Stick"-introduction Image quality settings Setting Meaning SUPER FINE (SFN) This is less... than in FINE mode. The image is compressed to each image varies depending on the image quality mode indicator This is only displayed during recording. 92 The number ...
Operating Instructions
Page 93
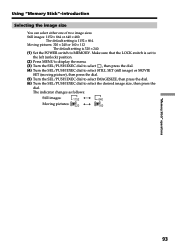
Using "Memory Stick"-introduction Selecting the image size You can select either one of two image sizes Still images: 1152 × 864 or 640 × 480... then press the dial. (5) Turn the SEL/PUSH EXEC dial to select IMAGESIZE, then press the dial. (6) Turn the SEL/PUSH EXEC dial to MEMORY. Moving pictures: 320 × 240 or 160 × 112 The default setting is 320 × 240. (1) Set the POWER switch to select the...Make sure that the LOCK switch is 1152 × 864. The indicator changes as follows: Still images: 1152 640 Moving pictures: 320 160 "Memory Stick" operations 93
Using "Memory Stick"-introduction Selecting the image size You can select either one of two image sizes Still images: 1152 × 864 or 640 × 480... then press the dial. (5) Turn the SEL/PUSH EXEC dial to select IMAGESIZE, then press the dial. (6) Turn the SEL/PUSH EXEC dial to MEMORY. Moving pictures: 320 × 240 or 160 × 112 The default setting is 320 × 240. (1) Set the POWER switch to select the...Make sure that the LOCK switch is 1152 × 864. The indicator changes as follows: Still images: 1152 640 Moving pictures: 320 160 "Memory Stick" operations 93

Operating Instructions
Page 94
...Memory Stick"-introduction 1 3 V OFCFR(CHG) POWER E ERMAORY CAM M 2 MENU 4 STILL SET MEMORY S E T ST I LL SET P I C MODE S I NG L E QUA L I TY I MAGES I ZE RETURN [ MENU ] : END 5 STILL SET MEMOR Y S E T 1152 ST I LL SET P I C MODE QUA L I TY I MAGES I ZE 1152 864 RETURN 640 480 REMA I N 6 [ MENU ] : END 6 STILL SET MEMORY... S E T ST I LL SET P I C MODE QUA L I TY I MAGES I ZE 640 480 RETURN REMA I N 20 [ MENU ] : END MEMORY S E T ST I LL SET MOV I E S E T PR I NT MARK P RO T E C T ...
...Memory Stick"-introduction 1 3 V OFCFR(CHG) POWER E ERMAORY CAM M 2 MENU 4 STILL SET MEMORY S E T ST I LL SET P I C MODE S I NG L E QUA L I TY I MAGES I ZE RETURN [ MENU ] : END 5 STILL SET MEMOR Y S E T 1152 ST I LL SET P I C MODE QUA L I TY I MAGES I ZE 1152 864 RETURN 640 480 REMA I N 6 [ MENU ] : END 6 STILL SET MEMORY... S E T ST I LL SET P I C MODE QUA L I TY I MAGES I ZE 640 480 RETURN REMA I N 20 [ MENU ] : END MEMORY S E T ST I LL SET MOV I E S E T PR I NT MARK P RO T E C T ...

Operating Instructions
Page 95
"Memory Stick" operations Using "Memory Stick"-introduction Image size settings Setting Meaning 1152 × 864 Records 1152 × 864 still images. 640 × 480 Records 640 × 480 still images. 320 × 240 Records 320 × 240 moving pictures. 160 × 112 Records 160 × 112 moving pictures Image size Maximum recording time 320 × 240 15 seconds 160 ×...
"Memory Stick" operations Using "Memory Stick"-introduction Image size settings Setting Meaning 1152 × 864 Records 1152 × 864 still images. 640 × 480 Records 640 × 480 still images. 320 × 240 Records 320 × 240 moving pictures. 160 × 112 Records 160 × 112 moving pictures Image size Maximum recording time 320 × 240 15 seconds 160 ×...

Operating Instructions
Page 96
...; 864 52 images 104 images 152 images 1152 × 864 104 images 208 images 304 images Approximate time of moving pictures you can record on a "Memory Stick" The time of moving pictures you can record varies depending on which image size you select and the complexity of the subject. 4MB type (supplied): Picture size...
...; 864 52 images 104 images 152 images 1152 × 864 104 images 208 images 304 images Approximate time of moving pictures you can record on a "Memory Stick" The time of moving pictures you can record varies depending on which image size you select and the complexity of the subject. 4MB type (supplied): Picture size...

Operating Instructions
Page 97
... left (unlock) position. (2) Keep pressing PHOTO lightly. Recording is set to MEMORY. The green z mark stops flashing, then lights up. Recording does not start yet. (3) Press PHOTO deeper. Memory Photo recording You can be recorded on the "Memory Stick" Number of recorded images PHOTO 3 1152 FINE "Memory Stick" operations PHOTO 97 Recording still images on "Memory Stick"s. The brightness of the image and focus...
... left (unlock) position. (2) Keep pressing PHOTO lightly. Recording is set to MEMORY. The green z mark stops flashing, then lights up. Recording does not start yet. (3) Press PHOTO deeper. Memory Photo recording You can be recorded on the "Memory Stick" Number of recorded images PHOTO 3 1152 FINE "Memory Stick" operations PHOTO 97 Recording still images on "Memory Stick"s. The brightness of the image and focus...


