
Operating Instructions
Page 2
... this product, you may cause undesired 2 operation. LITHIUM ION BATTERY. Operation is subject to persons. You will soon be producing home video that you call : Sony Customer Information Center 1-800-222SONY (7669) The number below is ...Sony Digital Handycam camcorder. Regulatory Information Declaration of the FCC Rules. For customers in the sun or under direct sunlight. This symbol is for years to use. You can capture life's precious moments with Part15 of Conformity Trade Name: SONY Model No.: DCR-TRV730, DCRTRV828, DCR-TRV830 Responsible Party: Sony...
... this product, you may cause undesired 2 operation. LITHIUM ION BATTERY. Operation is subject to persons. You will soon be producing home video that you call : Sony Customer Information Center 1-800-222SONY (7669) The number below is ...Sony Digital Handycam camcorder. Regulatory Information Declaration of the FCC Rules. For customers in the sun or under direct sunlight. This symbol is for years to use. You can capture life's precious moments with Part15 of Conformity Trade Name: SONY Model No.: DCR-TRV730, DCRTRV828, DCR-TRV830 Responsible Party: Sony...
Operating Instructions
Page 5
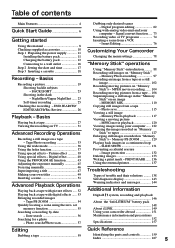
...computer - Digital program editing 62 Using with analog video unit and your own titles 49 Inserting a scene 51 Advanced Playback Operations Playing back a tape with picture effects ..... 52 Playing back a tape with digital effects ...... 53 Enlarging recorded images - Tape Photo recording 33 ... accessories 10 Step 1 Preparing the power supply 11 Installing the battery pack 11 Charging the battery pack 12 Connecting to tapes 127 Enlarging still images recorded on "Memory Stick"s - Memory Photo recording 97 Recording an image from a tape ... 106 Superimposing a still image ...
...computer - Digital program editing 62 Using with analog video unit and your own titles 49 Inserting a scene 51 Advanced Playback Operations Playing back a tape with picture effects ..... 52 Playing back a tape with digital effects ...... 53 Enlarging recorded images - Tape Photo recording 33 ... accessories 10 Step 1 Preparing the power supply 11 Installing the battery pack 11 Charging the battery pack 12 Connecting to tapes 127 Enlarging still images recorded on "Memory Stick"s - Memory Photo recording 97 Recording an image from a tape ... 106 Superimposing a still image ...

Operating Instructions
Page 6
... the basic features of the arrow and open the lid. 2 Insert the cassette in parentheses "( )" for more information. Connecting the power cord (p. 16) Use the battery pack when using your camcorder. After the cassette compartment goes down completely, close the lid until it clicks. Open the DC IN jack cover. Quick...
... the basic features of the arrow and open the lid. 2 Insert the cassette in parentheses "( )" for more information. Connecting the power cord (p. 16) Use the battery pack when using your camcorder. After the cassette compartment goes down completely, close the lid until it clicks. Open the DC IN jack cover. Quick...
Operating Instructions
Page 7
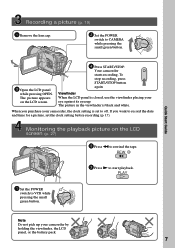
... START/STOP button again. If you purchase your camcorder, the clock setting is set the clock setting before recording (p. 17). E ERMAORY E ERMAORY Quick Start Guide Recording a picture (p. 19) 1 Remove the lens cap. 2 Set the POWER switch to start playback. The picture appears on the LCD screen (p. 27).... When you want to record the date and time for a picture, set to off. The picture in the viewfinder is closed, use the viewfinder placing your camcorder by holding the viewfinder, the LCD panel, or the battery pack. 7 REW 3 Press N to CAMERA while pressing the small green...
... START/STOP button again. If you purchase your camcorder, the clock setting is set the clock setting before recording (p. 17). E ERMAORY E ERMAORY Quick Start Guide Recording a picture (p. 19) 1 Remove the lens cap. 2 Set the POWER switch to start playback. The picture appears on the LCD screen (p. 27).... When you want to record the date and time for a picture, set to off. The picture in the viewfinder is closed, use the viewfinder placing your camcorder by holding the viewfinder, the LCD panel, or the battery pack. 7 REW 3 Press N to CAMERA while pressing the small green...
Operating Instructions
Page 10
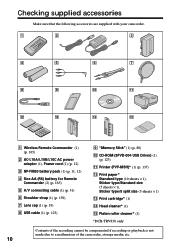
... 8 9 0 qa qs qd qf qg 1 Wireless Remote Commander (1) (p. 165) 2 AC-L10A/L10B/L10C AC power adaptor (1), Power cord (1) (p. 12) 3 NP-FM50 battery pack (1) (p. 11, 12) 4 Size AA (R6) battery for Remote Commander (2) (p. 165) 5 A/V connecting cable (1) (p. 31) 6 Shoulder strap (1) (p. 159) 7 Lens cap (1) (p. 19) 8 USB cable (1) (p. 123...sheets × 1) qd Print cartridge* (1) qf Head cleaner* (1) qg Platen roller cleaner* (1) *DCR-TRV830 only Contents of the recording cannot be compensated if recording or playback is not made due to a malfunction of the camcorder, storage media, etc. 10
... 8 9 0 qa qs qd qf qg 1 Wireless Remote Commander (1) (p. 165) 2 AC-L10A/L10B/L10C AC power adaptor (1), Power cord (1) (p. 12) 3 NP-FM50 battery pack (1) (p. 11, 12) 4 Size AA (R6) battery for Remote Commander (2) (p. 165) 5 A/V connecting cable (1) (p. 31) 6 Shoulder strap (1) (p. 159) 7 Lens cap (1) (p. 19) 8 USB cable (1) (p. 123...sheets × 1) qd Print cartridge* (1) qf Head cleaner* (1) qg Platen roller cleaner* (1) *DCR-TRV830 only Contents of the recording cannot be compensated if recording or playback is not made due to a malfunction of the camcorder, storage media, etc. 10
Operating Instructions
Page 11
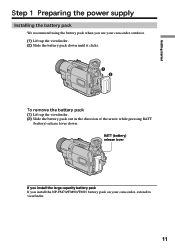
Getting started Step 1 Preparing the power supply Installing the battery pack We recommend using the battery pack when you install the NP-FM70/FM90/FM91 battery pack on your camcorder outdoors. (1) Lift up the viewfinder. (2) Slide the battery pack down until it clicks. 1 2 To remove the battery pack (1) Lift up the viewfinder. (2) Slide the battery pack out in the direction of the arrow while pressing BATT (battery) release lever down. BATT (battery) release lever If you install the large capacity battery pack If you use your camcorder, extend its viewfinder. 11
Getting started Step 1 Preparing the power supply Installing the battery pack We recommend using the battery pack when you install the NP-FM70/FM90/FM91 battery pack on your camcorder outdoors. (1) Lift up the viewfinder. (2) Slide the battery pack down until it clicks. 1 2 To remove the battery pack (1) Lift up the viewfinder. (2) Slide the battery pack out in the direction of the arrow while pressing BATT (battery) release lever down. BATT (battery) release lever If you install the large capacity battery pack If you use your camcorder, extend its viewfinder. 11
Operating Instructions
Page 12
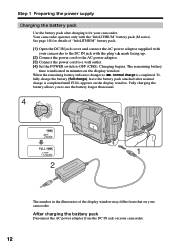
.... (3) Connect the power cord to a wall outlet. (4) Set the POWER switch to OFF (CHG). The remaining battery time is indicated in the illustration of "InfoLITHIUM" battery pack. (1) Open the DC IN jack cover and connect the AC power adaptor supplied with your camcorder. Fully charging...minutes on your camcorder to u, normal charge is completed. After charging the battery pack Disconnect the AC power adaptor from that on the display window. To fully charge the battery (full charge), leave the battery pack attached after charging it for details of the display window may differ ...
.... (3) Connect the power cord to a wall outlet. (4) Set the POWER switch to OFF (CHG). The remaining battery time is indicated in the illustration of "InfoLITHIUM" battery pack. (1) Open the DC IN jack cover and connect the AC power adaptor supplied with your camcorder. Fully charging...minutes on your camcorder to u, normal charge is completed. After charging the battery pack Disconnect the AC power adaptor from that on the display window. To fully charge the battery (full charge), leave the battery pack attached after charging it for details of the display window may differ ...
Operating Instructions
Page 13
... The "InfoLITHIUM" is correct. min" appears in the display window roughly indicates the recording time with the viewfinder. "InfoLITHIUM" M series battery packs have the mark. While charging the battery pack, no indicator appears or the indicator flashes in the display window in an ambient ...temperature of Sony Corporation. If the power may cause a short-circuit, damaging the AC power ...
... The "InfoLITHIUM" is correct. min" appears in the display window roughly indicates the recording time with the viewfinder. "InfoLITHIUM" M series battery packs have the mark. While charging the battery pack, no indicator appears or the indicator flashes in the display window in an ambient ...temperature of Sony Corporation. If the power may cause a short-circuit, damaging the AC power ...
Operating Instructions
Page 14
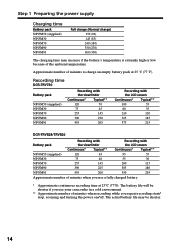
... (270) 360 (300) The charging time may be shorter if you use a fully charged battery * Approximate continuous recording time at 25 ˚C (77 ˚F) Recording time DCR-TRV730 Battery pack NP-FM50 (supplied) NP-FM30 NP-FM70 NP-FM90 NP-FM91 Recording with the viewfinder Continuous* Typical** 120 70 75 45 255 145 390 230 455 265...
... (270) 360 (300) The charging time may be shorter if you use a fully charged battery * Approximate continuous recording time at 25 ˚C (77 ˚F) Recording time DCR-TRV730 Battery pack NP-FM50 (supplied) NP-FM30 NP-FM70 NP-FM90 NP-FM91 Recording with the viewfinder Continuous* Typical** 120 70 75 45 255 145 390 230 455 265...
Operating Instructions
Page 15
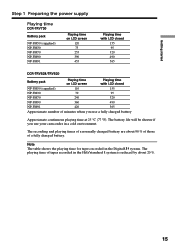
...the playing time for tapes recorded in the Hi8/standard 8 system is reduced by about 90 % of those of a fully charged battery. The battery life will be shorter if you use your camcorder in a cold environment. Getting started Step 1 Preparing the power supply Playing time DCR-TRV730 Battery pack NP-FM50 (supplied)... NP-FM30 NP-FM70 NP-FM90 NP-FM91 Playing time on LCD screen 120 75 255 390 455 Playing time with LCD closed 155 95 320 490 565 DCR-TRV828/TRV830 Battery pack Playing time on LCD screen...
...the playing time for tapes recorded in the Hi8/standard 8 system is reduced by about 90 % of those of a fully charged battery. The battery life will be shorter if you use your camcorder in a cold environment. Getting started Step 1 Preparing the power supply Playing time DCR-TRV730 Battery pack NP-FM50 (supplied)... NP-FM30 NP-FM70 NP-FM90 NP-FM91 Playing time on LCD screen 120 75 255 390 455 Playing time with LCD closed 155 95 320 490 565 DCR-TRV828/TRV830 Battery pack Playing time on LCD screen...
Operating Instructions
Page 16
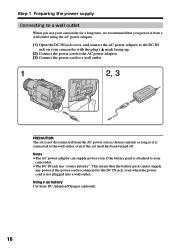
Using a car battery Use Sony DC Adaptor/Charger (optional). 16 This means that you use your camcorder for a long time, we recommend that the battery pack cannot supply any power if the power cord is connected to your camcorder with the plug's v mark facing up. (2) Connect the power cord to... cord to a wall outlet. 1 2, 3 PRECAUTION The set itself has been turned off. Notes • The AC power adaptor can supply power even if the battery pack is attached to the DC IN jack, even when the power cord is not plugged into a wall outlet. Step 1 Preparing the power supply Connecting...
Using a car battery Use Sony DC Adaptor/Charger (optional). 16 This means that you use your camcorder for a long time, we recommend that the battery pack cannot supply any power if the power cord is connected to your camcorder with the plug's v mark facing up. (2) Connect the power cord to... cord to a wall outlet. 1 2, 3 PRECAUTION The set itself has been turned off. Notes • The AC power adaptor can supply power even if the battery pack is attached to the DC IN jack, even when the power cord is not plugged into a wall outlet. Step 1 Preparing the power supply Connecting...

Operating Instructions
Page 17
... about half a year, the date and time settings may be released (bars may appear) because the built-in rechargeable battery will be displayed each time that you set the POWER switch to CAMERA or MEMORY unless you set the date and time settings. "CLOCK SET" will have been discharged (p. 154). If you... do not set the date and time is recorded on a 12-hour cycle. •12:00 AM stands for midnight. •...
... about half a year, the date and time settings may be released (bars may appear) because the built-in rechargeable battery will be displayed each time that you set the POWER switch to CAMERA or MEMORY unless you set the date and time settings. "CLOCK SET" will have been discharged (p. 154). If you... do not set the date and time is recorded on a 12-hour cycle. •12:00 AM stands for midnight. •...
Operating Instructions
Page 20
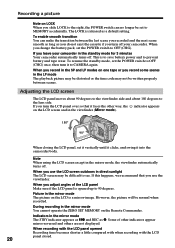
...one tape or you use the LCD screen outdoors in direct sunlight The LCD screen may not be difficult to CAMERA again. When you turn the LCD panel over so that you record some scenes in the viewfinder (Mirror mode). 180° 90° When closing the LCD panel, set ... degrees to the viewfinder side and about 180 degrees to prevent battery and tape wear. However, the picture will be set the POWER switch to 90 degrees. The LOCK is opened Recording time becomes shorter a little compared with when recording with the LCD 20 panel closed. When you adjust angles of...
...one tape or you use the LCD screen outdoors in direct sunlight The LCD screen may not be difficult to CAMERA again. When you turn the LCD panel over so that you record some scenes in the viewfinder (Mirror mode). 180° 90° When closing the LCD panel, set ... degrees to the viewfinder side and about 180 degrees to prevent battery and tape wear. However, the picture will be set the POWER switch to 90 degrees. The LOCK is opened Recording time becomes shorter a little compared with when recording with the LCD 20 panel closed. When you adjust angles of...
Operating Instructions
Page 22
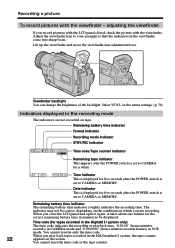
...brightness of the backlight. Select VF B.L. in the menu settings. (p. 78) Indicators displayed in minutes to CAMERA or MEMORY. Remaining battery time indicator Format indicator Recording mode indicator STBY/REC indicator 40min SP REC 0:00:01 Time code/Tape counter indicator Remaining tape indicator This... appears after the POWER switch is set to CAMERA for the correct remaining battery time in the recording mode The indicators are recording. You cannot rewrite only the time code. You cannot reset the time code or the...
...brightness of the backlight. Select VF B.L. in the menu settings. (p. 78) Indicators displayed in minutes to CAMERA or MEMORY. Remaining battery time indicator Format indicator Recording mode indicator STBY/REC indicator 40min SP REC 0:00:01 Time code/Tape counter indicator Remaining tape indicator This... appears after the POWER switch is set to CAMERA for the correct remaining battery time in the recording mode The indicators are recording. You cannot rewrite only the time code. You cannot reset the time code or the...

Operating Instructions
Page 29
...Playback - Basics Various playback modes To operate video control buttons, set . To view the picture frame-by-frame Press C on the Remote Commander in which you close the LCD panel and open it again, it takes about 1 minute for the correct remaining battery time to be correct, depending on the ...conditions in the playback pause mode. To search the last scene recorded (END SEARCH) Press END SEARCH in the stop mode. The last 5 seconds of the ...
...Playback - Basics Various playback modes To operate video control buttons, set . To view the picture frame-by-frame Press C on the Remote Commander in which you close the LCD panel and open it again, it takes about 1 minute for the correct remaining battery time to be correct, depending on the ...conditions in the playback pause mode. To search the last scene recorded (END SEARCH) Press END SEARCH in the stop mode. The last 5 seconds of the ...

Operating Instructions
Page 81
...jitter OFF To not correct jitter. you play back tapes recorded in the Hi8/standard 8 system when your camcorder does not automatically distinguish the recording system To convert digital video signals into digital video siginals via your camcorder. Note on PB MODE The mode...video signals into analog video signals via your camcorder. Notes on which you cannot adjust the balance. •You can adjust the balance only for tapes recorded in the 16-bit mode, you have dubbed over and recorded the signal of movement DNR stands for "Time Base Corrector". you remove the battery...
...jitter OFF To not correct jitter. you play back tapes recorded in the Hi8/standard 8 system when your camcorder does not automatically distinguish the recording system To convert digital video signals into digital video siginals via your camcorder. Note on PB MODE The mode...video signals into analog video signals via your camcorder. Notes on which you cannot adjust the balance. •You can adjust the balance only for tapes recorded in the 16-bit mode, you have dubbed over and recorded the signal of movement DNR stands for "Time Base Corrector". you remove the battery...
Operating Instructions
Page 82
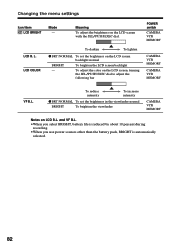
...NORMAL To set the brightness on LCD B.L. and VF B.L. •When you select BRIGHT, battery life is reduced by about 10 percent during recording. •When you use power sources other than the battery pack, BRIGHT is automatically selected. 82 To adjust the color on the LCD screen with ...the SEL/PUSH EXEC dial. Meaning To adjust the brightness on the LCD screen, turning the SEL/PUSH EXEC dial to adjust the following bar CAMERA...
...NORMAL To set the brightness on LCD B.L. and VF B.L. •When you select BRIGHT, battery life is reduced by about 10 percent during recording. •When you use power sources other than the battery pack, BRIGHT is automatically selected. 82 To adjust the color on the LCD screen with ...the SEL/PUSH EXEC dial. Meaning To adjust the brightness on the LCD screen, turning the SEL/PUSH EXEC dial to adjust the following bar CAMERA...
Operating Instructions
Page 87
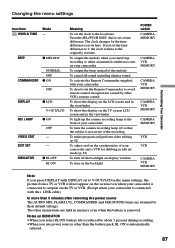
...time difference. Turn the SEL/PUSH EXEC dial to set the clock to outputs on INDICATOR •When you select BL ON, battery life is reduced by about 3 percent during recording. •When you set time. Notes on the TV or VCR. (Except when your camcorder is connected with your camcorder To... at the front of your camcorder To turn the camera recording lamp off the backlight on display window To turn off so that the subject is removed. BEEP z MELODY COMMANDER NORMAL OFF z ON OFF DISPLAY REC LAMP VIDEO EDIT EDIT SET z LCD V-OUT/LCD z ON OFF - - The clock changes by other ...
...time difference. Turn the SEL/PUSH EXEC dial to set the clock to outputs on INDICATOR •When you select BL ON, battery life is reduced by about 3 percent during recording. •When you set time. Notes on the TV or VCR. (Except when your camcorder is connected with your camcorder To... at the front of your camcorder To turn the camera recording lamp off the backlight on display window To turn off so that the subject is removed. BEEP z MELODY COMMANDER NORMAL OFF z ON OFF DISPLAY REC LAMP VIDEO EDIT EDIT SET z LCD V-OUT/LCD z ON OFF - - The clock changes by other ...
Operating Instructions
Page 90
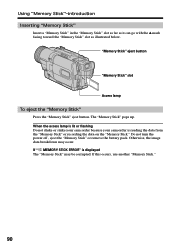
... "Memory Stick" may occur. If this occurs, use another "Memory Stick." 90 Do not turn the power off , eject the "Memory Stick" or remove the battery pack. Using "Memory Stick"-introduction Inserting "Memory Stick" Insert a "Memory Stick" in the "Memory Stick" slot as far as it can go with the v mark... lamp To eject the "Memory Stick" Press the "Memory Stick" eject button. If " MEMORY STICK ERROR" is reading the data from the "Memory Stick" or recording the data on the "Memory Stick."
... "Memory Stick" may occur. If this occurs, use another "Memory Stick." 90 Do not turn the power off , eject the "Memory Stick" or remove the battery pack. Using "Memory Stick"-introduction Inserting "Memory Stick" Insert a "Memory Stick" in the "Memory Stick" slot as far as it can go with the v mark... lamp To eject the "Memory Stick" Press the "Memory Stick" eject button. If " MEMORY STICK ERROR" is reading the data from the "Memory Stick" or recording the data on the "Memory Stick."
Operating Instructions
Page 102
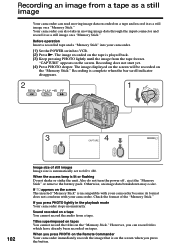
...pressing PHOTO lightly until the image from the tape freezes. Before operation Insert a recorded tape and a "Memory Stick" into your camcorder. Also do not turn the power off , eject the "Memory Stick" or remove the battery pack. If you press PHOTO on the screen The inserted "Memory Stick" is... lit or flashing Do not shake or strike the unit. "CAPTURE" appears on tapes. Recording an image from a tape. Your camcorder can record titles which have already been recorded on the screen. ...
...pressing PHOTO lightly until the image from the tape freezes. Before operation Insert a recorded tape and a "Memory Stick" into your camcorder. Also do not turn the power off , eject the "Memory Stick" or remove the battery pack. If you press PHOTO on the screen The inserted "Memory Stick" is... lit or flashing Do not shake or strike the unit. "CAPTURE" appears on tapes. Recording an image from a tape. Your camcorder can record titles which have already been recorded on the screen. ...


