
Operating Instructions
Page 2
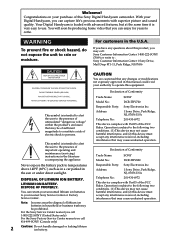
... under direct sunlight. Declaration of Conformity Trade Name: SONY Model No.: DCR-TRV720 Responsible Party: Sony Electronics lnc. WARNING To prevent fire or shock hazard...trash may not cause harmful interference, and (2) this Sony Digital Handycam camcorder. Address: 1 Sony Drive, Park Ridge, NJ, 07656 USA Telephone ...video that you may call 416-499-SONY (Canada only) 2 Caution: Do not handle damaged or leaking lithium ion battery. Note: In some areas the disposal of the FCC Rules. Declaration of Conformity Trade Name: SONY Model No.: DCR-TRV820 Responsible Party: Sony...
... under direct sunlight. Declaration of Conformity Trade Name: SONY Model No.: DCR-TRV720 Responsible Party: Sony Electronics lnc. WARNING To prevent fire or shock hazard...trash may not cause harmful interference, and (2) this Sony Digital Handycam camcorder. Address: 1 Sony Drive, Park Ridge, NJ, 07656 USA Telephone ...video that you may call 416-499-SONY (Canada only) 2 Caution: Do not handle damaged or leaking lithium ion battery. Note: In some areas the disposal of the FCC Rules. Declaration of Conformity Trade Name: SONY Model No.: DCR-TRV820 Responsible Party: Sony...
Operating Instructions
Page 4
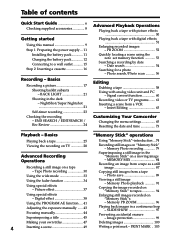
... NightShot/Super Nightshot 21 Self-timer recording 23 Checking the recording - Photo search/Photo scan 56 Editing Dubbing a tape 58 Using with digital effects 51 Enlarging recorded images - Insert Editing 63 Customizing Your Camcorder Changing the menu settings 65 Resetting ...Copying the image recorded on "Memory Stick" to a wall outlet 15 Step 2 Inserting a cassette 16 Recording - Signal convert function 60 Recording video or TV programs ....... 61 Inserting a scene from a tape - PRINT MARK .. 103 Memory Photo recording 79 Advanced Recording Operations Recording a still image...
... NightShot/Super Nightshot 21 Self-timer recording 23 Checking the recording - Photo search/Photo scan 56 Editing Dubbing a tape 58 Using with digital effects 51 Enlarging recorded images - Insert Editing 63 Customizing Your Camcorder Changing the menu settings 65 Resetting ...Copying the image recorded on "Memory Stick" to a wall outlet 15 Step 2 Inserting a cassette 16 Recording - Signal convert function 60 Recording video or TV programs ....... 61 Inserting a scene from a tape - PRINT MARK .. 103 Memory Photo recording 79 Advanced Recording Operations Recording a still image...
Operating Instructions
Page 5
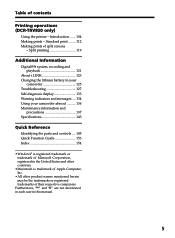
... Making prints of contents Printing operations (DCR-TRV820 only) Using the printer - Split printing 119 Additional Information Digital8 system, recording and playback 121 About i.LINK 123 Changing the lithium battery in your camcorder 125 Troubleshooting 127 Self-diagnosis display 133 Warning indicators and messages .... 134 Using your camcorder abroad .......... 136 Maintenance information and precautions...
... Making prints of contents Printing operations (DCR-TRV820 only) Using the printer - Split printing 119 Additional Information Digital8 system, recording and playback 121 About i.LINK 123 Changing the lithium battery in your camcorder 125 Troubleshooting 127 Self-diagnosis display 133 Warning indicators and messages .... 134 Using your camcorder abroad .......... 136 Maintenance information and precautions...
Operating Instructions
Page 6
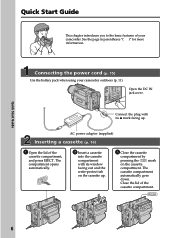
Connecting the power cord (p. 15) Use the battery pack when using your camcorder. AC power adaptor (supplied) Inserting a cassette (p. 16) 1 Open the lid of the cassette compartment. Quick Start Guide 6 Connect the plug with its v mark facing up . 3 ... by pressing the mark on the cassette compartment. The compartment opens automatically. Quick Start Guide This chapter introduces you to the basic features of your camcorder outdoors (p. 11). Open the DC IN jack cover. EJECT 2 Insert a cassette into the cassette compartment with its window facing out and the write-protect tab...
Connecting the power cord (p. 15) Use the battery pack when using your camcorder. AC power adaptor (supplied) Inserting a cassette (p. 16) 1 Open the lid of the cassette compartment. Quick Start Guide 6 Connect the plug with its v mark facing up . 3 ... by pressing the mark on the cassette compartment. The compartment opens automatically. Quick Start Guide This chapter introduces you to the basic features of your camcorder outdoors (p. 11). Open the DC IN jack cover. EJECT 2 Insert a cassette into the cassette compartment with its window facing out and the write-protect tab...
Operating Instructions
Page 7
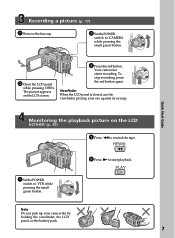
... LCD screen (p. 25) 2 Press m to VTR while pressing the small green button. Your camcorder starts recording. VTR OFF (CHARGE) MEMORY CAMERA Quick Start Guide Monitoring the playback picture on the LCD screen. 4 Press the red button. VTR OFF (CHARGE) MEMORY CAMERA Recording a picture (p. 17) 1 Remove the lens cap. 2 SetthePOWER switch to start playback. OFF (CHARGE...
... LCD screen (p. 25) 2 Press m to VTR while pressing the small green button. Your camcorder starts recording. VTR OFF (CHARGE) MEMORY CAMERA Quick Start Guide Monitoring the playback picture on the LCD screen. 4 Press the red button. VTR OFF (CHARGE) MEMORY CAMERA Recording a picture (p. 17) 1 Remove the lens cap. 2 SetthePOWER switch to start playback. OFF (CHARGE...

Operating Instructions
Page 8
...L10C AC power adaptor (1), Power cord (1) (p. 12) 3 NP-F330 battery pack (1) (p. 11, 12) 4 CR2025 lithium battery (1) (p. 125) The lithium battery is already installed in your camcorder. 5 Size AA (R6) battery for Remote Commander (2) (p. 151) 6 A/V connecting cable (1) (p. 28) 7 Shoulder strap (1) (p. 147) 8 Lens cap (1) (p. 17) 9 PC serial...sheets × 1) Sticker type/Standard size (10 sheets × 1) Sticker type/9 split size (10 sheets × 1) DCR-TRV820 only qd Print cartridge (2) (p. 106) DCR-TRV820 only qf Head cleaner (1) (p. 139) DCR-TRV820 only qg Platen roller cleaner (1) (p. 140...
...L10C AC power adaptor (1), Power cord (1) (p. 12) 3 NP-F330 battery pack (1) (p. 11, 12) 4 CR2025 lithium battery (1) (p. 125) The lithium battery is already installed in your camcorder. 5 Size AA (R6) battery for Remote Commander (2) (p. 151) 6 A/V connecting cable (1) (p. 28) 7 Shoulder strap (1) (p. 147) 8 Lens cap (1) (p. 17) 9 PC serial...sheets × 1) Sticker type/Standard size (10 sheets × 1) Sticker type/9 split size (10 sheets × 1) DCR-TRV820 only qd Print cartridge (2) (p. 106) DCR-TRV820 only qf Head cleaner (1) (p. 139) DCR-TRV820 only qg Platen roller cleaner (1) (p. 140...
Operating Instructions
Page 9
...settings on your camcorder plays back tapes recorded in the Digital8 system. Also, your camcorder are clearly indicated in "Advanced Playback Operations" on TV color systems TV color systems differ from country to the provision of your digital camcorder, you can use... is not made due to CAMERA. To view your camcorder. Type of your recordings on a tape. Unauthorized recording of such materials may be copyrighted. Copyright precautions Television programs, films, video tapes, and other materials may be compensated for example, "DCR-TRV820 only." Getting started ...
...settings on your camcorder plays back tapes recorded in the Digital8 system. Also, your camcorder are clearly indicated in "Advanced Playback Operations" on TV color systems TV color systems differ from country to the provision of your digital camcorder, you can use... is not made due to CAMERA. To view your camcorder. Type of your recordings on a tape. Unauthorized recording of such materials may be copyrighted. Copyright precautions Television programs, films, video tapes, and other materials may be compensated for example, "DCR-TRV820 only." Getting started ...

Operating Instructions
Page 10
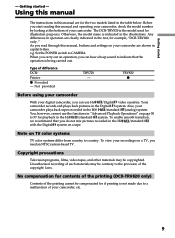
... cannot be compensated if recording or playback is in your camcorder. (DCR-TRV820 only) •Do not place your camcorder so as in a car parked in the sun or under direct sunlight[b]. However, there may cause your camcorder to point the viewfinder,... the LCD screen or lens toward the sun. However, do not affect the recorded picture in the viewfinder. Effective ratio of the camcorder, video...
... cannot be compensated if recording or playback is in your camcorder. (DCR-TRV820 only) •Do not place your camcorder so as in a car parked in the sun or under direct sunlight[b]. However, there may cause your camcorder to point the viewfinder,... the LCD screen or lens toward the sun. However, do not affect the recorded picture in the viewfinder. Effective ratio of the camcorder, video...
Operating Instructions
Page 11
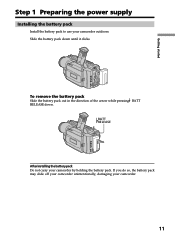
BATT RELEASE After installing the battery pack Do not carry your camcorder outdoors. Getting started Step 1 Preparing the power supply Installing the battery pack Install the battery pack to use your camcorder by holding the battery pack. If you do so, the battery pack may slide off your camcorder unintentionally, damaging your camcorder. 11 To remove the battery pack Slide the battery pack out in the direction of the arrow while pressing BATT RELEASE down until it clicks. Slide the battery pack down .
BATT RELEASE After installing the battery pack Do not carry your camcorder outdoors. Getting started Step 1 Preparing the power supply Installing the battery pack Install the battery pack to use your camcorder by holding the battery pack. If you do so, the battery pack may slide off your camcorder unintentionally, damaging your camcorder. 11 To remove the battery pack Slide the battery pack out in the direction of the arrow while pressing BATT RELEASE down until it clicks. Slide the battery pack down .
Operating Instructions
Page 12
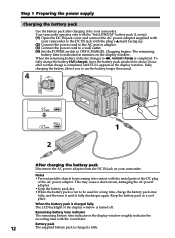
... remaining battery indicator changes to use it until FULL appears in the display window roughly indicates the recording time with the plug's v mark facing up. (2) Connect the power cord to the AC ...Connect the power cord to a wall outlet. (4) Set the POWER switch to be used for your camcorder. To fully charge the battery (full charge), leave the battery pack attached for about 1 hour after...once fully, and then use the battery longer than usual. 4 VTR OFF (CHARGE) MEMORY CAMERA 1 2 After charging the battery pack Disconnect the AC power adaptor from coming into contact with ...
... remaining battery indicator changes to use it until FULL appears in the display window roughly indicates the recording time with the plug's v mark facing up. (2) Connect the power cord to the AC ...Connect the power cord to a wall outlet. (4) Set the POWER switch to be used for your camcorder. To fully charge the battery (full charge), leave the battery pack attached for about 1 hour after...once fully, and then use the battery longer than usual. 4 VTR OFF (CHARGE) MEMORY CAMERA 1 2 After charging the battery pack Disconnect the AC power adaptor from coming into contact with ...

Operating Instructions
Page 13
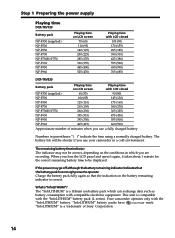
... if you use a fully charged battery Numbers in parentheses "( )" indicate the time using a normally charged battery. * Approximate continuous recording time at 77°F (25°C). min" appears in the following cases: - Charging time Battery pack Full charge (Normal charge...345) 790 (710) 450 (405) Recording with the battery pack. The battery life will be shorter. 13 Getting started Step 1 Preparing the power supply Until your camcorder in a cold environment. ** Approximate number of minutes when you use your camcorder calculates the actual remaining battery time "-...
... if you use a fully charged battery Numbers in parentheses "( )" indicate the time using a normally charged battery. * Approximate continuous recording time at 77°F (25°C). min" appears in the following cases: - Charging time Battery pack Full charge (Normal charge...345) 790 (710) 450 (405) Recording with the battery pack. The battery life will be shorter. 13 Getting started Step 1 Preparing the power supply Until your camcorder in a cold environment. ** Approximate number of minutes when you use your camcorder calculates the actual remaining battery time "-...
Operating Instructions
Page 14
...camcorder operates only with compatible electronic equipment. "InfoLITHIUM" is "InfoLITHIUM"? If the power may not be correct, depending on the battery remaining indicator is correct. Step 1 Preparing the power supply Playing time DCR-TRV720...425 (380) 555 (500) 650 (590) 765 (685) DCR-TRV820 Battery pack Playing time on LCD screen Playing time with LCD ...F960 465 (415) 660 (590) Approximate number of Sony Corporation. 14 When you close the LCD panel and ...enough power to be shorter if you use your camcorder in a cold environment. "InfoLITHIUM" battery packs...
...camcorder operates only with compatible electronic equipment. "InfoLITHIUM" is "InfoLITHIUM"? If the power may not be correct, depending on the battery remaining indicator is correct. Step 1 Preparing the power supply Playing time DCR-TRV720...425 (380) 555 (500) 650 (590) 765 (685) DCR-TRV820 Battery pack Playing time on LCD screen Playing time with LCD ...F960 465 (415) 660 (590) Approximate number of Sony Corporation. 14 When you close the LCD panel and ...enough power to be shorter if you use your camcorder in a cold environment. "InfoLITHIUM" battery packs...

Operating Instructions
Page 15
.... (1) Open the DC IN jack cover, and connect the AC power adaptor to the DC IN jack on your camcorder with the plug's v mark facing up. (2) Connect the power cord to the AC power adaptor. (3) Connect the... has been turned off. This means that you use your camcorder. •The DC IN jack has "source priority". Using a car battery Use Sony DC Adaptor/Charger (not supplied). 15 Notes •The AC... power adaptor can supply power even if the battery pack is attached to your camcorder for a long time, we ...
.... (1) Open the DC IN jack cover, and connect the AC power adaptor to the DC IN jack on your camcorder with the plug's v mark facing up. (2) Connect the power cord to the AC power adaptor. (3) Connect the... has been turned off. This means that you use your camcorder. •The DC IN jack has "source priority". Using a car battery Use Sony DC Adaptor/Charger (not supplied). 15 Notes •The AC... power adaptor can supply power even if the battery pack is attached to your camcorder for a long time, we ...
Operating Instructions
Page 16
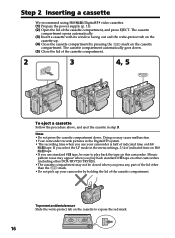
... press any part of the lid other DCR-TRV720/TRV820). •The cassette compartment may cause malfunction. •Your camcorder records pictures in the Digital8 system. • The recording time when you use your camcorder by pressing the mark on other camcorders (including other than the mark. •...;Do not pick up . (4) Close the cassette compartment by holding the lid of indicated time on Hi8 tape. •If you select the LP mode in step 3. Step 2 Inserting a cassette We recommend using Hi8 /Digital8 video...
... press any part of the lid other DCR-TRV720/TRV820). •The cassette compartment may cause malfunction. •Your camcorder records pictures in the Digital8 system. • The recording time when you use your camcorder by pressing the mark on other camcorders (including other than the mark. •...;Do not pick up . (4) Close the cassette compartment by holding the lid of indicated time on Hi8 tape. •If you select the LP mode in step 3. Step 2 Inserting a cassette We recommend using Hi8 /Digital8 video...
Operating Instructions
Page 17
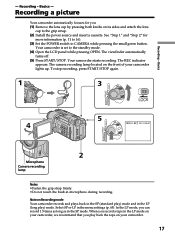
... and in the SP mode. Note on the front of your camcorder. 17 Recording - Select SP or LP in microphone during recording. Your camcorder is set to the grip strap. (2) Install the power source and insert a cassette. The camera recording lamp located on Recording mode Your camcorder records and plays back in the SP (standard play ) mode. The REC...
... and in the SP mode. Note on the front of your camcorder. 17 Recording - Select SP or LP in microphone during recording. Your camcorder is set to the grip strap. (2) Install the power source and insert a cassette. The camera recording lamp located on Recording mode Your camcorder records and plays back in the SP (standard play ) mode. The REC...

Operating Instructions
Page 18
... side and about 180 degrees to OFF (CHARGE). During recording in the mirror mode, the viewfinder automatically turns off . When you use the viewfinder. If you leave your camcorder. This is a mirror-image. If you turn it to CAMERA again. Indicators in the mirror mode The STBY indicator appears...POWER switch can make the transition between the last scene you recorded and the next scene smooth as long as you do not eject the cassette if you turn off your camcorder in the standby mode for 3 minutes Your camcorder automatically turns off . To enable smooth transition You can no...
... side and about 180 degrees to OFF (CHARGE). During recording in the mirror mode, the viewfinder automatically turns off . When you use the viewfinder. If you leave your camcorder. This is a mirror-image. If you turn it to CAMERA again. Indicators in the mirror mode The STBY indicator appears...POWER switch can make the transition between the last scene you recorded and the next scene smooth as long as you do not eject the cassette if you turn off your camcorder in the standby mode for 3 minutes Your camcorder automatically turns off . To enable smooth transition You can no...

Operating Instructions
Page 21
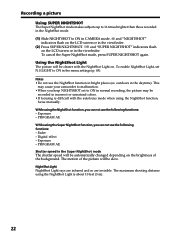
... subjects - Shooting in CAMERA or MEMORY mode. While your camcorder is in the viewfinder. and "NIGHTSHOT" indicators flash on the LCD screen or in CAMERA or MEMORY mode, slide NIGHTSHOT to OFF. To cancel the NightShot function, slide NIGHTSHOT to ON. Recording - Press BACK LIGHT ... shoot a subject in the viewfinder. Basics BACK LIGHT If you use the backlight function. For example, you can satisfactorily record the environment of nocturnal animals for observation when you press EXPOSURE when shooting backlit subjects The backlight function will be canceled. indicator...
... subjects - Shooting in CAMERA or MEMORY mode. While your camcorder is in the viewfinder. and "NIGHTSHOT" indicators flash on the LCD screen or in CAMERA or MEMORY mode, slide NIGHTSHOT to OFF. To cancel the NightShot function, slide NIGHTSHOT to ON. Recording - Press BACK LIGHT ... shoot a subject in the viewfinder. Basics BACK LIGHT If you use the backlight function. For example, you can satisfactorily record the environment of nocturnal animals for observation when you press EXPOSURE when shooting backlit subjects The backlight function will be canceled. indicator...
Operating Instructions
Page 22
... with the autofocus mode when using the Super NightShot function, you keep NIGHTSHOT set N.S.LIGHT to ON in normal recording, the picture may cause your camcorder to ON in CAMERA mode. The motion of the background. NightShot Light NightShot Light rays are infrared and so are invisible. outdoors in... picture will be slow. While using the NightShot Light is difficult with the NightShot Light on the LCD screen or in the viewfinder. Digital effect - To cancel the Super NightShot mode, press SUPER NIGHTSHOT again. PROGRAM AE Shutter speed in the Super NightShot mode The shutter ...
... with the autofocus mode when using the Super NightShot function, you keep NIGHTSHOT set N.S.LIGHT to ON in normal recording, the picture may cause your camcorder to ON in CAMERA mode. The motion of the background. NightShot Light NightShot Light rays are infrared and so are invisible. outdoors in... picture will be slow. While using the NightShot Light is difficult with the NightShot Light on the LCD screen or in the viewfinder. Digital effect - To cancel the Super NightShot mode, press SUPER NIGHTSHOT again. PROGRAM AE Shutter speed in the Super NightShot mode The shutter ...
Operating Instructions
Page 23
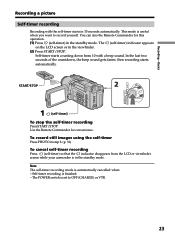
...VTR. 23 Recording - VTR START/STOP 2 OFF (CHARGE) MEMORY CAMERA 1 (self-timer) To stop the self-timer recording Press START/STOP. Basics Recording a picture Self-timer recording Recording with a ...beep sound. Use the Remote Commander for this operation. (1) Press (self-timer) in step 2. (p. 31) To cancel self-timer recording... the LCD screen or in 10 seconds automatically. To record still images using the self-timer Press PHOTO in the...
...VTR. 23 Recording - VTR START/STOP 2 OFF (CHARGE) MEMORY CAMERA 1 (self-timer) To stop the self-timer recording Press START/STOP. Basics Recording a picture Self-timer recording Recording with a ...beep sound. Use the Remote Commander for this operation. (1) Press (self-timer) in step 2. (p. 31) To cancel self-timer recording... the LCD screen or in 10 seconds automatically. To record still images using the self-timer Press PHOTO in the...
Operating Instructions
Page 24
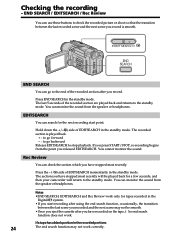
...8226;END SEARCH, EDITSEARCH and Rec Review work only for tapes recorded in the standby mode. You can search for a few seconds, and then your camcorder will be played back for the next recording start recording after using the end search function, occasionally, the transition between... the last recorded scene and the next scene you record. Press the - ( 7) side of the recorded section after you have recorded on the tape, ...
...8226;END SEARCH, EDITSEARCH and Rec Review work only for tapes recorded in the standby mode. You can search for a few seconds, and then your camcorder will be played back for the next recording start recording after using the end search function, occasionally, the transition between... the last recorded scene and the next scene you record. Press the - ( 7) side of the recorded section after you have recorded on the tape, ...


