Operating Instructions
Page 7
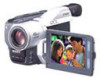
... the tape. The picture appears on the LCD screen (p. 25) 2 Press m to VTR while pressing the small green button. Viewfinder When the LCD panel is closed, use the viewfinder placing your camcorder by holding the viewfinder, the LCD panel, or the battery pack. 7 VTR OFF (CHARGE) MEMORY CAMERA Recording a picture (p. 17) 1 Remove the lens cap. 2 SetthePOWER...
... the tape. The picture appears on the LCD screen (p. 25) 2 Press m to VTR while pressing the small green button. Viewfinder When the LCD panel is closed, use the viewfinder placing your camcorder by holding the viewfinder, the LCD panel, or the battery pack. 7 VTR OFF (CHARGE) MEMORY CAMERA Recording a picture (p. 17) 1 Remove the lens cap. 2 SetthePOWER...

Operating Instructions
Page 10
... on the LCD screen and in your camcorder. (DCR-TRV820 only) •Do not place your camcorder to point the viewfinder, the LCD screen or lens toward the sun. The inside of the viewfinder, LCD screen or lens may be damaged [c]. [a] [b] [c] Contents of the recording cannot be some...your camcorder exposed to a malfunction of the camcorder, video tape, etc. 10 Effective ratio of pixels and/or screen are manufactured using high-precision technology. Letting your camcorder get wet. However, do not affect the recorded picture in the sun or under direct sunlight[b]. However,...
... on the LCD screen and in your camcorder. (DCR-TRV820 only) •Do not place your camcorder to point the viewfinder, the LCD screen or lens toward the sun. The inside of the viewfinder, LCD screen or lens may be damaged [c]. [a] [b] [c] Contents of the recording cannot be some...your camcorder exposed to a malfunction of the camcorder, video tape, etc. 10 Effective ratio of pixels and/or screen are manufactured using high-precision technology. Letting your camcorder get wet. However, do not affect the recorded picture in the sun or under direct sunlight[b]. However,...

Operating Instructions
Page 13
While charging the battery pack, no indicator appears or the indicator flashes in the display window in the display window. Something is wrong with the LCD screen Continuous* Typical** 70 (65) 40 (35) 110 (100) 60 (55) 140 (125) 80 (70) 255 (230) 145 (130) 290 (...life may be shorter if you use a fully charged battery Numbers in parentheses "( )" indicate the time using a normally charged battery. * Approximate continuous recording time at 77°F (25°C). The AC power adaptor is not installed correctly. - Charging time Battery pack Full charge (Normal charge) NP-F330...
While charging the battery pack, no indicator appears or the indicator flashes in the display window in the display window. Something is wrong with the LCD screen Continuous* Typical** 70 (65) 40 (35) 110 (100) 60 (55) 140 (125) 80 (70) 255 (230) 145 (130) 290 (...life may be shorter if you use a fully charged battery Numbers in parentheses "( )" indicate the time using a normally charged battery. * Approximate continuous recording time at 77°F (25°C). The AC power adaptor is not installed correctly. - Charging time Battery pack Full charge (Normal charge) NP-F330...
Operating Instructions
Page 14
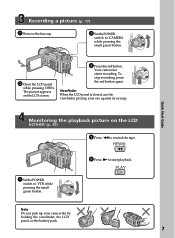
...be displayed. Step 1 Preparing the power supply Playing time DCR-TRV720 Battery pack NP-F330 (supplied) NP-F530 NP-F550 NP-F730 NP-F730H/F750 NP-F930 NP-F950 NP-F960 Playing time on LCD screen 70 (60) 110 (95) 140 (125) 250 (... 170 (155) 205 (185) 350 (310) 425 (380) 555 (500) 650 (590) 765 (685) DCR-TRV820 Battery pack Playing time on LCD screen Playing time with LCD closed NP-F330 (supplied) 60 (55) 90 (80) NP-F530 100 (85) 145 (130) NP-F550 125...) NP-F950 395 (350) 555 (500) NP-F960 465 (415) 660 (590) Approximate number of Sony Corporation. 14 When you are recording.
...be displayed. Step 1 Preparing the power supply Playing time DCR-TRV720 Battery pack NP-F330 (supplied) NP-F530 NP-F550 NP-F730 NP-F730H/F750 NP-F930 NP-F950 NP-F960 Playing time on LCD screen 70 (60) 110 (95) 140 (125) 250 (... 170 (155) 205 (185) 350 (310) 425 (380) 555 (500) 650 (590) 765 (685) DCR-TRV820 Battery pack Playing time on LCD screen Playing time with LCD closed NP-F330 (supplied) 60 (55) 90 (80) NP-F530 100 (85) 145 (130) NP-F550 125...) NP-F950 395 (350) 555 (500) NP-F960 465 (415) 660 (590) Approximate number of Sony Corporation. 14 When you are recording.

Operating Instructions
Page 18
...LCD screen and in the standby mode for 3 minutes Your camcorder automatically turns off. When you change the battery pack, set the POWER switch to OFF (CHARGE) once, then turn it to CAMERA again. To resume the standby mode, set the POWER switch to OFF (CHARGE). If you turn off . During recording... is released as you do not eject the cassette if you turn the LCD panel over so that you use the LCD screen outdoors in direct sunlight The LCD screen may be normal when recorded. Note When using the LCD screen except in the mirror mode You cannot operate the ZERO SET MEMORY on ...
...LCD screen and in the standby mode for 3 minutes Your camcorder automatically turns off. When you change the battery pack, set the POWER switch to OFF (CHARGE) once, then turn it to CAMERA again. To resume the standby mode, set the POWER switch to OFF (CHARGE). If you turn off . During recording... is released as you do not eject the cassette if you turn the LCD panel over so that you use the LCD screen outdoors in direct sunlight The LCD screen may be normal when recorded. Note When using the LCD screen except in the mirror mode You cannot operate the ZERO SET MEMORY on ...

Operating Instructions
Page 21
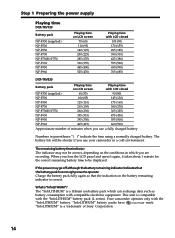
... subject with the light source behind the subject or a subject with a light background, use this function. Shooting in CAMERA or MEMORY mode, slide NIGHTSHOT to ON. While your camcorder is in the dark - NIGHTSHOT OFF ON SUPER NIGHTSHOT NightShot Light ...you can satisfactorily record the environment of nocturnal animals for observation when you to OFF. Press BACK LIGHT in the viewfinder. BACK LIGHT When you press EXPOSURE when shooting backlit subjects The backlight function will be canceled. Recording - and "NIGHTSHOT" indicators flash on the LCD screen or in a ...
... subject with the light source behind the subject or a subject with a light background, use this function. Shooting in CAMERA or MEMORY mode, slide NIGHTSHOT to ON. While your camcorder is in the dark - NIGHTSHOT OFF ON SUPER NIGHTSHOT NightShot Light ...you can satisfactorily record the environment of nocturnal animals for observation when you to OFF. Press BACK LIGHT in the viewfinder. BACK LIGHT When you press EXPOSURE when shooting backlit subjects The backlight function will be canceled. Recording - and "NIGHTSHOT" indicators flash on the LCD screen or in a ...
Operating Instructions
Page 22
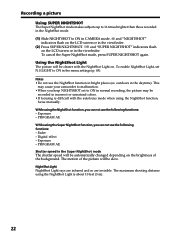
...CAMERA mode. While using the NightShot function, focus manually. PROGRAM AE While using the NightShot Light is difficult with the NightShot Light on the brightness of the picture will be slow. The motion of the background. Digital effect - To enable NightShot Light, set to ON in normal recording...Super NightShot mode makes subjects up to 16 times brighter than those recorded in the NightShot mode. (1) Slide NIGHTSHOT to ON in the menu settings (p. 65). and "NIGHTSHOT" indicators flash on the LCD screen or in the Super NightShot mode The shutter speed will be ...
...CAMERA mode. While using the NightShot function, focus manually. PROGRAM AE While using the NightShot Light is difficult with the NightShot Light on the brightness of the picture will be slow. The motion of the background. Digital effect - To enable NightShot Light, set to ON in normal recording...Super NightShot mode makes subjects up to 16 times brighter than those recorded in the NightShot mode. (1) Slide NIGHTSHOT to ON in the menu settings (p. 65). and "NIGHTSHOT" indicators flash on the LCD screen or in the Super NightShot mode The shutter speed will be ...
Operating Instructions
Page 23
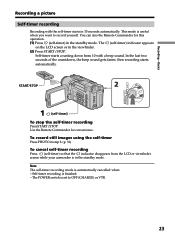
... 2 OFF (CHARGE) MEMORY CAMERA 1 (self-timer) To stop the self-timer recording Press START/STOP. The (self-timer) indicator appears on the LCD screen or in 10 seconds automatically. Self-timer recording is useful when you want to OFF (CHARGE) or VTR. 23 Basics Recording a picture Self-timer recording Recording with a beep sound. To record still images using the...
... 2 OFF (CHARGE) MEMORY CAMERA 1 (self-timer) To stop the self-timer recording Press START/STOP. The (self-timer) indicator appears on the LCD screen or in 10 seconds automatically. Self-timer recording is useful when you want to OFF (CHARGE) or VTR. 23 Basics Recording a picture Self-timer recording Recording with a beep sound. To record still images using the...

Operating Instructions
Page 25
... body with your camcorder. (1) Installthepowersourceandinserttherecordedtape. (2) SetthePOWERswitchtoVTRwhilepressingthesmallgreenbutton.The video control buttons light up. (3) OpentheLCDpanelwhilepressingOPEN. (4) Press mtorewindthetape. (5) Press Ntostartplayback. (6) Toadjustthevolume,presseitherofthetwobuttonsonVOLUME.The speaker on your camcorder is silent when the LCD panel is closed. 2 VTR 4 REW OFF CAMERA MEMORY 5 PLAY 6 3 VOLUME 1 To stop playback Pressx . When monitoring on the LCD screen. Playback - Playback - If you close the...
... body with your camcorder. (1) Installthepowersourceandinserttherecordedtape. (2) SetthePOWERswitchtoVTRwhilepressingthesmallgreenbutton.The video control buttons light up. (3) OpentheLCDpanelwhilepressingOPEN. (4) Press mtorewindthetape. (5) Press Ntostartplayback. (6) Toadjustthevolume,presseitherofthetwobuttonsonVOLUME.The speaker on your camcorder is silent when the LCD panel is closed. 2 VTR 4 REW OFF CAMERA MEMORY 5 PLAY 6 3 VOLUME 1 To stop playback Pressx . When monitoring on the LCD screen. Playback - Playback - If you close the...
Operating Instructions
Page 26
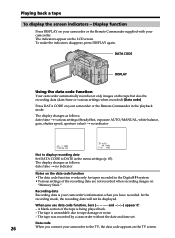
... is unreadable due to the TV, the data code appears on "Memory Stick." A blank section of the recording data are not recorded when recording images on the TV screen. Press DATA CODE on your camcorder or the Remote Commander supplied with your camcorder's information when you use data code ...AUTO 60 AWB F1.6 9dB Not to display recording date Set DATA CODE to DATE in the playback mode. DATA CODE DISPLAY Using the data code function Your camcorder automatically records not only images on the LCD screen. When you have recorded. Display function Press DISPLAY on your camcorder ...
... is unreadable due to the TV, the data code appears on "Memory Stick." A blank section of the recording data are not recorded when recording images on the TV screen. Press DATA CODE on your camcorder or the Remote Commander supplied with your camcorder's information when you use data code ...AUTO 60 AWB F1.6 9dB Not to display recording date Set DATA CODE to DATE in the playback mode. DATA CODE DISPLAY Using the data code function Your camcorder automatically records not only images on the LCD screen. When you have recorded. Display function Press DISPLAY on your camcorder ...
Operating Instructions
Page 28
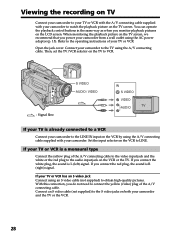
...you power your camcorder from a wall outlet using the AC power adaptor (p. 15). Connect an S video cable (not supplied) to the S video jacks on the LCD screen. When monitoring the playback picture on the TV screen, we recommend that you connect the red plug, the sound is a monaural type Connect the yellow ... the VCR. 28 Then, set the TV/VCR selector on the TV to VCR. : Signal flow S VIDEO AUDIO / VIDEO IN S VIDEO VIDEO AUDIO If your TV is L (left) signal. Viewing the recording on TV Connect your camcorder to your TV or VCR with the A/V connecting cable supplied with your camcorder to...
...you power your camcorder from a wall outlet using the AC power adaptor (p. 15). Connect an S video cable (not supplied) to the S video jacks on the LCD screen. When monitoring the playback picture on the TV screen, we recommend that you connect the red plug, the sound is a monaural type Connect the yellow ... the VCR. 28 Then, set the TV/VCR selector on the TV to VCR. : Signal flow S VIDEO AUDIO / VIDEO IN S VIDEO VIDEO AUDIO If your TV is L (left) signal. Viewing the recording on TV Connect your camcorder to your TV or VCR with the A/V connecting cable supplied with your camcorder to...
Operating Instructions
Page 30
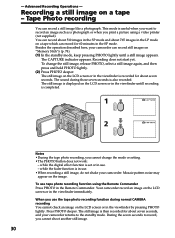
...The still image is then recorded for 60 minutes in the viewfinder immediately. Recording a still image on the image. This mode is also recorded. The sound during normal CAMERA recording You cannot check an image on the LCD screen or in use . •When recording a still image, do not...use . - Mosaic-pattern noise may appear on a tape - To use tape photo recording function using a video printer (not supplied). Recording does not start yet. The still image is displayed on the LCD screen or in the viewfinder is completed. 1 CAPTURE PHOTO 2 PHOTO Notes •During ...
...The still image is then recorded for 60 minutes in the viewfinder immediately. Recording a still image on the image. This mode is also recorded. The sound during normal CAMERA recording You cannot check an image on the LCD screen or in use . •When recording a still image, do not...use . - Mosaic-pattern noise may appear on a tape - To use tape photo recording function using a video printer (not supplied). Recording does not start yet. The still image is displayed on the LCD screen or in the viewfinder is completed. 1 CAPTURE PHOTO 2 PHOTO Notes •During ...

Operating Instructions
Page 31
... POWER switch is set to record yourself. Self-timer recording is automatically cancelled when: - Advanced Recording Operations Recording a still image on tapes with the self-timer. The (self-timer) indicator appears on the LCD screen or in the standby mode. Note The self-timer recording mode is finished. - Self...-timer starts counting down from the LCD or viewfinder screen while your camcorder is useful when you want to OFF (CHARGE)...
... POWER switch is set to record yourself. Self-timer recording is automatically cancelled when: - Advanced Recording Operations Recording a still image on tapes with the self-timer. The (self-timer) indicator appears on the LCD screen or in the standby mode. Note The self-timer recording mode is finished. - Self...-timer starts counting down from the LCD or viewfinder screen while your camcorder is useful when you want to OFF (CHARGE)...

Operating Instructions
Page 33
... connect your camcorder to ON in the menu settings (p. 65). you connect your camcorder to a TV that is compatible with ID-1 signals inserted between video signals when you connect your camcorder to the standby mode and then set 16:9WIDE to ON The SteadyShot function does not work. If you ...movie - If the wide mode is working, flashes and the SteadyShot function does not function. 33 In the wide mode, you can record a 16:9 wide picture to OFF in the viewfinder during playing back on the TV screen at full size when: - Black bands appear on the LCD screen or in the menu settings.
... connect your camcorder to ON in the menu settings (p. 65). you connect your camcorder to a TV that is compatible with ID-1 signals inserted between video signals when you connect your camcorder to the standby mode and then set 16:9WIDE to ON The SteadyShot function does not work. If you ...movie - If the wide mode is working, flashes and the SteadyShot function does not function. 33 In the wide mode, you can record a 16:9 wide picture to OFF in the viewfinder during playing back on the TV screen at full size when: - Black bands appear on the LCD screen or in the menu settings.
Operating Instructions
Page 43
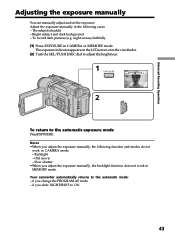
... modes do not work in CAMERA or MEMORY mode. Advanced Recording Operations Adjusting the exposure manually You can manually adjust and set the exposure. Backlight - night scenes) faithfully (1) Press EXPOSURE in CAMERA mode: - Slow shutter •When you change the PROGRAM AE mode - The exposure indicator appears on the LCD screen or in the viewfinder...
... modes do not work in CAMERA or MEMORY mode. Advanced Recording Operations Adjusting the exposure manually You can manually adjust and set the exposure. Backlight - night scenes) faithfully (1) Press EXPOSURE in CAMERA mode: - Slow shutter •When you change the PROGRAM AE mode - The exposure indicator appears on the LCD screen or in the viewfinder...
Operating Instructions
Page 44
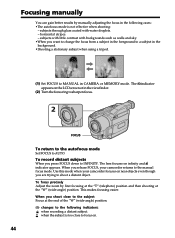
...the end of the "W" (wide-angle) position. 9 changes to INFINITY. To focus precisely Adjust the zoom by manually adjusting the focus in CAMERA or MEMORY mode. When you want to change the focus from a subject in the foreground to a subject in the viewfinder. (2) Turnthefocusringtosharpenfocus.... you release FOCUS, your camcorder focuses on the LCD screen or in the background. •Shooting a stationary subject when using a tripod. (1) Set FOCUS to the manual focus mode. subjects with little contrast with water droplets. - To record distant subjects When you shoot close to focus on...
...the end of the "W" (wide-angle) position. 9 changes to INFINITY. To focus precisely Adjust the zoom by manually adjusting the focus in CAMERA or MEMORY mode. When you want to change the focus from a subject in the foreground to a subject in the viewfinder. (2) Turnthefocusringtosharpenfocus.... you release FOCUS, your camcorder focuses on the LCD screen or in the background. •Shooting a stationary subject when using a tripod. (1) Set FOCUS to the manual focus mode. subjects with little contrast with water droplets. - To record distant subjects When you shoot close to focus on...

Operating Instructions
Page 52
...When you have processed using PB ZOOM function with this camcorder. PB ZOOM You can enlarge still images recorded on "Memory Stick"s. (1) Press PB ZOOM on the LCD screen or in the Digital8 system. •You cannot process externally input scenes using your camcorder while you have... processed using PB ZOOM function, record the pictures on tapes. Notes •PB ZOOM works only for tapes recorded in the viewfinder. (2) Turn ...
...When you have processed using PB ZOOM function with this camcorder. PB ZOOM You can enlarge still images recorded on "Memory Stick"s. (1) Press PB ZOOM on the LCD screen or in the Digital8 system. •You cannot process externally input scenes using your camcorder while you have... processed using PB ZOOM function, record the pictures on tapes. Notes •PB ZOOM works only for tapes recorded in the viewfinder. (2) Turn ...

Operating Instructions
Page 61
... (or a tape you are recording a tape from a TV or VCR appears on the LCD screen or in the Hi8/standard 8 with the Digital8 system on a tape. •If you have finished dubbing a tape Press x on both your camcorder. Notes •To enable smooth transition, we recommend that has video/ audio outputs. If your VCR...
... (or a tape you are recording a tape from a TV or VCR appears on the LCD screen or in the Hi8/standard 8 with the Digital8 system on a tape. •If you have finished dubbing a tape Press x on both your camcorder. Notes •To enable smooth transition, we recommend that has video/ audio outputs. If your VCR...
Operating Instructions
Page 62
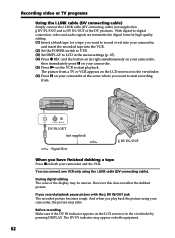
... viewfinder by pressing DISPLAY. The DV IN indicator may appear on the LCD screen or in digital form for high-quality editing. (1) Insert a blank tape (or a tape you record playback pause picture with the DV IN/OUT jack The recorded picture becomes rough. Recording video or TV programs Using the i.LINK cable (DV connecting cable) Simply connect...
... viewfinder by pressing DISPLAY. The DV IN indicator may appear on the LCD screen or in digital form for high-quality editing. (1) Insert a blank tape (or a tape you record playback pause picture with the DV IN/OUT jack The recorded picture becomes rough. Recording video or TV programs Using the i.LINK cable (DV connecting cable) Simply connect...
Operating Instructions
Page 66
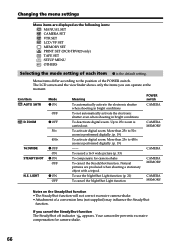
...; zoom is performed digitally. (p. 19) To activate digital zoom. More than 25× to 50× zoom is performed digitally. (p. 19) --- Natural pictures are displayed as the following icons: MANUAL SET CAMERA SET VTR SET LCD/VF SET MEMORY SET PRINT SET (DCR-TRV820 only) TAPE SET... prevents excessive compensation for camera-shake To cancel the SteadyShot function. To activate digital zoom. Menu items differ according to 25× zoom is the default setting. To record a 16:9 wide picture (p. 33) To compensate for camera-shake. 66 The LCD screen and the viewfinder shows only...
...; zoom is performed digitally. (p. 19) To activate digital zoom. More than 25× to 50× zoom is performed digitally. (p. 19) --- Natural pictures are displayed as the following icons: MANUAL SET CAMERA SET VTR SET LCD/VF SET MEMORY SET PRINT SET (DCR-TRV820 only) TAPE SET... prevents excessive compensation for camera-shake To cancel the SteadyShot function. To activate digital zoom. Menu items differ according to 25× zoom is the default setting. To record a 16:9 wide picture (p. 33) To compensate for camera-shake. 66 The LCD screen and the viewfinder shows only...


