Operating Instructions
Page 1
AC- Model No. Record the serial number in the space provided below. Serial No. DCR-TRV Model No. Serial No. DCR-TRV520 DCR-TRV520/TRV525 ©2000 Sony Corporation Refer to these numbers whenever you call upon your Sony dealer regarding this manual thoroughly, and retain it for future reference. 3-059-561-11 (2) Digital Video Camera Recorder Operating Instructions Before operating the unit, please read this product. Owner's Record The model and serial numbers are located on the bottom.
AC- Model No. Record the serial number in the space provided below. Serial No. DCR-TRV Model No. Serial No. DCR-TRV520 DCR-TRV520/TRV525 ©2000 Sony Corporation Refer to these numbers whenever you call upon your Sony dealer regarding this manual thoroughly, and retain it for future reference. 3-059-561-11 (2) Digital Video Camera Recorder Operating Instructions Before operating the unit, please read this product. Owner's Record The model and serial numbers are located on the bottom.
Operating Instructions
Page 4
... Viewing the recording on TV 27 Advanced Recording Operations Recording a still image on "Memory Stick" - Photo save 87 Shooting in your camcorder 106 Focusing manually 43 Superimposing a title 44 Making your own titles 46 Inserting a scene 48 Troubleshooting 108 Self-diagnosis display 113 Warning indicators and messages 114 Using your camcorder abroad 116 Advanced Playback Operations Playing back a tape with picture effects ..... 49 Playing back a tape with analog video unit and PC - Picture effect 36 Using special effects - Basics Recording a picture...
... Viewing the recording on TV 27 Advanced Recording Operations Recording a still image on "Memory Stick" - Photo save 87 Shooting in your camcorder 106 Focusing manually 43 Superimposing a title 44 Making your own titles 46 Inserting a scene 48 Troubleshooting 108 Self-diagnosis display 113 Warning indicators and messages 114 Using your camcorder abroad 116 Advanced Playback Operations Playing back a tape with picture effects ..... 49 Playing back a tape with analog video unit and PC - Picture effect 36 Using special effects - Basics Recording a picture...

Operating Instructions
Page 8
... manual The instructions in this manual and operating your camcorder, check the model number by looking at the bottom of difference DCRviewfinder TRV520 B/W TRV525 Color Before using your camcorder With your camcorder plays back tapes recorded in the Digital8 system. Any differences in operation are clearly indicated in the text, for playback in the Hi8 /standard 8 with the Digital8 system on your recordings on a TV, you do not mix pictures recorded...
... manual The instructions in this manual and operating your camcorder, check the model number by looking at the bottom of difference DCRviewfinder TRV520 B/W TRV525 Color Before using your camcorder With your camcorder plays back tapes recorded in the Digital8 system. Any differences in operation are clearly indicated in the text, for playback in the Hi8 /standard 8 with the Digital8 system on your recordings on a TV, you do not mix pictures recorded...

Operating Instructions
Page 13
... the LCD panel and open it again, it takes about 1 minute for the correct remaining battery time to be displayed. When you are recording. Ift hepowermaygooffalthoughthebatteryremainingindicatorindicatesthat the battery pack has enough power to operate Charge the battery pack fully again so that the indication on the battery remaining indicator is a trademark of minutes when you use your camcorder in which can exchange data such as battery...
... the LCD panel and open it again, it takes about 1 minute for the correct remaining battery time to be displayed. When you are recording. Ift hepowermaygooffalthoughthebatteryremainingindicatorindicatesthat the battery pack has enough power to operate Charge the battery pack fully again so that the indication on the battery remaining indicator is a trademark of minutes when you use your camcorder in which can exchange data such as battery...
Operating Instructions
Page 17
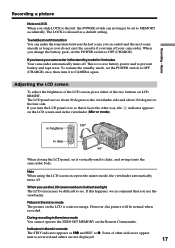
... closing the LCD panel, set the POWER switch to the lens side. If you use the viewfinder. When you leave your camcorder. If you use the LCD screen outdoors in the standby mode for 3 minutes Your camcorder automatically turns off . Note When using the LCD screen except in the mirror mode The STBY indicator appears as Xz and REC as you do not eject the cassette if you turn the LCD panel...
... closing the LCD panel, set the POWER switch to the lens side. If you use the viewfinder. When you leave your camcorder. If you use the LCD screen outdoors in the standby mode for 3 minutes Your camcorder automatically turns off . Note When using the LCD screen except in the mirror mode The STBY indicator appears as Xz and REC as you do not eject the cassette if you turn the LCD panel...
Operating Instructions
Page 19
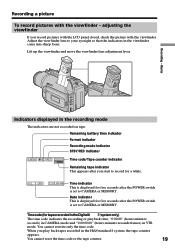
... CAMERA or MEMORY. You cannot reset the time code or the tape counter. 19 adjusting the viewfinder If you record pictures with the LCD panel closed, check the picture with the viewfinder - Remaining battery time indicator Format indicator Recording mode indicator STBY/REC indicator 40min SP REC 0:00:01 Time code/Tape counter indicator Remaining tape indicator This appears after the POWER switch is set to record for tapes recorded in the Digital8 system only) The time code indicates the recording or playback time...
... CAMERA or MEMORY. You cannot reset the time code or the tape counter. 19 adjusting the viewfinder If you record pictures with the LCD panel closed, check the picture with the viewfinder - Remaining battery time indicator Format indicator Recording mode indicator STBY/REC indicator 40min SP REC 0:00:01 Time code/Tape counter indicator Remaining tape indicator This appears after the POWER switch is set to record for tapes recorded in the Digital8 system only) The time code indicates the recording or playback time...
Operating Instructions
Page 27
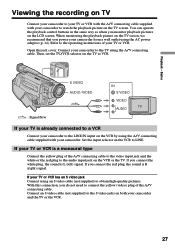
... camcorder to connect the yellow (video) plug of the A/V connecting cable to the video input jack and the white or the red plug to obtain high-quality pictures. Refer to LINE. Set the input selector on the TV to VCR. : Signal flow S VIDEO AUDIO / VIDEO IN S VIDEO VIDEO AUDIO If your TV is a monaural type Connect the yellow plug of the A/V connecting cable. Basics Viewing the recording on the TV screen. With this connection, you do not need to watch the playback picture...
... camcorder to connect the yellow (video) plug of the A/V connecting cable to the video input jack and the white or the red plug to obtain high-quality pictures. Refer to LINE. Set the input selector on the TV to VCR. : Signal flow S VIDEO AUDIO / VIDEO IN S VIDEO VIDEO AUDIO If your TV is a monaural type Connect the yellow plug of the A/V connecting cable. Basics Viewing the recording on the TV screen. With this connection, you do not need to watch the playback picture...
Operating Instructions
Page 28
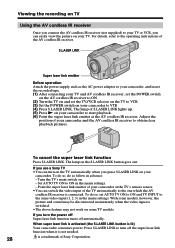
... recorded tape. (1) After connecting your TV and AV cordless IR receiver, set the POWER switch on the AV cordless IR receiver to ON. (2) Turn the TV on and set AUTO TV ON to ON and TV INPUT to the same video input (1, 2, 3) in the menu settings. When super laser link is activated (the S.LASER LINK button is switched. • The above feature may not work on your camcorder...
... recorded tape. (1) After connecting your TV and AV cordless IR receiver, set the POWER switch on the AV cordless IR receiver to ON. (2) Turn the TV on and set AUTO TV ON to ON and TV INPUT to the same video input (1, 2, 3) in the menu settings. When super laser link is activated (the S.LASER LINK button is switched. • The above feature may not work on your camcorder...
Operating Instructions
Page 29
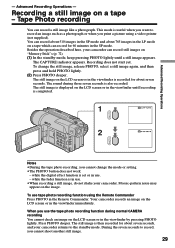
... use the tape photo recording function during those seven seconds is in use tape photo recording function using a video printer (not supplied). The CAPTURE indicator appears. You can record still images on a tape - Besides the operation described here, your camcorder. Recording a still image on "Memory Stick"s (p. 72). (1) In the standby mode, keep pressing PHOTO lightly until a still image appears. Mosaic-pattern noise may appear on a tape which can record a still image like a photograph. Advanced Recording Operations - When you cannot shoot another still image...
... use the tape photo recording function during those seven seconds is in use tape photo recording function using a video printer (not supplied). The CAPTURE indicator appears. You can record still images on a tape - Besides the operation described here, your camcorder. Recording a still image on "Memory Stick"s (p. 72). (1) In the standby mode, keep pressing PHOTO lightly until a still image appears. Mosaic-pattern noise may appear on a tape which can record a still image like a photograph. Advanced Recording Operations - When you cannot shoot another still image...
Operating Instructions
Page 32
... screen mode of the wide-screen TV to other equipment by an A/V connecting cable. Old movie - Connection for a TV Pictures recorded in the menu settings. Using the wide mode You can watch on the 16:9 wide-screen TV (16:9 WIDE). ID-2 system The ID-2 system sends a copyright protection signal with the video ID (ID-1/ID-2) system. - Black bands appear on the LCD screen or in the viewfinder (DCR-TRV525) during playing...
... screen mode of the wide-screen TV to other equipment by an A/V connecting cable. Old movie - Connection for a TV Pictures recorded in the menu settings. Using the wide mode You can watch on the 16:9 wide-screen TV (16:9 WIDE). ID-2 system The ID-2 system sends a copyright protection signal with the video ID (ID-1/ID-2) system. - Black bands appear on the LCD screen or in the viewfinder (DCR-TRV525) during playing...
Operating Instructions
Page 59
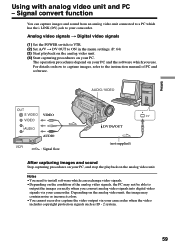
...) jack to the instruction manual of the analog video signals, the PC may contain noise or incorrect colors. •You cannot record or capture the video output via your PC, and stop the playback on the condition of PC and software. For details on your camcorder. Analog video signals t Digital video signals (1) Set the POWER switch to VTR. (2) Set A/V t DV OUT to output the images correctly when you use. AUDIO / VIDEO OUT S VIDEO VIDEO VIDEO AUDIO AUDIO : Signal flow...
...) jack to the instruction manual of the analog video signals, the PC may contain noise or incorrect colors. •You cannot record or capture the video output via your PC, and stop the playback on the condition of PC and software. For details on your camcorder. Analog video signals t Digital video signals (1) Set the POWER switch to VTR. (2) Set A/V t DV OUT to output the images correctly when you use. AUDIO / VIDEO OUT S VIDEO VIDEO VIDEO AUDIO AUDIO : Signal flow...
Operating Instructions
Page 65
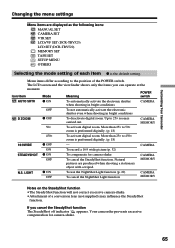
.../item Mode Meaning switch AUTO SHTR z ON To automatically activate the electronic shutter when shooting in bright conditions CAMERA OFF To not automatically activate the electronic shutter even when shooting in bright conditions D ZOOM z OFF 50× To deactivate digital zoom. Customizing Your Camcorder Changing the menu settings Menu items are produced when shooting a stationary object with a tripod. Natural pictures are displayed as the following icons: MANUAL SET CAMERA SET VTR SET LCD/VF SET (DCR-TRV525) LCD SET (DCR-TRV520) MEMORY SET TAPE SET SETUP MENU...
.../item Mode Meaning switch AUTO SHTR z ON To automatically activate the electronic shutter when shooting in bright conditions CAMERA OFF To not automatically activate the electronic shutter even when shooting in bright conditions D ZOOM z OFF 50× To deactivate digital zoom. Customizing Your Camcorder Changing the menu settings Menu items are produced when shooting a stationary object with a tripod. Natural pictures are displayed as the following icons: MANUAL SET CAMERA SET VTR SET LCD/VF SET (DCR-TRV525) LCD SET (DCR-TRV520) MEMORY SET TAPE SET SETUP MENU...
Operating Instructions
Page 68
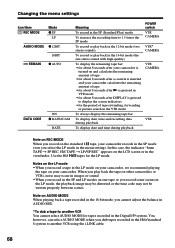
... select the LP mode in the menu settings. Changing the menu settings Icon/item REC MODE Mode z SP LP AUDIO MODE z 12BIT 16BIT q REMAIN z AUTO DATA CODE ON z DATE/CAM DATE Meaning To record in the SP (Standard Play) mode To increase the recording time to 1.5 times the SP mode To record or play back in the 12-bit mode (two stereo sounds) To record or play back the tape on other camcorders or VCRs, noise may occur in images or sound. •When you...
... select the LP mode in the menu settings. Changing the menu settings Icon/item REC MODE Mode z SP LP AUDIO MODE z 12BIT 16BIT q REMAIN z AUTO DATA CODE ON z DATE/CAM DATE Meaning To record in the SP (Standard Play) mode To increase the recording time to 1.5 times the SP mode To record or play back in the 12-bit mode (two stereo sounds) To record or play back the tape on other camcorders or VCRs, noise may occur in images or sound. •When you...
Operating Instructions
Page 77
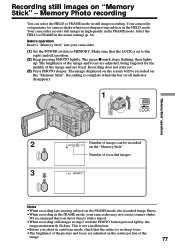
... FRAME mode, the recorded image blurry. •When recording in the FRAME mode, your camcorder. (1) Set the POWER switch to the right (unlock) position. (2) Keep pressing PHOTO lightly. Your camcorder records still images in high quality in the menu settings (p. 64). Recording is set to MEMORY. The image displayed on the screen will be recorded on the center portion of recorded images PHOTO 3 FINE PHOTO Notes •When recording fast-moving subjects in still image recording. Recording still images on the "Memory Stick". Memory Photo recording You...
... FRAME mode, the recorded image blurry. •When recording in the FRAME mode, your camcorder. (1) Set the POWER switch to the right (unlock) position. (2) Keep pressing PHOTO lightly. Your camcorder records still images in high quality in the menu settings (p. 64). Recording is set to MEMORY. The image displayed on the screen will be recorded on the center portion of recorded images PHOTO 3 FINE PHOTO Notes •When recording fast-moving subjects in still image recording. Recording still images on the "Memory Stick". Memory Photo recording You...
Operating Instructions
Page 85
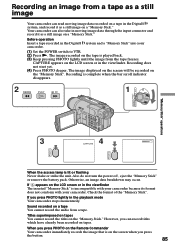
... played back. (3) Keep pressing PHOTO lightly until the image from a tape. Before operation Insert a tape recorded in the playback mode Your camcorder stops momentarily. Also do not turn the power off , eject the "Memory Stick" or remove the battery pack. Sound recorded on a tape You cannot record the audio from the tape freezes. Recording does not start yet. (4) Press PHOTO deeper. Recording an image from a tape as a still image Your camcorder can read moving image data through the input connector and record it as a still image on a "Memory Stick...
... played back. (3) Keep pressing PHOTO lightly until the image from a tape. Before operation Insert a tape recorded in the playback mode Your camcorder stops momentarily. Also do not turn the power off , eject the "Memory Stick" or remove the battery pack. Sound recorded on a tape You cannot record the audio from the tape freezes. Recording does not start yet. (4) Press PHOTO deeper. Recording an image from a tape as a still image Your camcorder can read moving image data through the input connector and record it as a still image on a "Memory Stick...
Operating Instructions
Page 102
... Digital8 system camcorder on the LCD screen, in the SP mode.) * If you use your camcorder that has recorded copyright control signals for copyright protection of systems, the screen turns blue, and the following displays appear. t / : During switching from Digital8 to play back Using any other DCR-TRV520/TRV525). Your camcorder does not record copyright control signals on other VCRs (including other video camera recorder, you record You cannot record software on a tape that contains copyright control signals...
... Digital8 system camcorder on the LCD screen, in the SP mode.) * If you use your camcorder that has recorded copyright control signals for copyright protection of systems, the screen turns blue, and the following displays appear. t / : During switching from Digital8 to play back Using any other DCR-TRV520/TRV525). Your camcorder does not record copyright control signals on other VCRs (including other video camera recorder, you record You cannot record software on a tape that contains copyright control signals...

Operating Instructions
Page 109
... menu settings. c Clean the heads using the Sony V8-25CLD cleaning cassette (not supplied). (p. 118) No sound or only a low sound is heard when playing back a tape. • The stereo tape is set to ON. c Set it to STEREO. (p. 64) • The volume is turned to /standard 8 system is set to ST2 side in the menu settings. (p. 64) (Continued on the following page) 109 c Open the LCD panel and press VOLUME +. (p. 24) • AUDIO...
... menu settings. c Clean the heads using the Sony V8-25CLD cleaning cassette (not supplied). (p. 118) No sound or only a low sound is heard when playing back a tape. • The stereo tape is set to ON. c Set it to STEREO. (p. 64) • The volume is turned to /standard 8 system is set to ST2 side in the menu settings. (p. 64) (Continued on the following page) 109 c Open the LCD panel and press VOLUME +. (p. 24) • AUDIO...
Operating Instructions
Page 122
... using the battery pack) During camera recording using LCD 4.2W Viewfinder DCR-TRV520: 3.3W DCR-TRV525: 3.0W Operating temperature 32 °F to 104 °F (0 °C to 40 °C) Storage temperature -4 °F to +140 °F (-20 °C to change without notice. Hi8 video cassette) SP mode: 1 hour LP mode: 1 hour and 30 minuites Fastforward/rewind time (using 120 min. Hi8 cassette, and shoulder strap Supplied accessories See page 5. Specifications Video camera recorder System Video recording...
... using the battery pack) During camera recording using LCD 4.2W Viewfinder DCR-TRV520: 3.3W DCR-TRV525: 3.0W Operating temperature 32 °F to 104 °F (0 °C to 40 °C) Storage temperature -4 °F to +140 °F (-20 °C to change without notice. Hi8 video cassette) SP mode: 1 hour LP mode: 1 hour and 30 minuites Fastforward/rewind time (using 120 min. Hi8 cassette, and shoulder strap Supplied accessories See page 5. Specifications Video camera recorder System Video recording...
Operating Instructions
Page 131
... LCD screen 17 LUMINANCEKEY 37 M, N Main sound 66 Manual focus 42 Memory chromakey 82 Memory luminancekey .......... 82 MEMORY MIX 82 Memory overlap 82 Memory photo recording ...... 77 "Memory Stick 72 Menu settings 64 Mirror mode 17 Moisture condensation ........ 117 Monaural 27 MONOTONE 33 Mosaic fader 33 NIGHTSHOT 20 Normal charge 11 NTSC system 116 O, P, Q OLD MOVIE 37 Operation indicators 129 OVERLAP 33 PB ZOOM 51, 94 PC serial cable 91 Photo scan 56 Photo search 55 PICTURE...
... LCD screen 17 LUMINANCEKEY 37 M, N Main sound 66 Manual focus 42 Memory chromakey 82 Memory luminancekey .......... 82 MEMORY MIX 82 Memory overlap 82 Memory photo recording ...... 77 "Memory Stick 72 Menu settings 64 Mirror mode 17 Moisture condensation ........ 117 Monaural 27 MONOTONE 33 Mosaic fader 33 NIGHTSHOT 20 Normal charge 11 NTSC system 116 O, P, Q OLD MOVIE 37 Operation indicators 129 OVERLAP 33 PB ZOOM 51, 94 PC serial cable 91 Photo scan 56 Photo search 55 PICTURE...
PictureGear v4.1 Lite User Guide
Page 3
... Colour Display Settings 6 How to Use this Manual 7 Installing PictureGear 8 Installing the Movie Support Library 10 Basic Operation Starting the Programme 11 Closing PictureGear 12 Viewing Slides 13 Displaying Sample Slides in the View Area 13 Display Slides other than the Samples 14 Viewing a Slide Enlarged 15 Playing a Movie 15 Using with External Devices Using a Video Camera 16 Connections and Settings 16 Using the First Time 18 Storing Images 18 Using a Digital Still Camera or Memory Stick Serial Port Adaptor (for Handycams 19 Using the Memory Stick...
... Colour Display Settings 6 How to Use this Manual 7 Installing PictureGear 8 Installing the Movie Support Library 10 Basic Operation Starting the Programme 11 Closing PictureGear 12 Viewing Slides 13 Displaying Sample Slides in the View Area 13 Display Slides other than the Samples 14 Viewing a Slide Enlarged 15 Playing a Movie 15 Using with External Devices Using a Video Camera 16 Connections and Settings 16 Using the First Time 18 Storing Images 18 Using a Digital Still Camera or Memory Stick Serial Port Adaptor (for Handycams 19 Using the Memory Stick...


