Operating Instructions
Page 5
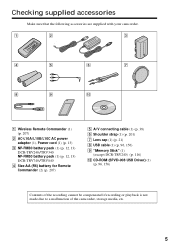
... Checking supplied accessories Make sure that the following accessories are supplied with your camcorder. 1 2 3 4 5 6 7 8 9 0 1 Wireless Remote Commander (1) (p. 207) 2 AC-L10A/L10B/L10C AC power adaptor (1), Power cord (1) (p. 13) 3 NP-FM30 battery pack (1) (p. 12, 13) DCR-TRV240/TRV340 NP-FM50 battery pack (1) (p. 12, 13) DCR-TRV740/TRV840 4 Size AA (R6) battery for Remote Commander (2) (p. 207) 5 A/V connecting cable (1) (p. 38...
... Checking supplied accessories Make sure that the following accessories are supplied with your camcorder. 1 2 3 4 5 6 7 8 9 0 1 Wireless Remote Commander (1) (p. 207) 2 AC-L10A/L10B/L10C AC power adaptor (1), Power cord (1) (p. 13) 3 NP-FM30 battery pack (1) (p. 12, 13) DCR-TRV240/TRV340 NP-FM50 battery pack (1) (p. 12, 13) DCR-TRV740/TRV840 4 Size AA (R6) battery for Remote Commander (2) (p. 207) 5 A/V connecting cable (1) (p. 38...
Operating Instructions
Page 8
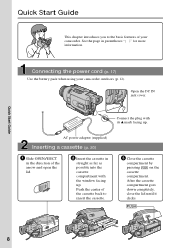
... direction of the arrow and open the lid. 2 Insert the cassette in parentheses "( )" for more information. Quick Start Guide 8 Connecting the power cord (p. 17) Use the battery pack when using your camcorder. Quick Start Guide This chapter introduces you to insert the cassette. 3 Close the cassette compartment by pressing on the cassette compartment... far as possible into the cassette compartment with its v mark facing up . Push the center of the cassette back to the basic features of your camcorder outdoors (p. 12).
... direction of the arrow and open the lid. 2 Insert the cassette in parentheses "( )" for more information. Quick Start Guide 8 Connecting the power cord (p. 17) Use the battery pack when using your camcorder. Quick Start Guide This chapter introduces you to insert the cassette. 3 Close the cassette compartment by pressing on the cassette compartment... far as possible into the cassette compartment with its v mark facing up . Push the center of the cassette back to the basic features of your camcorder outdoors (p. 12).
Operating Instructions
Page 13
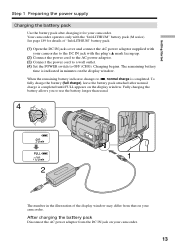
Your camcorder operates only with the plug's v mark facing up. (2) Connect the power cord to the AC power adaptor. (3) Connect the power cord to a wall outlet. (4) Set the POWER switch to OFF (CHG). Charging begins. Getting Started OFCFR(CHG) E ERMAORY CAM M Step 1 Preparing the power supply Charging the ... illustration of "InfoLITHIUM" battery pack. (1) Open the DC IN jack cover and connect the AC power adaptor supplied with your camcorder. See page 189 for your camcorder. 13 When the remaining battery indicator changes to u, normal charge is completed until FULL appears on ...
Your camcorder operates only with the plug's v mark facing up. (2) Connect the power cord to the AC power adaptor. (3) Connect the power cord to a wall outlet. (4) Set the POWER switch to OFF (CHG). Charging begins. Getting Started OFCFR(CHG) E ERMAORY CAM M Step 1 Preparing the power supply Charging the ... illustration of "InfoLITHIUM" battery pack. (1) Open the DC IN jack cover and connect the AC power adaptor supplied with your camcorder. See page 189 for your camcorder. 13 When the remaining battery indicator changes to u, normal charge is completed until FULL appears on ...
Operating Instructions
Page 17
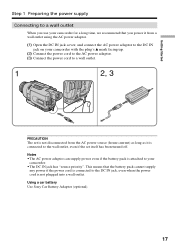
...Use Sony Car Battery Adaptor (optional). 17 Getting Started Step 1 Preparing the power supply Connecting to a wall outlet When you use your camcorder for a long time, we recommend that the battery pack cannot supply any power if the power cord is connected to the DC IN jack, even when the power cord ... outlet. Notes •The AC power adaptor can supply power even if the battery pack is attached to your camcorder with the plug's v mark facing up. (2) Connect the power cord to the AC power adaptor. (3) Connect the power cord to the DC IN jack on your camcorder. •The DC IN jack has...
...Use Sony Car Battery Adaptor (optional). 17 Getting Started Step 1 Preparing the power supply Connecting to a wall outlet When you use your camcorder for a long time, we recommend that the battery pack cannot supply any power if the power cord is connected to the DC IN jack, even when the power cord ... outlet. Notes •The AC power adaptor can supply power even if the battery pack is attached to your camcorder with the plug's v mark facing up. (2) Connect the power cord to the AC power adaptor. (3) Connect the power cord to the DC IN jack on your camcorder. •The DC IN jack has...

Operating Instructions
Page 183
If the functions still do not work, open the LCD panel and press the RESET button under TITLE button using a sharp-pointed object (If you press the RESET button, all the settings including the date ... cannot be transferred by the USB connection. • The USB cable was connected before installation of the USB driver was completed. c Uninstall the incorrect USB driver and re-install the USB driver (p. 97, 158). c Contact your Sony dealer or local authorized Sony service facility. Turn the power on . • Disconnect the power cord of the AC power adaptor or remove the...
If the functions still do not work, open the LCD panel and press the RESET button under TITLE button using a sharp-pointed object (If you press the RESET button, all the settings including the date ... cannot be transferred by the USB connection. • The USB cable was connected before installation of the USB driver was completed. c Uninstall the incorrect USB driver and re-install the USB driver (p. 97, 158). c Contact your Sony dealer or local authorized Sony service facility. Turn the power on . • Disconnect the power cord of the AC power adaptor or remove the...

Operating Instructions
Page 184
...even if you can service your camcorder yourself. • E:ss:ss Contact your camcorder. • A malfunction that is displayed, check the following list of codes. After reconnecting the power source, operate your Sony dealer or local authorized Sony facility. LCD screen, viewfinder or display window.... c Contact your camcorder. Self-diagnosis display Your camcorder has a self-diagnosis display function. The last two digits (indicated by ss) differ depending on the state of a letter and figures) on the screen or in the display window. c Disconnect the power cord of the 5-digit...
...even if you can service your camcorder yourself. • E:ss:ss Contact your camcorder. • A malfunction that is displayed, check the following list of codes. After reconnecting the power source, operate your Sony dealer or local authorized Sony facility. LCD screen, viewfinder or display window.... c Contact your camcorder. Self-diagnosis display Your camcorder has a self-diagnosis display function. The last two digits (indicated by ss) differ depending on the state of a letter and figures) on the screen or in the display window. c Disconnect the power cord of the 5-digit...

Operating Instructions
Page 197
... use this function, dub the image into a Digital8 or DV tape first, and then input it out by Hi8/standard 8 system into Sony VAIO The Program Capture function of solvent which may damage the finish. •Do not let sand get into your camcorder. This is not a malfunction. •Do ...dirty - Do not use , particularly during use your camcorder on a sandy beach or in use any type of DVgate motion doesn't work. When you are : - AC power adaptor •Unplug the unit from coming into your Sony VAIO. This will damage the cord and may be damaged. •Always keep it ...
... use this function, dub the image into a Digital8 or DV tape first, and then input it out by Hi8/standard 8 system into Sony VAIO The Program Capture function of solvent which may damage the finish. •Do not let sand get into your camcorder. This is not a malfunction. •Do ...dirty - Do not use , particularly during use your camcorder on a sandy beach or in use any type of DVgate motion doesn't work. When you are : - AC power adaptor •Unplug the unit from coming into your Sony VAIO. This will damage the cord and may be damaged. •Always keep it ...

Operating Instructions
Page 200
...125 × 39 × 62 mm (5 × 1 9/16 × 2 1/2 in. ) (w/h/d) excluding projecting parts Mass (approx.) 280 g (9.8 oz) excluding power cord Battery pack Maximum output voltage DC 8.4 V Mean output voltage DC 7.2 V Capacity NP-FM30: 5.0 Wh (700 mAh) NP-FM50: 8.5 wh (1 180 mAh) Operating ...approx.) NP-FM30: 65 g (2.3 oz) NP-FM50: 76 g (2.7 oz) Type Lithium ion "Memory Stick" (except DCR-TRV240) Memory Flash memory 8MB: MSA-8A Operating voltage 2.7 - 3.6 V Power consumption Approx. 45 mA in the operating mode Approx. 130 µA in the standby mode Dimensions (approx.) 50 ×...
...125 × 39 × 62 mm (5 × 1 9/16 × 2 1/2 in. ) (w/h/d) excluding projecting parts Mass (approx.) 280 g (9.8 oz) excluding power cord Battery pack Maximum output voltage DC 8.4 V Mean output voltage DC 7.2 V Capacity NP-FM30: 5.0 Wh (700 mAh) NP-FM50: 8.5 wh (1 180 mAh) Operating ...approx.) NP-FM30: 65 g (2.3 oz) NP-FM50: 76 g (2.7 oz) Type Lithium ion "Memory Stick" (except DCR-TRV240) Memory Flash memory 8MB: MSA-8A Operating voltage 2.7 - 3.6 V Power consumption Approx. 45 mA in the operating mode Approx. 130 µA in the standby mode Dimensions (approx.) 50 ×...


