
Operating Instructions
Page 5
...USB Driver) (1) (p. 140) qa Lens hood (1) (p. 22) Contents of the recording cannot be compensated if recording or playback is not made due to a malfunction of the camcorder, storage media, etc. 5 qa 1 Wireless Remote Commander (1) (p. 184) 2 AC-L10A/L10B/L10C AC power adaptor (1), Power ...cord (1) (p. 13) 3 Size AA (R6) battery for Remote Commander (2) (p. 184) 4 NP-FM50 battery pack (1)...
...USB Driver) (1) (p. 140) qa Lens hood (1) (p. 22) Contents of the recording cannot be compensated if recording or playback is not made due to a malfunction of the camcorder, storage media, etc. 5 qa 1 Wireless Remote Commander (1) (p. 184) 2 AC-L10A/L10B/L10C AC power adaptor (1), Power ...cord (1) (p. 13) 3 Size AA (R6) battery for Remote Commander (2) (p. 184) 4 NP-FM50 battery pack (1)...

Operating Instructions
Page 21
..., the viewfinder automatically turns off. Even if you adjust the LCD screen backlight or brightness of the two buttons on the Remote Commander does not work. Basics Recording a picture Adjusting the brightness of the LCD screen To adjust the brightness of the LCD screen, press either of the LCD... screen The recorded picture will be normal when recorded. Some of the backlight. LCD screen backlight You can adjust the brightness of the other indicators appear mirror-reversed and others...
..., the viewfinder automatically turns off. Even if you adjust the LCD screen backlight or brightness of the two buttons on the Remote Commander does not work. Basics Recording a picture Adjusting the brightness of the LCD screen To adjust the brightness of the LCD screen, press either of the LCD... screen The recorded picture will be normal when recorded. Some of the backlight. LCD screen backlight You can adjust the brightness of the other indicators appear mirror-reversed and others...

Operating Instructions
Page 22
...from the lens. in the corners of the lens hood may not function properly because the lens hood blocks the infrared rays from the Remote Commander. Adjust the viewfinder lens to remove filters or other objects onto the lens hood. Lift up the viewfinder and move the viewfinder lens... adjustment lever. Notes •When you use the filter (optional) The shadow of the screen. 22 Recording a picture Adjusting the viewfinder If you record pictures with the LCD panel closed, check the picture with the lens hood on. Attaching the supplied lens hood To...
...from the lens. in the corners of the lens hood may not function properly because the lens hood blocks the infrared rays from the Remote Commander. Adjust the viewfinder lens to remove filters or other objects onto the lens hood. Lift up the viewfinder and move the viewfinder lens... adjustment lever. Notes •When you use the filter (optional) The shadow of the screen. 22 Recording a picture Adjusting the viewfinder If you record pictures with the LCD panel closed, check the picture with the lens hood on. Attaching the supplied lens hood To...

Operating Instructions
Page 27
...-timer Press PHOTO in the standby mode. Self-timer memory photo recording You can also use the Remote Commander for this operation. (1) Press (self-timer) in 10 seconds automatically. You can also record still images on "Memory Stick"s with a beep sound. To record still images on the screen. (2) Press START/STOP. Self-timer starts...
...-timer Press PHOTO in the standby mode. Self-timer memory photo recording You can also use the Remote Commander for this operation. (1) Press (self-timer) in 10 seconds automatically. You can also record still images on "Memory Stick"s with a beep sound. To record still images on the screen. (2) Press START/STOP. Self-timer starts...

Operating Instructions
Page 29
If you can monitor the playback picture on the LCD screen You can control playback using the Remote Commander supplied with your camcorder. (1) Install the power source and insert the recorded tape. (2) Set the POWER switch to VCR while pressing the small green button. (3) Open the LCD panel while pressing OPEN. (4) Press m to...playback picture in the viewfinder. When you close the LCD panel, you close the LCD panel, sound is muted. 4 REW 5 PLAY 2 POWER VCR OFF(CHG) CAMERA MEMORY 3 6 VOLUME 1 To stop playback Press x. Playback - When monitoring on the screen. Basics -
If you can monitor the playback picture on the LCD screen You can control playback using the Remote Commander supplied with your camcorder. (1) Install the power source and insert the recorded tape. (2) Set the POWER switch to VCR while pressing the small green button. (3) Open the LCD panel while pressing OPEN. (4) Press m to...playback picture in the viewfinder. When you close the LCD panel, you close the LCD panel, sound is muted. 4 REW 5 PLAY 2 POWER VCR OFF(CHG) CAMERA MEMORY 3 6 VOLUME 1 To stop playback Press x. Playback - When monitoring on the screen. Basics -

Operating Instructions
Page 30
The indicators appear on the tape but also the recording data (date/time or various settings when recorded) (Data code). The display changes as follows: date/time y no indicator Date/time Various settings JUL 4 2001 12:05:56 AM [a] [b] [c] AUTO...exposure, white balance, gain, shutter speed, aperture value mode) t no indicator 30 DATA CODE DISPLAY DISPLAY Using the data code function Your camcorder automatically records not only images on the screen. Playing back a tape To display the screen indicators - To make the indicators disappear, press DISPLAY again. Display ...
The indicators appear on the tape but also the recording data (date/time or various settings when recorded) (Data code). The display changes as follows: date/time y no indicator Date/time Various settings JUL 4 2001 12:05:56 AM [a] [b] [c] AUTO...exposure, white balance, gain, shutter speed, aperture value mode) t no indicator 30 DATA CODE DISPLAY DISPLAY Using the data code function Your camcorder automatically records not only images on the screen. Playing back a tape To display the screen indicators - To make the indicators disappear, press DISPLAY again. Display ...

Operating Instructions
Page 31
...pressing m while rewinding or M while advancing the tape. To view the picture at slow speed (slow playback) Press y on the Remote Commander. The tape was recorded by a camcorder without the date and time set the POWER switch to VCR. To resume normal playback, press N or X. To ... playback, press N. Basics Playing back a tape Recording data Recording data is being played back. - To advance the tape Press M in the stop mode. Data code When you use the data code function, bars (-- -- --) appear if: - Various playback modes To operate video control buttons, set . Playback - To rewind...
...pressing m while rewinding or M while advancing the tape. To view the picture at slow speed (slow playback) Press y on the Remote Commander. The tape was recorded by a camcorder without the date and time set the POWER switch to VCR. To resume normal playback, press N or X. To ... playback, press N. Basics Playing back a tape Recording data Recording data is being played back. - To advance the tape Press M in the stop mode. Data code When you use the data code function, bars (-- -- --) appear if: - Various playback modes To operate video control buttons, set . Playback - To rewind...

Operating Instructions
Page 32
... of the screen. Slow playback The slow playback can be performed smoothly on the Remote Commander in the stop mode. In the various playback modes •Sound is not a malfunction. 32 To search the last scene recorded (END SEARCH) Press END SEARCH in the playback pause mode. To resume playback,... press N. This is muted. •The previous picture may appear at the center, or the top and bottom of the recorded portion plays back and stops. To resume normal playback, press N. Playing back a tape To view the picture frame-by -frame playback in reverse ...
... of the screen. Slow playback The slow playback can be performed smoothly on the Remote Commander in the stop mode. In the various playback modes •Sound is not a malfunction. 32 To search the last scene recorded (END SEARCH) Press END SEARCH in the playback pause mode. To resume playback,... press N. This is muted. •The previous picture may appear at the center, or the top and bottom of the recorded portion plays back and stops. To resume normal playback, press N. Playing back a tape To view the picture frame-by -frame playback in reverse ...

Operating Instructions
Page 35
... settings. is connected. Playback - To do so, make sure you: - Basics Viewing the recording on the TV automatically when you use a Sony TV •You can switch the video input of the TV automatically to the one to the same video input (1, 2, 3) in the menu settings. - To do so, set AUTO TV ON ...to ON and TV INPUT to which the AV cordless IR receiver is a trademark of Sony Corporation. 35 Point the super laser link emitter at the TV's remote sensor. •You can turn ...
... settings. is connected. Playback - To do so, make sure you: - Basics Viewing the recording on the TV automatically when you use a Sony TV •You can switch the video input of the TV automatically to the one to the same video input (1, 2, 3) in the menu settings. - To do so, set AUTO TV ON ...to ON and TV INPUT to which the AV cordless IR receiver is a trademark of Sony Corporation. 35 Point the super laser link emitter at the TV's remote sensor. •You can turn ...
Operating Instructions
Page 36
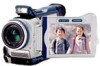
...a image using the Remote Commander Press PHOTO on a tape - Press PHOTO deeper. Recording does not start yet. Digital effect If you record a moving subject with tape photo recording function When you want to the standby mode. To record clear and less fluctuated...CAPTURE Notes • During tape photo recording, you record on "Memory Stick"s. 36 To use the tape photo recording function using a video printer (optional). To use PHOTO during following operations: - Advanced Recording Operations - The sound during normal CAMERA recording You cannot check an image on other...
...a image using the Remote Commander Press PHOTO on a tape - Press PHOTO deeper. Recording does not start yet. Digital effect If you record a moving subject with tape photo recording function When you want to the standby mode. To record clear and less fluctuated...CAPTURE Notes • During tape photo recording, you record on "Memory Stick"s. 36 To use the tape photo recording function using a video printer (optional). To use PHOTO during following operations: - Advanced Recording Operations - The sound during normal CAMERA recording You cannot check an image on other...

Operating Instructions
Page 39
... self-timer. (p. 119) 39 Note The self-timer recording mode is set to OFF (CHG) or VCR. You cannot cancel the self-timer recording using the Remote Commander. Self-timer recording is in the standby mode. Recording a still image on the screen. (2) Press PHOTO firmly.... The (self-timer) indicator appears on a tape - Tape Photo recording Self-timer recording You can record still images on "Memory Stick"s ...
... self-timer. (p. 119) 39 Note The self-timer recording mode is set to OFF (CHG) or VCR. You cannot cancel the self-timer recording using the Remote Commander. Self-timer recording is in the standby mode. Recording a still image on the screen. (2) Press PHOTO firmly.... The (self-timer) indicator appears on a tape - Tape Photo recording Self-timer recording You can record still images on "Memory Stick"s ...

Operating Instructions
Page 58
...proper remaining tape time is not indicated if you use this effect, alternately move the subject a little and make a recording with a stop-motion animated effect using the Remote Commander after step 6. (1) Press MENU to display the menu in the menu settings. • Set the POWER switch ...to erase the menu display. The FRAME REC indicator lights up. (6) Press START/STOP to recording standby. (7) Move the subject, and repeat step 6. 1 MENU 6 2-4 58 CAMERA SET...
...proper remaining tape time is not indicated if you use this effect, alternately move the subject a little and make a recording with a stop-motion animated effect using the Remote Commander after step 6. (1) Press MENU to display the menu in the menu settings. • Set the POWER switch ...to erase the menu display. The FRAME REC indicator lights up. (6) Press START/STOP to recording standby. (7) Move the subject, and repeat step 6. 1 MENU 6 2-4 58 CAMERA SET...

Operating Instructions
Page 62
... the Remote Commander for this operation. (1) In the playback mode, press DISPLAY. (2) Press ZERO SET MEMORY at the tape counter zero point. The ZERO SET MEMORY indicator disappears and the time code appears. (5) Press N. Rewind the tape to the standby mode. 62 Recording stops automatically... scene having a tape counter value of several seconds from the counter's zero point. Your camcorder returns to the insert start point, and start recording. DISPLAY ZERO SET MEMORY m N x Notes • When you press ZERO SET MEMORY before rewinding the tape, the zero set memory function...
... the Remote Commander for this operation. (1) In the playback mode, press DISPLAY. (2) Press ZERO SET MEMORY at the tape counter zero point. The ZERO SET MEMORY indicator disappears and the time code appears. (5) Press N. Rewind the tape to the standby mode. 62 Recording stops automatically... scene having a tape counter value of several seconds from the counter's zero point. Your camcorder returns to the insert start point, and start recording. DISPLAY ZERO SET MEMORY m N x Notes • When you press ZERO SET MEMORY before rewinding the tape, the zero set memory function...

Operating Instructions
Page 63
...indicates the actual point you can search for this operation. To superimpose a title See page 91. 63 Use the Remote Commander for the boundaries of recorded tape by title - In the mark •The bar in the •The mark in the menu settings (p.... no indicator T PHOTO SCAN (3) Press . or > on the Remote Commander repeatedly, until the TITLE SEARCH indicator appears. Your camcorder automatically starts playback of recorded tape by title. If a tape has a blank portion between recorded portions The title search function may not work correctly. If you selected...
...indicates the actual point you can search for this operation. To superimpose a title See page 91. 63 Use the Remote Commander for the boundaries of recorded tape by title - In the mark •The bar in the •The mark in the menu settings (p.... no indicator T PHOTO SCAN (3) Press . or > on the Remote Commander repeatedly, until the TITLE SEARCH indicator appears. Your camcorder automatically starts playback of recorded tape by title. If a tape has a blank portion between recorded portions The title search function may not work correctly. If you selected...

Operating Instructions
Page 64
... repeatedly, until the DATE SEARCH indicator appears. Use the Remote Commander for this function only when playing back a tape with cassette memory for playback. MENU 64 Your camcorder automatically starts playback at each recording date. Searching a recording by using cassette memory Before operation •You can automatically search for the point where the...
... repeatedly, until the DATE SEARCH indicator appears. Use the Remote Commander for this function only when playing back a tape with cassette memory for playback. MENU 64 Your camcorder automatically starts playback at each recording date. Searching a recording by using cassette memory Before operation •You can automatically search for the point where the...

Operating Instructions
Page 65
...search Note If one day's recording is less than 2 minutes, your camcorder searches for the next date. Cassette memory The tape cassette memory can hold 6 recording date data. Your camcorder automatically starts playback at the point where the date changes. on the Remote Commander to search for the ...previous date or press > on the Remote Commander to OFF in the mark indicates the present ...
...search Note If one day's recording is less than 2 minutes, your camcorder searches for the next date. Cassette memory The tape cassette memory can hold 6 recording date data. Your camcorder automatically starts playback at the point where the date changes. on the Remote Commander to search for the ...previous date or press > on the Remote Commander to OFF in the mark indicates the present ...

Operating Instructions
Page 66
... only when playing back a tape with cassette memory. • Set CM SEARCH in to search. If a tape has a blank portion between recorded portions The photo search/photo scan function may not work correctly. Your camcorder automatically starts playback of the photo having the date that can use... in the • The mark in the menu settings (p. 103). (The default setting is up to VCR. (2) Press SEARCH MODE on the Remote Commander to check or edit still images. Searching for these operations. You can search for a photo by using cassette memory Before operation • You...
... only when playing back a tape with cassette memory. • Set CM SEARCH in to search. If a tape has a blank portion between recorded portions The photo search/photo scan function may not work correctly. Your camcorder automatically starts playback of the photo having the date that can use... in the • The mark in the menu settings (p. 103). (The default setting is up to VCR. (2) Press SEARCH MODE on the Remote Commander to check or edit still images. Searching for these operations. You can search for a photo by using cassette memory Before operation • You...

Operating Instructions
Page 67
...repeatedly, until the PHOTO SCAN indicator appears. or > on the Remote Commander repeatedly, until the PHOTO SEARCH indicator appears. Your camcorder ... (1) Set the POWER switch to VCR. (2) Set CM SEARCH in to VCR. (2) Press SEARCH MODE on the Remote Commander to select the photo for the previous or next photo. To stop scanning Press x. 67 Each photo is played... switch to OFF in the menu settings (p. 103). (3) Press SEARCH MODE on the Remote Commander. Advanced Playback Operations Searching for about 5 seconds automatically. 2 SEARCH MODE PHOTO 00 SCAN 3 1 POWER VCR OFF(CHG...
...repeatedly, until the PHOTO SCAN indicator appears. or > on the Remote Commander repeatedly, until the PHOTO SEARCH indicator appears. Your camcorder ... (1) Set the POWER switch to VCR. (2) Set CM SEARCH in to VCR. (2) Press SEARCH MODE on the Remote Commander to select the photo for the previous or next photo. To stop scanning Press x. 67 Each photo is played... switch to OFF in the menu settings (p. 103). (3) Press SEARCH MODE on the Remote Commander. Advanced Playback Operations Searching for about 5 seconds automatically. 2 SEARCH MODE PHOTO 00 SCAN 3 1 POWER VCR OFF(CHG...
Operating Instructions
Page 68
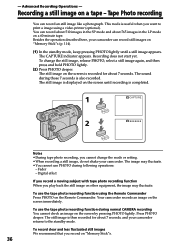
...Betamax, mini DV, DV, Digital8 If your VCR is output. 68 DATA CODE - S VIDEO : Signal flow AUDIO/VIDEO IN S VIDEO VIDEO AUDIO When you have finished dubbing a tape Press x on the Remote Commander (1) Insert a blank tape (or a tape you want to the operating instructions of... your camcorder. You can dub or edit on the edited tape: - Refer to record over) into the VCR, and insert the recorded...
...Betamax, mini DV, DV, Digital8 If your VCR is output. 68 DATA CODE - S VIDEO : Signal flow AUDIO/VIDEO IN S VIDEO VIDEO AUDIO When you have finished dubbing a tape Press x on the Remote Commander (1) Insert a blank tape (or a tape you want to the operating instructions of... your camcorder. You can dub or edit on the edited tape: - Refer to record over) into the VCR, and insert the recorded...
Operating Instructions
Page 71
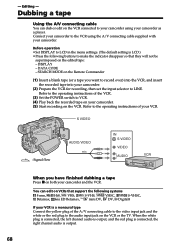
... . I N " " CUT-OUT " I R SETUP 4 P AUS EMODE I TSET CONTROL ADJ TEST " CUT- Digital program editing Step 2: Setting the VCR to operate with the A/V connecting cable To edit using an A/V connecting cable, follow ...using the VCR, send the control signal by infrared rays to the remote sensor on , then set the input selector to select the IR ... C A_ _ M_ _ _ _ [ MENU ] : END OTHERS ED I TSET CONTROL I R ADJ TEST " CUT- When you connect a video camera recorder, set its power switch to VCR/VTR. 3 Press MENU to display the menu. 4 Turn the SEL/PUSH EXEC dial to select , then press ...
... . I N " " CUT-OUT " I R SETUP 4 P AUS EMODE I TSET CONTROL ADJ TEST " CUT- Digital program editing Step 2: Setting the VCR to operate with the A/V connecting cable To edit using an A/V connecting cable, follow ...using the VCR, send the control signal by infrared rays to the remote sensor on , then set the input selector to select the IR ... C A_ _ M_ _ _ _ [ MENU ] : END OTHERS ED I TSET CONTROL I R ADJ TEST " CUT- When you connect a video camera recorder, set its power switch to VCR/VTR. 3 Press MENU to display the menu. 4 Turn the SEL/PUSH EXEC dial to select , then press ...


