
Operating Instructions
Page 1
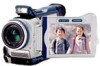
TM SERIES DCR-TRV30 ©2001 Sony Corporation Refer to these numbers whenever you call upon your Sony dealer regarding this manual thoroughly, and retain it for future reference. Record the serial number in the space provided below. AC- Model No. Serial No. 3-067-099-11 (1) Digital Video Camera Recorder Operating Instructions Before operating the unit, please read this product. Owner's Record The model and serial numbers are located on the bottom. DCR-TRV30 Model No. Serial No.
TM SERIES DCR-TRV30 ©2001 Sony Corporation Refer to these numbers whenever you call upon your Sony dealer regarding this manual thoroughly, and retain it for future reference. Record the serial number in the space provided below. AC- Model No. Serial No. 3-067-099-11 (1) Digital Video Camera Recorder Operating Instructions Before operating the unit, please read this product. Owner's Record The model and serial numbers are located on the bottom. DCR-TRV30 Model No. Serial No.
Operating Instructions
Page 6
...... 12 Installing the battery pack 12 Charging the battery pack 13 Connecting to a wall outlet 16 Step 2 Setting the date and time ........ 17 Step 3 Inserting a cassette 18 Recording - Basics Recording a picture 19 Shooting backlit subjects - Date search 64 Searching for a photo - Table of recorded tape by title - Tape Photo recording 36 Adjusting the white balance manually 41 Using the wide mode 42 Using the fader function 43 Using special effects - introduction 106 Recording still images on a tape - Memory Photo recording ......... 114 Recording an image from a VCR...
...... 12 Installing the battery pack 12 Charging the battery pack 13 Connecting to a wall outlet 16 Step 2 Setting the date and time ........ 17 Step 3 Inserting a cassette 18 Recording - Basics Recording a picture 19 Shooting backlit subjects - Date search 64 Searching for a photo - Table of recorded tape by title - Tape Photo recording 36 Adjusting the white balance manually 41 Using the wide mode 42 Using the fader function 43 Using special effects - introduction 106 Recording still images on a tape - Memory Photo recording ......... 114 Recording an image from a VCR...
Operating Instructions
Page 20
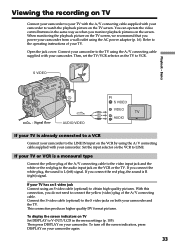
... switch is to save battery power and to prevent battery and tape wear. This is set it vertically, and swing it faces the other way, the indicator appears on the LCD screen and in the LP mode The playback picture may be distorted or the time code may not be set the POWER switch to CAMERA again. Recording data The recording data (date/time or various settings when recorded) are recorded automatically onto the tape. When you use a tape with cassette memory...
... switch is to save battery power and to prevent battery and tape wear. This is set it vertically, and swing it faces the other way, the indicator appears on the LCD screen and in the LP mode The playback picture may be distorted or the time code may not be set the POWER switch to CAMERA again. Recording data The recording data (date/time or various settings when recorded) are recorded automatically onto the tape. When you use a tape with cassette memory...
Operating Instructions
Page 33
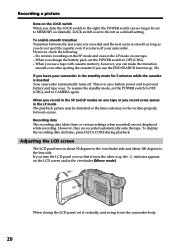
... to VCR. Open the jack cover. When monitoring the playback picture on the VCR by using the AC power adaptor (p. 16). Set the input selector on your camcorder again. 33 To turn off the screen indicators, press DISPLAY on the VCR to LINE. You can operate the video control buttons in the menu settings (p. 105). If your TV or VCR is L (left) signal. If you connect the red plug, the sound is already connected to a VCR Connect your camcorder...
... to VCR. Open the jack cover. When monitoring the playback picture on the VCR by using the AC power adaptor (p. 16). Set the input selector on your camcorder again. 33 To turn off the screen indicators, press DISPLAY on the VCR to LINE. You can operate the video control buttons in the menu settings (p. 105). If your TV or VCR is L (left) signal. If you connect the red plug, the sound is already connected to a VCR Connect your camcorder...
Operating Instructions
Page 36
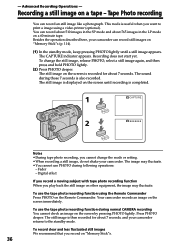
... tape photo recording function using a video printer (optional). Your camcorder records an image on "Memory Stick"s. 36 To record clear and less fluctuated still images We recommend that you want to the standby mode. The still image on "Memory Stick"s (p. 114). (1) In the standby mode, keep pressing PHOTO lightly until recording is displayed on the screen by pressing PHOTO lightly. Fader - Advanced Recording Operations - This mode is recorded for about 7 seconds, and your camcorder returns to print a image using the Remote Commander Press PHOTO...
... tape photo recording function using a video printer (optional). Your camcorder records an image on "Memory Stick"s. 36 To record clear and less fluctuated still images We recommend that you want to the standby mode. The still image on "Memory Stick"s (p. 114). (1) In the standby mode, keep pressing PHOTO lightly until recording is displayed on the screen by pressing PHOTO lightly. Fader - Advanced Recording Operations - This mode is recorded for about 7 seconds, and your camcorder returns to print a image using the Remote Commander Press PHOTO...
Operating Instructions
Page 38
... focusing manually. Low lux mode of PROGRAM AE - Digital effect - Super NightShot - Recording a still image on individual differences, the distance to prepare for 5 or more minutes after the flash pops up. Darken the surroundings by covering the lens part, and press PHOTO lightly so that your camcorder starts to the default setting (auto). You cannot shoot images with the flash on "Memory Stick"s. Fader - NightShot - If you use forced flash in flash...
... focusing manually. Low lux mode of PROGRAM AE - Digital effect - Super NightShot - Recording a still image on individual differences, the distance to prepare for 5 or more minutes after the flash pops up. Darken the surroundings by covering the lens part, and press PHOTO lightly so that your camcorder starts to the default setting (auto). You cannot shoot images with the flash on "Memory Stick"s. Fader - NightShot - If you use forced flash in flash...
Operating Instructions
Page 60
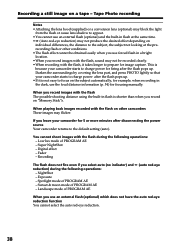
...) or stop playing back The digital effect function is stored in memory as a still image at the time you can process a scene using the digital effect functions: STILL, FLASH, LUMI. y TRAIL (2) Press the SEL/PUSH EXEC dial. In the STILL or LUMI. mode, the picture is captured and is automatically canceled. 60 Notes •You cannot process externally input scenes using your camcorder as follows: STILL y FLASH y LUMI. Pictures processed...
...) or stop playing back The digital effect function is stored in memory as a still image at the time you can process a scene using the digital effect functions: STILL, FLASH, LUMI. y TRAIL (2) Press the SEL/PUSH EXEC dial. In the STILL or LUMI. mode, the picture is captured and is automatically canceled. 60 Notes •You cannot process externally input scenes using your camcorder as follows: STILL y FLASH y LUMI. Pictures processed...
Operating Instructions
Page 71
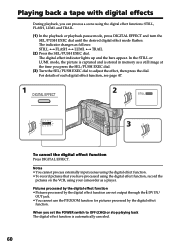
... " CUT- Digital program editing Step 2: Setting the VCR to operate with the A/V connecting cable To edit using an A/V connecting cable, follow the procedures below, (1) to (4), to send the control signal correctly. (1) Set the IR SETUP code 1 Set the POWER switch to VCR on the VCR. I N " " CUT-OUT " I R SETUP P AUS EMODE I R TEST RETURN [ MENU ] : END OTHERS ED I R ADJ TEST " CUT- Check the cord in "About the IR SETUP code." (P. 72) 1 POWER VCR OFF(CHG) CAMERA MEMORY 3 MENU Editing 4 5 OTHERS DATA CODE DATE / CAM BEEP...
... " CUT- Digital program editing Step 2: Setting the VCR to operate with the A/V connecting cable To edit using an A/V connecting cable, follow the procedures below, (1) to (4), to send the control signal correctly. (1) Set the IR SETUP code 1 Set the POWER switch to VCR on the VCR. I N " " CUT-OUT " I R SETUP P AUS EMODE I R TEST RETURN [ MENU ] : END OTHERS ED I R ADJ TEST " CUT- Check the cord in "About the IR SETUP code." (P. 72) 1 POWER VCR OFF(CHG) CAMERA MEMORY 3 MENU Editing 4 5 OTHERS DATA CODE DATE / CAM BEEP...

Operating Instructions
Page 75
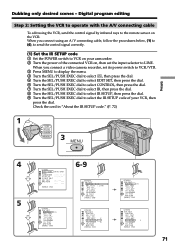
...-OUT " I R SETUP P AUS EMODE I TSET CONTROL ADJ TEST " CUT- Editing Dubbing only desired scenes - Digital program editing Step 2: Setting the VCR to operate with the i.LINK cable (DV connecting cable) When you connect a digital video camera recorder, set the input selector to select i.LINK, then press the dial. 1 POWER VCR OFF(CHG) CAMERA MEMORY 3 MENU 5 6,7 OTHERS DATA CODE BEEP COMMA ND E R D I SPLAY V I DEO ED I T ED I TSET RETURN DATE / CAM _ _ _ _ _ _ T_ _ _ E E _ / / _ C C A_ M_ __ _ _ [ MENU ] : END OTHERS...
...-OUT " I R SETUP P AUS EMODE I TSET CONTROL ADJ TEST " CUT- Editing Dubbing only desired scenes - Digital program editing Step 2: Setting the VCR to operate with the i.LINK cable (DV connecting cable) When you connect a digital video camera recorder, set the input selector to select i.LINK, then press the dial. 1 POWER VCR OFF(CHG) CAMERA MEMORY 3 MENU 5 6,7 OTHERS DATA CODE BEEP COMMA ND E R D I SPLAY V I DEO ED I T ED I TSET RETURN DATE / CAM _ _ _ _ _ _ T_ _ _ E E _ / / _ C C A_ M_ __ _ _ [ MENU ] : END OTHERS...
Operating Instructions
Page 78
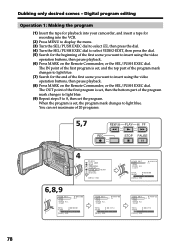
... first program is set maximum of the first scene you want to insert using the video operation buttons, then pause playback. (6) Press MARK on the Remote Commander, or the SEL/PUSH EXEC dial. Dubbing only desired scenes - Digital program editing Operation 1: Making the program (1) Insert the tape for playback into your camcorder, and insert a tape for recording into the VCR. (2) Press MENU to display the menu. (3) Turn the SEL/PUSH...
... first program is set maximum of the first scene you want to insert using the video operation buttons, then pause playback. (6) Press MARK on the Remote Commander, or the SEL/PUSH EXEC dial. Dubbing only desired scenes - Digital program editing Operation 1: Making the program (1) Insert the tape for playback into your camcorder, and insert a tape for recording into the VCR. (2) Press MENU to display the menu. (3) Turn the SEL/PUSH...

Operating Instructions
Page 79
... portion of the tape You cannot set its power switch to recording pause. Operation 2: Performing a Digital program editing (Dubbing a tape) Make sure your camcorder and the VCR automatically stop. 79 The SEARCH indicator appears during search, and the EDIT indicator appears during the Digital program editing. If there is not necessary. When you have set to VCR/VTR. (1) Select VIDEO EDIT. The PROGRAM indicator changes to select...
... portion of the tape You cannot set its power switch to recording pause. Operation 2: Performing a Digital program editing (Dubbing a tape) Make sure your camcorder and the VCR automatically stop. 79 The SEARCH indicator appears during search, and the EDIT indicator appears during the Digital program editing. If there is not necessary. When you have set to VCR/VTR. (1) Select VIDEO EDIT. The PROGRAM indicator changes to select...

Operating Instructions
Page 99
... following icons: MANUAL SET CAMERA SET VCR SET LCD/VF SET MEMORY SET PRINT SET CM SET TAPE SET SETUP MENU OTHERS Customizing Your Camcorder Selecting the mode setting of each item z is performed digitally (p. 23). 16:9WIDE z OFF - To adjust the white balance (p. 41). Up to automatically activate the electronic shutter even when shooting in bright conditions. Natural pictures are displayed as the following page) 99 Changing the menu settings Menu items are produced when shooting a stationary object with the flash level. (Continued...
... following icons: MANUAL SET CAMERA SET VCR SET LCD/VF SET MEMORY SET PRINT SET CM SET TAPE SET SETUP MENU OTHERS Customizing Your Camcorder Selecting the mode setting of each item z is performed digitally (p. 23). 16:9WIDE z OFF - To adjust the white balance (p. 41). Up to automatically activate the electronic shutter even when shooting in bright conditions. Natural pictures are displayed as the following page) 99 Changing the menu settings Menu items are produced when shooting a stationary object with the flash level. (Continued...
Operating Instructions
Page 125
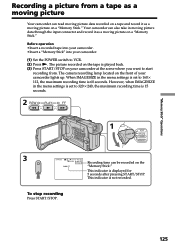
... in the menu settings is 60 seconds. This indicator is not recorded. To stop recording Press START/STOP. 125 "Memory Stick" Operations Recording a picture from . When IMAGESIZE in moving picture data through the input connector and record it as a moving picture on your camcorder lights up. The picture recorded on the tape is set to VCR. (2) Press N. Your camcorder can also take in the menu settings is played back. (3) Press START/STOP on a "Memory Stick." This indicator is displayed for 5 seconds...
... in the menu settings is 60 seconds. This indicator is not recorded. To stop recording Press START/STOP. 125 "Memory Stick" Operations Recording a picture from . When IMAGESIZE in moving picture data through the input connector and record it as a moving picture on your camcorder lights up. The picture recorded on the tape is set to VCR. (2) Press N. Your camcorder can also take in the menu settings is played back. (3) Press START/STOP on a "Memory Stick." This indicator is displayed for 5 seconds...

Operating Instructions
Page 140
... window opened in step 4 (drag and drop). • Sony Camcorder USB Driver • Sony Camcorder USB Shim (6) When "Put these items into the end Note You cannot install the USB driver if a "Memory Stick" is contained together with your camcorder. For Macintosh users (1) Turn on your computer using computer Installing the USB driver Before connecting your camcorder to your computer, install the USB driver to MEMORY. appears, click OK. (7) Restart your camcorder. Viewing images using the supplied USB cable. (6) Insert a "Memory Stick" into your camcorder before installing...
... window opened in step 4 (drag and drop). • Sony Camcorder USB Driver • Sony Camcorder USB Shim (6) When "Put these items into the end Note You cannot install the USB driver if a "Memory Stick" is contained together with your camcorder. For Macintosh users (1) Turn on your computer using computer Installing the USB driver Before connecting your camcorder to your computer, install the USB driver to MEMORY. appears, click OK. (7) Restart your camcorder. Viewing images using the supplied USB cable. (6) Insert a "Memory Stick" into your camcorder before installing...
Operating Instructions
Page 155
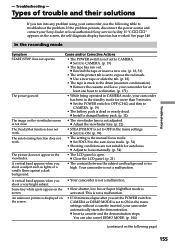
If "C:ss:ss" appears on the screen. The power goes off. The SteadyShot function does not work . The autofocusing function does not work . c Adjust the viewfinder lens. (p. 22) • STEADYSHOT is the manual focus mode. c Set it to CAMERA or DEMO MODE is not a malfunction. Your camcorder is set the POWER switch to CAMERA. (p. 19) • The tape has run into any problem using your Sony dealer or local authorized Sony service facility. A vertical band appears when...
If "C:ss:ss" appears on the screen. The power goes off. The SteadyShot function does not work . The autofocusing function does not work . c Adjust the viewfinder lens. (p. 22) • STEADYSHOT is the manual focus mode. c Set it to CAMERA or DEMO MODE is not a malfunction. Your camcorder is set the POWER switch to CAMERA. (p. 19) • The tape has run into any problem using your Sony dealer or local authorized Sony service facility. A vertical band appears when...
Operating Instructions
Page 163
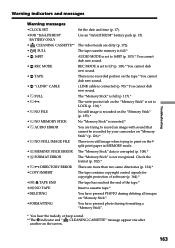
... screen. 163 Troubleshooting Warning indicators and messages Warning messages •CLOCK SET Set the date and time (p. 17). •FOR "InfoLITHIUM" BATTERY ONLY Use an "InfoLITHIUM" battery pack (p. 15). • CLEANING CASSETTE** The video heads are dirty (p. 172). • FULL The tape cassette memory is full.* • 16BIT AUDIO MODE is set to 16BIT (p. 103).* You cannot dub new sound. • REC MODE REC MODE is set to LOCK (p. 106).* • NO FILE No still image is recorded on the "Memory Stick...
... screen. 163 Troubleshooting Warning indicators and messages Warning messages •CLOCK SET Set the date and time (p. 17). •FOR "InfoLITHIUM" BATTERY ONLY Use an "InfoLITHIUM" battery pack (p. 15). • CLEANING CASSETTE** The video heads are dirty (p. 172). • FULL The tape cassette memory is full.* • 16BIT AUDIO MODE is set to 16BIT (p. 103).* You cannot dub new sound. • REC MODE REC MODE is set to LOCK (p. 106).* • NO FILE No still image is recorded on the "Memory Stick...
Operating Instructions
Page 164
... two types of up to record such software. Your camcorder does not record copyright control signals on the tape, operate the followings. "COPY INHIBIT" appears on the tape. You cannot use the mini DV cassette only*. We recommend that contains copyright control signals for copyright protection of software which is marked with the cassette memory function. The functions using a digital video camera recorder without cassette memory. Your camcorder can use any other video camera recorder, you record You cannot record software on your camcorder that...
... two types of up to record such software. Your camcorder does not record copyright control signals on the tape, operate the followings. "COPY INHIBIT" appears on the tape. You cannot use the mini DV cassette only*. We recommend that contains copyright control signals for copyright protection of software which is marked with the cassette memory function. The functions using a digital video camera recorder without cassette memory. Your camcorder can use any other video camera recorder, you record You cannot record software on your camcorder that...

Operating Instructions
Page 176
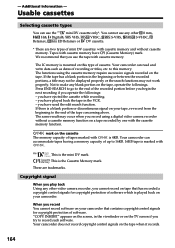
...) including the battery pack, NP-FM50, cassette DVM60, lens cap and shoulder strap Supplied accessories See page 5. 176 Specifications Video camera recorder System Video recording system 2 rotary heads Helical scanning system Audio recording system Rotary heads, PCM system Quantization: 12 bits (Fs 32 kHz, stereo 1, stereo 2), 16 bits (Fs 48 kHz, stereo) Video signal NTSC color, EIA standards Usable cassette Mini DV cassette with infrared lighting. Input/Output connectors S video input/output 4-pin mini DIN Luminance...
...) including the battery pack, NP-FM50, cassette DVM60, lens cap and shoulder strap Supplied accessories See page 5. 176 Specifications Video camera recorder System Video recording system 2 rotary heads Helical scanning system Audio recording system Rotary heads, PCM system Quantization: 12 bits (Fs 32 kHz, stereo 1, stereo 2), 16 bits (Fs 48 kHz, stereo) Video signal NTSC color, EIA standards Usable cassette Mini DV cassette with infrared lighting. Input/Output connectors S video input/output 4-pin mini DIN Luminance...
Operating Instructions
Page 178
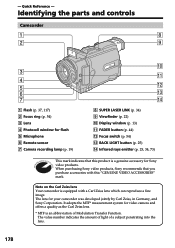
... image. Identifying the parts and controls Camcorder 1 8 2 9 3 4 5 6 7 1 Flash (p. 37, 117) 2 Focus ring (p. 54) 3 Lens 4 Photocell window for your camcorder was developed jointly by Carl Zeiss, in Germany, and Sony Corporation. It adopts the MTF* measurement system for Sony video products. qa qs qd qf 8 SUPER LASER LINK (p. 34) 9 Viewfinder (p. 22) q; The lens for flash 5 Microphone 6 Remote sensor 7 Camera recording lamp (p. 19) q; When purchasing Sony video products, Sony recommends that this "GENUINE VIDEO...
... image. Identifying the parts and controls Camcorder 1 8 2 9 3 4 5 6 7 1 Flash (p. 37, 117) 2 Focus ring (p. 54) 3 Lens 4 Photocell window for your camcorder was developed jointly by Carl Zeiss, in Germany, and Sony Corporation. It adopts the MTF* measurement system for Sony video products. qa qs qd qf 8 SUPER LASER LINK (p. 34) 9 Viewfinder (p. 22) q; The lens for flash 5 Microphone 6 Remote sensor 7 Camera recording lamp (p. 19) q; When purchasing Sony video products, Sony recommends that this "GENUINE VIDEO...

Operating Instructions
Page 186
... ZOOM 146 Memory photo recording 114 "Memory Stick 106 Menu settings 98 Memory overlap 129 Mirror mode 20 Moisture condensation ........ 171 MONOTONE 43 Mosaic fader 43 MPEG 106 MPEG movie recording ....... 123 NIGHTSHOT 25 Normal charge 13 NTSC system 170 O, P, Q OLD MOVIE 47 Operation indicators 185 OVERLAP 43 Photo save 132 Photo scan 66 Photo search 66 PICTURE EFFECT 46, 59 Picture search 31 Playback pause 31 Power zoom 23 Print mark 152 PROGRAM AE 50 R Recording time...
... ZOOM 146 Memory photo recording 114 "Memory Stick 106 Menu settings 98 Memory overlap 129 Mirror mode 20 Moisture condensation ........ 171 MONOTONE 43 Mosaic fader 43 MPEG 106 MPEG movie recording ....... 123 NIGHTSHOT 25 Normal charge 13 NTSC system 170 O, P, Q OLD MOVIE 47 Operation indicators 185 OVERLAP 43 Photo save 132 Photo scan 66 Photo search 66 PICTURE EFFECT 46, 59 Picture search 31 Playback pause 31 Power zoom 23 Print mark 152 PROGRAM AE 50 R Recording time...


