
Camera Operations Guide
Page 3
...CCD-TRV228: TRV228 CCD-TRV328: TRV328 CCD-TRV428: TRV428 DCR-TRV260: TRV260 DCR-TRV265: TRV265 Instructions with specific model names are for a digital device pursuant to correct the interference by one or more ... model name of the sun only in a particular installation. Take pictures of your camcorder. Before you see. • In this manual could void your authority to radio..., video tapes, and other materials may cause a malfunction of the FCC Rules. Consult a Sony dealer or an experienced radio/TV technician for details. Be careful when placing the camera near ...
...CCD-TRV228: TRV228 CCD-TRV328: TRV328 CCD-TRV428: TRV428 DCR-TRV260: TRV260 DCR-TRV265: TRV265 Instructions with specific model names are for a digital device pursuant to correct the interference by one or more ... model name of the sun only in a particular installation. Take pictures of your camcorder. Before you see. • In this manual could void your authority to radio..., video tapes, and other materials may cause a malfunction of the FCC Rules. Consult a Sony dealer or an experienced radio/TV technician for details. Be careful when placing the camera near ...
Camera Operations Guide
Page 7
...7 FRAME REC/INT.REC, etc. ......54 Using the (SETUP MENU) - Digital program editing ( TRV260/265 69 For TRV260/265: Refer also to other operating instructions supplied with your camcorder: • Editing images with your camcorder abroad 81 Usable cassette tapes 82 About the "InfoLITHIUM" battery pack 83 About...controls 91 Index 98 Dubbing/Editing Connecting to a VCR 61 Dubbing to another tape 63 Dubbing a tape easily - Advanced operations Customizing Your Camcorder Changing the menu settings 43 Using the (MANUAL SET) menu - HiFi SOUND/EDIT, etc 51 Using the (LCD SET) menu - ...
...7 FRAME REC/INT.REC, etc. ......54 Using the (SETUP MENU) - Digital program editing ( TRV260/265 69 For TRV260/265: Refer also to other operating instructions supplied with your camcorder: • Editing images with your camcorder abroad 81 Usable cassette tapes 82 About the "InfoLITHIUM" battery pack 83 About...controls 91 Index 98 Dubbing/Editing Connecting to a VCR 61 Dubbing to another tape 63 Dubbing a tape easily - Advanced operations Customizing Your Camcorder Changing the menu settings 43 Using the (MANUAL SET) menu - HiFi SOUND/EDIT, etc 51 Using the (LCD SET) menu - ...
Camera Operations Guide
Page 23
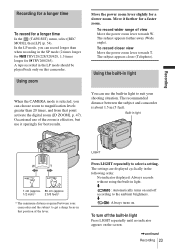
...cm (approx. 1/2 inch)* 2 5/8 feet)* * The minimum distance required between the subject and camcorder is selected, you can record longer than 20 times, and from that position of the lever. No indicator... displayed: Always records without using the built-in that point activate the digital zoom ([D ZOOM], p. 47). Recording for a longer time To record for a slower zoom....off the built-in the following order. In the LP mode, you can use it further for TRV260/265). To record closer view Move the power zoom lever towards W. To turn off according to...
...cm (approx. 1/2 inch)* 2 5/8 feet)* * The minimum distance required between the subject and camcorder is selected, you can record longer than 20 times, and from that position of the lever. No indicator... displayed: Always records without using the built-in that point activate the digital zoom ([D ZOOM], p. 47). Recording for a longer time To record for a slower zoom....off the built-in the following order. In the LP mode, you can use it further for TRV260/265). To record closer view Move the power zoom lever towards W. To turn off according to...
Camera Operations Guide
Page 47
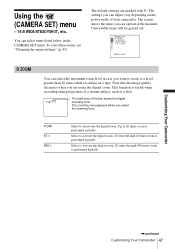
...recording enlarged pictures of the bar shows the digital zooming zone. This function is performed digitally. Up to a level greater than 20 times while recording on the power mode of your camcorder. Customizing Your Camcorder ,continued Customizing Your Camcorder 47 The screen shows the items you ...are marked with G. The default settings are using the digital zoom. The zooming zone appears when you can select items...
...recording enlarged pictures of the bar shows the digital zooming zone. This function is performed digitally. Up to a level greater than 20 times while recording on the power mode of your camcorder. Customizing Your Camcorder ,continued Customizing Your Camcorder 47 The screen shows the items you ...are marked with G. The default settings are using the digital zoom. The zooming zone appears when you can select items...
Camera Operations Guide
Page 62
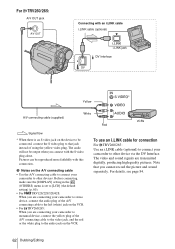
...connection. The video and sound signals are connecting your camcorder to monaural device, connect the yellow plug of the A/V connecting cable to the left (white) jack on the VCR. • For TRV260/265: When you are transmitted digitally, producing high quality pictures. To use an i.LINK... cable for connection For TRV260/265: Use an i.LINK cable (optional) to connect your camcorder to other device via the DV Interface. For TRV260/265: A/V OUT jack A/V OUT ...
...connection. The video and sound signals are connecting your camcorder to monaural device, connect the yellow plug of the A/V connecting cable to the left (white) jack on the VCR. • For TRV260/265: When you are transmitted digitally, producing high quality pictures. To use an i.LINK... cable for connection For TRV260/265: Use an i.LINK cable (optional) to connect your camcorder to other device via the DV Interface. For TRV260/265: A/V OUT jack A/V OUT ...
Camera Operations Guide
Page 69
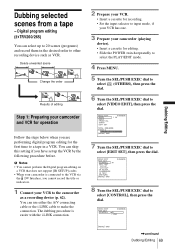
...END ,continued Dubbing/Editing 69 Dubbing/Editing You can skip this setting if you cannot record the title or indicators. 1 Connect your VCR to the camcorder as VCR. You can select up the VCR by the following procedure before. VIDEO EDIT EDIT SET CONTROL 0:08:55:06 IR i. VIDEO EDIT EDIT... IR TEST RETURN [MENU] : END 0:08:55:06 8 Turn the SEL/PUSH EXEC dial to select [VIDEO EDIT], then press the dial. Digital program editing ( TRV260/265) You can use either the A/V connecting cable or the i.LINK cable to select [EDIT SET], then press the dial. Delete unwanted scene Change...
...END ,continued Dubbing/Editing 69 Dubbing/Editing You can skip this setting if you cannot record the title or indicators. 1 Connect your VCR to the camcorder as VCR. You can select up the VCR by the following procedure before. VIDEO EDIT EDIT SET CONTROL 0:08:55:06 IR i. VIDEO EDIT EDIT... IR TEST RETURN [MENU] : END 0:08:55:06 8 Turn the SEL/PUSH EXEC dial to select [VIDEO EDIT], then press the dial. Digital program editing ( TRV260/265) You can use either the A/V connecting cable or the i.LINK cable to select [EDIT SET], then press the dial. Delete unwanted scene Change...
Camera Operations Guide
Page 70
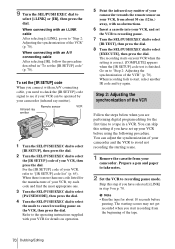
...code list" (p. 65). The starting scene. 1 Remove the cassette from the beginning of the VCR Follow the steps below when you are performing digital program editing for about 30 cm (12 in.) away, with an A/V connecting cable After selecting [IR], follow the procedure described in "To ...the operating instructions supplied with your VCR for the manufacturer of the VCR" (p. 70). When recording fails to "Step 2: Adjusting the synchronization of your camcorder. Prepare a pen and paper to take notes. 2 Set the VCR to select [i.LINK] or [IR], then press the dial. For the [...
...code list" (p. 65). The starting scene. 1 Remove the cassette from the beginning of the VCR Follow the steps below when you are performing digital program editing for about 30 cm (12 in.) away, with an A/V connecting cable After selecting [IR], follow the procedure described in "To ...the operating instructions supplied with your VCR for the manufacturer of the VCR" (p. 70). When recording fails to "Step 2: Adjusting the synchronization of your camcorder. Prepare a pen and paper to take notes. 2 Set the VCR to select [i.LINK] or [IR], then press the dial. For the [...

Camera Operations Guide
Page 71
...:06 0 8 Turn the SEL/PUSH EXEC dial to p. 70) beforehand. 1 Prepare a cassette. Recording the selected scenes as programs When you are performing digital program editing for the first time to a tape in a VCR, go through the procedures described in slow mode. 5 opening numbers for each [IN] and...value of each [IN] and the closing number value of each [OUT], then calculate the average numerical value for each for recording into the camcorder. Insert a cassette for adjusting synchronization is recorded. [COMPLETE] appears when the recording is set . 9 Turn the SEL/PUSH EXEC dial ...
...:06 0 8 Turn the SEL/PUSH EXEC dial to p. 70) beforehand. 1 Prepare a cassette. Recording the selected scenes as programs When you are performing digital program editing for the first time to a tape in a VCR, go through the procedures described in slow mode. 5 opening numbers for each [IN] and...value of each [IN] and the closing number value of each [OUT], then calculate the average numerical value for each for recording into the camcorder. Insert a cassette for adjusting synchronization is recorded. [COMPLETE] appears when the recording is set . 9 Turn the SEL/PUSH EXEC dial ...
Camera Operations Guide
Page 78
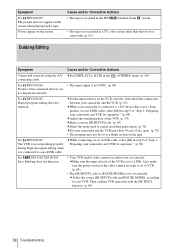
... editing does not function. For TRV260/265: The VCR is not responding properly during Digital program editing when it is not set correctly. cWhile connecting via an i.LINK cable, select [IR] in step 9 of "Step 1: Preparing your camcorder and VCR for operation." (p. 69) cAdjust the synchronization of the video camera recorder is set... VCR. (p. 70) cEnter a correct [IR SETUP] code. (p. 65) cSelect the mode used to VCR. (p. 64) • The [IR SETUP] code or [PAUSE MODE] is not a Sony product via an i.LINK cable.
... editing does not function. For TRV260/265: The VCR is not responding properly during Digital program editing when it is not set correctly. cWhile connecting via an i.LINK cable, select [IR] in step 9 of "Step 1: Preparing your camcorder and VCR for operation." (p. 69) cAdjust the synchronization of the video camera recorder is set... VCR. (p. 70) cEnter a correct [IR SETUP] code. (p. 65) cSelect the mode used to VCR. (p. 64) • The [IR SETUP] code or [PAUSE MODE] is not a Sony product via an i.LINK cable.

Camera Operations Guide
Page 79
...Troubleshooting 79 cChange the tape. Remove the cassette and leave your camcorder again. Do not perform this procedure if moisture starts to (CHG) OFF, and leave it again and operate your Sony dealer or local authorized Sony service facility. E (Battery level warning) • The ... tried a couple of the 5-digit code, which starts from "E." cPress the RESET button and operate your Sony dealer or local authorized Sony service facility. E:61:ss / E:62:ss cContact your camcorder again. Remove and insert the cassette, then operate your camcorder for about 1 hour with the...
...Troubleshooting 79 cChange the tape. Remove the cassette and leave your camcorder again. Do not perform this procedure if moisture starts to (CHG) OFF, and leave it again and operate your Sony dealer or local authorized Sony service facility. E (Battery level warning) • The ... tried a couple of the 5-digit code, which starts from "E." cPress the RESET button and operate your Sony dealer or local authorized Sony service facility. E:61:ss / E:62:ss cContact your camcorder again. Remove and insert the cassette, then operate your camcorder for about 1 hour with the...
Camera Operations Guide
Page 82
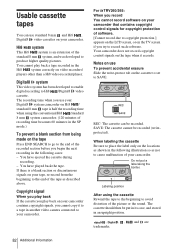
...to avoid distortion of the standard 8 mm system, and was developed to produce higher quality pictures. For TRV260/265: When you record You cannot record software on your camcorder contains copyright signals, you begin the next recording in the following illustration so as shown in an upright ...: The cassette can use standard 8 mm and Hi8 , Digital8 video cassettes on your camcorder. Digital8 system This video system has been developed to enable digital recording to SAVE. Your camcorder does not record copyright control signals on the TV screen if you use To prevent accidental...
...to avoid distortion of the standard 8 mm system, and was developed to produce higher quality pictures. For TRV260/265: When you record You cannot record software on your camcorder contains copyright signals, you begin the next recording in the following illustration so as shown in an upright ...: The cassette can use standard 8 mm and Hi8 , Digital8 video cassettes on your camcorder. Digital8 system This video system has been developed to enable digital recording to SAVE. Your camcorder does not record copyright control signals on the TV screen if you use To prevent accidental...
Camera Operations Guide
Page 85
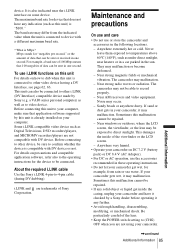
...further. • Avoid rough handling, disassembling, modifying, or mechanical shock. This unit can be connected. About the required i.LINK cable Use the Sony i.LINK 4-pin-to other video device having a DV Interface, see page 62, 63. Maintenance and precautions On use and care • Do ... computer, make sure that 100 megabits of the viewfinder or the LCD screen. - If your camcorder get inside of data can also be repaired. • If any indication (such as Digital Televisions, DVD recorders/players, and MICROMV recorders/players are not compatible with DV device. Some ...
...further. • Avoid rough handling, disassembling, modifying, or mechanical shock. This unit can be connected. About the required i.LINK cable Use the Sony i.LINK 4-pin-to other video device having a DV Interface, see page 62, 63. Maintenance and precautions On use and care • Do ... computer, make sure that 100 megabits of the viewfinder or the LCD screen. - If your camcorder get inside of data can also be repaired. • If any indication (such as Digital Televisions, DVD recorders/players, and MICROMV recorders/players are not compatible with DV device. Some ...
Computer Applications Guide
Page 4
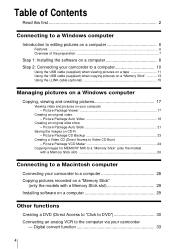
...Introduction to editing pictures on a computer 6 Features ...6 Overview of the preparation 7 Step 1: Installing the software on a computer 8 Step 2: Connecting your camcorder to a computer 10 Using the USB cable (supplied) when viewing pictures on a tape 11 Using the USB cable (supplied) when copying pictures on ... cable (optional 15 Managing pictures on a Windows computer Copying, viewing and creating pictures 17 Viewing video and pictures on CD-R - Digital convert function 33 4 Picture Package VCD Maker 24 Copying images for MEMORY MIX to a "Memory Stick" (only the models with ...
...Introduction to editing pictures on a computer 6 Features ...6 Overview of the preparation 7 Step 1: Installing the software on a computer 8 Step 2: Connecting your camcorder to a computer 10 Using the USB cable (supplied) when viewing pictures on a tape 11 Using the USB cable (supplied) when copying pictures on ... cable (optional 15 Managing pictures on a Windows computer Copying, viewing and creating pictures 17 Viewing video and pictures on CD-R - Digital convert function 33 4 Picture Package VCD Maker 24 Copying images for MEMORY MIX to a "Memory Stick" (only the models with ...
Computer Applications Guide
Page 6
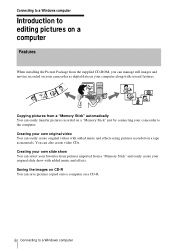
... slide show You can select your favorites from pictures imported from the supplied CD-ROM, you can manage still images and movies recorded on your camcorder as materials. Creating your own slide show with added music and effects. Saving the images on CD-R You can save pictures copied onto a computer ... a "Memory Stick" automatically You can easily transfer pictures recorded on your computer along with added music and effects using pictures recorded on a tape as digital data on a "Memory Stick" just by connecting your own original video You can also create video CDs. Creating your...
... slide show You can select your favorites from pictures imported from the supplied CD-ROM, you can manage still images and movies recorded on your camcorder as materials. Creating your own slide show with added music and effects. Saving the images on CD-R You can save pictures copied onto a computer ... a "Memory Stick" automatically You can easily transfer pictures recorded on your computer along with added music and effects using pictures recorded on a tape as digital data on a "Memory Stick" just by connecting your own original video You can also create video CDs. Creating your...
Computer Applications Guide
Page 11
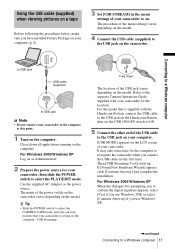
.../Windows XP Log on as the power source. Fully insert. Refer to the separate Camera Operations Guide supplied with the Handycam Station, connect the USB cable to the USB jack on the Handycam Station, then set the USB ON/OFF switch to ON. 5 Connect the other end of the USB cable to... USB jack USB cable (supplied) to USB jack b Note • Do not connect your camcorder to the USB jack on the computer. For Windows 2000/Windows XP When the dialogue box prompting you to confirm the digital signature appears, select [Yes] if you use Windows 2000 or select [Continue Anyway] if you...
.../Windows XP Log on as the power source. Fully insert. Refer to the separate Camera Operations Guide supplied with the Handycam Station, connect the USB cable to the USB jack on the Handycam Station, then set the USB ON/OFF switch to ON. 5 Connect the other end of the USB cable to... USB jack USB cable (supplied) to USB jack b Note • Do not connect your camcorder to the USB jack on the computer. For Windows 2000/Windows XP When the dialogue box prompting you to confirm the digital signature appears, select [Yes] if you use Windows 2000 or select [Continue Anyway] if you...

Computer Applications Guide
Page 32
...the operation after [Finalizing DVD.] is displayed on the LCD screen of your camcorder. • Do not disconnect the i.LINK cable or set to on. • You cannot operate your camcorder in a format other than Digital 8 format. 32 Other functions For SEL/PUSH EXEC dial models Press BURN ...DVD/VCD of your camcorder while [WRITING] or [CONVERTING] is displayed. • When any of the following situations...
...the operation after [Finalizing DVD.] is displayed on the LCD screen of your camcorder. • Do not disconnect the i.LINK cable or set to on. • You cannot operate your camcorder in a format other than Digital 8 format. 32 Other functions For SEL/PUSH EXEC dial models Press BURN ...DVD/VCD of your camcorder while [WRITING] or [CONVERTING] is displayed. • When any of the following situations...
Computer Applications Guide
Page 33
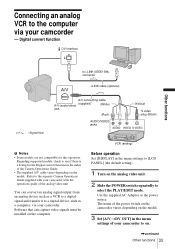
...that can convert an analog signal output from an analog device such as a VCR to a digital signal and transfer it to the computer via your camcorder. Use the supplied AC Adaptor as a computer, via your camcorder to i.LINK (IEEE1394) connector i.LINK cable (optional) : Signal flow A/V connecting cable (... there is a listing for this operation. Refer to the separate Camera Operations Guide supplied with your camcorder with the operations guide of your camcorder - Digital convert function DV Interface Other functions to on the computer. Connecting an analog VCR to...
...that can convert an analog signal output from an analog device such as a VCR to a digital signal and transfer it to the computer via your camcorder. Use the supplied AC Adaptor as a computer, via your camcorder to i.LINK (IEEE1394) connector i.LINK cable (optional) : Signal flow A/V connecting cable (... there is a listing for this operation. Refer to the separate Camera Operations Guide supplied with your camcorder with the operations guide of your camcorder - Digital convert function DV Interface Other functions to on the computer. Connecting an analog VCR to...
Computer Applications Guide
Page 34
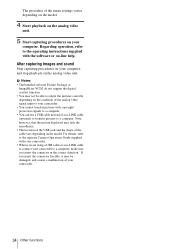
b Notes • The bundled software Picture Package or ImageMixer VCD2 do not support the digital convert function. • You may not be damaged, and causes a malfunction of your computer. The procedure of the menu settings varies depending on the model....Camera Operations Guide supplied with copyright protection signals to a computer. • You can use a USB cable instead of the analog video signal input to your camcorder to a computer, make sure you are using a USB cable or an i.LINK cable to a computer. Regarding operation, refer to the operating instructions supplied with...
b Notes • The bundled software Picture Package or ImageMixer VCD2 do not support the digital convert function. • You may not be damaged, and causes a malfunction of your computer. The procedure of the menu settings varies depending on the model....Camera Operations Guide supplied with copyright protection signals to a computer. • You can use a USB cable instead of the analog video signal input to your camcorder to a computer, make sure you are using a USB cable or an i.LINK cable to a computer. Regarding operation, refer to the operating instructions supplied with...

Marketing Specifications
Page 1
... Sony's rechargeable Lithium-Ion batteries are not subjected to perform at an optimal level. Program AE (Auto Exposure) Modes Program AE modes make recording easy even when filming in the viewfinder or the LCD screen. ® DCR-TRV260 Digital Handycam® Camcorder The DCR-TRV260 ...is clearer, with less distortion than previous types of digital zooms. 2.5" SwivelScreen™ LCD Display (123K Pixels) Provides excellent viewing clarity with ...
... Sony's rechargeable Lithium-Ion batteries are not subjected to perform at an optimal level. Program AE (Auto Exposure) Modes Program AE modes make recording easy even when filming in the viewfinder or the LCD screen. ® DCR-TRV260 Digital Handycam® Camcorder The DCR-TRV260 ...is clearer, with less distortion than previous types of digital zooms. 2.5" SwivelScreen™ LCD Display (123K Pixels) Provides excellent viewing clarity with ...
Marketing Specifications
Page 2
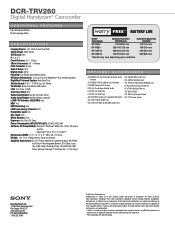
... (WHD): 3 3⁄8" x 3 7⁄8" x 6" (85 x 98 x 151mm) Weight: 1 lb. 11oz. (780g) without written permission is a trademark of Sony, used only to change without notice. Microsoft and Windows are trademarks of Microsoft Corporation. DCR-TRV260 Digital Handycam® Camcorder ADDITIONAL FEATURES Easy Handycam Button Multi-Language Menu S P E C I F I C AT I O N S Imaging Device: 1/6" 460K Gross Pixel CCD Video Actual: 290K Pixels Still...
... (WHD): 3 3⁄8" x 3 7⁄8" x 6" (85 x 98 x 151mm) Weight: 1 lb. 11oz. (780g) without written permission is a trademark of Sony, used only to change without notice. Microsoft and Windows are trademarks of Microsoft Corporation. DCR-TRV260 Digital Handycam® Camcorder ADDITIONAL FEATURES Easy Handycam Button Multi-Language Menu S P E C I F I C AT I O N S Imaging Device: 1/6" 460K Gross Pixel CCD Video Actual: 290K Pixels Still...


