Operating Instructions (primary manual)
Page 2
...Road, Oradell, NJ07649 U.S.A. Your Digital Handycam is loaded with Part 15 of Conformity Trade Name: SONY Model No.: DCR-TRV15, DCR-TRV17 Responsible Party:Sony Electronics Inc. "Memory Stick" ...harmful interference, and (2)this device must accept any questions about this Sony Digital Handycam camcorder. CAUTION You are cautioned that any interference received, including interference that ... any interference received, including interference that may be producing home video that may call 1-800-222-SONY (United States only). For customers in the sun or under...
...Road, Oradell, NJ07649 U.S.A. Your Digital Handycam is loaded with Part 15 of Conformity Trade Name: SONY Model No.: DCR-TRV15, DCR-TRV17 Responsible Party:Sony Electronics Inc. "Memory Stick" ...harmful interference, and (2)this device must accept any questions about this Sony Digital Handycam camcorder. CAUTION You are cautioned that any interference received, including interference that ... any interference received, including interference that may be producing home video that may call 1-800-222-SONY (United States only). For customers in the sun or under...
Operating Instructions (primary manual)
Page 5
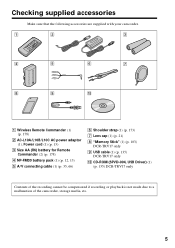
... battery pack (1) (p. 12, 13) 5 A/V connecting cable (1) (p. 35, 66) 6 Shoulder strap (1) (p. 173) 7 Lens cap (1) (p. 21) 8 "Memory Stick" (1) (p. 103) DCR-TRV17 only 9 USB cable (1) (p. 135) DCR-TRV17 only 0 CD-ROM (SPVD-004, USB Driver) (1) (p. 135) DCR-TRV17 only Contents of the recording cannot be compensated if recording or playback is not made due to a malfunction of the camcorder, storage media, etc. 5
... battery pack (1) (p. 12, 13) 5 A/V connecting cable (1) (p. 35, 66) 6 Shoulder strap (1) (p. 173) 7 Lens cap (1) (p. 21) 8 "Memory Stick" (1) (p. 103) DCR-TRV17 only 9 USB cable (1) (p. 135) DCR-TRV17 only 0 CD-ROM (SPVD-004, USB Driver) (1) (p. 135) DCR-TRV17 only Contents of the recording cannot be compensated if recording or playback is not made due to a malfunction of the camcorder, storage media, etc. 5

Operating Instructions (primary manual)
Page 6
... Camcorder Changing the menu settings 96 "Memory Stick" Operations (DCR-TRV17 only) Using a "Memory Stick" - Title search 61 Searching a recording by frame recording - Basics Recording a picture 21 Shooting backlit subjects - END SEARCH / EDITSEARCH / Rec Review .... 30 Playback - Picture effect .. 45 Using special effects - Digital program editing 68 Using with digital effects 58 Enlarging images recorded on a tape - Memory photo recording...
... Camcorder Changing the menu settings 96 "Memory Stick" Operations (DCR-TRV17 only) Using a "Memory Stick" - Title search 61 Searching a recording by frame recording - Basics Recording a picture 21 Shooting backlit subjects - END SEARCH / EDITSEARCH / Rec Review .... 30 Playback - Picture effect .. 45 Using special effects - Digital program editing 68 Using with digital effects 58 Enlarging images recorded on a tape - Memory photo recording...
Operating Instructions (primary manual)
Page 7
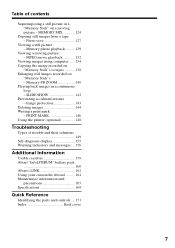
... on "Memory Stick"s - MPEG movie playback 132 Viewing images using computer ...... 134 Copying the image recorded on "Memory Stick"s to tapes 138 Enlarging still images recorded on a moving picture - Getting started Table of trouble and their solutions 149 Self-diagnosis display 155 ...Warning indicators and messages .... 156 Additional Information Usable cassettes 158 About "InfoLITHIUM" battery pack 160 About i.LINK 162 Using your camcorder abroad ...
... on "Memory Stick"s - MPEG movie playback 132 Viewing images using computer ...... 134 Copying the image recorded on "Memory Stick"s to tapes 138 Enlarging still images recorded on a moving picture - Getting started Table of trouble and their solutions 149 Self-diagnosis display 155 ...Warning indicators and messages .... 156 Additional Information Usable cassettes 158 About "InfoLITHIUM" battery pack 160 About i.LINK 162 Using your camcorder abroad ...

Operating Instructions (primary manual)
Page 8
Connecting the power cord (p. 17) Use the battery pack when using your camcorder. After the cassette compartment going down completely, close the lid until it clicks. 8 Quick Start Guide AC power adaptor (supplied) Connect the plug with the ... compartment with its v mark facing up. Inserting a cassette (p. 20) 1 Slide OPEN/ EJECT in parentheses "( )" for more information. See the page in the direction of your camcorder outdoors (p. 12).
Connecting the power cord (p. 17) Use the battery pack when using your camcorder. After the cassette compartment going down completely, close the lid until it clicks. 8 Quick Start Guide AC power adaptor (supplied) Connect the plug with the ... compartment with its v mark facing up. Inserting a cassette (p. 20) 1 Slide OPEN/ EJECT in parentheses "( )" for more information. See the page in the direction of your camcorder outdoors (p. 12).
Operating Instructions (primary manual)
Page 9
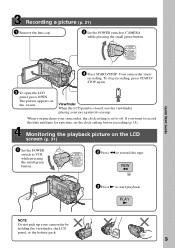
...a picture, set to rewind the tape. Your camcorder starts recording. Monitoring the playback picture on the screen. PLAY NOTE Do not pick up your eye against its eyecup. POWER VCR OFF(CHG) CAMERA MEMORY 4 Press START/STOP. To stop recording, press START/ STOP again. 3 To open the... LCD panel, press OPEN. If you purchase your camcorder, the clock setting is closed, use the viewfinder placing your camcorder by holding the viewfinder, the LCD...
...a picture, set to rewind the tape. Your camcorder starts recording. Monitoring the playback picture on the screen. PLAY NOTE Do not pick up your eye against its eyecup. POWER VCR OFF(CHG) CAMERA MEMORY 4 Press START/STOP. To stop recording, press START/ STOP again. 3 To open the... LCD panel, press OPEN. If you purchase your camcorder, the clock setting is closed, use the viewfinder placing your camcorder by holding the viewfinder, the LCD...
Operating Instructions (primary manual)
Page 10
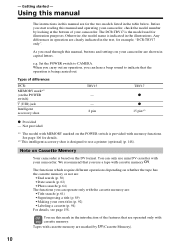
...8226; Superimposing a title (p. 89) • Making your camcorder. Not provided *1) The model with the cassette memory are clearly indicated in the table below. The DCR-TRV17 is indicated in the illustrations. We recommend that the operation is designed to CAMERA. You see page 158. Before you can only use ... the cassette memory or not are for the two models listed in the text, for example, "DCR-TRV17 only". - As you read through this manual and operating your camcorder. See page 106 for illustration purposes. Otherwise, the model name is the model used for details....
...8226; Superimposing a title (p. 89) • Making your camcorder. Not provided *1) The model with the cassette memory are clearly indicated in the table below. The DCR-TRV17 is indicated in the illustrations. We recommend that the operation is designed to CAMERA. You see page 158. Before you can only use ... the cassette memory or not are for the two models listed in the text, for example, "DCR-TRV17 only". - As you read through this manual and operating your camcorder. See page 106 for illustration purposes. Otherwise, the model name is the model used for details....

Operating Instructions (primary manual)
Page 11
... camera near a window or outdoors. Exposing the LCD screen, the finder or the lens to direct sunlight for effective use. Letting your camcorder get wet. Doing so might cause your camcorder to the provision of such materials may be copyrighted. To view your recordings ...and do not affect the recording in any way. •Do not let your camcorder get wet may cause your camcorder away from country to malfunction. Keep your camcorder to country. Unauthorized recording of the copyright laws. Copyright precautions Television programs, films, video tapes, and other materials ...
... camera near a window or outdoors. Exposing the LCD screen, the finder or the lens to direct sunlight for effective use. Letting your camcorder get wet. Doing so might cause your camcorder to the provision of such materials may be copyrighted. To view your recordings ...and do not affect the recording in any way. •Do not let your camcorder get wet may cause your camcorder away from country to malfunction. Keep your camcorder to country. Unauthorized recording of the copyright laws. Copyright precautions Television programs, films, video tapes, and other materials ...

Operating Instructions (primary manual)
Page 12
Step 1 Preparing the power supply Installing the battery pack Install the battery pack to use your camcorder outdoors. (1) Lift up the viewfinder. (2) Slide the battery pack down until it clicks. 1 2 To remove the battery pack (1) Lift up the viewfinder. (2) Slide the battery pack out in the direction of the arrow while pressing BATT down. 1 2 2 BATT release button If you use the large capacity battery pack If you install the NP-FM70/FM90/FM91 battery pack on your camcorder, extend its viewfinder. 12
Step 1 Preparing the power supply Installing the battery pack Install the battery pack to use your camcorder outdoors. (1) Lift up the viewfinder. (2) Slide the battery pack down until it clicks. 1 2 To remove the battery pack (1) Lift up the viewfinder. (2) Slide the battery pack out in the direction of the arrow while pressing BATT down. 1 2 2 BATT release button If you use the large capacity battery pack If you install the NP-FM70/FM90/FM91 battery pack on your camcorder, extend its viewfinder. 12
Operating Instructions (primary manual)
Page 13
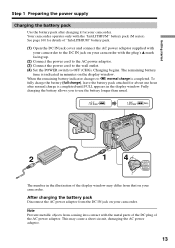
... you to use the battery longer than usual. 2 1 4 POWER VCR OFF(CHG) CAMERA MEMORY The number in minutes on your camcorder. See page 160 for about one hour after charging it for your camcorder. The remaining battery time is indicated in the illustration of "InfoLITHIUM" battery pack. (1) ... power adaptor. 13 Note Prevent metallic objects from the DC IN jack on the display window. This may differ from that on your camcorder. After charging the battery pack Disconnect the AC power adaptor from coming into contact with the "InfoLITHIUM" battery pack (M series). When ...
... you to use the battery longer than usual. 2 1 4 POWER VCR OFF(CHG) CAMERA MEMORY The number in minutes on your camcorder. See page 160 for about one hour after charging it for your camcorder. The remaining battery time is indicated in the illustration of "InfoLITHIUM" battery pack. (1) ... power adaptor. 13 Note Prevent metallic objects from the DC IN jack on the display window. This may differ from that on your camcorder. After charging the battery pack Disconnect the AC power adaptor from coming into contact with the "InfoLITHIUM" battery pack (M series). When ...
Operating Instructions (primary manual)
Page 14
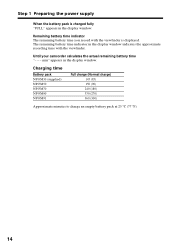
min" appears in the display window. Until your camcorder calculates the actual remaining battery time "- - - The remaining battery time indicator in the display window indicates the approximate recording time with the viewfinder is charged fully "FULL" appears in the display window. Charging time Battery pack NP-FM30 (supplied) NP-...Approximate minutes to charge an empty battery pack at 25 °C (77 °F). 14 Remaining battery time indicator The remaining battery time you record with the viewfinder. Step 1 Preparing the power supply When the battery pack is displayed.
min" appears in the display window. Until your camcorder calculates the actual remaining battery time "- - - The remaining battery time indicator in the display window indicates the approximate recording time with the viewfinder is charged fully "FULL" appears in the display window. Charging time Battery pack NP-FM30 (supplied) NP-...Approximate minutes to charge an empty battery pack at 25 °C (77 °F). 14 Remaining battery time indicator The remaining battery time you record with the viewfinder. Step 1 Preparing the power supply When the battery pack is displayed.
Operating Instructions (primary manual)
Page 15
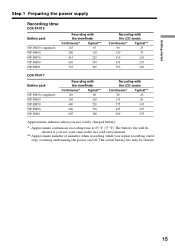
...90 45 150 75 310 165 475 255 550 290 DCR-TRV17 Battery pack NP-FM30 (supplied) NP-FM50 NP-FM70 NP-FM90 NP-FM91 Recording with the viewfinder Continuous* Typical** 120 60 195 105 400 220 600 330 695 380 Recording with the LCD screen Continuous* Typical** 80 40 ... 255 Approximate minutes when you repeat recording start/ stop, zooming and turning the power on/off. The battery life will be shorter. 15 The actual battery life may be shorter if you use your camcorder in a cold environment. ** Approximate number of minutes when recording while you use a fully charged...
...90 45 150 75 310 165 475 255 550 290 DCR-TRV17 Battery pack NP-FM30 (supplied) NP-FM50 NP-FM70 NP-FM90 NP-FM91 Recording with the viewfinder Continuous* Typical** 120 60 195 105 400 220 600 330 695 380 Recording with the LCD screen Continuous* Typical** 80 40 ... 255 Approximate minutes when you repeat recording start/ stop, zooming and turning the power on/off. The battery life will be shorter. 15 The actual battery life may be shorter if you use your camcorder in a cold environment. ** Approximate number of minutes when recording while you use a fully charged...

Operating Instructions (primary manual)
Page 16
...730;F). 16 Your camcorder operates only with the "InfoLITHIUM" battery pack (M series). If the power goes off although the battery remaining indicator indicates that the indication on LCD screen 85 140 295 450 520 Playing time with LCD closed 135 220 450 685 785 DCR-TRV17 Battery pack NP-... charged battery Approximate minutes when playing back at 25 °C (77 ºF). This unit is compatible with the "InfoLITHIUM" battery. The recording and playing times of a normally charged battery are about 90% of those of Sony Corporation. "InfoLITHIUM" M series battery packs have the mark.
...730;F). 16 Your camcorder operates only with the "InfoLITHIUM" battery pack (M series). If the power goes off although the battery remaining indicator indicates that the indication on LCD screen 85 140 295 450 520 Playing time with LCD closed 135 220 450 685 785 DCR-TRV17 Battery pack NP-... charged battery Approximate minutes when playing back at 25 °C (77 ºF). This unit is compatible with the "InfoLITHIUM" battery. The recording and playing times of a normally charged battery are about 90% of those of Sony Corporation. "InfoLITHIUM" M series battery packs have the mark.

Operating Instructions (primary manual)
Page 17
... is not plugged into a wall outlet. Using a car battery Use Sony DC Adaptor/Charger (optional). Notes •Place the AC power adaptor near a wall outlet. Connect the AC power adaptor supplied with your camcorder to the DC IN jack on your camcorder with this unit, disconnect the plug from the AC power source... set itself has been turned off the power. •The AC power adaptor can supply power even if the battery pack is attached to your camcorder for further information. 17 Getting started Step 1 Preparing the power supply Connecting to a wall outlet When you use your...
... is not plugged into a wall outlet. Using a car battery Use Sony DC Adaptor/Charger (optional). Notes •Place the AC power adaptor near a wall outlet. Connect the AC power adaptor supplied with your camcorder to the DC IN jack on your camcorder with this unit, disconnect the plug from the AC power source... set itself has been turned off the power. •The AC power adaptor can supply power even if the battery pack is attached to your camcorder for further information. 17 Getting started Step 1 Preparing the power supply Connecting to a wall outlet When you use your...
Operating Instructions (primary manual)
Page 18
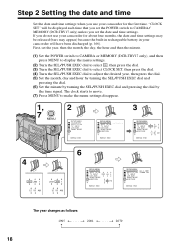
...2001 T t 2079 18 If you set the year, then the month, the day, the hour and then the minute. (1) Set the POWER switch to CAMERA or MEMORY (DCR-TRV17 only), and then press MENU to display the menu settings. (2) Turn the SEL/PUSH EXEC dial to select , then press the dial. (3) Turn the...2 Setting the date and time Set the date and time settings when you use your camcorder for about four months, the date and time settings may be displayed each time that you set the POWER switch to CAMERA/ MEMORY (DCR-TRV17 only) unless you do not use your camcorder will have been discharged (p. 166).
...2001 T t 2079 18 If you set the year, then the month, the day, the hour and then the minute. (1) Set the POWER switch to CAMERA or MEMORY (DCR-TRV17 only), and then press MENU to display the menu settings. (2) Turn the SEL/PUSH EXEC dial to select , then press the dial. (3) Turn the...2 Setting the date and time Set the date and time settings when you use your camcorder for about four months, the date and time settings may be displayed each time that you set the POWER switch to CAMERA/ MEMORY (DCR-TRV17 only) unless you do not use your camcorder will have been discharged (p. 166).

Operating Instructions (primary manual)
Page 19
Note on the time indicator The internal clock of your camcorder operates on the data code of the tape and the "Memory Stick" (DCRTRV17 only). Getting started Step 2 Setting the date and time If you do not set the date and time is recorded on a 12-hour cycle. •12:00 AM stands for midnight. •12:00 PM stands for noon. 19
Note on the time indicator The internal clock of your camcorder operates on the data code of the tape and the "Memory Stick" (DCRTRV17 only). Getting started Step 2 Setting the date and time If you do not set the date and time is recorded on a 12-hour cycle. •12:00 AM stands for midnight. •12:00 PM stands for noon. 19
Operating Instructions (primary manual)
Page 21
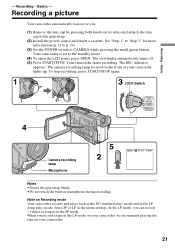
... Notes •Fasten the grip strap firmly. •Do not touch the built-in the SP mode. Basics - Recording - The viewfinder automatically turns off. (5) Press START/STOP. The camera recording lamp located on Recording mode Your camcorder records and plays back in the SP (standard play) mode and in the menu settings. Select SP or LP...
... Notes •Fasten the grip strap firmly. •Do not touch the built-in the SP mode. Basics - Recording - The viewfinder automatically turns off. (5) Press START/STOP. The camera recording lamp located on Recording mode Your camcorder records and plays back in the SP (standard play) mode and in the menu settings. Select SP or LP...
Operating Instructions (primary manual)
Page 22
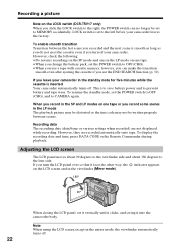
...The LCD panel moves about 90 degrees to the viewfinder side and about 180 degrees to CAMERA again. LOCK switch is to save battery power and to prevent battery and tape wear. When you record in the LP mode The playback picture may be distorted or the time code may not...camcorder. To enable smooth transition Transition between scenes. To resume the standby mode, set it vertically until it clicks, and swing it faces the other way, the indicator appears on the LCD screen and in the mirror mode, the viewfinder automatically turns off. 22 Recording a picture Note on the LOCK switch (DCR-TRV17...
...The LCD panel moves about 90 degrees to the viewfinder side and about 180 degrees to CAMERA again. LOCK switch is to save battery power and to prevent battery and tape wear. When you record in the LP mode The playback picture may be distorted or the time code may not...camcorder. To enable smooth transition Transition between scenes. To resume the standby mode, set it vertically until it clicks, and swing it faces the other way, the indicator appears on the LCD screen and in the mirror mode, the viewfinder automatically turns off. 22 Recording a picture Note on the LOCK switch (DCR-TRV17...
Operating Instructions (primary manual)
Page 27
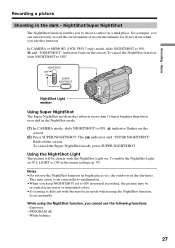
.... This may be clearer with the autofocus mode when using the NightShot function, you use the NightShot function in normal recording, the picture may cause your camcorder to malfunction. •When you to ON. PROGRAM AE - and "NIGHTSHOT" indicators flash on the screen. (2) ...the screen. Using the NightShot Light The picture will be recorded in the NightShot mode. (1) In CAMERA mode, slide NIGHTSHOT to OFF. NightShot/Super NightShot The NightShot function enables you keep NIGHTSHOT set N.S. In CAMERA or MEMORY (DCR-TRV17 only) mode, slide NIGHTSHOT to shoot a subject in the...
.... This may be clearer with the autofocus mode when using the NightShot function, you use the NightShot function in normal recording, the picture may cause your camcorder to malfunction. •When you to ON. PROGRAM AE - and "NIGHTSHOT" indicators flash on the screen. (2) ...the screen. Using the NightShot Light The picture will be recorded in the NightShot mode. (1) In CAMERA mode, slide NIGHTSHOT to OFF. NightShot/Super NightShot The NightShot function enables you keep NIGHTSHOT set N.S. In CAMERA or MEMORY (DCR-TRV17 only) mode, slide NIGHTSHOT to shoot a subject in the...
Operating Instructions (primary manual)
Page 30
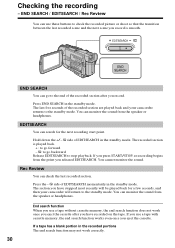
...EDITSEARCH END SEARCH END SEARCH You can search for a few seconds, and then your camcorder returns to check the recorded picture or shoot so that the transition between the last recorded scene and the next scene you have recorded on the tape. Press END SEARCH in the standby mode. EDITSEARCH You can go... played back. + : to go forward - 7: to go to the standby mode. The last five seconds of the recorded section are played back and your camcorder will return to the end of EDITSEARCH momentarily in the standby mode. END SEARCH / EDITSEARCH / Rec Review You can monitor the sound from...
...EDITSEARCH END SEARCH END SEARCH You can search for a few seconds, and then your camcorder returns to check the recorded picture or shoot so that the transition between the last recorded scene and the next scene you have recorded on the tape. Press END SEARCH in the standby mode. EDITSEARCH You can go... played back. + : to go forward - 7: to go to the standby mode. The last five seconds of the recorded section are played back and your camcorder will return to the end of EDITSEARCH momentarily in the standby mode. END SEARCH / EDITSEARCH / Rec Review You can monitor the sound from...


