
Operating Instructions
Page 4
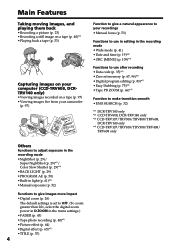
...•Viewing images recorded on a tape (p. 97) •Viewing images live from your camcorder (p. 97) Function to give a natural appearance to your recordings •Manual focus (p. ... Function to make transition smooth •END SEARCH (p. 32) *1) DCR-TRV140 only *2) CCD-TRV608, DCR-TRV140 only *3) CCD-TRV107/TRV308/TRV408/TRV608, DCR-TRV140 only *4) CCD-TRV107/TRV108/TRV308/TRV408/ TRV608 only Others Functions to... default settings is set to OFF. (To zoom greater than 20×, select the digital zoom power in D ZOOM in the menu settings.) •FADER (p. 43) • Tape photo recording...
...•Viewing images recorded on a tape (p. 97) •Viewing images live from your camcorder (p. 97) Function to give a natural appearance to your recordings •Manual focus (p. ... Function to make transition smooth •END SEARCH (p. 32) *1) DCR-TRV140 only *2) CCD-TRV608, DCR-TRV140 only *3) CCD-TRV107/TRV308/TRV408/TRV608, DCR-TRV140 only *4) CCD-TRV107/TRV108/TRV308/TRV408/ TRV608 only Others Functions to... default settings is set to OFF. (To zoom greater than 20×, select the digital zoom power in D ZOOM in the menu settings.) •FADER (p. 43) • Tape photo recording...
Operating Instructions
Page 5
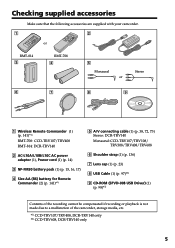
Checking supplied accessories Make sure that the following accessories are supplied with your camcorder. 1 2 or RMT-814 3 RMT-708 4 5 Monaural or Stereo 6 7 8 9 1 Wireless Remote Commander (1) (p. 141)*1) RMT-708: CCD-TRV107/TRV408 RMT-814: DCR-TRV140 2 AC-L10A/L10B/L10C AC power adaptor (1), Power cord (1) (p. 14) 3 NP-FM30 battery pack (1) (p. 15, 16, 17) 4 Size AA (R6) battery...
Checking supplied accessories Make sure that the following accessories are supplied with your camcorder. 1 2 or RMT-814 3 RMT-708 4 5 Monaural or Stereo 6 7 8 9 1 Wireless Remote Commander (1) (p. 141)*1) RMT-708: CCD-TRV107/TRV408 RMT-814: DCR-TRV140 2 AC-L10A/L10B/L10C AC power adaptor (1), Power cord (1) (p. 14) 3 NP-FM30 battery pack (1) (p. 15, 16, 17) 4 Size AA (R6) battery...

Operating Instructions
Page 6
... the exposure manually ...... 52 Focusing manually 53 Interval recording (DCR-TRV140 only 54 Frame by date - Date search 68 Searching for a photo - Table of contents Main Features 4 Checking supplied accessories 5 Quick Start Guide 8 Getting started Using this manual 10 Step 1 Preparing the power supply ... 13 Installing the battery pack 13 Charging the battery...
... the exposure manually ...... 52 Focusing manually 53 Interval recording (DCR-TRV140 only 54 Frame by date - Date search 68 Searching for a photo - Table of contents Main Features 4 Checking supplied accessories 5 Quick Start Guide 8 Getting started Using this manual 10 Step 1 Preparing the power supply ... 13 Installing the battery pack 13 Charging the battery...
Operating Instructions
Page 8
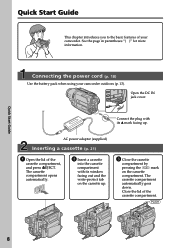
... automatically. See the page in parentheses "( )" for more information. The cassette compartment automatically goes down. Connecting the power cord (p. 18) Use the battery pack when using your camcorder. EJECT 2 Insert a cassette into the cassette compartment with its window facing out and the write-protect tab on ...lid of the cassette compartment, and press ZEJECT. Quick Start Guide This chapter introduces you to the basic features of your camcorder outdoors (p. 13). AC power adaptor (supplied) Inserting a cassette (p. 21) 1 Open the lid of the cassette compartment.
... automatically. See the page in parentheses "( )" for more information. The cassette compartment automatically goes down. Connecting the power cord (p. 18) Use the battery pack when using your camcorder. EJECT 2 Insert a cassette into the cassette compartment with its window facing out and the write-protect tab on ...lid of the cassette compartment, and press ZEJECT. Quick Start Guide This chapter introduces you to the basic features of your camcorder outdoors (p. 13). AC power adaptor (supplied) Inserting a cassette (p. 21) 1 Open the lid of the cassette compartment.
Operating Instructions
Page 9
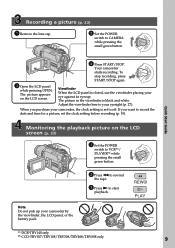
... picture on the LCD screen. REW PLAY *1) DCR-TRV140 only *2) CCD-TRV107/TRV108/TRV308/TRV408/TRV608 only 9 The picture in the viewfinder is closed, use the viewfinder placing your eye against its eyecup. Note Do not pick up your camcorder by the viewfinder, the LCD panel, or the...Recording a picture (p. 23) 1 Remove the lens cap. 2 Set the POWER switch to off. Your camcorder starts recording. The picture appears on the LCD screen (p. 33) 1 Set the POWER switch to VCR*1)/ PLAYER*2) while POWER pressing the small green button. When you want to record the date and time...
... picture on the LCD screen. REW PLAY *1) DCR-TRV140 only *2) CCD-TRV107/TRV108/TRV308/TRV408/TRV608 only 9 The picture in the viewfinder is closed, use the viewfinder placing your eye against its eyecup. Note Do not pick up your camcorder by the viewfinder, the LCD panel, or the...Recording a picture (p. 23) 1 Remove the lens cap. 2 Set the POWER switch to off. Your camcorder starts recording. The picture appears on the LCD screen (p. 33) 1 Set the POWER switch to VCR*1)/ PLAYER*2) while POWER pressing the small green button. When you want to record the date and time...
Operating Instructions
Page 10
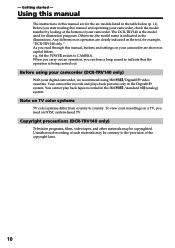
... the POWER switch to indicate that the operation is being carried out. Before you read through this manual are shown in the table below (p. 11). - Before using Hi8 /Digital8 video cassettes. Your camcorder records and plays back pictures only in the text, for the six models listed in capital letters. The DCR-TRV140 is indicated...
... the POWER switch to indicate that the operation is being carried out. Before you read through this manual are shown in the table below (p. 11). - Before using Hi8 /Digital8 video cassettes. Your camcorder records and plays back pictures only in the text, for the six models listed in capital letters. The DCR-TRV140 is indicated...

Operating Instructions
Page 13
To remove the battery pack Slide the battery pack out in the direction of the arrow while pressing V BATT down until it clicks. V BATT release lever 13 Getting started Step 1 Preparing the power supply Installing the battery pack Slide the battery pack down .
To remove the battery pack Slide the battery pack out in the direction of the arrow while pressing V BATT down until it clicks. V BATT release lever 13 Getting started Step 1 Preparing the power supply Installing the battery pack Slide the battery pack down .
Operating Instructions
Page 14
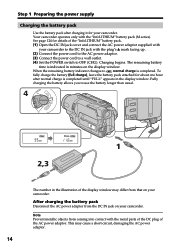
...hour after charging it for details of the AC power adaptor. This may differ from the DC IN jack on your camcorder. After charging the battery pack Disconnect the AC power adaptor from that on your camcorder. Charging begins. CR 4 V POWER OFF(CHG) CAME RA FULL 1 2,3 The ...number in the illustration of the display window may cause a short-circuit, damaging the AC power adaptor. 14 Step 1 Preparing the power supply Charging the battery...
...hour after charging it for details of the AC power adaptor. This may differ from the DC IN jack on your camcorder. After charging the battery pack Disconnect the AC power adaptor from that on your camcorder. Charging begins. CR 4 V POWER OFF(CHG) CAME RA FULL 1 2,3 The ...number in the illustration of the display window may cause a short-circuit, damaging the AC power adaptor. 14 Step 1 Preparing the power supply Charging the battery...
Operating Instructions
Page 15
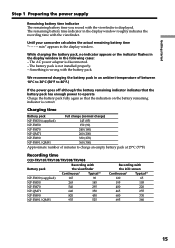
...QM71 640 350 NP-FM90 820 450 NP-FM91/QM91 955 525 Recording with the viewfinder is displayed. Something is correct. Until your camcorder calculates the actual remaining battery time "- - - - We recommend charging the battery pack in the display window roughly indicates the ...with the battery pack. The battery pack is disconnected. - Getting started Step 1 Preparing the power supply Remaining battery time indicator The remaining battery time you record with the LCD screen Continuous* Typical** 120 65 195 105 400 220 465 255 600 330 695 380 15
...QM71 640 350 NP-FM90 820 450 NP-FM91/QM91 955 525 Recording with the viewfinder is displayed. Something is correct. Until your camcorder calculates the actual remaining battery time "- - - - We recommend charging the battery pack in the display window roughly indicates the ...with the battery pack. The battery pack is disconnected. - Getting started Step 1 Preparing the power supply Remaining battery time indicator The remaining battery time you record with the LCD screen Continuous* Typical** 120 65 195 105 400 220 465 255 600 330 695 380 15

Operating Instructions
Page 16
...Playing time on /off. The actual battery life may be shorter if you use your camcorder in a cold environment. ** Approximate number of minutes when you repeat recording start/ stop, zooming and turning the power on LCD screen NP-FM30 (supplied) 120 NP-FM50 195 NP-FM70 400 NP-QM71 465 NP... 145 540 295 640 350 820 450 955 525 Recording with the LCD screen Continuous* Typical** 100 55 160 90 335 185 390 215 505 275 585 320 DCR-TRV140 Battery pack Recording with the viewfinder Recording with LCD closed 175 280 570 675 865 1010 CCD-TRV608 Battery pack NP-...
...Playing time on /off. The actual battery life may be shorter if you use your camcorder in a cold environment. ** Approximate number of minutes when you repeat recording start/ stop, zooming and turning the power on LCD screen NP-FM30 (supplied) 120 NP-FM50 195 NP-FM70 400 NP-QM71 465 NP... 145 540 295 640 350 820 450 955 525 Recording with the LCD screen Continuous* Typical** 100 55 160 90 335 185 390 215 505 275 585 320 DCR-TRV140 Battery pack Recording with the viewfinder Recording with LCD closed 175 280 570 675 865 1010 CCD-TRV608 Battery pack NP-...

Operating Instructions
Page 17
... playing time of a normally charged battery are about 90% of those of Sony Corporation. 17 What is compatible with the "InfoLITHIUM" battery pack (M series). Getting started Step 1 Preparing the power supply DCR-TRV140 Battery pack Playing time on LCD screen Playing time with LCD closed NP-FM30 (supplied) 85 115 NP-FM50 140 185 NP-FM70... battery pack which can exchange data such as battery consumption with the "InfoLITHIUM" battery pack. The battery life will be shorter if you use your camcorder in a cold environment.
... playing time of a normally charged battery are about 90% of those of Sony Corporation. 17 What is compatible with the "InfoLITHIUM" battery pack (M series). Getting started Step 1 Preparing the power supply DCR-TRV140 Battery pack Playing time on LCD screen Playing time with LCD closed NP-FM30 (supplied) 85 115 NP-FM50 140 185 NP-FM70... battery pack which can exchange data such as battery consumption with the "InfoLITHIUM" battery pack. The battery life will be shorter if you use your camcorder in a cold environment.

Operating Instructions
Page 18
...this unit, disconnect the plug from the AC power source (wall outlet) as long as possible to cut off . This means that you use your camcorder for further information. 18 Using a car battery Use Sony DC Adaptor/Charger (optional). Refer to your camcorder. • The DC IN jack has "...source priority". Step 1 Preparing the power supply Connecting to a wall outlet When you power it from a wall outlet using the AC power adaptor, if any power if the power cord is connected to ...
...this unit, disconnect the plug from the AC power source (wall outlet) as long as possible to cut off . This means that you use your camcorder for further information. 18 Using a car battery Use Sony DC Adaptor/Charger (optional). Refer to your camcorder. • The DC IN jack has "...source priority". Step 1 Preparing the power supply Connecting to a wall outlet When you power it from a wall outlet using the AC power adaptor, if any power if the power cord is connected to ...

Operating Instructions
Page 19
... about 6 months, the date and time settings may be displayed each time when you set the power switch to CAMERA unless you do not use your camcorder for the first time. "CLOCK SET" will have been discharged. t 2079 T 19 First, set the year, then the month, the day, the hour and then... the minute. (1) While your camcorder is in your camcorder will be released (bars may appear) because the built-in rechargeable battery in CAMERA mode, press MENU to display the menu. (2) Turn the SEL...
... about 6 months, the date and time settings may be displayed each time when you set the power switch to CAMERA unless you do not use your camcorder for the first time. "CLOCK SET" will have been discharged. t 2079 T 19 First, set the year, then the month, the day, the hour and then... the minute. (1) While your camcorder is in your camcorder will be released (bars may appear) because the built-in rechargeable battery in CAMERA mode, press MENU to display the menu. (2) Turn the SEL...

Operating Instructions
Page 21
... the LP mode in the Digital8 system.*1) • The recording time when you use your camcorder by pressing the mark on other camcorders (including other than the mark. •Do not pick up your camcorder is the 3/4 of the cassette compartment. *1) DCR-TRV140 only *2) CCD-TRV107/TRV108/...the cassette compartment by the lid of the indicated time on Hi8 /Digital8 tape.*1) •If you use Hi8 video cassettes.*2) (1) Prepare the power supply (p. 13). (2) Open the lid of the indicated time on this camcorder. Notes •Do not press the cassette compartment down . (5)...
... the LP mode in the Digital8 system.*1) • The recording time when you use your camcorder by pressing the mark on other camcorders (including other than the mark. •Do not pick up your camcorder is the 3/4 of the cassette compartment. *1) DCR-TRV140 only *2) CCD-TRV107/TRV108/...the cassette compartment by the lid of the indicated time on Hi8 /Digital8 tape.*1) •If you use Hi8 video cassettes.*2) (1) Prepare the power supply (p. 13). (2) Open the lid of the indicated time on this camcorder. Notes •Do not press the cassette compartment down . (5)...

Operating Instructions
Page 23
...built-in microphone during recording. See "Step 1" to CAMERA while pressing the small green button. Your camcorder is set to the grip strap. (2) Install the power source and insert a cassette. Your camcorder starts recording. In the LP mode, you play ) mode. Basics - Note on its sides ...and attach the lens cap to the standby mode. (4) Open the LCD panel while pressing OPEN. Recording - The camera...
...built-in microphone during recording. See "Step 1" to CAMERA while pressing the small green button. Your camcorder is set to the grip strap. (2) Install the power source and insert a cassette. Your camcorder starts recording. In the LP mode, you play ) mode. Basics - Note on its sides ...and attach the lens cap to the standby mode. (4) Open the LCD panel while pressing OPEN. Recording - The camera...
Operating Instructions
Page 24
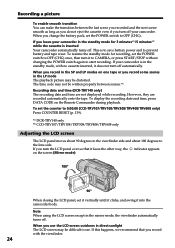
... the transition between scenes.*1) Recording date and time (DCR-TRV140 only) The recording date and time are recorded automatically onto the tape. If you turn off . The time code may not be distorted. If your camcorder is to save battery power and to start recording. This is in the mirror... counter to 0:00:00 (CCD-TRV107/TRV108/TRV308/TRV408/TRV608 only) Press COUNTER RESET (p. 139). *1) DCR-TRV140 only *2) CCD-TRV107/TRV108/TRV308/TRV408/TRV608 only Adjusting the LCD screen The LCD panel moves about 90 degrees to the viewfinder side and about 180 degrees to OFF (CHG). If this ...
... the transition between scenes.*1) Recording date and time (DCR-TRV140 only) The recording date and time are recorded automatically onto the tape. If you turn off . The time code may not be distorted. If your camcorder is to save battery power and to start recording. This is in the mirror... counter to 0:00:00 (CCD-TRV107/TRV108/TRV308/TRV408/TRV608 only) Press COUNTER RESET (p. 139). *1) DCR-TRV140 only *2) CCD-TRV107/TRV108/TRV308/TRV408/TRV608 only Adjusting the LCD screen The LCD panel moves about 90 degrees to the viewfinder side and about 180 degrees to OFF (CHG). If this ...

Operating Instructions
Page 26
After using your camcorder (CCD-TRV107/TRV308/TRV408/TRV608, DCR-TRV140 only) Remove the battery pack from your camcorder to avoid turning on the built-in better-looking recordings. Move it further for wide-angle (subject appears farther away) W T WT W T To use...the zoom function sparingly results in light accidentally. To activate digital zoom, select the digital zoom power in D ZOOM in the menu settings. 26 The digital zoom function is set to OFF (CHG). (2) Close the LCD panel. (3) Eject the cassette. (4) Attach the lens cap. The digital zooming zone appears ...
After using your camcorder (CCD-TRV107/TRV308/TRV408/TRV608, DCR-TRV140 only) Remove the battery pack from your camcorder to avoid turning on the built-in better-looking recordings. Move it further for wide-angle (subject appears farther away) W T WT W T To use...the zoom function sparingly results in light accidentally. To activate digital zoom, select the digital zoom power in D ZOOM in the menu settings. 26 The digital zoom function is set to OFF (CHG). (2) Close the LCD panel. (3) Eject the cassette. (4) Attach the lens cap. The digital zooming zone appears ...

Operating Instructions
Page 27
... subject If you go toward the "T" side. Viewfinder backlight (CCD-TRV107/TRV308/TRV408/TRV608, DCR-TRV140 only) You can shoot a subject that the indicators in the viewfinder come into sharp focus. ... your eyesight so that is sharp. Adjusting the viewfinder If you record pictures with the LCD panel closed, check the picture with the viewfinder - Basics Recording a picture Notes on... B.L. You can change the brightness of the backlight. Lift up the viewfinder and move the power zoom lever to function when zoom exceeds 20×. •The picture quality deteriorates as you...
... subject If you go toward the "T" side. Viewfinder backlight (CCD-TRV107/TRV308/TRV408/TRV608, DCR-TRV140 only) You can shoot a subject that the indicators in the viewfinder come into sharp focus. ... your eyesight so that is sharp. Adjusting the viewfinder If you record pictures with the LCD panel closed, check the picture with the viewfinder - Basics Recording a picture Notes on... B.L. You can change the brightness of the backlight. Lift up the viewfinder and move the power zoom lever to function when zoom exceeds 20×. •The picture quality deteriorates as you...

Operating Instructions
Page 28
...is displayed for five seconds after the POWER switch is set to CAMERA. [h] : Time indicator This is set to be correct, depending on tape. [a] [b] [c] [d] [e] [a] [i] [c] [d] [j] 40min SP REC 0:00:01 [f] 40min SP REC 0:00:01 [f] [g] JUL 4 2002 12:05:56 AM DCR-TRV140 [h] CCD-TRV107/TRV108/TRV308/TRV408/ ...indicator This appears after you start to record for a while.*1) This appears after you close the LCD panel and open it again, it takes about 1 minute for five seconds after the POWER switch is displayed for the correct remaining battery time in minutes to CAMERA. [i] : Hi8 ...
...is displayed for five seconds after the POWER switch is set to CAMERA. [h] : Time indicator This is set to be correct, depending on tape. [a] [b] [c] [d] [e] [a] [i] [c] [d] [j] 40min SP REC 0:00:01 [f] 40min SP REC 0:00:01 [f] [g] JUL 4 2002 12:05:56 AM DCR-TRV140 [h] CCD-TRV107/TRV108/TRV308/TRV408/ ...indicator This appears after you start to record for a while.*1) This appears after you close the LCD panel and open it again, it takes about 1 minute for five seconds after the POWER switch is displayed for the correct remaining battery time in minutes to CAMERA. [i] : Hi8 ...

Operating Instructions
Page 33
.../TRV408, DCR-TRV140 only 33 Basics - If you close the LCD panel, you can control playback using the Remote Commander supplied with your camcorder is silent when the LCD panel is closed. Playing back a tape You can playback tapes recorded in the Digital8 system.*1) You can playback tapes recorded in the viewfinder. (1) Install the power source and...
.../TRV408, DCR-TRV140 only 33 Basics - If you close the LCD panel, you can control playback using the Remote Commander supplied with your camcorder is silent when the LCD panel is closed. Playing back a tape You can playback tapes recorded in the Digital8 system.*1) You can playback tapes recorded in the viewfinder. (1) Install the power source and...

