Operating Guide
Page 8
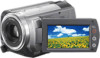
... that item supplied. "ImageMixer for HDD Camcorder" (Software) - Rechargeable battery pack NP-FP50 (1) (p.11) Power cord (1) (p.10) Handycam Station (1) (p.10) Lens Cap (1) (p.12) (DCR-SR40) To attach the lens cap A/V connecting cable (1) (p.20) USB cable (1) Thread the grip belt through the lens cap ring. AC Adaptor (1) (p.10) Wireless Remote Commander (1) (DCR-SR60/SR80) A button-type lithium battery is...
... that item supplied. "ImageMixer for HDD Camcorder" (Software) - Rechargeable battery pack NP-FP50 (1) (p.11) Power cord (1) (p.10) Handycam Station (1) (p.10) Lens Cap (1) (p.12) (DCR-SR40) To attach the lens cap A/V connecting cable (1) (p.20) USB cable (1) Thread the grip belt through the lens cap ring. AC Adaptor (1) (p.10) Wireless Remote Commander (1) (DCR-SR60/SR80) A button-type lithium battery is...

Operating Guide
Page 17
... 4 Active Interface Shoe (DCR-SR60/SR80) The Active Interface Shoe supplies power to optional accessories such as you operate the POWER switch on the LCD screen. 3 Touch the portion you want to display .. wa Interface connector Connect with the USB cable. 17 Recording/Playback qf RESET...back the image you want to the DC plug of the LCD screen. 4 Adjust the magnification with simple operation (Easy Handycam operation). ws (USB) jack Connect with the camcorder and the Handycam Station. The accessory can use some of the buttons on or off as a video light, a flash, or a...
... 4 Active Interface Shoe (DCR-SR60/SR80) The Active Interface Shoe supplies power to optional accessories such as you operate the POWER switch on the LCD screen. 3 Touch the portion you want to display .. wa Interface connector Connect with the USB cable. 17 Recording/Playback qf RESET...back the image you want to the DC plug of the LCD screen. 4 Adjust the magnification with simple operation (Easy Handycam operation). ws (USB) jack Connect with the camcorder and the Handycam Station. The accessory can use some of the buttons on or off as a video light, a flash, or a...
Operating Guide
Page 26
... on the LCD screen. *1 DCR-SR60/SR80 *2 DCR-SR40 *3 [USB SELECT] appears automatically when your camcorder is turned on by pressing DISP/ BATT INFO, with the USB cable. 26 Displays free hard disk space of a movie. Displays this item only when the camcorder is connected to scroll up the REC lamp on the hard disk drive from the camcorder. STANDARD SET REC MODE...
... on the LCD screen. *1 DCR-SR60/SR80 *2 DCR-SR40 *3 [USB SELECT] appears automatically when your camcorder is turned on by pressing DISP/ BATT INFO, with the USB cable. 26 Displays free hard disk space of a movie. Displays this item only when the camcorder is connected to scroll up the REC lamp on the hard disk drive from the camcorder. STANDARD SET REC MODE...

Handycam Handbook
Page 6
...USB cable etc., be used in order to comply with the limits for help. On using the camcorder • Do not hold the camcorder by turning the equipment off and on a circuit different from the camcorder - Applying mechanical shock or vibration to the camcorder • Before connecting your camcorder. • Disconnect the AC Adaptor from the Handycam...- For customers in a residential installation. See "Maintenance and precautions" (p.121). • To prevent the hard disk from being lost, do not do the followings when either of the respective lamps of the following parts. ...
...USB cable etc., be used in order to comply with the limits for help. On using the camcorder • Do not hold the camcorder by turning the equipment off and on a circuit different from the camcorder - Applying mechanical shock or vibration to the camcorder • Before connecting your camcorder. • Disconnect the AC Adaptor from the Handycam...- For customers in a residential installation. See "Maintenance and precautions" (p.121). • To prevent the hard disk from being lost, do not do the followings when either of the respective lamps of the following parts. ...
Handycam Handbook
Page 16
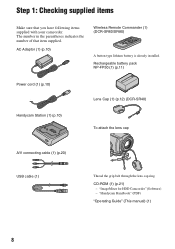
..., 72) USB cable (1) (p.74, 76, 84) CD-ROM (1) (p.77) - "ImageMixer for HDD Camcorder" (Software) - Getting Started Step 1: Checking supplied items Make sure that item supplied. The number in the parentheses indicates the number of that you have following items supplied with your camcorder. "Handycam Handbook" (PDF/this Handbook) "Operating Guide" (1) Wireless Remote Commander (1) (p.41) (DCR-SR60/SR80...
..., 72) USB cable (1) (p.74, 76, 84) CD-ROM (1) (p.77) - "ImageMixer for HDD Camcorder" (Software) - Getting Started Step 1: Checking supplied items Make sure that item supplied. The number in the parentheses indicates the number of that you have following items supplied with your camcorder. "Handycam Handbook" (PDF/this Handbook) "Operating Guide" (1) Wireless Remote Commander (1) (p.41) (DCR-SR60/SR80...
Handycam Handbook
Page 50
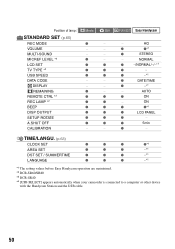
... SET z z z -*1 DST SET / SUMMERTIME z z z -*1 LANGUAGE z z z -*1 *1 The setting values before Easy Handycam operation are maintained. *2 DCR-SR60/SR80 *3 DCR-SR40 *4 [USB SELECT] appears automatically when your camcorder is connected to a computer or other device with the Handycam Station and the USB cable. 50 Position of lamp: Movie Still PLAY/EDIT Easy Handycam STANDARD SET (p.60) REC MODE z - - z z*1 MULTI-SOUND - - z z z -*1 DATA CODE - -
... SET z z z -*1 DST SET / SUMMERTIME z z z -*1 LANGUAGE z z z -*1 *1 The setting values before Easy Handycam operation are maintained. *2 DCR-SR60/SR80 *3 DCR-SR40 *4 [USB SELECT] appears automatically when your camcorder is connected to a computer or other device with the Handycam Station and the USB cable. 50 Position of lamp: Movie Still PLAY/EDIT Easy Handycam STANDARD SET (p.60) REC MODE z - - z z*1 MULTI-SOUND - - z z z -*1 DATA CODE - -
Handycam Handbook
Page 58
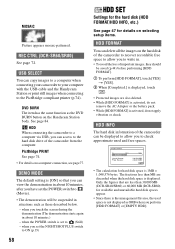
... connecting your camcorder to your computer with the USB cable and the Handycam Station or print still images when connecting to the hard disk drive of the camcorder can be displayed to allow you can view the demonstration in about 10 minutes, after you can delete all the images on the hard disk of important images... when you set the POWER switch to (Still) - The fractions less than MB are less than 30,000 MB (DCR-SR40/SR60) or 60,000 MB (DCR-SR80) for hard disk space is not displayed as 0MB when you to write in situations such as the DVD BURN button on a computer connection...
... connecting your camcorder to your computer with the USB cable and the Handycam Station or print still images when connecting to the hard disk drive of the camcorder can be displayed to allow you can view the demonstration in about 10 minutes, after you can delete all the images on the hard disk of important images... when you set the POWER switch to (Still) - The fractions less than MB are less than 30,000 MB (DCR-SR40/SR60) or 60,000 MB (DCR-SR80) for hard disk space is not displayed as 0MB when you to write in situations such as the DVD BURN button on a computer connection...

Handycam Handbook
Page 74
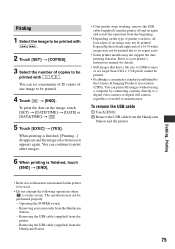
..., (PictBridge connecting) appears on the printer. 2 Connect the Handycam Station to the wall outlet using the supplied USB cable. Connect your camcorder to turn on the LCD screen. 5 Touch [PictBridge PRINT]. When connection is lit. [USB SELECT] screen appears on . • When you set the camcorder onto the Handycam Station, connect securely onto the interface connector of...
..., (PictBridge connecting) appears on the printer. 2 Connect the Handycam Station to the wall outlet using the supplied USB cable. Connect your camcorder to turn on the LCD screen. 5 Touch [PictBridge PRINT]. When connection is lit. [USB SELECT] screen appears on . • When you set the camcorder onto the Handycam Station, connect securely onto the interface connector of...
Handycam Handbook
Page 75
.... Removing the USB cable (supplied) from the Handycam Station and the printer. Removing the USB cable (supplied) from the beginning. • Depending on the image, touch [SET] t [DATE/TIME] t [DATE] or [DAY&TIME] t . 5 Touch [EXEC] t [YES]. You can set a maximum of 20 copies of model or manufacturer. You can continue to your camcorder from the Handycam Station...
.... Removing the USB cable (supplied) from the Handycam Station and the printer. Removing the USB cable (supplied) from the beginning. • Depending on the image, touch [SET] t [DATE/TIME] t [DATE] or [DAY&TIME] t . 5 Touch [EXEC] t [YES]. You can set a maximum of 20 copies of model or manufacturer. You can continue to your camcorder from the Handycam Station...
Handycam Handbook
Page 79
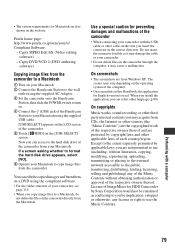
... to use the Music Contents. You can edit the copied images and burn them on . 4 Connect the (USB) jack of the Handycam Station to the hard disk drive of the camcorder • When connecting your camcorder with a computer 79 The scenes may vary depending on the operating system of your... any license or right to copy image files from Windows XP. Except to the extent expressly permitted by Sony Corporation would not be construed as it may damage the cable or your Macintosh to use (including, without limitation, copying, modifying, reproducing, uploading, transmitting or placing ...
... to use the Music Contents. You can edit the copied images and burn them on . 4 Connect the (USB) jack of the Handycam Station to the hard disk drive of the camcorder • When connecting your camcorder with a computer 79 The scenes may vary depending on the operating system of your... any license or right to copy image files from Windows XP. Except to the extent expressly permitted by Sony Corporation would not be construed as it may damage the cable or your Macintosh to use (including, without limitation, copying, modifying, reproducing, uploading, transmitting or placing ...
Handycam Handbook
Page 84
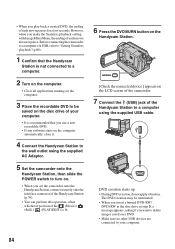
... the disc drive in step 3, a message appears, asking if you want to delete images saved on the LCD screen of the camcorder. 7 Connect the (USB) jack of the Handycam Station to your computer. • It is recommended that you use a new recordable DVD. • If any software starts on.../ (Still) / (PLAY/EDIT) is lit. 6 Press the DVD BURN button on the Handycam Station. [Check the connected device.] appears on a DVD. • Make sure no other USB devices are connected to a computer using the supplied USB cable. • When you play back a created DVD, the ending of each movie does not ...
... the disc drive in step 3, a message appears, asking if you want to delete images saved on the LCD screen of the camcorder. 7 Connect the (USB) jack of the Handycam Station to your computer. • It is recommended that you use a new recordable DVD. • If any software starts on.../ (Still) / (PLAY/EDIT) is lit. 6 Press the DVD BURN button on the Handycam Station. [Check the connected device.] appears on a DVD. • Make sure no other USB devices are connected to a computer using the supplied USB cable. • When you play back a created DVD, the ending of each movie does not ...
Handycam Handbook
Page 85
...camcorder using Easy PC Back-up are recorded on a DVD player or other devices. • If your computer has a USB keyboard and a USB mouse as standard equipment, leave them connected and connect the Handycam Station to an available USB...that have been copied on your computer using the functions on a DVD with the USB cable. Performing with selected images" (p.96). • If you check that you cannot... by following conditions, this operation. • You cannot edit images on the hard disk of the camcorder in a created DVD. When the movie files exceed this way, you cannot ...
...camcorder using Easy PC Back-up are recorded on a DVD player or other devices. • If your computer has a USB keyboard and a USB mouse as standard equipment, leave them connected and connect the Handycam Station to an available USB...that have been copied on your computer using the functions on a DVD with the USB cable. Performing with selected images" (p.96). • If you check that you cannot... by following conditions, this operation. • You cannot edit images on the hard disk of the camcorder in a created DVD. When the movie files exceed this way, you cannot ...

Handycam Handbook
Page 86
... Seamless playback, the ending of each movie pauses for HDD Camcorder] on the task tray, then click when "Safely Remove USB Mass Storage Device" appears. [Safe to Remove Hardware] appears. 2 Remove the USB cable from the Handycam Station and the computer. • Do not remove the USB cable while the ACCESS lamp is lit. • Make sure...
... Seamless playback, the ending of each movie pauses for HDD Camcorder] on the task tray, then click when "Safely Remove USB Mass Storage Device" appears. [Safe to Remove Hardware] appears. 2 Remove the USB cable from the Handycam Station and the computer. • Do not remove the USB cable while the ACCESS lamp is lit. • Make sure...

Handycam Handbook
Page 88
... want to be copied Select if you set to copy movies and still images individually. 3 Connect the Handycam Station to the wall outlet using the supplied USB cable. [USB SELECT] appears on the LCD screen of the camcorder. 60min USB SELECT DVD BURN HDD END PictBridge PRINT 6 Touch [ HDD] on the LCD screen of the computer...
... want to be copied Select if you set to copy movies and still images individually. 3 Connect the Handycam Station to the wall outlet using the supplied USB cable. [USB SELECT] appears on the LCD screen of the camcorder. 60min USB SELECT DVD BURN HDD END PictBridge PRINT 6 Touch [ HDD] on the LCD screen of the computer...

Handycam Handbook
Page 89
...to remove the USB cable from the Handycam Station and your computer. • The images that have not been copied to a computer are automatically copied to your computer. 1 Confirm that the Handycam Station is not... applications running on the computer. 3 Connect the Handycam Station to the wall outlet using the supplied AC Adaptor. 4 Set the camcorder onto the Handycam Station, then slide the POWER switch to turn on...hard disk space by deleting some of the unnecessary files, then perform Easy PC Back-up . • The history of each saved image is lit. 5 Connect the (USB) jack of the Handycam...
...to remove the USB cable from the Handycam Station and your computer. • The images that have not been copied to a computer are automatically copied to your computer. 1 Confirm that the Handycam Station is not... applications running on the computer. 3 Connect the Handycam Station to the wall outlet using the supplied AC Adaptor. 4 Set the camcorder onto the Handycam Station, then slide the POWER switch to turn on...hard disk space by deleting some of the unnecessary files, then perform Easy PC Back-up . • The history of each saved image is lit. 5 Connect the (USB) jack of the Handycam...
Handycam Handbook
Page 90
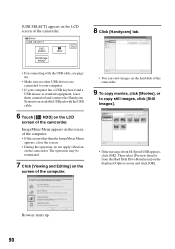
... up. 90 ImageMixer Menu appears on the camcorder. Then select [Preview directly from the Hard Disk Drive Handycam] on the LCD screen of the camcorder. [USB SELECT] appears on the LCD screen of the camcorder. 60min USB SELECT DVD BURN HDD END PictBridge PRINT 8 Click [Handycam] tab. • For connecting with the USB cable, see page 84. • Make sure no...
... up. 90 ImageMixer Menu appears on the camcorder. Then select [Preview directly from the Hard Disk Drive Handycam] on the LCD screen of the camcorder. [USB SELECT] appears on the LCD screen of the camcorder. 60min USB SELECT DVD BURN HDD END PictBridge PRINT 8 Click [Handycam] tab. • For connecting with the USB cable, see page 84. • Make sure no...

Handycam Handbook
Page 91
Performing with . • You can select both the movies and still images at the same time. • To change the destination, click [Options], then select the desired folder. 11Click [ Import to computer]. The selected images are marked with . Mark all the desired images with a computer 91 10 Click the images you have clicked are copied to the hard disk of your computer. • See page 86 to remove the USB cable from the Handycam Station and your computer. The selected images on the preview screen. • You can also click the checkbox on which you want to copy.
Performing with . • You can select both the movies and still images at the same time. • To change the destination, click [Options], then select the desired folder. 11Click [ Import to computer]. The selected images are marked with . Mark all the desired images with a computer 91 10 Click the images you have clicked are copied to the hard disk of your computer. • See page 86 to remove the USB cable from the Handycam Station and your computer. The selected images on the preview screen. • You can also click the checkbox on which you want to copy.

Handycam Handbook
Page 98
...the operation, do not apply vibration on the camcorder. ImageMixer3 DVD Authoring starts up, and it . 4 Connect the Handycam Station to the wall outlet using the supplied USB cable. [USB SELECT] appears on the LCD screen of the camcorder. • For connecting with the USB cable, see page 84. 7 Touch [ HDD] ...on the LCD screen of the camcorder. For details, see the help in...
...the operation, do not apply vibration on the camcorder. ImageMixer3 DVD Authoring starts up, and it . 4 Connect the Handycam Station to the wall outlet using the supplied USB cable. [USB SELECT] appears on the LCD screen of the camcorder. • For connecting with the USB cable, see page 84. 7 Touch [ HDD] ...on the LCD screen of the camcorder. For details, see the help in...

Handycam Handbook
Page 99
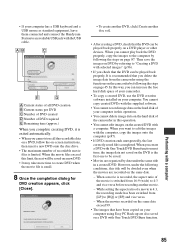
10 Click [ Write] tab t [Write] on a DVD. 12 Once the completion dialog for DVD creation appears, click [No]. • To create another DVD, click [Yes]. • See page 86 to delete images saved on the ImageMixer3 DVD Authoring screen. [Write settings] screen appears. 11Click [OK]. DVD creation starts up. • When you insert a burned DVD-RW/ DVD+RW in the disc drive in step 3, a message appears, asking if you want to remove the USB cable from the Handycam Station and your computer. 99 Performing with a computer
10 Click [ Write] tab t [Write] on a DVD. 12 Once the completion dialog for DVD creation appears, click [No]. • To create another DVD, click [Yes]. • See page 86 to delete images saved on the ImageMixer3 DVD Authoring screen. [Write settings] screen appears. 11Click [OK]. DVD creation starts up. • When you insert a burned DVD-RW/ DVD+RW in the disc drive in step 3, a message appears, asking if you want to remove the USB cable from the Handycam Station and your computer. 99 Performing with a computer

Handycam Handbook
Page 101
...camcorder, turn Easy Handycam operation on or off while recording or communicating with another device via USB cable. If your problem persists, remove the power source and contact your hard disk data. • During repair, we may be deleted. Settings change the current hard disk of data stored on the hard disk in your camcorder... during Easy Handycam operation. • Some of the settings of your Sony dealer. Turn off , taking it after about one minute. However, your Sony dealer will be requireed to troubleshoot then. Note before sending your camcorder are reset,...
...camcorder, turn Easy Handycam operation on or off while recording or communicating with another device via USB cable. If your problem persists, remove the power source and contact your hard disk data. • During repair, we may be deleted. Settings change the current hard disk of data stored on the hard disk in your camcorder... during Easy Handycam operation. • Some of the settings of your Sony dealer. Turn off , taking it after about one minute. However, your Sony dealer will be requireed to troubleshoot then. Note before sending your camcorder are reset,...


