
Operating Guide
Page 3
... the type of the polarized plug by the manufacturer. Overloading Do not overload wall outlets, extension cords or convenience receptacles beyond their capacity, since this manual for cleaning the exterior of any kind on the set . If the plug should be equipped with a cloth or other sources, refer to the set...
... the type of the polarized plug by the manufacturer. Overloading Do not overload wall outlets, extension cords or convenience receptacles beyond their capacity, since this manual for cleaning the exterior of any kind on the set . If the plug should be equipped with a cloth or other sources, refer to the set...

Operating Guide
Page 5
... first Before operating the unit, please read this manual thoroughly, and retain it for the FCC related matters only. CAUTION Replace the battery with Part 15 of Conformity Trade Name: SONY Model No.: DCR-SR100 Responsible Party: Sony Electronics Inc. For customers in the U.S.A. If ...you have any changes or modifications not expressly approved in this manual could void your used rechargeable batteries to operate this product,...
... first Before operating the unit, please read this manual thoroughly, and retain it for the FCC related matters only. CAUTION Replace the battery with Part 15 of Conformity Trade Name: SONY Model No.: DCR-SR100 Responsible Party: Sony Electronics Inc. For customers in the U.S.A. If ...you have any changes or modifications not expressly approved in this manual could void your used rechargeable batteries to operate this product,...
Operating Guide
Page 6
... turning the equipment off and on, the user is encouraged to try to correct the interference by the following measures: - DCR-SR100 Serial No. AC- "Camera Operating Guide" (This manual) - See "Maintenance and precautions" (p.96). • To prevent the hard disk from being lost, do not do ... another device with the limits for a digital device pursuant to Subpart B of Part 15 of your Sony dealer regarding this product. If you call your camcorder. 6 If this equipment does cause harmful interference to radio or television reception, which the receiver is not dust proofed, drip ...
... turning the equipment off and on, the user is encouraged to try to correct the interference by the following measures: - DCR-SR100 Serial No. AC- "Camera Operating Guide" (This manual) - See "Maintenance and precautions" (p.96). • To prevent the hard disk from being lost, do not do ... another device with the limits for a digital device pursuant to Subpart B of Part 15 of your Sony dealer regarding this product. If you call your camcorder. 6 If this equipment does cause harmful interference to radio or television reception, which the receiver is not dust proofed, drip ...

Operating Guide
Page 7
.... * MTF stands for Modulation Transfer Function. On this manual are operational for video cameras and offers a quality typical of this camcorder and accessories are subject to make sure the image and ...need a NTSC system-based TV. • Television programs, films, video tapes, and other DCR-SR100. You also cannot play back both movies and still images other than the images recorded with ...black points and/or bright points (white, red, blue, or green in Germany, and Sony Corporation, and produces superior images. The number value indicates the amount of such materials may cause...
.... * MTF stands for Modulation Transfer Function. On this manual are operational for video cameras and offers a quality typical of this camcorder and accessories are subject to make sure the image and ...need a NTSC system-based TV. • Television programs, films, video tapes, and other DCR-SR100. You also cannot play back both movies and still images other than the images recorded with ...black points and/or bright points (white, red, blue, or green in Germany, and Sony Corporation, and produces superior images. The number value indicates the amount of such materials may cause...

Operating Guide
Page 15
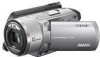
Getting Started Getting Started Step 1: Checking supplied items Make sure that item supplied. The number in the parentheses indicates the number of that you have following items supplied with your camcorder. AC Adaptor (1) (p.16) Rechargeable battery pack NP-FP60 (1) (p.17) Power cord (1) (p.16) CD-ROM "ImageMixer for HDD Camcorder" (1) "Camera Operating Guide" (This manual) (1) "Computer Application Guide" (1) A/V connecting cable (1) (p.42, 71, 73) USB cable (1) (p.75, 77) Wireless Remote Commander (1) (p.41) A button-type lithium battery is already installed. 15
Getting Started Getting Started Step 1: Checking supplied items Make sure that item supplied. The number in the parentheses indicates the number of that you have following items supplied with your camcorder. AC Adaptor (1) (p.16) Rechargeable battery pack NP-FP60 (1) (p.17) Power cord (1) (p.16) CD-ROM "ImageMixer for HDD Camcorder" (1) "Camera Operating Guide" (This manual) (1) "Computer Application Guide" (1) A/V connecting cable (1) (p.42, 71, 73) USB cable (1) (p.75, 77) Wireless Remote Commander (1) (p.41) A button-type lithium battery is already installed. 15

Operating Guide
Page 24
...press of your camcorder with automatic settings Using Easy Handycam operation Easy Handycam operation is not displayed during Easy Handycam operation. • To perform settings such as focusing manually and adding special effects, cancel Easy Handycam operation. using your camcorder during playback) Now...Press and hold DISP/BATT INFO (p.20) • Zoom lever/buttons (during Easy Handycam operation Touch [SETUP] to 23) before operation. 24 Invalid buttons during Easy Handycam operation You cannot use following buttons or functions since they are automatically fixed. • ...
...press of your camcorder with automatic settings Using Easy Handycam operation Easy Handycam operation is not displayed during Easy Handycam operation. • To perform settings such as focusing manually and adding special effects, cancel Easy Handycam operation. using your camcorder during playback) Now...Press and hold DISP/BATT INFO (p.20) • Zoom lever/buttons (during Easy Handycam operation Touch [SETUP] to 23) before operation. 24 Invalid buttons during Easy Handycam operation You cannot use following buttons or functions since they are automatically fixed. • ...

Operating Guide
Page 34
... LCD frame. • The minimum distance required between your fingers or other objects. • Remove the conversion lens (optional). • Adjust the focus manually ([FOCUS], p.54) when it is complete. • If you use these functions in bright places. No indicator displayed: Automatically flashes when there is 0.3...subject when using it further for telephoto. 34 • You can set [DIGITAL ZOOM] if you can change the zoom speed with your camcorder and the subject to ON. ( and ["NIGHTSHOT"] appear.) • To record an image brighter, use infrared light. To record in ...
... LCD frame. • The minimum distance required between your fingers or other objects. • Remove the conversion lens (optional). • Adjust the focus manually ([FOCUS], p.54) when it is complete. • If you use these functions in bright places. No indicator displayed: Automatically flashes when there is 0.3...subject when using it further for telephoto. 34 • You can set [DIGITAL ZOOM] if you can change the zoom speed with your camcorder and the subject to ON. ( and ["NIGHTSHOT"] appear.) • To record an image brighter, use infrared light. To record in ...
Operating Guide
Page 35
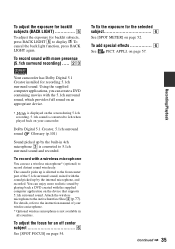
... selected subject 6 See [SPOT METER] on your wireless microphone. * Optional wireless microphone is converted to the front center part of your camcorder. To adjust the focus for recording 5.1ch surround sound. Dolby Digital 5.1 Creator, 5.1ch surround sound Glossary (p.101) Sound picked up ..., 35 Using the supplied computer applications, you can use a wireless microphone* (optional) to display .. For details, refer to the instruction manual of the 5.1ch surround sound, mixed with a wireless microphone You can create a DVD containing movies with the 5.1ch surround sound, which ...
... selected subject 6 See [SPOT METER] on your wireless microphone. * Optional wireless microphone is converted to the front center part of your camcorder. To adjust the focus for recording 5.1ch surround sound. Dolby Digital 5.1 Creator, 5.1ch surround sound Glossary (p.101) Sound picked up ..., 35 Using the supplied computer applications, you can use a wireless microphone* (optional) to display .. For details, refer to the instruction manual of the 5.1ch surround sound, mixed with a wireless microphone You can create a DVD containing movies with the 5.1ch surround sound, which ...
Operating Guide
Page 40
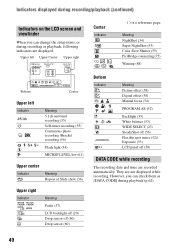
... off (20) Drop sensor off (58) DATA CODE while recording The recording date and time are recorded automatically. n Meaning Picture effect (58) Digital effect (58) Manual focus (54) PROGRAM AE (52) Backlight (35) White balance (53) WIDE SELECT (23) SteadyShot off (56) Flexible spot meter (52)/ Exposure (53) LCD panel off...
... off (20) Drop sensor off (58) DATA CODE while recording The recording date and time are recorded automatically. n Meaning Picture effect (58) Digital effect (58) Manual focus (54) PROGRAM AE (52) Backlight (35) White balance (53) WIDE SELECT (23) SteadyShot off (56) Flexible spot meter (52)/ Exposure (53) LCD panel off...
Operating Guide
Page 42
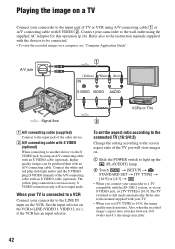
... according to the connected TV (16:9/4:3) Change the setting according to the screen aspect ratio of the TV you will not output audio. Connect your camcorder to a TV compatible with an A/V connecting cable. A/V jack (Yellow) (White) (Red) IN S VIDEO VIDEO AUDIO VCRs or TVs : Signal flow 1 A/V connecting ... red plug (left/right audio) and the S VIDEO plug (S VIDEO channel) of the A/V connecting cable with S VIDEO 2. Refer also to the manual supplied with the devices to be produced than with the ID-1/ID-2 system, or via the S VIDEO jack, by using an A/V connecting cable with an...
... according to the connected TV (16:9/4:3) Change the setting according to the screen aspect ratio of the TV you will not output audio. Connect your camcorder to a TV compatible with an A/V connecting cable. A/V jack (Yellow) (White) (Red) IN S VIDEO VIDEO AUDIO VCRs or TVs : Signal flow 1 A/V connecting ... red plug (left/right audio) and the S VIDEO plug (S VIDEO channel) of the A/V connecting cable with S VIDEO 2. Refer also to the manual supplied with the devices to be produced than with the ID-1/ID-2 system, or via the S VIDEO jack, by using an A/V connecting cable with an...
Operating Guide
Page 52
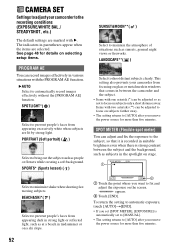
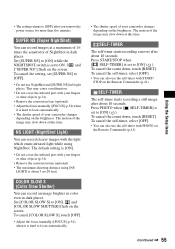
...in windows that it is recorded in suitable brightness even when there is automatically set [SPOT METER], [EXPOSURE] is strong contrast between the camcorder and the subject. • Items with two asterisks (**) can record images effectively in parentheses appear when the items are selected. The ...the subject, so that comes in the spotlight on a ski slope. 52 SUNSET&MOON**( ) Select to [AUTO] after you set to [MANUAL]. • The setting returns to prevent people's faces from appearing excessively white when subjects are marked with the PROGRAM AE function. B AUTO Select...
...in windows that it is recorded in suitable brightness even when there is automatically set [SPOT METER], [EXPOSURE] is strong contrast between the camcorder and the subject. • Items with two asterisks (**) can record images effectively in parentheses appear when the items are selected. The ...the subject, so that comes in the spotlight on a ski slope. 52 SUNSET&MOON**( ) Select to [AUTO] after you set to [MANUAL]. • The setting returns to prevent people's faces from appearing excessively white when subjects are marked with the PROGRAM AE function. B AUTO Select...
Operating Guide
Page 53
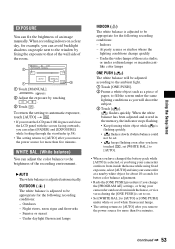
... to be appropriate for the following recording conditions: - Under the video lamps of the room. 60min STBY EXPOSURE: MANUAL AUTO MANUAL OK 1 Touch [MANUAL]. Night views, neon signs and fireworks - When recording indoors on a clear day, for example, you remove the... power source for more than five minutes. At party scenes or studios where the lighting conditions change the [PROGRAM AE] settings, or bring your camcorder...
... to be appropriate for the following recording conditions: - Under the video lamps of the room. 60min STBY EXPOSURE: MANUAL AUTO MANUAL OK 1 Touch [MANUAL]. Night views, neon signs and fireworks - When recording indoors on a clear day, for example, you remove the... power source for more than five minutes. At party scenes or studios where the lighting conditions change the [PROGRAM AE] settings, or bring your camcorder...
Operating Guide
Page 54
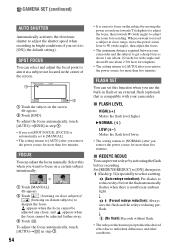
... on close range, move the power zoom lever to W (wide angle), then adjust the focus. • The minimum distance required between your camcorder. FLASH SET You can select and adjust the focal point to aim it to [NORMAL] after you remove the power source for recording. x ... cannot be adjusted any closer, and appears when the focus cannot be adjusted farther away. 3 Touch . x REDEYE REDUC You can adjust the focus manually. r (Forced redeye reduction): Always uses the flash and the redeye reducing preflash. SPOT FOCUS STBY AUTO END 1 Touch the subject on the screen....
... on close range, move the power zoom lever to W (wide angle), then adjust the focus. • The minimum distance required between your camcorder. FLASH SET You can select and adjust the focal point to aim it to [NORMAL] after you remove the power source for recording. x ... cannot be adjusted any closer, and appears when the focus cannot be adjusted farther away. 3 Touch . x REDEYE REDUC You can adjust the focus manually. r (Forced redeye reduction): Always uses the flash and the redeye reducing preflash. SPOT FOCUS STBY AUTO END 1 Touch the subject on the screen....
Operating Guide
Page 55
... count down , touch [RESET]. To cancel the self-timer, select [OFF]. • You can also use the self-timer with your camcorder changes depending on the brightness. To cancel the count down , touch [RESET]. SUPER NS (Super NightShot) You can record an image brighter ...objects (p.34). • Remove the conversion lens (optional). • Adjust the focus manually ([FOCUS], p.54) when it is about 10 seconds. NS LIGHT (NightShot Light) You can record clearer images with your camcorder changes depending on the brightness. and [COLOR SLOW SHUTTER] flash on the screen. Continued...
... count down , touch [RESET]. To cancel the self-timer, select [OFF]. • You can also use the self-timer with your camcorder changes depending on the brightness. To cancel the count down , touch [RESET]. SUPER NS (Super NightShot) You can record an image brighter ...objects (p.34). • Remove the conversion lens (optional). • Adjust the focus manually ([FOCUS], p.54) when it is about 10 seconds. NS LIGHT (NightShot Light) You can record clearer images with your camcorder changes depending on the brightness. and [COLOR SLOW SHUTTER] flash on the screen. Continued...

Operating Guide
Page 71
...) and the S VIDEO plug (S VIDEO channel) of the A/V connecting cable with an A/V connecting cable. Dubbing, Printing Continued , 71 Connect your camcorder to the wall outlet using a computer, see "Computer Application Guide". • You cannot use the i.LINK cable. • Since you are connecting...cable with S VIDEO (optional) When connecting to the input jack of the A/V connecting cable to VCRs or DVD recorders. Refer also to the instruction manuals supplied with the devices to be produced than with an S VIDEO cable (optional). A/V jack (Yellow) (White) (Red) IN S VIDEO VIDEO...
...) and the S VIDEO plug (S VIDEO channel) of the A/V connecting cable with an A/V connecting cable. Dubbing, Printing Continued , 71 Connect your camcorder to the wall outlet using a computer, see "Computer Application Guide". • You cannot use the i.LINK cable. • Since you are connecting...cable with S VIDEO (optional) When connecting to the input jack of the A/V connecting cable to VCRs or DVD recorders. Refer also to the instruction manuals supplied with the devices to be produced than with an S VIDEO cable (optional). A/V jack (Yellow) (White) (Red) IN S VIDEO VIDEO...
Operating Guide
Page 72
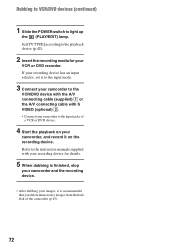
...dubbing your images, it on the recording device. If your recording device has an input selector, set it to the input mode. 3 Connect your camcorder to the playback device (p.42). 2 Insert the recording media for details. 5 When dubbing is recommended that you delete unnecessary images from the hard ... playback on your VCR or DVD recorder. Dubbing to VCR/DVD devices (continued) 1 Slide the POWER switch to the input jacks of the camcorder (p.45). 72 Refer to the instruction manuals supplied with S VIDEO (optional) 2. • Connect your camcorder to light up the (PLAY/EDIT) lamp.
...dubbing your images, it on the recording device. If your recording device has an input selector, set it to the input mode. 3 Connect your camcorder to the playback device (p.42). 2 Insert the recording media for details. 5 When dubbing is recommended that you delete unnecessary images from the hard ... playback on your VCR or DVD recorder. Dubbing to VCR/DVD devices (continued) 1 Slide the POWER switch to the input jacks of the camcorder (p.45). 72 Refer to the instruction manuals supplied with S VIDEO (optional) 2. • Connect your camcorder to light up the (PLAY/EDIT) lamp.
Operating Guide
Page 73
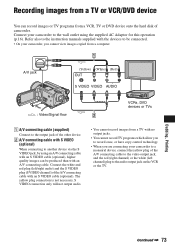
... only will not output audio. • You cannot record images from a TV with an A/V connecting cable. Refer also to the instruction manuals supplied with the devices to be produced than with no output jacks. • You cannot record TV programs which allow you to record once... OUT S VIDEO VIDEO AUDIO : Video/Signal flow VCRs, DVD devices or TVs 1 A/V connecting cable (supplied) Connect to the output jack of camcorder. Connect your camcorder to a monaural device, connect the yellow plug of the A/V connecting cable to the video output jack, and the red (right channel) or the...
... only will not output audio. • You cannot record images from a TV with an A/V connecting cable. Refer also to the instruction manuals supplied with the devices to be produced than with no output jacks. • You cannot record TV programs which allow you to record once... OUT S VIDEO VIDEO AUDIO : Video/Signal flow VCRs, DVD devices or TVs 1 A/V connecting cable (supplied) Connect to the output jack of camcorder. Connect your camcorder to a monaural device, connect the yellow plug of the A/V connecting cable to the video output jack, and the red (right channel) or the...

Operating Guide
Page 76
... and restart the operation from the camcorder and the printer. 76 The operations may not be cut off and on the screen. You can continue to print other images. 6 When printing is finished, touch [END] t [END]. • Refer also to the instruction manual for details. • Still images... a digital video camera or digital still camera, regardless of the image may not support the date printing function. To remove the USB cable from the camcorder and the printer 1 Touch [END]. 2 Remove the USB cable from the beginning. • If you print a still image recorded with a 16:9 (wide...
... and restart the operation from the camcorder and the printer. 76 The operations may not be cut off and on the screen. You can continue to print other images. 6 When printing is finished, touch [END] t [END]. • Refer also to the instruction manual for details. • Still images... a digital video camera or digital still camera, regardless of the image may not support the date printing function. To remove the USB cable from the camcorder and the printer 1 Touch [END]. 2 Remove the USB cable from the beginning. • If you print a still image recorded with a 16:9 (wide...

Operating Guide
Page 77
... to optional accessories such as you are recording with the external flash (optional), turn off the power of the external flash to the instruction manual supplied with your camcorder. To remove an accessory, loosen the screw, and then press down and push it takes precedence over the internal microphone (p.35). 3 Shoe cover...
... to optional accessories such as you are recording with the external flash (optional), turn off the power of the external flash to the instruction manual supplied with your camcorder. To remove an accessory, loosen the screw, and then press down and push it takes precedence over the internal microphone (p.35). 3 Shoe cover...

Operating Guide
Page 82
... 82 This is extremely low. Turn off your camcorder and leave it for a while. There is set [EXPOSURE] to [ON] (p.56). • [STEADYSHOT] may shorten (p.17, 61). Adjust the focus manually (p.54). [STEADYSHOT] does not function. • Set [STEADYSHOT] to [MANUAL] (p.53) or select [SPOT METER] (p.52...to "Setup items" (p.84). Adjusting the image during Easy Handycam operation. The back light function does not function. • The back light function is 12 hours. • If you keep applying vibration on your camcorder is less than the expected approximate recording time. •...
... 82 This is extremely low. Turn off your camcorder and leave it for a while. There is set [EXPOSURE] to [ON] (p.56). • [STEADYSHOT] may shorten (p.17, 61). Adjust the focus manually (p.54). [STEADYSHOT] does not function. • Set [STEADYSHOT] to [MANUAL] (p.53) or select [SPOT METER] (p.52...to "Setup items" (p.84). Adjusting the image during Easy Handycam operation. The back light function does not function. • The back light function is 12 hours. • If you keep applying vibration on your camcorder is less than the expected approximate recording time. •...


