

Operating Instructions
Page 2
... Kinderkamack Road, Oradell, NJ 07649 U.S.A. Your Digital Handycam is loaded with Part 15 of Conformity Trade Name: SONY Model No.: DCR-PC9 Responsible Party:Sony Electronics Inc. For the Customers in the U.S.A.... not cause harmful interference, and (2) this Sony Digital Handycam camcorder. Operation is very easy to come. With your nearest Sony Service Center or Factory Service Center. You can...CANADA DISPOSAL OF LITHIUM ION BATTERY. For the Sony Factory Service Center nearest you may be producing home video that any questions about this equipment. 2 CAUTION You...
... Kinderkamack Road, Oradell, NJ 07649 U.S.A. Your Digital Handycam is loaded with Part 15 of Conformity Trade Name: SONY Model No.: DCR-PC9 Responsible Party:Sony Electronics Inc. For the Customers in the U.S.A.... not cause harmful interference, and (2) this Sony Digital Handycam camcorder. Operation is very easy to come. With your nearest Sony Service Center or Factory Service Center. You can...CANADA DISPOSAL OF LITHIUM ION BATTERY. For the Sony Factory Service Center nearest you may be producing home video that any questions about this equipment. 2 CAUTION You...
Operating Instructions
Page 5
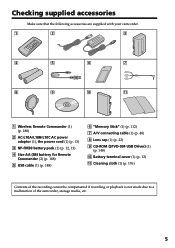
Battery terminal cover (1) (p. 12) qa Cleaning cloth (1) (p. 176) Contents of the recording cannot be compensated if recording or playback is not made due to a malfunction of the camcorder, storage media, etc. 5 qa 1 Wireless Remote Commander (1) (p. 188) 2 AC-L10A/L10B/L10C AC power adaptor (1), the power cord (1) (p. 13) 3 NP-FM30 battery pack (1) (p. 12, 13) 4 ...) 8 Lens cap (1) (p. 22) 9 CD-ROM (SPVD-004 USB Driver) (1) (p. 148) q; Getting started Checking supplied accessories Make sure that the following accessories are supplied with your camcorder. 1 2 3 4 5 6 7 8 9 q;
Battery terminal cover (1) (p. 12) qa Cleaning cloth (1) (p. 176) Contents of the recording cannot be compensated if recording or playback is not made due to a malfunction of the camcorder, storage media, etc. 5 qa 1 Wireless Remote Commander (1) (p. 188) 2 AC-L10A/L10B/L10C AC power adaptor (1), the power cord (1) (p. 13) 3 NP-FM30 battery pack (1) (p. 12, 13) 4 ...) 8 Lens cap (1) (p. 22) 9 CD-ROM (SPVD-004 USB Driver) (1) (p. 148) q; Getting started Checking supplied accessories Make sure that the following accessories are supplied with your camcorder. 1 2 3 4 5 6 7 8 9 q;
Operating Instructions
Page 6
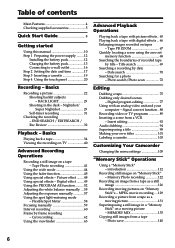
...mode - Title search 69 Searching a recording by title - Digital program editing 77 Using with digital effects ... 66 Enlarging images recorded on "Memory Stick"s - MEMORY MIX 135 Copying still images from a VCR - Tape Photo recording 41 Using the wide mode 44 Using... analog video unit and your own titles 101 Labeling a cassette 103 Customizing Your Camcorder Changing the menu settings 105 "Memory Stick" Operations Using a "Memory Stick" - Signal convert function .. 88 Recording video or TV programs 89 Inserting a scene from a tape - Memory Photo recording 122 Recording an ...
...mode - Title search 69 Searching a recording by title - Digital program editing 77 Using with digital effects ... 66 Enlarging images recorded on "Memory Stick"s - MEMORY MIX 135 Copying still images from a VCR - Tape Photo recording 41 Using the wide mode 44 Using... analog video unit and your own titles 101 Labeling a cassette 103 Customizing Your Camcorder Changing the menu settings 105 "Memory Stick" Operations Using a "Memory Stick" - Signal convert function .. 88 Recording video or TV programs 89 Inserting a scene from a tape - Memory Photo recording 122 Recording an ...

Operating Instructions
Page 7
... Information Usable cassettes 169 About the "InfoLITHIUM" battery pack 171 About i.LINK 172 Using your computer .. 147 Enlarging still images recorded on "Memory Stick"s - Memory PB ZOOM 153 Playing back images in a continuous loop - Image protection 155 Deleting images 156...of contents Viewing a still image - SLIDE SHOW 154 Preventing accidental erasure - MPEG movie playback 145 Viewing images using your camcorder abroad 174 Maintenance information and precautions 175 Specifications 181 Quick Reference Identifying the parts and controls .......... 183 Index 190 7 ...
... Information Usable cassettes 169 About the "InfoLITHIUM" battery pack 171 About i.LINK 172 Using your computer .. 147 Enlarging still images recorded on "Memory Stick"s - Memory PB ZOOM 153 Playing back images in a continuous loop - Image protection 155 Deleting images 156...of contents Viewing a still image - SLIDE SHOW 154 Preventing accidental erasure - MPEG movie playback 145 Viewing images using your camcorder abroad 174 Maintenance information and precautions 175 Specifications 181 Quick Reference Identifying the parts and controls .......... 183 Index 190 7 ...

Operating Instructions
Page 8
...cassette (p. 19) 1 Slide OPEN/ ZEJECT in the direction of the arrow and open the lid. 2 Push the middle portion of the back of your camcorder. Quick Start Guide 8 See the page in a straight line deeply into the cassette compartment with its v mark facing the Holding Grip. After the cassette... compartment goes down the Holding Grip to insert. Connecting the power cord (p. 16) Use the battery pack when using your camcorder as illustrated. Open the DC IN jack cover. AC power adaptor (supplied) Connect the plug with the window facing out. 3 Close the ...
...cassette (p. 19) 1 Slide OPEN/ ZEJECT in the direction of the arrow and open the lid. 2 Push the middle portion of the back of your camcorder. Quick Start Guide 8 See the page in a straight line deeply into the cassette compartment with its v mark facing the Holding Grip. After the cassette... compartment goes down the Holding Grip to insert. Connecting the power cord (p. 16) Use the battery pack when using your camcorder as illustrated. Open the DC IN jack cover. AC power adaptor (supplied) Connect the plug with the window facing out. 3 Close the ...

Operating Instructions
Page 9
... time for a picture, set to rewind the tape. 3 Press of it. MEMORY OFF CAMERA (CHARGE) NOTE Do not pick up your camcorder, the clock setting is set the clock setting before recording (p. 17). Your camcorder starts recording. If you purchase your camcorder by holding the viewfinder, the LCD panel, the battery pack or the jack cover...
... time for a picture, set to rewind the tape. 3 Press of it. MEMORY OFF CAMERA (CHARGE) NOTE Do not pick up your camcorder, the clock setting is set the clock setting before recording (p. 17). Your camcorder starts recording. If you purchase your camcorder by holding the viewfinder, the LCD panel, the battery pack or the jack cover...
Operating Instructions
Page 10
...use a tape with cassette memory are : - Photo search (p. 72) The functions you can operate only with your camcorder are : - Unauthorized recording of such materials may be contrary to the provision of the features that the operation is based on TV color systems...you carry out an operation, you can hear a beep sound to CAMERA. The functions which require different operations depending on a TV, you read through this mark in capital letters. Copyright precautions Television programs, films, video tapes, and other materials may be copyrighted. Getting started - You see...
...use a tape with cassette memory are : - Photo search (p. 72) The functions you can operate only with your camcorder are : - Unauthorized recording of such materials may be contrary to the provision of the features that the operation is based on TV color systems...you carry out an operation, you can hear a beep sound to CAMERA. The functions which require different operations depending on a TV, you read through this mark in capital letters. Copyright precautions Television programs, films, video tapes, and other materials may be copyrighted. Getting started - You see...

Operating Instructions
Page 11
... process and do not affect the recording in any way. •Do not let your camcorder get wet may cause your camcorder to direct sunlight for effective use. Exposing the LCD screen, the finder or the lens to malfunction. Sometimes this manual Precautions on camcorder care Lens and LCD screen/finder ...the sun in low light conditions such as in a car parked in the sun or under direct sunlight [b]. •Be careful when placing the camera near a window or outdoors. Keep your camcorder to malfunction. However, there may cause malfunctions [c]. •Do not directly shoot the sun.
... process and do not affect the recording in any way. •Do not let your camcorder get wet may cause your camcorder to direct sunlight for effective use. Exposing the LCD screen, the finder or the lens to malfunction. Sometimes this manual Precautions on camcorder care Lens and LCD screen/finder ...the sun in low light conditions such as in a car parked in the sun or under direct sunlight [b]. •Be careful when placing the camera near a window or outdoors. Keep your camcorder to malfunction. However, there may cause malfunctions [c]. •Do not directly shoot the sun.

Operating Instructions
Page 12
... pack is removed. 12 Step 1 Preparing the power supply Installing the battery pack We recommend that you use the battery pack when you use your camcorder outdoors. (1) While sliding BATT (battery) release lever in the direction of the arrow 1, slide the battery terminal cover in the direction of the arrow 2. (2) Insert...
... pack is removed. 12 Step 1 Preparing the power supply Installing the battery pack We recommend that you use the battery pack when you use your camcorder outdoors. (1) While sliding BATT (battery) release lever in the direction of the arrow 1, slide the battery terminal cover in the direction of the arrow 2. (2) Insert...

Operating Instructions
Page 13
...charge) 2 CHARGE lamp 14 POWER LOCK VCR MEMORY OFF CAMERA (CHARGE) After charging the battery pack Disconnect the AC power adaptor from the DC IN jack on your camcorder to the DC IN jack with your camcorder. Your camcorder operates only with the battery pack. Note Prevent metallic ...is not installed correctly. - While charging the battery pack, the CHARGE lamp flashes in the following cases: - See page 171 for your camcorder. This may cause a short-circuit, damaging the AC power adaptor. Getting started Step 1 Preparing the power supply Charging the battery pack Use...
...charge) 2 CHARGE lamp 14 POWER LOCK VCR MEMORY OFF CAMERA (CHARGE) After charging the battery pack Disconnect the AC power adaptor from the DC IN jack on your camcorder to the DC IN jack with your camcorder. Your camcorder operates only with the battery pack. Note Prevent metallic ...is not installed correctly. - While charging the battery pack, the CHARGE lamp flashes in the following cases: - See page 171 for your camcorder. This may cause a short-circuit, damaging the AC power adaptor. Getting started Step 1 Preparing the power supply Charging the battery pack Use...

Operating Instructions
Page 14
...295 160 450 245 520 285 Approximate minutes when you use your camcorder in a cold environment. ** Approximate number of the ambient temperature. The battery life will be shorter if you use a fully charged battery * Approximate continuous recording time at 25 °C (77 °F) to charge an ... the viewfinder Continuous* Typical** 115 60 185 100 385 210 580 315 670 365 Recording with LCD closed 125 200 415 630 725 Approximate minutes when you use your camcorder in a cold environment. 14 Approximate minutes at 25 °C (77 °F). The battery life will be ...
...295 160 450 245 520 285 Approximate minutes when you use your camcorder in a cold environment. ** Approximate number of the ambient temperature. The battery life will be shorter if you use a fully charged battery * Approximate continuous recording time at 25 °C (77 °F) to charge an ... the viewfinder Continuous* Typical** 115 60 185 100 385 210 580 315 670 365 Recording with LCD closed 125 200 415 630 725 Approximate minutes when you use your camcorder in a cold environment. 14 Approximate minutes at 25 °C (77 °F). The battery life will be ...

Operating Instructions
Page 15
What is a lithium ion battery pack which can exchange data such as battery consumption with compatible electronic equipment. Your camcorder operates only with the "InfoLITHIUM" battery pack (M series). "InfoLITHIUM" M series battery packs have the mark. The "InfoLITHIUM" is "InfoLITHIUM...indication on the battery remaining indicator is correct. Recommended charging temperature We recommend charging the battery pack in an ambient temperature of Sony Corporation. 15 Getting started Step 1 Preparing the power supply If the power goes off although the battery remaining indicator indicates ...
What is a lithium ion battery pack which can exchange data such as battery consumption with compatible electronic equipment. Your camcorder operates only with the "InfoLITHIUM" battery pack (M series). "InfoLITHIUM" M series battery packs have the mark. The "InfoLITHIUM" is "InfoLITHIUM...indication on the battery remaining indicator is correct. Recommended charging temperature We recommend charging the battery pack in an ambient temperature of Sony Corporation. 15 Getting started Step 1 Preparing the power supply If the power goes off although the battery remaining indicator indicates ...

Operating Instructions
Page 16
... power even if the battery pack is not plugged into a wall outlet. This means that you use your camcorder. • The DC IN jack has "source priority." Using a car battery Use Sony DC Adaptor/Charger (optional). 16 Step 1 Preparing the power supply Connecting to a wall outlet When you power... it from a wall outlet using the AC power adaptor. (1) Open the DC IN jack cover and connect the AC power adaptor supplied with your camcorder to the DC IN...
... power even if the battery pack is not plugged into a wall outlet. This means that you use your camcorder. • The DC IN jack has "source priority." Using a car battery Use Sony DC Adaptor/Charger (optional). 16 Step 1 Preparing the power supply Connecting to a wall outlet When you power... it from a wall outlet using the AC power adaptor. (1) Open the DC IN jack cover and connect the AC power adaptor supplied with your camcorder to the DC IN...

Operating Instructions
Page 17
... MEMORY unless you set the year, then the month, the day, the hour and then the minute. (1) Set the POWER switch to CAMERA or MEMORY. (2) Press FN to display PAGE1 (p. 20). (3) Press MENU to move. 2 FN 4R r SETUP MENU CLOCK SET DEMO MODE EXEC EXIT SETUP MENU EXIT ... about three months, the date and time settings may appear) because the built-in rechargeable battery installed in your camcorder will have been discharged (p. 177). If you do not use your camcorder for the first time. The clock starts to display the menu. (4) Select with r/R, and press EXEC. (5) Select CLOCK SET with...
... MEMORY unless you set the year, then the month, the day, the hour and then the minute. (1) Set the POWER switch to CAMERA or MEMORY. (2) Press FN to display PAGE1 (p. 20). (3) Press MENU to move. 2 FN 4R r SETUP MENU CLOCK SET DEMO MODE EXEC EXIT SETUP MENU EXIT ... about three months, the date and time settings may appear) because the built-in rechargeable battery installed in your camcorder will have been discharged (p. 177). If you do not use your camcorder for the first time. The clock starts to display the menu. (4) Select with r/R, and press EXEC. (5) Select CLOCK SET with...

Operating Instructions
Page 18
If you do not set the date and time and are recorded on a 12-hour cycle. - 12:00 AM stands for midnight. - 12:00 PM stands for noon. 18 Step 2 Setting the date and time The year changes as follows: 1995 y 2001 T t 2079 To return to FN Press EXIT. Note on the time indicator The internal clock of your camcorder operates on the data code of the tape and the "Memory Stick".
If you do not set the date and time and are recorded on a 12-hour cycle. - 12:00 AM stands for midnight. - 12:00 PM stands for noon. 18 Step 2 Setting the date and time The year changes as follows: 1995 y 2001 T t 2079 To return to FN Press EXIT. Note on the time indicator The internal clock of your camcorder operates on the data code of the tape and the "Memory Stick".

Operating Instructions
Page 20
... screen. (5) Press PAGE2 to go to PAGE2. SCH SURE 4 FN MEMORY OFF CAMERA (CHARGE) VCR 3 POWER LOCK PAGE1 PAGE2 PAGE3 EXIT TITLE LCD VOL MEM BRT...EXIT SELF TIMER 2 1 To return to operate each function. 5,6 In CAMERA mode PAGE1 PAGE2 PAGE3 EXIT MENU FADER DIG EFFT SPOT METER END EXPO-... To cancel settings Press OFF to return to PAGE1/PAGE2/PAGE3. In CAMERA or VCR mode (1) Install the battery pack, or connect the AC ... Press OPEN to open the LCD panel. (3) Set the POWER switch to CAMERA (in the standby/recording mode) or VCR (in the playback mode) while pressing the small green ...
... screen. (5) Press PAGE2 to go to PAGE2. SCH SURE 4 FN MEMORY OFF CAMERA (CHARGE) VCR 3 POWER LOCK PAGE1 PAGE2 PAGE3 EXIT TITLE LCD VOL MEM BRT...EXIT SELF TIMER 2 1 To return to operate each function. 5,6 In CAMERA mode PAGE1 PAGE2 PAGE3 EXIT MENU FADER DIG EFFT SPOT METER END EXPO-... To cancel settings Press OFF to return to PAGE1/PAGE2/PAGE3. In CAMERA or VCR mode (1) Install the battery pack, or connect the AC ... Press OPEN to open the LCD panel. (3) Set the POWER switch to CAMERA (in the standby/recording mode) or VCR (in the playback mode) while pressing the small green ...

Operating Instructions
Page 21
Do not press them , an adjustment is not on your camcorder. • When operation buttons do not work even if you press them with sharp-pointed objects such as pens. • Do not press the LCD ... panel, press operation buttons with your thumb supporting the LCD screen from the back side of the items changes to display the following buttons: In CAMERA mode PAGE1 PAGE2 PAGE3 MENU, SPOT METER, FADER, DIG EFFT, END SCH, EXPOSURE TITLE, LCD BRT, VOL, MEM MIX SELFTIMER In VCR mode PAGE1 PAGE2...
Do not press them , an adjustment is not on your camcorder. • When operation buttons do not work even if you press them with sharp-pointed objects such as pens. • Do not press the LCD ... panel, press operation buttons with your thumb supporting the LCD screen from the back side of the items changes to display the following buttons: In CAMERA mode PAGE1 PAGE2 PAGE3 MENU, SPOT METER, FADER, DIG EFFT, END SCH, EXPOSURE TITLE, LCD BRT, VOL, MEM MIX SELFTIMER In VCR mode PAGE1 PAGE2...

Operating Instructions
Page 22
.... See "Step 1" and "Step 3" for you. (1) Remove the lens cap and pull the lens cap string to CAMERA while pressing the small green button. Your camcorder starts recording. The camera recording lamp located on the front of your camcorder firmly as illustrated. (4) Press OPEN to open the LCD panel. (5) Set the POWER switch to fix it...
.... See "Step 1" and "Step 3" for you. (1) Remove the lens cap and pull the lens cap string to CAMERA while pressing the small green button. Your camcorder starts recording. The camera recording lamp located on the front of your camcorder firmly as illustrated. (4) Press OPEN to open the LCD panel. (5) Set the POWER switch to fix it...
Operating Instructions
Page 23
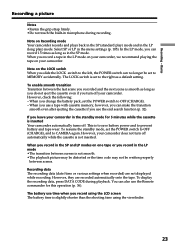
... between the last scene you record using the viewfinder. 23 However, your camcorder does not turn off . To display the recording data, press DATA CODE during recording. Note on your camcorder, we recommend playing the tape on Recording mode Your camcorder records and plays back in the SP... POWER switch to CAMERA again. However, they are not displayed while recording. However, check the following: - When you can record 1.5 times as long as in the SP mode. Recording data The recording data (date/time or various settings when recorded) are recorded automatically onto the tape...
... between the last scene you record using the viewfinder. 23 However, your camcorder does not turn off . To display the recording data, press DATA CODE during recording. Note on your camcorder, we recommend playing the tape on Recording mode Your camcorder records and plays back in the SP... POWER switch to CAMERA again. However, they are not displayed while recording. However, check the following: - When you can record 1.5 times as long as in the SP mode. Recording data The recording data (date/time or various settings when recorded) are recorded automatically onto the tape...

Operating Instructions
Page 24
... and rotate the LCD screen 180 degrees. When the POWER switch is opened up to 90 degrees. Recording a picture Adjusting the LCD screen The LCD panel moves about 90 degrees to the viewfinder side and ... 180° 90° OPEN When closing the LCD panel, set to CAMERA, Xz appears in the standby mode, and z appears in the recording mode. If this feature to check his or her own image on the...and on the LCD screen. In CAMERA or MEMORY mode. Some of the LCD panel Make sure if the LCD panel is set it vertically, and swing it into the camcorder body. The subject uses this happens...
... and rotate the LCD screen 180 degrees. When the POWER switch is opened up to 90 degrees. Recording a picture Adjusting the LCD screen The LCD panel moves about 90 degrees to the viewfinder side and ... 180° 90° OPEN When closing the LCD panel, set to CAMERA, Xz appears in the standby mode, and z appears in the recording mode. If this feature to check his or her own image on the...and on the LCD screen. In CAMERA or MEMORY mode. Some of the LCD panel Make sure if the LCD panel is set it vertically, and swing it into the camcorder body. The subject uses this happens...


