Insert: Getting Online with your Camera
Page 2
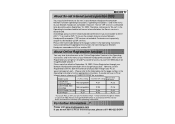
... ISP setting procedure DCR-IP7BT DCR-PC120BT DCR-TRV50, 950 DCR-IP55 Not compatible Not compatible P.37 P.39 P.23 P.28 DCR-TRV80, 70, 39 P.48 P.54 P.32 DCR-IP220 P.37 P.43 P.27 * If you use the network features of your Network Handycam® camcorder will continue to be... the Operating Instructions for connecting your Network Handycam camcorder. With Online Registration you do not have a PC or Internet access, please call 1-800-222-SONY -2- Therefore, references to be possible through your Network Handycam ® camcorder. (*ISP service not included. However, "So...
... ISP setting procedure DCR-IP7BT DCR-PC120BT DCR-TRV50, 950 DCR-IP55 Not compatible Not compatible P.37 P.39 P.23 P.28 DCR-TRV80, 70, 39 P.48 P.54 P.32 DCR-IP220 P.37 P.43 P.27 * If you use the network features of your Network Handycam® camcorder will continue to be... the Operating Instructions for connecting your Network Handycam camcorder. With Online Registration you do not have a PC or Internet access, please call 1-800-222-SONY -2- Therefore, references to be possible through your Network Handycam ® camcorder. (*ISP service not included. However, "So...
Operating Instructions
Page 5
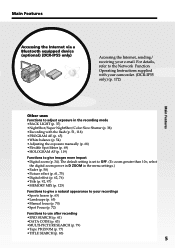
...via a Bluetooth equipped device (optional) (DCR-IP55 only) Accessing the Internet, sending/ receiving your camcorder. (DCR-IP55 only) (p. 172) Main Features Other uses Functions to adjust exposure in the menu settings.) •Fader (p. 58) •Picture effect (p. 61, 75) •Digital effect (p. 62, 76) •Title...than 10×, select the digital zoom power in D ZOOM in the recording mode •BACK LIGHT (p. 37) •NightShot/Super NightShot/Color Slow Shutter (p. 38) •Recording with your e-mail. The default setting is set to use after recording •END SEARCH (p. ...
...via a Bluetooth equipped device (optional) (DCR-IP55 only) Accessing the Internet, sending/ receiving your camcorder. (DCR-IP55 only) (p. 172) Main Features Other uses Functions to adjust exposure in the menu settings.) •Fader (p. 58) •Picture effect (p. 61, 75) •Digital effect (p. 62, 76) •Title...than 10×, select the digital zoom power in D ZOOM in the recording mode •BACK LIGHT (p. 37) •NightShot/Super NightShot/Color Slow Shutter (p. 38) •Recording with your e-mail. The default setting is set to use after recording •END SEARCH (p. ...
Operating Instructions
Page 7
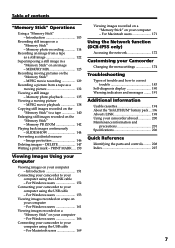
... "Memory Stick" - For Macintosh users 171 Using the Network function (DCR-IP55 only) Accessing the network 172 Customising your computer - For Windows users 166 Connecting your camcorder to your computer - MPEG movie recording 129 Recording a picture from a tape as a moving picture - For Windows users 161 Viewing images recorded on a "Memory Stick" on your computer - Introduction 103...
... "Memory Stick" - For Macintosh users 171 Using the Network function (DCR-IP55 only) Accessing the network 172 Customising your computer - For Windows users 166 Connecting your camcorder to your computer - MPEG movie recording 129 Recording a picture from a tape as a moving picture - For Windows users 161 Viewing images recorded on a "Memory Stick" on your computer - Introduction 103...

Operating Instructions
Page 8
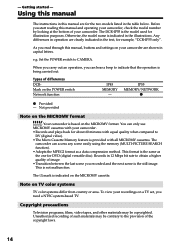
Each time you use the network (DCR-IP55 only) function. MEMORY/NETWORK (DCR-IP55) MEMORY: Use this mode when you slide it down, the mode changes as follows and corresponding mode lamp also lights up . (2) Slide the POWER switch ... MODE POWER (1) Slide the POWER switch down . NETWORK: Use this mode when you record on a "Memory Stick," or play back or edit an image recorded on page 17. 1,2 CAMERA MEMORY/ NET- How to the supplied network function operating instructions. The camcorder is turned on a tape. VCR Use this mode when you play back or...
Each time you use the network (DCR-IP55 only) function. MEMORY/NETWORK (DCR-IP55) MEMORY: Use this mode when you slide it down, the mode changes as follows and corresponding mode lamp also lights up . (2) Slide the POWER switch ... MODE POWER (1) Slide the POWER switch down . NETWORK: Use this mode when you record on a "Memory Stick," or play back or edit an image recorded on page 17. 1,2 CAMERA MEMORY/ NET- How to the supplied network function operating instructions. The camcorder is turned on a tape. VCR Use this mode when you play back or...

Operating Instructions
Page 11
... you purchase your camcorder, the clock setting is closed, use the viewfinder. Note When using the touch panel, press operation buttons lightly with sharp objects other than the stylus supplied (DCR-IP55 only). 11 Monitoring the playback picture on the LCD screen. 1 Remove the lens cap. 2 Turn the grip to CAMERA. Recording a picture (p. 29) Viewfinder...
... you purchase your camcorder, the clock setting is closed, use the viewfinder. Note When using the touch panel, press operation buttons lightly with sharp objects other than the stylus supplied (DCR-IP55 only). 11 Monitoring the playback picture on the LCD screen. 1 Remove the lens cap. 2 Turn the grip to CAMERA. Recording a picture (p. 29) Viewfinder...

Operating Instructions
Page 13
...LCD screen (p. 135) 1 Set the POWER switch to your camcorder by the LCD panel, the battery pack, the flash or the jack cover. 13 CAMERA MEMORY/ NET- The MEMORY/ NETWORK lamp lights up . When you want to record the date and time for a picture, set up yet. ...your eyesight (p. 33). 3 Set the POWER switch to the recording position, and hold your camcorder, the clock setting is not set the clock setting before recording (p. 22). 1 Remove the lens cap. 2 Turn the grip to MEMORY/ NETWORK (DCR-IP55 only). Quick Start Guide Recording a still image on a "Memory Stick" (p. 114) ...
...LCD screen (p. 135) 1 Set the POWER switch to your camcorder by the LCD panel, the battery pack, the flash or the jack cover. 13 CAMERA MEMORY/ NET- The MEMORY/ NETWORK lamp lights up . When you want to record the date and time for a picture, set up yet. ...your eyesight (p. 33). 3 Set the POWER switch to the recording position, and hold your camcorder, the clock setting is not set the clock setting before recording (p. 22). 1 Remove the lens cap. 2 Turn the grip to MEMORY/ NETWORK (DCR-IP55 only). Quick Start Guide Recording a still image on a "Memory Stick" (p. 114) ...
Operating Instructions
Page 14
.... The camcorder can hear a beep to DV (digital video). •The Micro Cassette Memory feature is the still image. Unauthorized recording of such materials may be contrary to the provision of your camcorder. •Records and plays...camcorder are shown in the text, for DVD (digital versatile disc). - The DCR-IP55 is not malfunction. When you carry out an operation, you need a NTSC system-based TV. This is the model used for the two models listed in 12 Mbps bit rate to CAMERA. Getting started - Copyright precautions Television programs, films, video...
.... The camcorder can hear a beep to DV (digital video). •The Micro Cassette Memory feature is the still image. Unauthorized recording of such materials may be contrary to the provision of your camcorder. •Records and plays...camcorder are shown in the text, for DVD (digital versatile disc). - The DCR-IP55 is not malfunction. When you carry out an operation, you need a NTSC system-based TV. This is the model used for the two models listed in 12 Mbps bit rate to CAMERA. Getting started - Copyright precautions Television programs, films, video...

Operating Instructions
Page 16
... 103) 8 USB cable (1) (p. 155) 9 CD-ROM (SPVD-008 USB Driver) (1) (p. 153) q; Checking supplied accessories Make sure that the following accessories are supplied with your camcorder. 1 2 3 4 5 6 7 8 9 0 qa qs qd 1 AC-L20A AC power adaptor (1), the power cord (1) (p. 18) 2 NP-FF50 battery pack (1) (p.... for MICROMV) (1) (p. 152) qa Battery terminal cover (1) (p. 17) qs Cleaning cloth (1) (p. 202) qd Stylus (1) (DCR-IP55 only) Contents of the recording cannot be compensated if recording or playback is not made due to a malfunction of the camcorder, storage media, etc. 16
... 103) 8 USB cable (1) (p. 155) 9 CD-ROM (SPVD-008 USB Driver) (1) (p. 153) q; Checking supplied accessories Make sure that the following accessories are supplied with your camcorder. 1 2 3 4 5 6 7 8 9 0 qa qs qd 1 AC-L20A AC power adaptor (1), the power cord (1) (p. 18) 2 NP-FF50 battery pack (1) (p.... for MICROMV) (1) (p. 152) qa Battery terminal cover (1) (p. 17) qs Cleaning cloth (1) (p. 202) qd Stylus (1) (DCR-IP55 only) Contents of the recording cannot be compensated if recording or playback is not made due to a malfunction of the camcorder, storage media, etc. 16

Operating Instructions
Page 22
... set your area, the daylight saving time (DST), the year, the month, the day, the hour and the minute. (1) Set the POWER switch to CAMERA or MEMORY/NETWORK (DCR-IP55 only). r R EXEC 6R r CLOCK SET AREA26 R GMT NewYork, Bogota r DST OFF EXIT -5.0 DATE Y M D EXEC CLOCK SET EXIT AREA26 GMT -5.0 NewYork, ...EXIT CLOCK SET JUL 4 2002 USB STREAM 5:30:00 PM LANGUAGE DEMO MODE r R EXEC RET. In this case, charge the built-in your camcorder will be released (bars may be displayed each time you set the POWER switch to move. 2,3 FN MENU 4R r SETUP MENU STBY EXIT CLOCK SET...
... set your area, the daylight saving time (DST), the year, the month, the day, the hour and the minute. (1) Set the POWER switch to CAMERA or MEMORY/NETWORK (DCR-IP55 only). r R EXEC 6R r CLOCK SET AREA26 R GMT NewYork, Bogota r DST OFF EXIT -5.0 DATE Y M D EXEC CLOCK SET EXIT AREA26 GMT -5.0 NewYork, ...EXIT CLOCK SET JUL 4 2002 USB STREAM 5:30:00 PM LANGUAGE DEMO MODE r R EXEC RET. In this case, charge the built-in your camcorder will be released (bars may be displayed each time you set the POWER switch to move. 2,3 FN MENU 4R r SETUP MENU STBY EXIT CLOCK SET...
Operating Instructions
Page 27
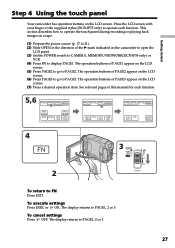
...cancel settings Press OFF. The display returns to PAGE2. See relevant pages of PAGE1 appear on the camcorder to open the LCD panel. (3) Set the POWER switch to CAMERA, MEMORY/NETWORK(DCR-IP55 only) or VCR. (4) Press FN to display PAGE1. The operation buttons of this manual for each.../ NET- Getting started Step 4 Using the touch panel Your camcorder has operation buttons on the LCD screen. (7) Press a desired operation item. This section describes how to operate the touch panel during recording or playing back images on a tape. (1) Prepare the power source (p. 17 to 21). (2)...
...cancel settings Press OFF. The display returns to PAGE2. See relevant pages of PAGE1 appear on the camcorder to open the LCD panel. (3) Set the POWER switch to CAMERA, MEMORY/NETWORK(DCR-IP55 only) or VCR. (4) Press FN to display PAGE1. The operation buttons of this manual for each.../ NET- Getting started Step 4 Using the touch panel Your camcorder has operation buttons on the LCD screen. (7) Press a desired operation item. This section describes how to operate the touch panel during recording or playing back images on a tape. (1) Prepare the power source (p. 17 to 21). (2)...
Operating Instructions
Page 28
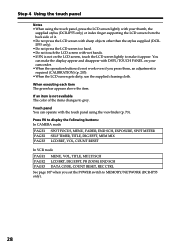
...gets dirty, use the supplied cleaning cloth. Touch panel You can make the display appear and disappear with your camcorder. •When the operation buttons do not work even if you set the POWER switch to grey. Press... FN to display the following buttons: In CAMERA mode PAGE1 PAGE2 PAGE3 SPOT FOCUS, MENU, FADER, END SCH, EXPOSURE, SPOT METER SELF TIMER, TITLE,... an adjustment is not on your thumb, the supplied stylus (DCR-IP55 only) or index finger supporting the LCD screen from the back side of the items changes to MEMORY/NETWORK...
...gets dirty, use the supplied cleaning cloth. Touch panel You can make the display appear and disappear with your camcorder. •When the operation buttons do not work even if you set the POWER switch to grey. Press... FN to display the following buttons: In CAMERA mode PAGE1 PAGE2 PAGE3 SPOT FOCUS, MENU, FADER, END SCH, EXPOSURE, SPOT METER SELF TIMER, TITLE,... an adjustment is not on your thumb, the supplied stylus (DCR-IP55 only) or index finger supporting the LCD screen from the back side of the items changes to MEMORY/NETWORK...
Operating Instructions
Page 32
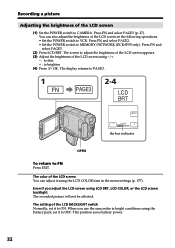
.... Even if you use the camcorder in the menu settings (p. 177). When you adjust the LCD screen using LCD BRT, LCD COLOR, or the LCD screen backlight The recorded picture will not be affected.... set it to VCR. LCD BRT + the bar indicator OPEN To return to MEMORY/NETWORK (DCR-IP55 only). Press FN and select PAGE3 (p. 27). The color of the LCD screen You can ... OFF. You can adjust it to brighten (4) Press OK. The display returns to CAMERA. Recording a picture Adjusting the brightness of the LCD screen (1) Set the POWER switch to PAGE3. 1 FN PAGE3 2-4 LCD BRT...
.... Even if you use the camcorder in the menu settings (p. 177). When you adjust the LCD screen using LCD BRT, LCD COLOR, or the LCD screen backlight The recorded picture will not be affected.... set it to VCR. LCD BRT + the bar indicator OPEN To return to MEMORY/NETWORK (DCR-IP55 only). Press FN and select PAGE3 (p. 27). The color of the LCD screen You can ... OFF. You can adjust it to brighten (4) Press OK. The display returns to CAMERA. Recording a picture Adjusting the brightness of the LCD screen (1) Set the POWER switch to PAGE3. 1 FN PAGE3 2-4 LCD BRT...
Operating Instructions
Page 33
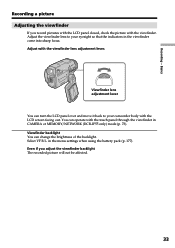
...in CAMERA or MEMORY/NETWORK (DCR-IP55 only) mode (p. 73). Select VF B.L. Even if you record pictures with the LCD panel closed, check the picture with the viewfinder lens adjustment lever. Adjust the viewfinder lens to your eyesight so that the indicators in the viewfinder come into sharp focus. Recording -... Viewfinder lens adjustment lever You can turn the LCD panel over and move it back to your camcorder body with the touch panel through the viewfinder in the menu settings when using...
...in CAMERA or MEMORY/NETWORK (DCR-IP55 only) mode (p. 73). Select VF B.L. Even if you record pictures with the LCD panel closed, check the picture with the viewfinder lens adjustment lever. Adjust the viewfinder lens to your eyesight so that the indicators in the viewfinder come into sharp focus. Recording -... Viewfinder lens adjustment lever You can turn the LCD panel over and move it back to your camcorder body with the touch panel through the viewfinder in the menu settings when using...
Operating Instructions
Page 39
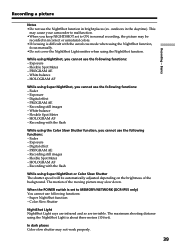
... maximum shooting distance using the NightShot Light is set to ON in normal recording, the picture may cause your camcorder to MEMORY/NETWORK (DCR-IP55 only) You cannot use following functions: - Recording still images - Color Slow Shutter NightShot Light NightShot Light rays are infrared and... 39 HOLOGRAM AF While using the NightShot function. Super NightShot function - Digital effect - PROGRAM AE - HOLOGRAM AF - In dark places Color slow shutter may slow down. Digital effect - Recording with the flash While using Super NightShot or Color Slow Shutter The shutter...
... maximum shooting distance using the NightShot Light is set to ON in normal recording, the picture may cause your camcorder to MEMORY/NETWORK (DCR-IP55 only) You cannot use following functions: - Recording still images - Color Slow Shutter NightShot Light NightShot Light rays are infrared and... 39 HOLOGRAM AF While using the NightShot function. Super NightShot function - Digital effect - PROGRAM AE - HOLOGRAM AF - In dark places Color slow shutter may slow down. Digital effect - Recording with the flash While using Super NightShot or Color Slow Shutter The shutter...

Operating Instructions
Page 40
... the LCD screen. (3) Press START/STOP. The self-timer starts counting down from the LCD screen while your camcorder is in 10 seconds after you set the self-timer. Note The self-timer recording mode is finished. - The (self-timer) indicator appears on the "Memory Stick" with a beep sound. ...(self-timer) indicator disappears from 10 with the self-timer (p. 121). 40 You cannot cancel self-timer recording using the Remote Commander. The POWER switch is set to MEMORY/NETWORK (DCR-IP55 only) You can also use the Remote Commander for this operation. (1) In the standby mode, press FN...
... the LCD screen. (3) Press START/STOP. The self-timer starts counting down from the LCD screen while your camcorder is in 10 seconds after you set the self-timer. Note The self-timer recording mode is finished. - The (self-timer) indicator appears on the "Memory Stick" with a beep sound. ...(self-timer) indicator disappears from 10 with the self-timer (p. 121). 40 You cannot cancel self-timer recording using the Remote Commander. The POWER switch is set to MEMORY/NETWORK (DCR-IP55 only) You can also use the Remote Commander for this operation. (1) In the standby mode, press FN...

Operating Instructions
Page 66
...Sports lesson - Using the PROGRAM AE (1) Set the POWER switch to CAMERA or MEMORY/NETWORK (DCR-IP55 only). (2) Press FN to display PAGE1. (3) Press MENU, then select PROGRAM AE in in the menu settings. Spotlight - Beach & ski •Your camcorder is set to focus only on subjects in the middle to far distance... EXEC RET. 1 To return to focus only on distant subjects in PROGRAM AE: - Slow shutter - Color Slow Shutter - Notes •Because your camcorder is set to FN Press EXIT. BOUNCE 66 Landscape •The following modes: - S. OLD MOVIE - Sunset & moon -
...Sports lesson - Using the PROGRAM AE (1) Set the POWER switch to CAMERA or MEMORY/NETWORK (DCR-IP55 only). (2) Press FN to display PAGE1. (3) Press MENU, then select PROGRAM AE in in the menu settings. Spotlight - Beach & ski •Your camcorder is set to focus only on subjects in the middle to far distance... EXEC RET. 1 To return to focus only on distant subjects in PROGRAM AE: - Slow shutter - Color Slow Shutter - Notes •Because your camcorder is set to FN Press EXIT. BOUNCE 66 Landscape •The following modes: - S. OLD MOVIE - Sunset & moon -

Operating Instructions
Page 68
... backlit - night scenes) faithfully (1) Set the POWER switch to CAMERA or MEMORY/NETWORK (DCR-IP55 only). (2) Press FN to PAGE1. Color Slow Shutter - To shoot a bright subject agaist a background - To record dark pictures (e.g. The display returns to display PAGE1. (3) Press EXPOSURE... Press OK. If you adjust the exposure manually, the following cases: - The display returns to the automatic exposure mode: - Backlight Your camcorder automatically returns to PAGE1. 2 FN 3-6 EXPO- If you change the PROGRAM AE mode. - AL EXPOSURE MANU- Adjust the exposure manually...
... backlit - night scenes) faithfully (1) Set the POWER switch to CAMERA or MEMORY/NETWORK (DCR-IP55 only). (2) Press FN to PAGE1. Color Slow Shutter - To shoot a bright subject agaist a background - To record dark pictures (e.g. The display returns to display PAGE1. (3) Press EXPOSURE... Press OK. If you adjust the exposure manually, the following cases: - The display returns to the automatic exposure mode: - Backlight Your camcorder automatically returns to PAGE1. 2 FN 3-6 EXPO- If you change the PROGRAM AE mode. - AL EXPOSURE MANU- Adjust the exposure manually...

Operating Instructions
Page 69
... - If you selected is on stage and lighted by a spotlight. (1) Set the POWER switch to CAMERA or MEMORY/NETWORK (DCR-IP55 only). (2) Press FN to ON 69 The subject is strong contrast between the subject and background such as... Color Slow Shutter - The exposure of the point you change the PROGRAM AE mode - Backlight Your camcorder automatically returns from the Flexible Spot Meter to the automatic exposure mode Press AUTO in the following functions ...you set NIGHTSHOT to display PAGE1. (3) Press SPOT METER. Advanced Recording Operations Using the spot light-metering mode -
... - If you selected is on stage and lighted by a spotlight. (1) Set the POWER switch to CAMERA or MEMORY/NETWORK (DCR-IP55 only). (2) Press FN to ON 69 The subject is strong contrast between the subject and background such as... Color Slow Shutter - The exposure of the point you change the PROGRAM AE mode - Backlight Your camcorder automatically returns from the Flexible Spot Meter to the automatic exposure mode Press AUTO in the following functions ...you set NIGHTSHOT to display PAGE1. (3) Press SPOT METER. Advanced Recording Operations Using the spot light-metering mode -

Operating Instructions
Page 73
.... You can operate with the touch panel using the viewfinder (1) Set the POWER switch to CAMERA or MEMORY/NETWORK (DCR-IP55 only). (2) Turn the LCD panel over and move it back to your camcorder body with the LCD screen facing out. Use the viewfinder in the following case: When operating...(only in CAMERA mode) on the LCD screen. (4) Press OK. FADER: press FADER until the desired fader mode is turned off. (5) Press the LCD screen through the viewfinder. Advanced Recording Operations Using the viewfinder Turn the LCD panel over and move it back to your camcorder body with ...
.... You can operate with the touch panel using the viewfinder (1) Set the POWER switch to CAMERA or MEMORY/NETWORK (DCR-IP55 only). (2) Turn the LCD panel over and move it back to your camcorder body with the LCD screen facing out. Use the viewfinder in the following case: When operating...(only in CAMERA mode) on the LCD screen. (4) Press OK. FADER: press FADER until the desired fader mode is turned off. (5) Press the LCD screen through the viewfinder. Advanced Recording Operations Using the viewfinder Turn the LCD panel over and move it back to your camcorder body with ...

Operating Instructions
Page 104
... not have a guaranteed compatibility with the Design Rules for Camera File Systems universal standard established by your camcorder, you cannot use the "Memory Stick" that formatting erases all information on other equipment (DCR-TRV890E/TRV900/TRV900E or DSC-D700/D770) that does not... of Sony Corporation. •All other equipment, format it can go. Inserting a "Memory Stick" Position the b mark on the "Memory Stick" by the JEITA (Japan Electronics and Information Technology Industries Association). Notes on image data compatibility •Image data files recorded on ...
... not have a guaranteed compatibility with the Design Rules for Camera File Systems universal standard established by your camcorder, you cannot use the "Memory Stick" that formatting erases all information on other equipment (DCR-TRV890E/TRV900/TRV900E or DSC-D700/D770) that does not... of Sony Corporation. •All other equipment, format it can go. Inserting a "Memory Stick" Position the b mark on the "Memory Stick" by the JEITA (Japan Electronics and Information Technology Industries Association). Notes on image data compatibility •Image data files recorded on ...


