Operating Instructions
Page 1
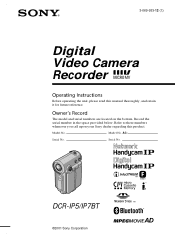
Record the serial number in the space provided below. Model No. Model No. Serial No. DCR-IP5/IP7BT ©2001 Sony Corporation Refer to these numbers whenever you call upon your Sony dealer regarding this manual thoroughly, and retain it for future reference. Serial No. 3-069-933-12 (1) Digital Video Camera Recorder Operating Instructions Before operating the unit, please read this product. Owner's Record The model and serial numbers are located on the bottom. AC-
Record the serial number in the space provided below. Model No. Model No. Serial No. DCR-IP5/IP7BT ©2001 Sony Corporation Refer to these numbers whenever you call upon your Sony dealer regarding this manual thoroughly, and retain it for future reference. Serial No. 3-069-933-12 (1) Digital Video Camera Recorder Operating Instructions Before operating the unit, please read this product. Owner's Record The model and serial numbers are located on the bottom. AC-

Operating Instructions
Page 6
... time you play back or edit an image in a "Memory Stick." NETWORK: Use this mode when you slide it down, the mode changes as follows and corresponding mode lamp also lights up . (2) Slide the POWER switch down while pressing the small green button, then release your finger. Introduction - CAMERA Use this mode when you record on a tape or "Memory Stick" (A "Memory Stick" can only be used to control and ways to the supplied network function operating instructions. MEMORY/NETWORK (DCR...
... time you play back or edit an image in a "Memory Stick." NETWORK: Use this mode when you slide it down, the mode changes as follows and corresponding mode lamp also lights up . (2) Slide the POWER switch down while pressing the small green button, then release your finger. Introduction - CAMERA Use this mode when you record on a tape or "Memory Stick" (A "Memory Stick" can only be used to control and ways to the supplied network function operating instructions. MEMORY/NETWORK (DCR...
Operating Instructions
Page 10
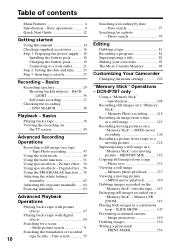
... tape as a still image 123 Recording moving picture - Photo save 135 Viewing a still image - Photo search 79 Editing Dubbing a tape 81 Recording a program 84 Superimposing a title 89 Making your own titles 95 The Micro Cassette Memory 98 Customizing Your Camcorder Changing the menu settings 102 "Memory Stick" Operations - Picture effect .. 54 Using special effects - Memory Photo recording ......... 118 Recording an image from a tape - Image protection 149 Deleting images 150 Writing a print mark - Tape Photo recording 47 Using the wide mode 49 Using the fader function...
... tape as a still image 123 Recording moving picture - Photo save 135 Viewing a still image - Photo search 79 Editing Dubbing a tape 81 Recording a program 84 Superimposing a title 89 Making your own titles 95 The Micro Cassette Memory 98 Customizing Your Camcorder Changing the menu settings 102 "Memory Stick" Operations - Picture effect .. 54 Using special effects - Memory Photo recording ......... 118 Recording an image from a tape - Image protection 149 Deleting images 150 Writing a print mark - Tape Photo recording 47 Using the wide mode 49 Using the fader function...
Operating Instructions
Page 14
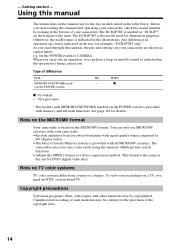
... camcorder is marked as a data compression method. Before you need an NTSC system-based TV. See page 162 for DVD (digital video disc). This format is being carried out. Set the POWER switch to the provision of your recordings on the POWER switch) IP5 IP7BT - The camcorder can only use MICROMV cassettes with MEMORY/NETWORK marked on the MICROMV format. You can access any scene easily using the memory (Multi-picture search function). •Adopts the MPEG2 format as "DCR...
... camcorder is marked as a data compression method. Before you need an NTSC system-based TV. See page 162 for DVD (digital video disc). This format is being carried out. Set the POWER switch to the provision of your recordings on the POWER switch) IP5 IP7BT - The camcorder can only use MICROMV cassettes with MEMORY/NETWORK marked on the MICROMV format. You can access any scene easily using the memory (Multi-picture search function). •Adopts the MPEG2 format as "DCR...
Operating Instructions
Page 30
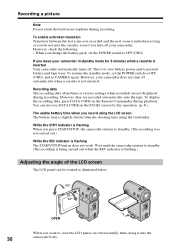
... camcorder body. This is slightly shorter than the shooting time using the LCD screen The battery time is to save battery power and to prevent battery and tape wear. However, they are not displayed during recording. The usable battery time when you record using the viewfinder. Recording data The recording data (date/time or various settings when recorded) are recorded automatically onto the tape. However, check the following: - You can be rotated as you do not eject the cassette, even if you turn...
... camcorder body. This is slightly shorter than the shooting time using the LCD screen The battery time is to save battery power and to prevent battery and tape wear. However, they are not displayed during recording. The usable battery time when you record using the viewfinder. Recording data The recording data (date/time or various settings when recorded) are recorded automatically onto the tape. However, check the following: - You can be rotated as you do not eject the cassette, even if you turn...
Operating Instructions
Page 42
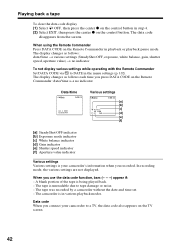
... screen. 42 The tape is your camcorder to tape damage or noise. - The display changes as follows each time you press DATA CODE on the Remote Commander in playback or playback pause mode. When you recorded. The tape was recorded by a camcorder without the date and time set. - In recording mode, the various settings are not displayed. The data code disappears from the screen. A blank portion of the tape is in various playback modes. Data code When you connect your camcorder's information when you use the data code function...
... screen. 42 The tape is your camcorder to tape damage or noise. - The display changes as follows each time you press DATA CODE on the Remote Commander in playback or playback pause mode. When you recorded. The tape was recorded by a camcorder without the date and time set. - In recording mode, the various settings are not displayed. The data code disappears from the screen. A blank portion of the tape is in various playback modes. Data code When you connect your camcorder's information when you use the data code function...

Operating Instructions
Page 45
... playback picture on the camcorder screen. Set the input selector on the TV. If you connect the white plug, the sound is an R (right) signal. 45 Use either the yellow or the black plug of the A/V connecting cable to the video or S video input jack and the white or red plug to the TV using the A/V connecting cable supplied with an S video plug and a video plug. Then, set the TV/VCR selector on the VCR using the A/V connecting cable. A/V : Signal flow White Yellow S VIDEO or VIDEO Black IN S VIDEO VIDEO AUDIO Red...
... playback picture on the camcorder screen. Set the input selector on the TV. If you connect the white plug, the sound is an R (right) signal. 45 Use either the yellow or the black plug of the A/V connecting cable to the video or S video input jack and the white or red plug to the TV using the A/V connecting cable supplied with an S video plug and a video plug. Then, set the TV/VCR selector on the VCR using the A/V connecting cable. A/V : Signal flow White Yellow S VIDEO or VIDEO Black IN S VIDEO VIDEO AUDIO Red...

Operating Instructions
Page 47
...8226;The tape photo recording function does not work during normal CAMERA recording. •During tape photo recording, you play back the still image using a video printer (optional). PHOTO 1 CAPTURE PHOTO 2 Notes •You cannot make a tape photo recording during the following operations: - This mode is useful when you record on a "Memory Stick" (DCR-IP7BT only) (p. 118). (1) In standby mode, keep pressing PHOTO lightly until the recording is displayed on the screen until a still image appears. Advanced Recording Operations - The still image on the screen is also...
...8226;The tape photo recording function does not work during normal CAMERA recording. •During tape photo recording, you play back the still image using a video printer (optional). PHOTO 1 CAPTURE PHOTO 2 Notes •You cannot make a tape photo recording during the following operations: - This mode is useful when you record on a "Memory Stick" (DCR-IP7BT only) (p. 118). (1) In standby mode, keep pressing PHOTO lightly until the recording is displayed on the screen until a still image appears. Advanced Recording Operations - The still image on the screen is also...

Operating Instructions
Page 84
...(1) Set the POWER switch to VCR. (2) Select FN, then press the center z on the control button. (6) Press DISPLAY to select one of the A/V connecting cable The supplied A/V connecting cable is VIDEO. Pressing DISPLAY again displays the video control buttons. 2 FN 3 MENU 4,5 VCR SET VIDEOINPUT RETURN VIDEO VCR SET VIDEOINPUT RETURN VIDEO S VIDEO 6 1 CAMERA MEMORY/ NETWORK VCR POWER (CHG) OFF ON MODE 84 You have to turn off the menu. The PAGE1 screen appears. (3) Select MENU, then press the center z on the control button. Recording a program When using the A/V connecting cable...
...(1) Set the POWER switch to VCR. (2) Select FN, then press the center z on the control button. (6) Press DISPLAY to select one of the A/V connecting cable The supplied A/V connecting cable is VIDEO. Pressing DISPLAY again displays the video control buttons. 2 FN 3 MENU 4,5 VCR SET VIDEOINPUT RETURN VIDEO VCR SET VIDEOINPUT RETURN VIDEO S VIDEO 6 1 CAMERA MEMORY/ NETWORK VCR POWER (CHG) OFF ON MODE 84 You have to turn off the menu. The PAGE1 screen appears. (3) Select MENU, then press the center z on the control button. Recording a program When using the A/V connecting cable...
Operating Instructions
Page 103
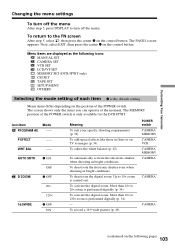
...: MANUAL SET CAMERA SET VCR SET LCD/VF SET MEMORY SET (DCR-IP7BT only) CM SET TAPE SET SETUP MENU OTHERS Selecting the mode setting of each item z is performed digitally (p. 34). - The MEMORY position of the POWER switch. Icon/item Mode PROGRAM AE -- More than 10× to images (p. 54). To automatically activate the electronic shutter when shooting in bright conditions. To activate the digital zoom. To activate the digital zoom. The screen shows only the items you can operate at...
...: MANUAL SET CAMERA SET VCR SET LCD/VF SET MEMORY SET (DCR-IP7BT only) CM SET TAPE SET SETUP MENU OTHERS Selecting the mode setting of each item z is performed digitally (p. 34). - The MEMORY position of the POWER switch. Icon/item Mode PROGRAM AE -- More than 10× to images (p. 54). To automatically activate the electronic shutter when shooting in bright conditions. To activate the digital zoom. To activate the digital zoom. The screen shows only the items you can operate at...

Operating Instructions
Page 123
... CAPTURE 4 PHOTO FN FINE FN 2 1 CAMERA MEMORY/ NETWORK VCR POWER (CHG) OFF ON MODE "Memory Stick" Operations When the access lamp is played back. (3) Keep pressing PHOTO lightly until the picture from a tape as a still image. Before operation •Insert a recorded tape into your camcorder. •Insert a "Memory Stick" into your camcorder. (1) Set the POWER switch to VCR. (2) Select , then press the center z on the screen The inserted "Memory Stick" is incompatible with your camcorder because its format does not conform with that used...
... CAPTURE 4 PHOTO FN FINE FN 2 1 CAMERA MEMORY/ NETWORK VCR POWER (CHG) OFF ON MODE "Memory Stick" Operations When the access lamp is played back. (3) Keep pressing PHOTO lightly until the picture from a tape as a still image. Before operation •Insert a recorded tape into your camcorder. •Insert a "Memory Stick" into your camcorder. (1) Set the POWER switch to VCR. (2) Select , then press the center z on the screen The inserted "Memory Stick" is incompatible with your camcorder because its format does not conform with that used...
Operating Instructions
Page 128
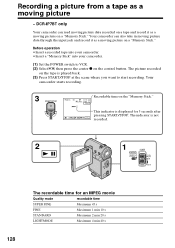
... camcorder. •Insert a "Memory Stick" into your camcorder. (1) Set the POWER switch to start recording. Recording a picture from a tape as a moving picture on a "Memory Stick." This indicator is displayed for an MPEG movie Quality mode recordable time SUPER FINE Maximum 45 s FINE Maximum 1 min 10 s STANDARD Maximum 2 min 20 s LIGHTMODE Maximum 4 min 40 s Your camcorder can read moving picture data recorded on a tape and record it as a moving picture on a "Memory Stick." The picture recorded on the tape is not recorded. 2 1 CAMERA MEMORY/ NETWORK VCR POWER...
... camcorder. •Insert a "Memory Stick" into your camcorder. (1) Set the POWER switch to start recording. Recording a picture from a tape as a moving picture on a "Memory Stick." This indicator is displayed for an MPEG movie Quality mode recordable time SUPER FINE Maximum 45 s FINE Maximum 1 min 10 s STANDARD Maximum 2 min 20 s LIGHTMODE Maximum 4 min 40 s Your camcorder can read moving picture data recorded on a tape and record it as a moving picture on a "Memory Stick." The picture recorded on the tape is not recorded. 2 1 CAMERA MEMORY/ NETWORK VCR POWER...

Operating Instructions
Page 129
Recording a moving picture from tapes. To pause or cancel recording Press START/STOP again. 129 Otherwise, the image data may be corrupted. The camcorder records a new date and time when the recording on the "Memory Stick" is LCD.) (1) Set the POWER switch to VCR. (2) When using the A/V connecting cable, set VIDEOINPUT to the appropriate position depending on the "Memory Stick." Note Sound recorded in the menu settings. (The default setting is made. When the access lamp is converted to monaural sound when recording from other...
Recording a moving picture from tapes. To pause or cancel recording Press START/STOP again. 129 Otherwise, the image data may be corrupted. The camcorder records a new date and time when the recording on the "Memory Stick" is LCD.) (1) Set the POWER switch to VCR. (2) When using the A/V connecting cable, set VIDEOINPUT to the appropriate position depending on the "Memory Stick." Note Sound recorded in the menu settings. (The default setting is made. When the access lamp is converted to monaural sound when recording from other...
Operating Instructions
Page 157
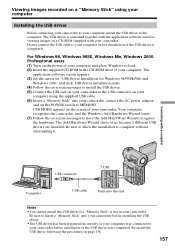
... camcorder, connect the AC power adaptor and set the POWER switch to the computer. The application software screen appears. (3) Set the cursor on "USB Driver Installation for viewing images on a CD-ROM supplied with a computer USB USB connector Computer USB cable Push into the end Notes •You cannot install the USB driver if a "Memory Stick" is contained together with the application software used for Windows 98/98SE/Me and Windows 2000" and click. Viewing images recorded on a "Memory Stick" using the supplied USB cable. (6) Insert a "Memory Stick...
... camcorder, connect the AC power adaptor and set the POWER switch to the computer. The application software screen appears. (3) Set the cursor on "USB Driver Installation for viewing images on a CD-ROM supplied with a computer USB USB connector Computer USB cable Push into the end Notes •You cannot install the USB driver if a "Memory Stick" is contained together with the application software used for Windows 98/98SE/Me and Windows 2000" and click. Viewing images recorded on a "Memory Stick" using the supplied USB cable. (6) Insert a "Memory Stick...
Operating Instructions
Page 158
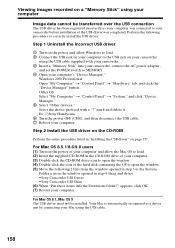
...," and click "Device Manager." 5 Select "Other devices." mark and delete it. Step 2 Install the USB driver on the CD-ROM Perform the entire procedure listed in "Installing the USB driver" on a "Memory Stick" using your computer Image data cannot be installed. Windows 2000 Professional: Open "My Computer" t "Control Panel" t "Hardware" tab, and click the "Device Manager" button. For Mac OS 8.5.1/8.6/9.0 users (1) Turn on the power of your computer and allow Windows to load. 2 Connect the USB jack on...
...," and click "Device Manager." 5 Select "Other devices." mark and delete it. Step 2 Install the USB driver on the CD-ROM Perform the entire procedure listed in "Installing the USB driver" on a "Memory Stick" using your computer Image data cannot be installed. Windows 2000 Professional: Open "My Computer" t "Control Panel" t "Hardware" tab, and click the "Device Manager" button. For Mac OS 8.5.1/8.6/9.0 users (1) Turn on the power of your computer and allow Windows to load. 2 Connect the USB jack on...
Operating Instructions
Page 160
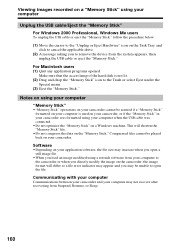
... appears, then unplug the USB cable or eject the "Memory Stick." Compressed files cannot be unable to open a still image file. •When you load an image modified using a retouch software from your computer to the camcorder or when you directly modify the image on a Windows machine. Viewing images recorded on a "Memory Stick" using your computer Unplug the USB cable/Eject the "Memory Stick" For Windows 2000 Professional, Windows Me users To unplug the USB cable or eject the "Memory Stick," follow the procedure below...
... appears, then unplug the USB cable or eject the "Memory Stick." Compressed files cannot be unable to open a still image file. •When you load an image modified using a retouch software from your computer to the camcorder or when you directly modify the image on a Windows machine. Viewing images recorded on a "Memory Stick" using your computer Unplug the USB cable/Eject the "Memory Stick" For Windows 2000 Professional, Windows Me users To unplug the USB cable or eject the "Memory Stick," follow the procedure below...

Operating Instructions
Page 164
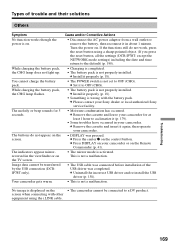
... out. c Adjust the viewfinder lens (p. 33). The demonstration stops. You can also cancel DEMO MODE (p. 106). 164 If the problem persists, disconnect the power source and contact your camcorder, use the following table to CAMERA (p. 29). • The tape has run into any problem using your Sony dealer. The image on the screen. • Slow shutter or low lux mode is set the POWER switch to CAMERA or DEMO MODE is activated. Types of trouble and their...
... out. c Adjust the viewfinder lens (p. 33). The demonstration stops. You can also cancel DEMO MODE (p. 106). 164 If the problem persists, disconnect the power source and contact your camcorder, use the following table to CAMERA (p. 29). • The tape has run into any problem using your Sony dealer. The image on the screen. • Slow shutter or low lux mode is set the POWER switch to CAMERA or DEMO MODE is activated. Types of trouble and their...
Operating Instructions
Page 169
... While charging the battery pack, the CHG lamp does not light up. The indicators appear mirrorreversed in your camcorder. • DISPLAY was pressed. screen when connecting with other equipment using a sharp-pointed object. (If you press the reset button, all the settings (DCR-IP7BT: except the NETWORK mode settings) including the date and time return to OFF (CHG). The buttons do not work, press the reset button using the i.LINK cable. c Remove the cassette...
... While charging the battery pack, the CHG lamp does not light up. The indicators appear mirrorreversed in your camcorder. • DISPLAY was pressed. screen when connecting with other equipment using a sharp-pointed object. (If you press the reset button, all the settings (DCR-IP7BT: except the NETWORK mode settings) including the date and time return to OFF (CHG). The buttons do not work, press the reset button using the i.LINK cable. c Remove the cassette...

Operating Instructions
Page 185
Specifications Video camera recorder System Video recording system 2 rotary heads Helical scanning system Audio recording system Rotary heads, PCM system Quantization: 12 bits (Fs 48 kHz, stereo) Video signal NTSC color, EIA standards Usable cassette MICROMV cassette with the mark printed Tape speed Approx. 5.66 mm/s Recording/playback time (using cassette MGR60) 1 hour Fastforward/rewind time (using cassette MGR60) Approx. 1 min and 30 s Viewfinder Electric viewfinder (color) Image device 3.0 mm (1/6 type) CCD (Charge Coupled Device) Approx. 680 000 pixels (Effective: 340 000 pixels) Lens ...
Specifications Video camera recorder System Video recording system 2 rotary heads Helical scanning system Audio recording system Rotary heads, PCM system Quantization: 12 bits (Fs 48 kHz, stereo) Video signal NTSC color, EIA standards Usable cassette MICROMV cassette with the mark printed Tape speed Approx. 5.66 mm/s Recording/playback time (using cassette MGR60) 1 hour Fastforward/rewind time (using cassette MGR60) Approx. 1 min and 30 s Viewfinder Electric viewfinder (color) Image device 3.0 mm (1/6 type) CCD (Charge Coupled Device) Approx. 680 000 pixels (Effective: 340 000 pixels) Lens ...

Operating Instructions
Page 194
... Zeiss lens 189 Cassette information 98 Charging the battery 19 Clock set 23 Data code 41 Date/time indicator 35 Date search 77 DEMO MODE 106 DIGITAL EFFECT 57, 69 DISPLAY 41 Dubbing a tape 81 E END SEARCH 38 Exposure 64 F, G, H Fader 51 Fade in/out 51 FLASH MOTION 56 FOCUS 65 Format 105 Full charge 19 Heads 180 I, J, K, L i.LINK 82, 87, 125, 130, 176 Image protection 149 Image quality mode 113 Index screen 139 "InfoLITHIUM" battery...
... Zeiss lens 189 Cassette information 98 Charging the battery 19 Clock set 23 Data code 41 Date/time indicator 35 Date search 77 DEMO MODE 106 DIGITAL EFFECT 57, 69 DISPLAY 41 Dubbing a tape 81 E END SEARCH 38 Exposure 64 F, G, H Fader 51 Fade in/out 51 FLASH MOTION 56 FOCUS 65 Format 105 Full charge 19 Heads 180 I, J, K, L i.LINK 82, 87, 125, 130, 176 Image protection 149 Image quality mode 113 Index screen 139 "InfoLITHIUM" battery...


