
Operating Instructions
Page 8
WORK VCR (CHG) OFF ON MODE POWER (1) Slide the POWER switch down . Introduction - The camcorder is turned on a tape or "Memory Stick". 8 CAMERA Use this mode when you use the network (DCR-IP55 only) function. How to the CAMERA mode so that the CAMERA lamp lights up . MEMORY/NETWORK (DCR-IP55) MEMORY: Use this mode when you record on a "Memory Stick," or play back or edit an image recorded on , and then the camcorder turns to turn on the power and select the mode To supply power for the...
WORK VCR (CHG) OFF ON MODE POWER (1) Slide the POWER switch down . Introduction - The camcorder is turned on a tape or "Memory Stick". 8 CAMERA Use this mode when you use the network (DCR-IP55 only) function. How to the CAMERA mode so that the CAMERA lamp lights up . MEMORY/NETWORK (DCR-IP55) MEMORY: Use this mode when you record on a "Memory Stick," or play back or edit an image recorded on , and then the camcorder turns to turn on the power and select the mode To supply power for the...

Operating Instructions
Page 11
... stop recording, press START/ STOP again. Quick Start Guide Note Do not pick up your eyesight (p. 33). 3 Set the POWER switch to start playback. Note When using the touch panel, press operation buttons lightly with sharp objects other than the stylus supplied (DCR-IP55 only). 11 WORK VCR (CHG) OFF ON MODE POWER 4 Slide OPEN in the direction of the touch panel to CAMERA. CAMERA MEMORY/ NET- Do not press the LCD screen with your camcorder...
... stop recording, press START/ STOP again. Quick Start Guide Note Do not pick up your eyesight (p. 33). 3 Set the POWER switch to start playback. Note When using the touch panel, press operation buttons lightly with sharp objects other than the stylus supplied (DCR-IP55 only). 11 WORK VCR (CHG) OFF ON MODE POWER 4 Slide OPEN in the direction of the touch panel to CAMERA. CAMERA MEMORY/ NET- Do not press the LCD screen with your camcorder...
Operating Instructions
Page 14
... in this manual, buttons and settings on the POWER switch Network function IP45 MEMORY - As you read through this manual are for DVD (digital versatile disc). IP55 MEMORY/NETWORK z z Provided - Not provided Note on the MICROMV format Your camcorder is the same as a data compression method. This is indicated on a TV set, you can hear a beep to CAMERA. Note on the MICROMV format. To view your recordings on the MICROMV cassette. Using this manual and operating your camcorder. Types of...
... in this manual, buttons and settings on the POWER switch Network function IP45 MEMORY - As you read through this manual are for DVD (digital versatile disc). IP55 MEMORY/NETWORK z z Provided - Not provided Note on the MICROMV format Your camcorder is the same as a data compression method. This is indicated on a TV set, you can hear a beep to CAMERA. Note on the MICROMV format. To view your recordings on the MICROMV cassette. Using this manual and operating your camcorder. Types of...
Operating Instructions
Page 47
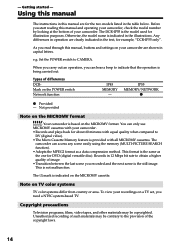
You can operate the playback control buttons in the same way as when you power your camcorder to the TV with an S video plug and a video plug. Open the jack cover. Yellow Black White A/V A/V connecting cable (supplied) Red : Signal flow IN S VIDEO VIDEO AUDIO If your camcorder. Then, set the TV/VCR selector on the VCR to VCR. Set the input selector on the TV to LINE. 47 Playback - Connect your camcorder to your TV with the A/V connecting cable supplied with your...
You can operate the playback control buttons in the same way as when you power your camcorder to the TV with an S video plug and a video plug. Open the jack cover. Yellow Black White A/V A/V connecting cable (supplied) Red : Signal flow IN S VIDEO VIDEO AUDIO If your camcorder. Then, set the TV/VCR selector on the VCR to VCR. Set the input selector on the TV to LINE. 47 Playback - Connect your camcorder to your TV with the A/V connecting cable supplied with your...
Operating Instructions
Page 75
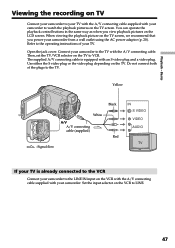
... process externally input scenes using the picture effect function. Advanced Playback Operations - ART SEPIA B&W SOLARIZE EXEC RET. However, you set the POWER switch to FN Press EXIT. Pictures processed by the picture effect function Pictures processed by the picture effect function are processing the image using the picture effect function. • You cannot record images on a tape on a VCR using the picture effect functions: NEG.ART, SEPIA, B&W and SOLARIZE. (1) In the playback or playback pause mode, press FN to display PAGE1. (2) Press MENU...
... process externally input scenes using the picture effect function. Advanced Playback Operations - ART SEPIA B&W SOLARIZE EXEC RET. However, you set the POWER switch to FN Press EXIT. Pictures processed by the picture effect function Pictures processed by the picture effect function are processing the image using the picture effect function. • You cannot record images on a tape on a VCR using the picture effect functions: NEG.ART, SEPIA, B&W and SOLARIZE. (1) In the playback or playback pause mode, press FN to display PAGE1. (2) Press MENU...

Operating Instructions
Page 88
... that has video/ audio outputs. Use your camcorder as a recorder. 1 Switching the video input jack of the jacks in the menu settings, then press 1 CAMERA MEMORY/ NET- You have to FN Press EXIT. in the menu settings. If the setup is VIDEO. VCR SET VIDEOINPUT EXIT VIDEO S VIDEO EXEC RET. 88 WORK VCR (CHG) OFF ON MODE POWER 2 FN 3,4 MENU VCR SET EXIT VIDEOINPUT VIDEO To return to select one of the A/V connecting cable The supplied A/V connecting cable is equipped with an S video plug and a video plug.
... that has video/ audio outputs. Use your camcorder as a recorder. 1 Switching the video input jack of the jacks in the menu settings, then press 1 CAMERA MEMORY/ NET- You have to FN Press EXIT. in the menu settings. If the setup is VIDEO. VCR SET VIDEOINPUT EXIT VIDEO S VIDEO EXEC RET. 88 WORK VCR (CHG) OFF ON MODE POWER 2 FN 3,4 MENU VCR SET EXIT VIDEOINPUT VIDEO To return to select one of the A/V connecting cable The supplied A/V connecting cable is equipped with an S video plug and a video plug.

Operating Instructions
Page 118
... flashes while the power for focusing manually. 118 To change FLASH LVL to focus on individual differences, the distance to strobe. Memory photo recording Recording images with the flash The flash automatically pops up . •If it is not easy to the desired brightness in the dark, use forced flash in flash is automatically adjusted to the appropriate brightness. The default setting is being charged. Try recording various images to reduce the red...
... flashes while the power for focusing manually. 118 To change FLASH LVL to focus on individual differences, the distance to strobe. Memory photo recording Recording images with the flash The flash automatically pops up . •If it is not easy to the desired brightness in the dark, use forced flash in flash is automatically adjusted to the appropriate brightness. The default setting is being charged. Try recording various images to reduce the red...

Operating Instructions
Page 130
...function - Color Slow Shutter - Title - MPEG movie recording Note Sound is not recorded on the "Memory Stick." While ejecting the tape, sound is recorded in CAMERA mode. 130 When the POWER switch is slightly larger compared with the camcorder: •Is MPEG MOVIE AD •Cannot be played back on other digital still cameras and digital video camera recorders. •Cannot be output from your camcorder. Digital zoom - Picture effect - To display the recording date/time, press DATA CODE during playback. Recording moving pictures on the "Memory Stick". MPEG movie...
...function - Color Slow Shutter - Title - MPEG movie recording Note Sound is not recorded on the "Memory Stick." While ejecting the tape, sound is recorded in CAMERA mode. 130 When the POWER switch is slightly larger compared with the camcorder: •Is MPEG MOVIE AD •Cannot be played back on other digital still cameras and digital video camera recorders. •Cannot be output from your camcorder. Digital zoom - Picture effect - To display the recording date/time, press DATA CODE during playback. Recording moving pictures on the "Memory Stick". MPEG movie...

Operating Instructions
Page 133
...image of the A/V connecting cable to the video jack on the LCD screen or in the menu settings (p. 182). (The default setting is recorded. Recording a picture from a tape as a moving picture with START/STOP. The date/time when it is recorded on the "Memory Stick" is LCD.) (1) Set the POWER switch to VCR. (2) When using the A/V connecting cable, set VIDEOINPUT to the appropriate position depending on the "Memory Stick". Using the A/V connecting cable "Memory Stick" Operations Black Yellow OUT S VIDEO VIDEO AUDIO Red : Signal flow White A/V A/V connecting cable (supplied) Connect...
...image of the A/V connecting cable to the video jack on the LCD screen or in the menu settings (p. 182). (The default setting is recorded. Recording a picture from a tape as a moving picture with START/STOP. The date/time when it is recorded on the "Memory Stick" is LCD.) (1) Set the POWER switch to VCR. (2) When using the A/V connecting cable, set VIDEOINPUT to the appropriate position depending on the "Memory Stick". Using the A/V connecting cable "Memory Stick" Operations Black Yellow OUT S VIDEO VIDEO AUDIO Red : Signal flow White A/V A/V connecting cable (supplied) Connect...

Operating Instructions
Page 151
... for the "Memory Stick" or a PC card adaptor for the recommended operating environment. Software •Depending on your application software, the file size may increase when you open the file. Viewing Images Using your Computer Notes on using retouching software from your computer to view images saved on a "Memory Stick" or recorded on a tape on a computer which has a "Memory Stick" slot, first remove the "Memory Stick" from your camcorder. Tape images Camcorder Connection jack USB jack i.LINK (MICROMV Interface) "Memory Stick" USB jack* images Connection cable USB cable (supplied...
... for the "Memory Stick" or a PC card adaptor for the recommended operating environment. Software •Depending on your application software, the file size may increase when you open the file. Viewing Images Using your Computer Notes on using retouching software from your computer to view images saved on a "Memory Stick" or recorded on a tape on a computer which has a "Memory Stick" slot, first remove the "Memory Stick" from your camcorder. Tape images Camcorder Connection jack USB jack i.LINK (MICROMV Interface) "Memory Stick" USB jack* images Connection cable USB cable (supplied...
Operating Instructions
Page 157
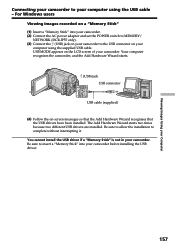
... a "Memory Stick" into your camcorder before installing the USB driver. 157 The Add Hardware Wizard starts two times because two different USB drivers are installed. USB MODE appears on -screen messages so that the Add Hardware Wizard recognises that the USB drivers have been installed. You cannot install the USB driver if a "Memory Stick" is not in your computer using the USB cable - For Windows users Viewing images recorded on a "Memory Stick" (1) Insert a "Memory Stick" into your camcorder. (2) Connect the AC power adaptor and set the POWER switch to MEMORY/ NETWORK (DCR...
... a "Memory Stick" into your camcorder before installing the USB driver. 157 The Add Hardware Wizard starts two times because two different USB drivers are installed. USB MODE appears on -screen messages so that the Add Hardware Wizard recognises that the USB drivers have been installed. You cannot install the USB driver if a "Memory Stick" is not in your computer using the USB cable - For Windows users Viewing images recorded on a "Memory Stick" (1) Insert a "Memory Stick" into your camcorder. (2) Connect the AC power adaptor and set the POWER switch to MEMORY/ NETWORK (DCR...
Operating Instructions
Page 158
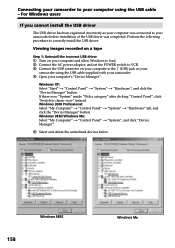
..." t "Hardware" tab, and click the "Device Manager" button. Viewing images recorded on a tape Step 1: Uninstall the incorrect USB driver 1 Turn on your computer and allow Windows to load. 2 Connect the AC power adaptor, and set the POWER switch to VCR. 3 Connect the USB connector on your camcorder using the USB cable - Perform the following procedure to the (USB) jack on your computer to correctly install the USB driver. Connecting your camcorder to classic view" instead. If there is no...
..." t "Hardware" tab, and click the "Device Manager" button. Viewing images recorded on a tape Step 1: Uninstall the incorrect USB driver 1 Turn on your computer and allow Windows to load. 2 Connect the AC power adaptor, and set the POWER switch to VCR. 3 Connect the USB connector on your camcorder using the USB cable - Perform the following procedure to the (USB) jack on your computer to correctly install the USB driver. Connecting your camcorder to classic view" instead. If there is no...

Operating Instructions
Page 160
... devices". For Windows users Viewing images recorded on a "Memory Stick" Step1: Uninstall the incorrect USB driver 1 Turn on your computer and allow Windows to load. 2 Insert a "Memory Stick" into your camcorder. 3 Connect the AC power adaptor, and set the POWER switch to MEMORY/ NETWORK (DCR-IP55 only). 4 Connect the USB connector on your computer to the (USB) jack on your camcorder using the USB cable - Windows 2000 Professional: Select "My Computer" t "Control Panel" t "System" t "Hardware", and click the "Device Manager" button. Ex: (?)Sony Handycam 7 Turn the POWER switch...
... devices". For Windows users Viewing images recorded on a "Memory Stick" Step1: Uninstall the incorrect USB driver 1 Turn on your computer and allow Windows to load. 2 Insert a "Memory Stick" into your camcorder. 3 Connect the AC power adaptor, and set the POWER switch to MEMORY/ NETWORK (DCR-IP55 only). 4 Connect the USB connector on your computer to the (USB) jack on your camcorder using the USB cable - Windows 2000 Professional: Select "My Computer" t "Control Panel" t "System" t "Hardware", and click the "Device Manager" button. Ex: (?)Sony Handycam 7 Turn the POWER switch...

Operating Instructions
Page 161
... a cassette into your Computer 161 The "PIXELA ImageMixer Ver.1.0 for Sony". The title screen appears. (5) Click on your computer - For Windows users Capturing images with permission of administrators. Viewing images recorded on a tape (1) Turn on your computer. If you are using Windows 2000 Professional, you are using Windows XP, log in with permission of managers. Viewing Images Using your camcorder. (3) Set the POWER switch to ON in to VCR. Viewing images recorded on a tape on the screen. Select USB STREAM...
... a cassette into your Computer 161 The "PIXELA ImageMixer Ver.1.0 for Sony". The title screen appears. (5) Click on your computer - For Windows users Capturing images with permission of administrators. Viewing images recorded on a tape (1) Turn on your computer. If you are using Windows 2000 Professional, you are using Windows XP, log in with permission of managers. Viewing Images Using your camcorder. (3) Set the POWER switch to ON in to VCR. Viewing images recorded on a tape on the screen. Select USB STREAM...

Operating Instructions
Page 166
Set the POWER switch to MEMORY/NETWORK (DCR-IP55 only). (3) When the CD-ROM is inserted on your computer, connect the (USB) jack on your camcorder to your computer - USB MODE appears on the LCD screen of your computer using the supplied USB cable. For Windows users Viewing images Before operation •You need to install the USB driver to view "Memory Stick" images on your computer (p. 155). •An application such as Windows Media Player must be installed to play back moving pictures in...
Set the POWER switch to MEMORY/NETWORK (DCR-IP55 only). (3) When the CD-ROM is inserted on your computer, connect the (USB) jack on your camcorder to your computer - USB MODE appears on the LCD screen of your computer using the supplied USB cable. For Windows users Viewing images Before operation •You need to install the USB driver to view "Memory Stick" images on your computer (p. 155). •An application such as Windows Media Player must be installed to play back moving pictures in...
Operating Instructions
Page 171
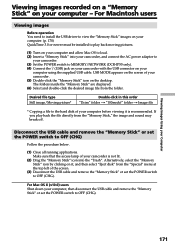
... Macintosh users Viewing images Before operation You need to install the USB driver to view the "Memory Stick" images on your computer. (p. 170) QuickTime 3.0 or newer must be installed to play back the file directly from the "Memory Stick," the image and sound may break off. USB MODE appears on the screen of the screen. (3) Disconnect the USB cable and remove the "Memory Stick" or set the POWER switch to OFF (CHG). If you play back moving pictures. (1) Turn on your computer and allow Mac OS...
... Macintosh users Viewing images Before operation You need to install the USB driver to view the "Memory Stick" images on your computer. (p. 170) QuickTime 3.0 or newer must be installed to play back the file directly from the "Memory Stick," the image and sound may break off. USB MODE appears on the screen of the screen. (3) Disconnect the USB cable and remove the "Memory Stick" or set the POWER switch to OFF (CHG). If you play back moving pictures. (1) Turn on your computer and allow Mac OS...

Operating Instructions
Page 175
... when shooting in films or on the position of each item z is not compatible with the flash level. N.S. LOW To make the flash level higher than normal. -- Changing the menu settings Menu items are displayed as the following icons: MANUAL SET CAMERA SET VCR SET LCD/VF SET MEMORY SET CM SET TAPE SET SETUP MENU OTHERS Selecting the mode setting of the POWER switch. To automatically activate the electronic shutter when shooting in bright conditions. To adjust the white balance (p. 54). To use the normal setting.
... when shooting in films or on the position of each item z is not compatible with the flash level. N.S. LOW To make the flash level higher than normal. -- Changing the menu settings Menu items are displayed as the following icons: MANUAL SET CAMERA SET VCR SET LCD/VF SET MEMORY SET CM SET TAPE SET SETUP MENU OTHERS Selecting the mode setting of the POWER switch. To automatically activate the electronic shutter when shooting in bright conditions. To adjust the white balance (p. 54). To use the normal setting.
Operating Instructions
Page 191
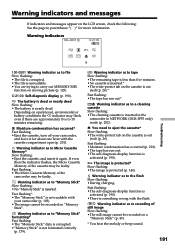
... Slow flashing: •The battery is out (red) (p. 26). Fast flashing: •The Micro Cassette Memory of the cassette may be recorded on a "Memory Stick" (p. 49). * You hear the melody or beep sound. 191 Troubleshooting Warning indicators and messages If indicators and messages appear on the LCD screen, check the following: See the page in NETWORK (DCR-IP55 only) mode (p. 202). If even then the indicator flashes, the Micro Cassette Memory of the camcorder...
... Slow flashing: •The battery is out (red) (p. 26). Fast flashing: •The Micro Cassette Memory of the cassette may be recorded on a "Memory Stick" (p. 49). * You hear the melody or beep sound. 191 Troubleshooting Warning indicators and messages If indicators and messages appear on the LCD screen, check the following: See the page in NETWORK (DCR-IP55 only) mode (p. 202). If even then the indicator flashes, the Micro Cassette Memory of the camcorder...

Operating Instructions
Page 206
... the battery pack, NP-FF50, cassette MGR60, lens cap and wrist strap Supplied accessories See page 16. 206 LINK (MICROMV Interface) input/output 4-pin connector S400 LANC jack Stereo mini-minijack (ø 2.5 mm) USB jack mini-B LCD screen Picture 6.2 cm (2.5 type) 50 × 37 mm (2 × 1 1/2 in the NightShot mode)* * Objects unable to be shot with infrared lighting. one min. Input/Output connectors Audio/Video input/output 10-pin connector Input/output auto switch Video signal...
... the battery pack, NP-FF50, cassette MGR60, lens cap and wrist strap Supplied accessories See page 16. 206 LINK (MICROMV Interface) input/output 4-pin connector S400 LANC jack Stereo mini-minijack (ø 2.5 mm) USB jack mini-B LCD screen Picture 6.2 cm (2.5 type) 50 × 37 mm (2 × 1 1/2 in the NightShot mode)* * Objects unable to be shot with infrared lighting. one min. Input/Output connectors Audio/Video input/output 10-pin connector Input/output auto switch Video signal...
Operating Instructions
Page 215
... Zeiss lens 209 Cassette information 100 Cassette memory 100 Charging battery 18 Charging built-in rechargeable battery 203 Cleaning cassette 202 Clock set 22 COLOR SLOW SHUTTER .... 38 Continuous photo recording 116 Data code 43 DATE SEARCH 84 DEMO MODE 181 Digital effect 62, 76 DISPLAY 182 Dubbing a tape 85 E END SEARCH 41 EXP BRKTG 116 Exposure 68 F, G, H Fader 58 Fade in/out 58 Flash recording 51, 118 FLASH 62 FLASH MOTION 62 Flexible Spot Meter 69 FOCUS 70 Focusing manually 70 FORMAT...
... Zeiss lens 209 Cassette information 100 Cassette memory 100 Charging battery 18 Charging built-in rechargeable battery 203 Cleaning cassette 202 Clock set 22 COLOR SLOW SHUTTER .... 38 Continuous photo recording 116 Data code 43 DATE SEARCH 84 DEMO MODE 181 Digital effect 62, 76 DISPLAY 182 Dubbing a tape 85 E END SEARCH 41 EXP BRKTG 116 Exposure 68 F, G, H Fader 58 Fade in/out 58 Flash recording 51, 118 FLASH 62 FLASH MOTION 62 Flexible Spot Meter 69 FOCUS 70 Focusing manually 70 FORMAT...


