Operating Guide
Page 5
...matters only. For customers in the U.S.A. Battery pack This device complies with Part 15 of Conformity Trade Name: SONY Model No.: DCR-HC46 Responsible Party: Sony Electronics Inc. Address: 16450 W. Operation is subject to the following two conditions: (1) This device may cause ...and (2) this product, you . Operation is for future reference. Otherwise, fire or injury may cause undesired operation. You can help preserve our environment by returning your used rechargeable batteries to the following two conditions: (1) This device may not cause harmful interference, ...
...matters only. For customers in the U.S.A. Battery pack This device complies with Part 15 of Conformity Trade Name: SONY Model No.: DCR-HC46 Responsible Party: Sony Electronics Inc. Address: 16450 W. Operation is subject to the following two conditions: (1) This device may cause ...and (2) this product, you . Operation is for future reference. Otherwise, fire or injury may cause undesired operation. You can help preserve our environment by returning your used rechargeable batteries to the following two conditions: (1) This device may not cause harmful interference, ...
Operating Guide
Page 6
...Handycam Station Model DCRA-C151 and AC Adaptor Model AC-L25A/L25B. • DCR-HC96 is subject to the following two conditions: (1) This device may cause harmful interference to which can use Your camcorder...by one or more of cassette you call upon your Sony dealer regarding this manual could void your camcorder You can be determined by turning the equipment off and... help. Model No. ACNo. However, there is connected. - The supplied interface cable must accept any changes or modifications not expressly approved in a particular installation. Notes • DCR...
...Handycam Station Model DCRA-C151 and AC Adaptor Model AC-L25A/L25B. • DCR-HC96 is subject to the following two conditions: (1) This device may cause harmful interference to which can use Your camcorder...by one or more of cassette you call upon your Sony dealer regarding this manual could void your camcorder You can be determined by turning the equipment off and... help. Model No. ACNo. However, there is connected. - The supplied interface cable must accept any changes or modifications not expressly approved in a particular installation. Notes • DCR...
Operating Guide
Page 87
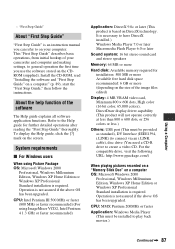
...start the "First Step Guide," then follow the instructions. This "First Step Guide" describes basic operations, from initial hookup of the software The Help guide explains all software application functions. "First Step Guide" About "First Step Guide" "First Step Guide" is not assured if the above ...the screen. Using a Computer - It is required. To display the Help guide, click the [?] mark on your camcorder and computer and making settings, to general operation the first time you can refer to the Help guide for installation: 500 MB or more Available free hard disk space ...
...start the "First Step Guide," then follow the instructions. This "First Step Guide" describes basic operations, from initial hookup of the software The Help guide explains all software application functions. "First Step Guide" About "First Step Guide" "First Step Guide" is not assured if the above ...the screen. Using a Computer - It is required. To display the Help guide, click the [?] mark on your camcorder and computer and making settings, to general operation the first time you can refer to the Help guide for installation: 500 MB or more Available free hard disk space ...
Operating Guide
Page 92
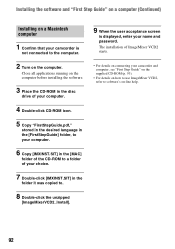
... the software and "First Step Guide" on a computer (Continued) Installing on a Macintosh computer 1 Confirm that your camcorder is displayed, enter your name and password. The installation of your camcorder and computer, see "First Step Guide" on the supplied CD-ROM (p. 93). • For details on how to... use ImageMixer VCD2, refer to the computer. 2 Turn on -line help. 92 Close all applications running on the computer ...
... the software and "First Step Guide" on a computer (Continued) Installing on a Macintosh computer 1 Confirm that your camcorder is displayed, enter your name and password. The installation of your camcorder and computer, see "First Step Guide" on the supplied CD-ROM (p. 93). • For details on how to... use ImageMixer VCD2, refer to the computer. 2 Turn on -line help. 92 Close all applications running on the computer ...
Operating Guide
Page 96
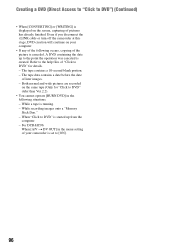
...tape (Only for details. - Even if you disconnect the i.LINK cable or turn off the camcorder at this stage, DVD creation will continue on the screen, capturing of the following situations: ...The tape data contains a date before the date of the picture is canceled. Refer to the help files of "Click to DVD" for "Click to DVD" older than Ver.2.2). • You ...Click to DVD" is created. The tape contains a 10-second blank portion. - While a tape is running. - For DCR-HC96: When [A/V t DV OUT] in the following occurs, copying of later images. - While recording images onto a "Memory ...
...tape (Only for details. - Even if you disconnect the i.LINK cable or turn off the camcorder at this stage, DVD creation will continue on the screen, capturing of the following situations: ...The tape data contains a date before the date of the picture is canceled. Refer to the help files of "Click to DVD" for "Click to DVD" older than Ver.2.2). • You ...Click to DVD" is created. The tape contains a 10-second blank portion. - While a tape is running. - For DCR-HC96: When [A/V t DV OUT] in the following occurs, copying of later images. - While recording images onto a "Memory ...
Operating Guide
Page 98
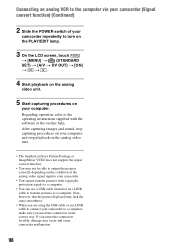
...the condition of the analog video signal input to your camcorder. • You cannot transfer pictures with the software or the on-line help. If you are using the USB cable or an i.LINK cable to connect your camcorder to turn on the PLAY/EDIT lamp. 3 On ...t [ON] t t. 4 Start playback on the analog video unit. 5 Start capturing procedures on your computer. Connecting an analog VCR to the computer via your camcorder (Signal convert function) (Continued) 2 Slide the POWER switch of an i.LINK cable to transfer pictures to the operating instructions supplied with copyright protection signals to...
...the condition of the analog video signal input to your camcorder. • You cannot transfer pictures with the software or the on-line help. If you are using the USB cable or an i.LINK cable to connect your camcorder to turn on the PLAY/EDIT lamp. 3 On ...t [ON] t t. 4 Start playback on the analog video unit. 5 Start capturing procedures on your computer. Connecting an analog VCR to the computer via your camcorder (Signal convert function) (Continued) 2 Slide the POWER switch of an i.LINK cable to transfer pictures to the operating instructions supplied with copyright protection signals to...
Operating Guide
Page 138
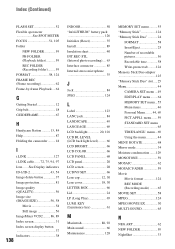
...) .........59 FORMAT 58, 124 FRAME REC (Frame recording 62 Frame-by-frame Playback ....64 G Getting Started 12 Grip belt 18 GUIDEFRAME 67 H Handycam Station ..........13, 84 Help 87 Holding the camcorder .........18 I i.LINK 127 i.LINK cable .......72, 75, 94, 97 Icon .......See Display indicators ID-1/ID-2 43, 54 Image delete button 37 Image...
...) .........59 FORMAT 58, 124 FRAME REC (Frame recording 62 Frame-by-frame Playback ....64 G Getting Started 12 Grip belt 18 GUIDEFRAME 67 H Handycam Station ..........13, 84 Help 87 Holding the camcorder .........18 I i.LINK 127 i.LINK cable .......72, 75, 94, 97 Icon .......See Display indicators ID-1/ID-2 43, 54 Image delete button 37 Image...


