Operating Guide
Page 6
...equipment does cause harmful interference to Subpart B of Part 15 of Conformity Trade Name: SONY Model No.: DCR-HC96 Responsible Party: Sony Electronics Inc. Notes • DCR-HC46 is to be used with the equipment in your camcorder You can radiate radio frequency energy and, if not installed and used in a ... of the FCC Rules. If this device must be used with the Handycam Station Model DCRA-C151 and AC Adaptor Model AC-L25A/L25B. • DCR-HC96 is supplied with the limits for connecting the camcorder to correct the interference by turning the equipment off and on the bottom...
...equipment does cause harmful interference to Subpart B of Part 15 of Conformity Trade Name: SONY Model No.: DCR-HC96 Responsible Party: Sony Electronics Inc. Notes • DCR-HC46 is to be used with the equipment in your camcorder You can radiate radio frequency energy and, if not installed and used in a ... of the FCC Rules. If this device must be used with the Handycam Station Model DCRA-C151 and AC Adaptor Model AC-L25A/L25B. • DCR-HC96 is supplied with the limits for connecting the camcorder to correct the interference by turning the equipment off and on the bottom...

Operating Guide
Page 7
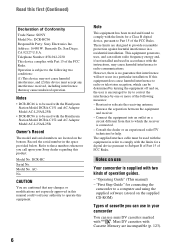
...your camcorder to another device with your camcorder. • For DCR-HC46/HC96: Disconnect the AC Adaptor from the Handycam Station holding both the Handycam Station and the DC plug. • For DCR-HC46/HC96: Be sure to slide the POWER switch to OFF (CHG) when you can use in your camcorder There...7 Viewfinder Battery pack "Memory Stick" (You cannot use it . Types of "Memory Stick" you insert the camcorder into the Handycam Station or remove the camcorder from it in your camcorder.) • You cannot use any type of memory card except "Memory Stick Duo." • "Memory Stick ...
...your camcorder to another device with your camcorder. • For DCR-HC46/HC96: Disconnect the AC Adaptor from the Handycam Station holding both the Handycam Station and the DC plug. • For DCR-HC46/HC96: Be sure to slide the POWER switch to OFF (CHG) when you can use in your camcorder There...7 Viewfinder Battery pack "Memory Stick" (You cannot use it . Types of "Memory Stick" you insert the camcorder into the Handycam Station or remove the camcorder from it in your camcorder.) • You cannot use any type of memory card except "Memory Stick Duo." • "Memory Stick ...

Operating Guide
Page 12
... lens cap Attach the lens cap to the metal fittings of that you have following items supplied with your camcorder. Handycam Station (1) (DCR-HC46/HC96) (p. 13) Rechargeable battery pack (1) (p. 13, 126) NP-FP30 (DCR-HC36) NP-FP50 (DCR-HC46/HC96) Wireless Remote Commander (1) (p. 40) A button-type lithium battery is already installed. The number in the parentheses indicates the...
... lens cap Attach the lens cap to the metal fittings of that you have following items supplied with your camcorder. Handycam Station (1) (DCR-HC46/HC96) (p. 13) Rechargeable battery pack (1) (p. 13, 126) NP-FP30 (DCR-HC36) NP-FP50 (DCR-HC46/HC96) Wireless Remote Commander (1) (p. 40) A button-type lithium battery is already installed. The number in the parentheses indicates the...
Operating Guide
Page 13
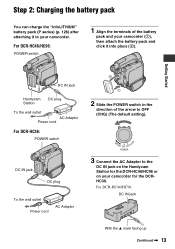
... switch 2 1 2 Slide the POWER switch in the direction of the battery pack and your camcorder (1), then attach the battery pack and click it to your camcorder for the DCRHC36. For DCR-HC46/HC96: POWER switch 1 Align the terminals of the arrow to the DC IN jack on the Handycam Station for the DCR-HC46/HC96 or on your...
... switch 2 1 2 Slide the POWER switch in the direction of the battery pack and your camcorder (1), then attach the battery pack and click it to your camcorder for the DCRHC36. For DCR-HC46/HC96: POWER switch 1 Align the terminals of the arrow to the DC IN jack on the Handycam Station for the DCR-HC46/HC96 or on your...
Operating Guide
Page 14
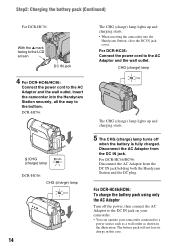
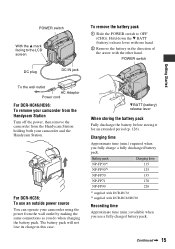
...the wall outlet. For DCR-HC46/HC96: To charge the battery pack using only the AC Adaptor Turn off when the battery is fully charged. CHG (charge) lamp The CHG (charge) lamp lights up and charging starts. • When inserting the camcorder into the Handycam Station securely, all the way... to a power source such as a wall outlet as shown in this case. DCR-HC96: /CHG (charge) lamp DCR-HC46: CHG (charge) lamp 14 The CHG (charge) lamp lights up and ...
...the wall outlet. For DCR-HC46/HC96: To charge the battery pack using only the AC Adaptor Turn off when the battery is fully charged. CHG (charge) lamp The CHG (charge) lamp lights up and charging starts. • When inserting the camcorder into the Handycam Station securely, all the way... to a power source such as a wall outlet as shown in this case. DCR-HC96: /CHG (charge) lamp DCR-HC46: CHG (charge) lamp 14 The CHG (charge) lamp lights up and ...
Operating Guide
Page 15
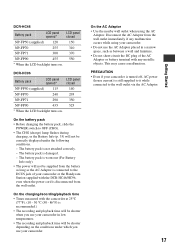
... same connections as you fully charge a fully discharged battery pack. POWER switch 1 Getting Started To the wall outlet AC Adaptor Power cord For DCR-HC46/HC96: To remove your camcorder and the Handycam Station. Battery pack NP-FP30*1 NP-FP50*2 NP-FP70 NP-FP71 NP-FP90 Charging time 115 125 155 170 220 *1 supplied with...
... same connections as you fully charge a fully discharged battery pack. POWER switch 1 Getting Started To the wall outlet AC Adaptor Power cord For DCR-HC46/HC96: To remove your camcorder and the Handycam Station. Battery pack NP-FP30*1 NP-FP50*2 NP-FP70 NP-FP71 NP-FP90 Charging time 115 125 155 170 220 *1 supplied with...
Operating Guide
Page 17
...use the AC Adaptor placed in a narrow space, such as the AC Adaptor is connected to the DC IN jack of your camcorder or the Handycam Station supplied with the DCR-HC46/HC96, even when the power cord is disconnected from the battery as long as between a wall and furniture. • Do not short...-circuit the DC plug of the AC Adaptor or battery terminal with the camcorder at 25°C (77°F). (10 - 30 °C (50 - ...
...use the AC Adaptor placed in a narrow space, such as the AC Adaptor is connected to the DC IN jack of your camcorder or the Handycam Station supplied with the DCR-HC46/HC96, even when the power cord is disconnected from the battery as long as between a wall and furniture. • Do not short...-circuit the DC plug of the AC Adaptor or battery terminal with the camcorder at 25°C (77°F). (10 - 30 °C (50 - ...
Operating Guide
Page 24
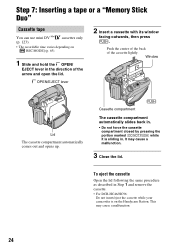
... . To eject the cassette Open the lid following the same procedure as described in Step 1 and remove the cassette. • For DCR-HC46/HC96: Do not insert/eject the cassette while your camcorder is sliding in the direction of the cassette lightly. This may cause a malfunction. 3 Close the lid. Push the center of... Step 7: Inserting a tape or a "Memory Stick Duo" Cassette tape You can use mini DV cassettes only (p. 123). • The recordable time varies depending on the Handycam Station.
... . To eject the cassette Open the lid following the same procedure as described in Step 1 and remove the cassette. • For DCR-HC46/HC96: Do not insert/eject the cassette while your camcorder is sliding in the direction of the cassette lightly. This may cause a malfunction. 3 Close the lid. Push the center of... Step 7: Inserting a tape or a "Memory Stick Duo" Cassette tape You can use mini DV cassettes only (p. 123). • The recordable time varies depending on the Handycam Station.
Operating Guide
Page 42
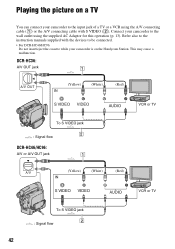
... be connected. • For DCR-HC46/HC96: Do not insert/eject the cassette while your camcorder is on a TV You can connect your camcorder to the input jack of a TV or a VCR using the A/V connecting cable (1) or the A/V connecting cable with the... manuals supplied with S VIDEO (2). DCR-HC36: A/V OUT jack 1 A/V OUT (Yellow) (White) (Red) VCR or TV To S VIDEO jack 2 : Signal flow DCR-HC46/HC96: A/V or A/V OUT jack 1 A/V (Yellow) (White) (Red) VCR or TV To S VIDEO jack 2 : Signal flow 42 This may cause a malfunction. Playing the picture on the Handycam Station.
... be connected. • For DCR-HC46/HC96: Do not insert/eject the cassette while your camcorder is on a TV You can connect your camcorder to the input jack of a TV or a VCR using the A/V connecting cable (1) or the A/V connecting cable with the... manuals supplied with S VIDEO (2). DCR-HC36: A/V OUT jack 1 A/V OUT (Yellow) (White) (Red) VCR or TV To S VIDEO jack 2 : Signal flow DCR-HC46/HC96: A/V or A/V OUT jack 1 A/V (Yellow) (White) (Red) VCR or TV To S VIDEO jack 2 : Signal flow 42 This may cause a malfunction. Playing the picture on the Handycam Station.
Operating Guide
Page 43
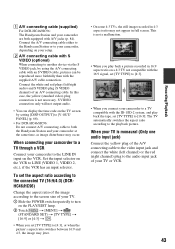
...image disturbance may not appear in 16:9 aspect ratio on the VCR. When your setup. A A/V connecting cable (supplied) For DCR-HC46/HC96: The Handycam Station and your camcorder, depending on the VCR to LINE (VIDEO 1, VIDEO 2, etc.), if the VCR has an input selector. The TV automatically ...switches the aspect ratio according to your camcorder are both the Handycam Station and your TV or VCR. 43 Recording/Playback Set ...
...image disturbance may not appear in 16:9 aspect ratio on the VCR. When your setup. A A/V connecting cable (supplied) For DCR-HC46/HC96: The Handycam Station and your camcorder, depending on the VCR to LINE (VIDEO 1, VIDEO 2, etc.), if the VCR has an input selector. The TV automatically ...switches the aspect ratio according to your camcorder are both the Handycam Station and your TV or VCR. 43 Recording/Playback Set ...
Operating Guide
Page 71
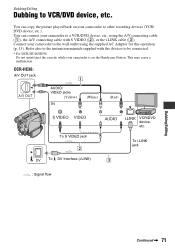
...flow VCR/DVD device, etc. You can connect your camcorder to other recording devices (VCR/ DVD device, etc.). To i.LINK jack Dubbing/Editing Continued , 71 You can copy the picture played back on your camcorder is on the Handycam Station. Dubbing/Editing Dubbing to a VCR/DVD device, etc...., using the A/V connecting cable (1), the A/V connecting cable with the devices to be connected. • For DCR-HC46/HC96: Do not insert/eject the cassette while your camcorder to the ...
...flow VCR/DVD device, etc. You can connect your camcorder to other recording devices (VCR/ DVD device, etc.). To i.LINK jack Dubbing/Editing Continued , 71 You can copy the picture played back on your camcorder is on the Handycam Station. Dubbing/Editing Dubbing to a VCR/DVD device, etc...., using the A/V connecting cable (1), the A/V connecting cable with the devices to be connected. • For DCR-HC46/HC96: Do not insert/eject the cassette while your camcorder to the ...
Operating Guide
Page 72
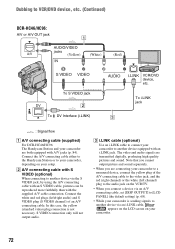
... OUTPUT] to [LCD PANEL] (the default setting) (p. 68). • While your camcorder to another device equipped with A/V jacks (p. 84). Dubbing to your camcorder, depending on your setup. To i.LINK jack : Signal flow A A/V connecting cable (supplied) For DCR-HC46/HC96: The Handycam Station and your camcorder are both equipped with an i.LINK jack. B A/V connecting cable with S VIDEO (optional...
... OUTPUT] to [LCD PANEL] (the default setting) (p. 68). • While your camcorder to another device equipped with A/V jacks (p. 84). Dubbing to your camcorder, depending on your setup. To i.LINK jack : Signal flow A A/V connecting cable (supplied) For DCR-HC46/HC96: The Handycam Station and your camcorder are both equipped with an i.LINK jack. B A/V connecting cable with S VIDEO (optional...
Operating Guide
Page 74
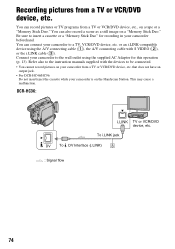
...manuals supplied with S VIDEO (2), or the i.LINK cable (3). that does not have an output jack. • For DCR-HC46/HC96: Do not insert/eject the cassette while your camcorder beforehand. Be sure to a TV, VCR/DVD device, etc. or an i.LINK-compatible device using the supplied AC Adaptor...with the devices to be connected. • You cannot record pictures on the Handycam Station. DCR-HC36: To i.LINK jack DV To DV Interface (i.LINK) 3 : Signal flow TV or VCR/DVD device, etc. 74 You can connect your camcorder to insert a cassette or a "Memory Stick Duo" for this operation (p. ...
...manuals supplied with S VIDEO (2), or the i.LINK cable (3). that does not have an output jack. • For DCR-HC46/HC96: Do not insert/eject the cassette while your camcorder beforehand. Be sure to a TV, VCR/DVD device, etc. or an i.LINK-compatible device using the supplied AC Adaptor...with the devices to be connected. • You cannot record pictures on the Handycam Station. DCR-HC36: To i.LINK jack DV To DV Interface (i.LINK) 3 : Signal flow TV or VCR/DVD device, etc. 74 You can connect your camcorder to insert a cassette or a "Memory Stick Duo" for this operation (p. ...

Operating Guide
Page 75
... cable with S VIDEO (optional) When connecting to the audio jack on your camcorder are transmitted digitally, producing high quality pictures and sound. Continued , 75 To i.LINK jack : Signal flow A For DCR-HC96: A/V connecting cable (supplied) The Handycam Station and your setup. DCR-HC46/HC96: A/V jack (DCR-HC96) 1 AUDIO/VIDEO jacks A/V (Yellow) (White) (Red) Dubbing/Editing To S VIDEO jack DV...
... cable with S VIDEO (optional) When connecting to the audio jack on your camcorder are transmitted digitally, producing high quality pictures and sound. Continued , 75 To i.LINK jack : Signal flow A For DCR-HC96: A/V connecting cable (supplied) The Handycam Station and your setup. DCR-HC46/HC96: A/V jack (DCR-HC96) 1 AUDIO/VIDEO jacks A/V (Yellow) (White) (Red) Dubbing/Editing To S VIDEO jack DV...

Operating Guide
Page 77
... play back the tape, then press PHOTO lightly at the point you want to stop recording, touch [REC STOP]t (Stop) t t . On your camcorder is recorded in [D. At the point you want to record. EFFECT] cannot be dubbed to a "Memory Stick Duo." 1 Slide the POWER switch repeatedly ...77 Dubbing/Editing • The date and time the picture is recorded on the Handycam Station. Check the image and press it fully. Make sure you want to record. This may cause a malfunction. • For DCR-HC96: The playback pictures edited using [DELAY MOTION] in 32kHz monaural. • For ...
... play back the tape, then press PHOTO lightly at the point you want to stop recording, touch [REC STOP]t (Stop) t t . On your camcorder is recorded in [D. At the point you want to record. EFFECT] cannot be dubbed to a "Memory Stick Duo." 1 Slide the POWER switch repeatedly ...77 Dubbing/Editing • The date and time the picture is recorded on the Handycam Station. Check the image and press it fully. Make sure you want to record. This may cause a malfunction. • For DCR-HC96: The playback pictures edited using [DELAY MOTION] in 32kHz monaural. • For ...
Operating Guide
Page 78
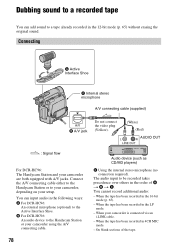
... A Active Interface Shoe C Internal stereo microphone A/V connecting cable (supplied) A/V B A/V jack Do not connect the video plug (Yellow). (White) (Red) AUDIO OUT : Signal flow For DCR-HC96: The Handycam Station and your camcorder is connected via an i.LINK cable. - When the tape has been recorded in the 16-bit mode (p. 65). - On blank sections of A t B t C. B For...
... A Active Interface Shoe C Internal stereo microphone A/V connecting cable (supplied) A/V B A/V jack Do not connect the video plug (Yellow). (White) (Red) AUDIO OUT : Signal flow For DCR-HC96: The Handycam Station and your camcorder is connected via an i.LINK cable. - When the tape has been recorded in the 16-bit mode (p. 65). - On blank sections of A t B t C. B For...

Operating Guide
Page 79
... A/V jack (DCR-HC96) or the internal stereo microphone, the picture will not be output from your camcorder. Continued , 79 After step 2 to SAVE (p. 123). - When the write-protect tab of the tape. 5 Touch (Stop) when you dub audio on a tape recorded on the Handycam Station. Check the ...picture on other device. To dub on the LCD screen or the viewfinder. • For DCR-HC46/HC96: Do not insert/eject the cassette while your camcorder to the end, and then tighten the screw. Dubbing/Editing...
... A/V jack (DCR-HC96) or the internal stereo microphone, the picture will not be output from your camcorder. Continued , 79 After step 2 to SAVE (p. 123). - When the write-protect tab of the tape. 5 Touch (Stop) when you dub audio on a tape recorded on the Handycam Station. Check the ...picture on other device. To dub on the LCD screen or the viewfinder. • For DCR-HC46/HC96: Do not insert/eject the cassette while your camcorder to the end, and then tighten the screw. Dubbing/Editing...
Operating Guide
Page 82
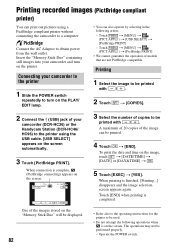
...] • We cannot guarantee the operation of your camcorder (DCR-HC36) or the Handycam Station (DCR-HC46/ HC96) to turn on the image, touch t [DATE/TIME] t [DATE] or [DAY&TIME] t . 5 Touch [EXEC] t [YES]. Operate the POWER switch. Insert the "Memory Stick Duo" containing still images into your camcorder to the printer 1 Slide the POWER switch repeatedly to...
...] • We cannot guarantee the operation of your camcorder (DCR-HC36) or the Handycam Station (DCR-HC46/ HC96) to turn on the image, touch t [DATE/TIME] t [DATE] or [DAY&TIME] t . 5 Touch [EXEC] t [YES]. Operate the POWER switch. Insert the "Memory Stick Duo" containing still images into your camcorder to the printer 1 Slide the POWER switch repeatedly to...
Operating Guide
Page 83
Disconnect the USB cable from the Handycam Station (DCR-HC46/HC96). - Remove the "Memory Stick Duo" from the beginning. • Some printer models may be cut off and on again and restart the operation from your camcorder. • If the printer stops working, disconnect ...printer's operating instructions for details. • We cannot guarantee the printing of images recorded with a device other than your camcorder (DCR-HC36) or the Handycam Station (DCR-HC46/HC96) or the printer. - Disconnect the power cord. - You can print still images without using a computer by the Camera...
Disconnect the USB cable from the Handycam Station (DCR-HC46/HC96). - Remove the "Memory Stick Duo" from the beginning. • Some printer models may be cut off and on again and restart the operation from your camcorder. • If the printer stops working, disconnect ...printer's operating instructions for details. • We cannot guarantee the printing of images recorded with a device other than your camcorder (DCR-HC36) or the Handycam Station (DCR-HC46/HC96) or the printer. - Disconnect the power cord. - You can print still images without using a computer by the Camera...
Operating Guide
Page 84
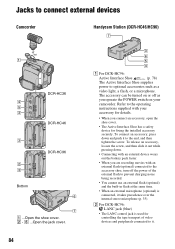
... with an external device wears out the battery pack faster. • When you are recording movies with your camcorder. Refer to the operating instructions supplied with an external flash (optional) connected to the accessory shoe, turn off... LANC control jack is connected, it . 84 Jacks to connect external devices Camcorder Handycam Station (DCR-HC46/HC96) 7 1 DCR-HC36 4 5 3 DCR-HC46 3 DCR-HC96 2 3 Bottom 6 7 1 ...Open the shoe cover. 2 - 6 ...Open the jack cover. 3 6 5 4 A For DCR-HC96: Active Interface Shoe (p. 78) The Active Interface Shoe supplies power to prevent...
... with an external device wears out the battery pack faster. • When you are recording movies with your camcorder. Refer to the operating instructions supplied with an external flash (optional) connected to the accessory shoe, turn off... LANC control jack is connected, it . 84 Jacks to connect external devices Camcorder Handycam Station (DCR-HC46/HC96) 7 1 DCR-HC36 4 5 3 DCR-HC46 3 DCR-HC96 2 3 Bottom 6 7 1 ...Open the shoe cover. 2 - 6 ...Open the jack cover. 3 6 5 4 A For DCR-HC96: Active Interface Shoe (p. 78) The Active Interface Shoe supplies power to prevent...


