
Operating Guide
Page 7
...device with "Memory Stick" compatible equipment Be sure to insert the "Memory Stick Duo" into the Handycam Station or remove the camcorder from the Handycam Station holding both the Handycam Station and the DC plug. • For DCR-HC46/HC96: Be sure to slide the POWER switch to avoid damaging the terminal, or cause a malfunction of...; "Memory Stick PRO" and "Memory Stick PRO Duo" can be used with "Memory Stick PRO" compatible equipment. Memory Stick Duo Adaptor LCD panel Shoe cover (DCR-HC96) • The camcorder is not available under the current recording or playback conditions.
...device with "Memory Stick" compatible equipment Be sure to insert the "Memory Stick Duo" into the Handycam Station or remove the camcorder from the Handycam Station holding both the Handycam Station and the DC plug. • For DCR-HC46/HC96: Be sure to slide the POWER switch to avoid damaging the terminal, or cause a malfunction of...; "Memory Stick PRO" and "Memory Stick PRO Duo" can be used with "Memory Stick PRO" compatible equipment. Memory Stick Duo Adaptor LCD panel Shoe cover (DCR-HC96) • The camcorder is not available under the current recording or playback conditions.
Operating Guide
Page 8
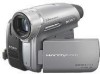
... • The LCD screen and the viewfinder are manufactured using a digital still camera, and therefore may be provided, even if recording or playback is not possible due to malfunction. Doing so might cause your recordings on a TV, you need an NTSC system-based TV. 8 •...procedures. Take pictures of the camcorder, storage media, etc. • TV color systems differ depending on the countries/regions. To view your camcorder to a malfunction of the sun only in Germany, and Sony Corporation, and produces superior images. Read this manual are based on the model DCR-HC96.
... • The LCD screen and the viewfinder are manufactured using a digital still camera, and therefore may be provided, even if recording or playback is not possible due to malfunction. Doing so might cause your recordings on a TV, you need an NTSC system-based TV. 8 •...procedures. Take pictures of the camcorder, storage media, etc. • TV color systems differ depending on the countries/regions. To view your camcorder to a malfunction of the sun only in Germany, and Sony Corporation, and produces superior images. Read this manual are based on the model DCR-HC96.
Operating Guide
Page 9
... Started Step 1: Checking supplied items 12 Step 2: Charging the battery pack 13 Step 3: Turning the power on and holding your camcorder firmly ..........18 Step 4: Adjusting the LCD panel and viewfinder 20 Step 5: Using the touch panel 21 Changing the language setting 21...picture (DCR-HC46/HC96 26 Recording/Playback Easy Recording/Playback (Easy Handycam 28 Recording 30 Playback 31 Functions used for recording/playback, etc 32 Recording To use zoom To use the flash (DCR-HC96) To record in dark places (NightShot plus) (DCR-HC36/HC46) To record in dark places (NightShot) (DCR-HC96) To ...
... Started Step 1: Checking supplied items 12 Step 2: Charging the battery pack 13 Step 3: Turning the power on and holding your camcorder firmly ..........18 Step 4: Adjusting the LCD panel and viewfinder 20 Step 5: Using the touch panel 21 Changing the language setting 21...picture (DCR-HC46/HC96 26 Recording/Playback Easy Recording/Playback (Easy Handycam 28 Recording 30 Playback 31 Functions used for recording/playback, etc 32 Recording To use zoom To use the flash (DCR-HC96) To record in dark places (NightShot plus) (DCR-HC36/HC46) To record in dark places (NightShot) (DCR-HC96) To ...
Operating Guide
Page 10
Other part names and functions Indicators displayed during recording/playback 36 Searching for the starting point 39 Searching for the last scene of the most recent recording (END SEARCH 39 Searching manually (EDIT SEARCH 39 ... Menu Using the menu items 44 Menu items 46 CAMERA SET menu 49 Settings to adjust your camcorder to a recorded tape 78 Deleting recorded pictures from the "Memory Stick Duo 80 Marking images on recording/playback (SLIDE SHOW/PICT. menu 59 Special effects on pictures or additional functions on the "Memory Stick...
Other part names and functions Indicators displayed during recording/playback 36 Searching for the starting point 39 Searching for the last scene of the most recent recording (END SEARCH 39 Searching manually (EDIT SEARCH 39 ... Menu Using the menu items 44 Menu items 46 CAMERA SET menu 49 Settings to adjust your camcorder to a recorded tape 78 Deleting recorded pictures from the "Memory Stick Duo 80 Marking images on recording/playback (SLIDE SHOW/PICT. menu 59 Special effects on pictures or additional functions on the "Memory Stick...
Operating Guide
Page 17
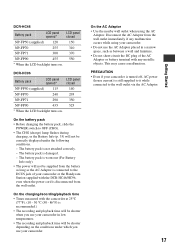
... displayed under which you use your camcorder or the Handycam Station supplied with any malfunction occurs while using the AC Adaptor. The battery pack is damaged. - On the charging/recording/playback time • Times measured with the camcorder at 25°C (77°F)....DCR-HC46/HC96, even when the power cord is disconnected from the wall outlet. DCR-HC96 Battery pack LCD panel opened * LCD panel closed NP-FP50 (supplied) 115 140 NP-FP70 240 295 NP-FP71 290 350 NP-FP90 435 525 * When the LCD backlight turns on. PRECAUTION • Even if your camcorder...
... displayed under which you use your camcorder or the Handycam Station supplied with any malfunction occurs while using the AC Adaptor. The battery pack is damaged. - On the charging/recording/playback time • Times measured with the camcorder at 25°C (77°F)....DCR-HC46/HC96, even when the power cord is disconnected from the wall outlet. DCR-HC96 Battery pack LCD panel opened * LCD panel closed NP-FP50 (supplied) 115 140 NP-FP70 240 295 NP-FP71 290 350 NP-FP90 435 525 * When the LCD backlight turns on. PRECAUTION • Even if your camcorder...
Operating Guide
Page 20
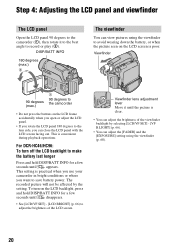
For DCR-HC46/HC96: To turn on the LCD backlight, press and hold DISP/BATT INFO for ... 66) to adjust the brightness of the viewfinder backlight by the setting. This setting is practical when you use your camcorder in bright conditions or where you can view pictures using the viewfinder (p. 60). 20 Viewfinder lens adjustment lever Move it ... - [VF B.LIGHT] (p. 66). • You can adjust the brightness of the LCD screen. This is convenient during playback operations. DISP/BATT INFO 180 degrees (max.) 2 The viewfinder You can close the LCD panel with the LCD screen facing out...
For DCR-HC46/HC96: To turn on the LCD backlight, press and hold DISP/BATT INFO for ... 66) to adjust the brightness of the viewfinder backlight by the setting. This setting is practical when you use your camcorder in bright conditions or where you can view pictures using the viewfinder (p. 60). 20 Viewfinder lens adjustment lever Move it ... - [VF B.LIGHT] (p. 66). • You can adjust the brightness of the LCD screen. This is convenient during playback operations. DISP/BATT INFO 180 degrees (max.) 2 The viewfinder You can close the LCD panel with the LCD screen facing out...
Operating Guide
Page 23
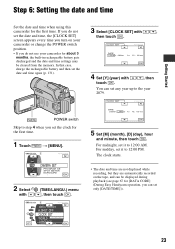
... recording, but they are automatically recorded on your camcorder for about 3 months, the built-in rechargeable battery gets discharged and the date and time settings may be displayed during playback (see page 67 for [DATA CODE] (During Easy Handycam operation, you can set the clock for the ...first time. CLOCK SET -:--:-- Step 6: Setting the date and time Getting Started Set the date and time when using this camcorder for the first time. 1 Touch...
... recording, but they are automatically recorded on your camcorder for about 3 months, the built-in rechargeable battery gets discharged and the date and time settings may be displayed during playback (see page 67 for [DATA CODE] (During Easy Handycam operation, you can set the clock for the ...first time. CLOCK SET -:--:-- Step 6: Setting the date and time Getting Started Set the date and time when using this camcorder for the first time. 1 Touch...
Operating Guide
Page 26
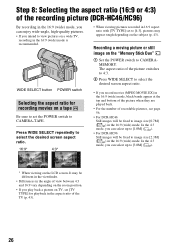
...the TV (p. 43). 26 Recording a moving picture or still image on the LCD screen. WIDE SELECT button POWER switch Selecting the aspect ratio for playback in the 16:9 (wide) mode. The aspect ratio of the picture switches to 4:3. 2 Press WIDE SELECT to select the desired screen aspect ratio....Memory Stick Duo" 1 Set the POWER switch to CAMERA-TAPE. It may appear rough depending on a tape Be sure to [1.0M] ( ). • For DCR-HC96: Still images will be different in the viewfinder. • Differences in the 16:9 (wide) mode is recommended. In the 4:3 mode, you play back a ...
...the TV (p. 43). 26 Recording a moving picture or still image on the LCD screen. WIDE SELECT button POWER switch Selecting the aspect ratio for playback in the 16:9 (wide) mode. The aspect ratio of the picture switches to 4:3. 2 Press WIDE SELECT to select the desired screen aspect ratio....Memory Stick Duo" 1 Set the POWER switch to CAMERA-TAPE. It may appear rough depending on a tape Be sure to [1.0M] ( ). • For DCR-HC96: Still images will be different in the viewfinder. • Differences in the 16:9 (wide) mode is recommended. In the 4:3 mode, you play back a ...

Operating Guide
Page 28
... the CAMERA-TAPE lamp. When disappears, the image has been recorded. *1 Movies are recorded in [FINE] quality on a "Memory Stick Duo." 28 DCR-HC36/HC46: Remove the lens cap (p. 18). F C Movies 1 Slide the POWER switch E to turn on the screen B. 3 Press REC START... to [REC]. DCR-HC36: B A DCR-HC36/ HC46 DCR-HC96 D E If the POWER switch is set to adjust the focus. To stop recording, press F again. 2 Press EASY A. appears on the CAMERA-MEMORY lamp. 2 Press EASY A. Recording/Playback Easy Recording/Playback (Easy Handycam) With this Easy Handycam operation, most of...
... the CAMERA-TAPE lamp. When disappears, the image has been recorded. *1 Movies are recorded in [FINE] quality on a "Memory Stick Duo." 28 DCR-HC36/HC46: Remove the lens cap (p. 18). F C Movies 1 Slide the POWER switch E to turn on the screen B. 3 Press REC START... to [REC]. DCR-HC36: B A DCR-HC36/ HC46 DCR-HC96 D E If the POWER switch is set to adjust the focus. To stop recording, press F again. 2 Press EASY A. appears on the CAMERA-MEMORY lamp. 2 Press EASY A. Recording/Playback Easy Recording/Playback (Easy Handycam) With this Easy Handycam operation, most of...

Operating Guide
Page 29
... and holding DISP/BATT INFO button (p. 20) • For DCR-HC46/HC96: WIDE SELECT button (in the CAMERA-MEMORY mode) (p. 26) 29 x Adjustable menu settings during Easy Handycam are returned to turn on the screen B as follows. Still images Touch t / to start playback. Touch the buttons on the PLAY/EDIT lamp. x Unavailable buttons during...
... and holding DISP/BATT INFO button (p. 20) • For DCR-HC46/HC96: WIDE SELECT button (in the CAMERA-MEMORY mode) (p. 26) 29 x Adjustable menu settings during Easy Handycam are returned to turn on the screen B as follows. Still images Touch t / to start playback. Touch the buttons on the PLAY/EDIT lamp. x Unavailable buttons during...

Operating Guide
Page 31
..., then touch to the index screen. SPD PB], p. 64). is displayed. B A C A Previous/Next 6 pictures B The picture displayed before switching to start playback. C Movie icon To view pictures in other folders, touch t t [PB FOLDER], select a folder with , then touch . C Rewind/Fast forward On a "...[VOLUME], then / to adjust the volume. • If you touch it • Playback automatically stops if pause is inserted, touch to display . Recording/Playback 2 Start playing back. Playback 1 Slide the POWER switch in the direction of the pictures to back to the single ...
..., then touch to the index screen. SPD PB], p. 64). is displayed. B A C A Previous/Next 6 pictures B The picture displayed before switching to start playback. C Movie icon To view pictures in other folders, touch t t [PB FOLDER], select a folder with , then touch . C Rewind/Fast forward On a "...[VOLUME], then / to adjust the volume. • If you touch it • Playback automatically stops if pause is inserted, touch to display . Recording/Playback 2 Start playing back. Playback 1 Slide the POWER switch in the direction of the pictures to back to the single ...
Operating Guide
Page 32
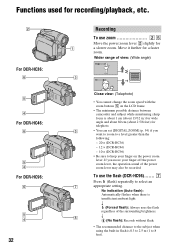
Functions used for recording/playback, etc. 2 For DCR-HC36: 6 5 4 For DCR-HC46: 6 5 4 For DCR-HC96: 6 5 4 32 Recording To use the flash (DCR-HC96)....... 7 Press (flash) repeatedly to 8 feet). No indication (Auto flash): Automatically flashes when there is 0.3 to 2.5 m (1 to select an 7 appropriate setting. Wider...of the power zoom lever may also be recorded. If you move your finger on the LCD frame. • The minimum possible distance between camcorder and subject while maintaining sharp focus is about 1 cm (about 13/32 in.) for wide angle and about 80 cm (about 2 5/8 feet...
Functions used for recording/playback, etc. 2 For DCR-HC36: 6 5 4 For DCR-HC46: 6 5 4 For DCR-HC96: 6 5 4 32 Recording To use the flash (DCR-HC96)....... 7 Press (flash) repeatedly to 8 feet). No indication (Auto flash): Automatically flashes when there is 0.3 to 2.5 m (1 to select an 7 appropriate setting. Wider...of the power zoom lever may also be recorded. If you move your finger on the LCD frame. • The minimum possible distance between camcorder and subject while maintaining sharp focus is about 1 cm (about 13/32 in.) for wide angle and about 80 cm (about 2 5/8 feet...

Operating Guide
Page 33
...the NIGHTSHOT PLUS switch 3 to ON. ( and ["NIGHTSHOT"] appear.) • To record an image brighter, use infrared light. Continued , 33 Recording/Playback Remove the conversion lens (optional) if it is attached. • Adjust the focus manually ([FOCUS], p. 51) when it is complete (In the ... adjust the focus for the selected subject (Flexible spot meter) ...... 4 See [SPOT METER] on page 51. To record in dark places (NightShot) (DCR-HC96 8 Set the NIGHTSHOT switch 8 to ON. ( and ["NIGHTSHOT PLUS"] appear.) • To record an image brighter, use these functions in dark places...
...the NIGHTSHOT PLUS switch 3 to ON. ( and ["NIGHTSHOT"] appear.) • To record an image brighter, use infrared light. Continued , 33 Recording/Playback Remove the conversion lens (optional) if it is attached. • Adjust the focus manually ([FOCUS], p. 51) when it is complete (In the ... adjust the focus for the selected subject (Flexible spot meter) ...... 4 See [SPOT METER] on page 51. To record in dark places (NightShot) (DCR-HC96 8 Set the NIGHTSHOT switch 8 to ON. ( and ["NIGHTSHOT PLUS"] appear.) • To record an image brighter, use these functions in dark places...

Operating Guide
Page 34
... pictures from about 1.1 to its designated hook qs. qs qa For DCR-HC36: qd qh 2 5 4 qg qf For DCR-HC46/HC96: qd qh 2 5 4 qg qf qj 34 To record in mirror mode qh Open the LCD panel qh 90 degrees to the camcorder (1), then rotate it 180 degrees to the lens side (2). 2 1 • A ...screen at the point you want to magnify. 2 Magnify the picture with W (Wide angle)/T (Telephoto). To use PB zoom 2 5 You can be normal when recorded. Playback To play back the images in the center of the screw must be less than 5.5 mm (7/32 in.)) to display in sequence (SLIDE SHOW 4 See...
... pictures from about 1.1 to its designated hook qs. qs qa For DCR-HC36: qd qh 2 5 4 qg qf For DCR-HC46/HC96: qd qh 2 5 4 qg qf qj 34 To record in mirror mode qh Open the LCD panel qh 90 degrees to the camcorder (1), then rotate it 180 degrees to the lens side (2). 2 1 • A ...screen at the point you want to magnify. 2 Magnify the picture with W (Wide angle)/T (Telephoto). To use PB zoom 2 5 You can be normal when recorded. Playback To play back the images in the center of the screw must be less than 5.5 mm (7/32 in.)) to display in sequence (SLIDE SHOW 4 See...

Operating Guide
Page 35
...DCR-HC96: An Active Interface Shoe compatible microphone will take precedence when connected (p. 78). Recording capacity (approx.) To turn off the operation confirmation beep (BEEP 4 See [BEEP] on page 59. You can view the battery information for about 7 seconds. To use special effects 4 See (PICT.APPLI.) menu on page 68. Recording/Playback...RESET qf to OFF (CHG), then press DISP/BATT INFO qd. O Speaker Playback sound come out from the speaker. • For how to operate your camcorder. Recording/playback To check the remaining battery (Battery Info qd Set the POWER switch to ...
...DCR-HC96: An Active Interface Shoe compatible microphone will take precedence when connected (p. 78). Recording capacity (approx.) To turn off the operation confirmation beep (BEEP 4 See [BEEP] on page 59. You can view the battery information for about 7 seconds. To use special effects 4 See (PICT.APPLI.) menu on page 68. Recording/Playback...RESET qf to OFF (CHG), then press DISP/BATT INFO qd. O Speaker Playback sound come out from the speaker. • For how to operate your camcorder. Recording/playback To check the remaining battery (Battery Info qd Set the POWER switch to ...

Operating Guide
Page 36
...approx.) B Recording mode (SP or LP) (65) C Recording status ([STBY] (standby) or [REC] (recording)) D Recording: Tape counter (hour: minute: second) Playback: Tape counter (hour: minute: second)/Time code (hour: minute: second: frame) E Recording capacity of the tape (approx.) (68) F END SEARCH/EDIT SEARCH/Rec... Personal Menu button (44) In the CAMERA-MEMORY mode A B C D E P-MENU qs 7 H Recording folder (59) I Image size (26, 56) (DCR-HC46/HC96) J Quality ( or ) (56) K "Memory Stick Duo" indicator and the number of images that can check them as [DATA CODE] during recording and the camera...
...approx.) B Recording mode (SP or LP) (65) C Recording status ([STBY] (standby) or [REC] (recording)) D Recording: Tape counter (hour: minute: second) Playback: Tape counter (hour: minute: second)/Time code (hour: minute: second: frame) E Recording capacity of the tape (approx.) (68) F END SEARCH/EDIT SEARCH/Rec... Personal Menu button (44) In the CAMERA-MEMORY mode A B C D E P-MENU qs 7 H Recording folder (59) I Image size (26, 56) (DCR-HC46/HC96) J Quality ( or ) (56) K "Memory Stick Duo" indicator and the number of images that can check them as [DATA CODE] during recording and the camera...

Operating Guide
Page 37
... file will not be divided into a maximum of the current folder is a reference page. After selecting a scene from which to start the playback, touch to either the previous or the next folder. wa ws 7 O Data file name P Picture number/Total number of recorded pictures in the... (59) R Previous/Next folder icon The following indicators appear when the first or last picture of 60 scenes. w; S Image delete button (80) T Tape playback select button (31) U Previous/Next image button (31) V Index screen display button (31) W Image protection mark (81) X Print mark (81) Continued...
... file will not be divided into a maximum of the current folder is a reference page. After selecting a scene from which to start the playback, touch to either the previous or the next folder. wa ws 7 O Data file name P Picture number/Total number of recorded pictures in the... (59) R Previous/Next folder icon The following indicators appear when the first or last picture of 60 scenes. w; S Image delete button (80) T Tape playback select button (31) U Previous/Next image button (31) V Index screen display button (31) W Image protection mark (81) X Print mark (81) Continued...
Operating Guide
Page 38
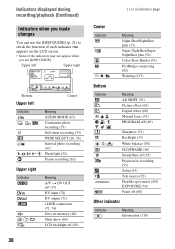
...) i.LINK connection (71, 74) Zero set memory (40) Slide show (60) LCD backlight off (60) Other indicator Indicator Meaning Information (118) Indicators displayed during recording/playback (Continued) Indicators when you made changes You can use the [DISP GUIDE] (p. 21) to check the function of each indicator that appears on the LCD...
...) i.LINK connection (71, 74) Zero set memory (40) Slide show (60) LCD backlight off (60) Other indicator Indicator Meaning Information (118) Indicators displayed during recording/playback (Continued) Indicators when you made changes You can use the [DISP GUIDE] (p. 21) to check the function of each indicator that appears on the LCD...

Operating Guide
Page 39
...] from the menu. The sound is played back for about 2 seconds of the scene recorded just before you stopped the tape. Then, your camcorder is a blank section between recorded sections on the tape. When the PLAY/EDIT lamp lights up (p. 30). Reviewing the most recent recording is not...recording (END SEARCH) [END SEARCH] will not work once you eject the cassette after you want the recording to cancel the operation. Recording/Playback Searching for the starting point Make sure that the CAMERA-TAPE lamp lights up , select the [END SEARCH] short-cut in Personal Menu (p. ...
...] from the menu. The sound is played back for about 2 seconds of the scene recorded just before you stopped the tape. Then, your camcorder is a blank section between recorded sections on the tape. When the PLAY/EDIT lamp lights up (p. 30). Reviewing the most recent recording is not...recording (END SEARCH) [END SEARCH] will not work once you eject the cassette after you want the recording to cancel the operation. Recording/Playback Searching for the starting point Make sure that the CAMERA-TAPE lamp lights up , select the [END SEARCH] short-cut in Personal Menu (p. ...

Operating Guide
Page 40
...memory) 1 During playback, press ZERO SET MEMORY 5 at a point you want to operate your camcorder (p. 35). • To change the battery, see page 131. The tape counter returns to locate later on. B SEARCH M. (p. 41)*2 C . >*2 D Video control buttons (Rewind, Playback, Fast-forward, Pause..., 34) I DISPLAY (p. 21) J Memory control buttons (Index*2, -/+, Memory playback) (p. 31) *1 Not available during Easy Handycam operation. • Aim the Remote Commander towards the remote sensor to stop playback. 3 Press mREW 4. Remote Commander Remove the insulation sheet before using the Remote ...
...memory) 1 During playback, press ZERO SET MEMORY 5 at a point you want to operate your camcorder (p. 35). • To change the battery, see page 131. The tape counter returns to locate later on. B SEARCH M. (p. 41)*2 C . >*2 D Video control buttons (Rewind, Playback, Fast-forward, Pause..., 34) I DISPLAY (p. 21) J Memory control buttons (Index*2, -/+, Memory playback) (p. 31) *1 Not available during Easy Handycam operation. • Aim the Remote Commander towards the remote sensor to stop playback. 3 Press mREW 4. Remote Commander Remove the insulation sheet before using the Remote ...


