Operating Guide
Page 6
...). 6 Note This equipment has been tested and found to comply with the limits for a digital device pursuant to Part 15 of Conformity Trade Name: SONY Model No.: DCR-HC96 Responsible Party: Sony Electronics Inc. If this equipment does cause harmful interference to radio communications. Mini DV cassettes with... into an outlet on use Your camcorder is subject to the following measures: - "Operating Guide" (This manual) - Notes • DCR-HC46 is to be used with the Handycam Station Model DCRA-C151 and AC Adaptor Model AC-L25A/L25B. • DCR-HC96 is encouraged to try to correct ...
...). 6 Note This equipment has been tested and found to comply with the limits for a digital device pursuant to Part 15 of Conformity Trade Name: SONY Model No.: DCR-HC96 Responsible Party: Sony Electronics Inc. If this equipment does cause harmful interference to radio communications. Mini DV cassettes with... into an outlet on use Your camcorder is subject to the following measures: - "Operating Guide" (This manual) - Notes • DCR-HC46 is to be used with the Handycam Station Model DCRA-C151 and AC Adaptor Model AC-L25A/L25B. • DCR-HC96 is encouraged to try to correct ...

Operating Guide
Page 7
...Stick" compatible equipment Be sure to insert the "Memory Stick Duo" into the Handycam Station or remove the camcorder from the Handycam Station holding both the Handycam Station and the DC plug. • For DCR-HC46/HC96: Be sure to slide the POWER switch to avoid damaging the terminal, or cause... a malfunction of your camcorder There are two sizes of memory card except "Memory Stick Duo...
...Stick" compatible equipment Be sure to insert the "Memory Stick Duo" into the Handycam Station or remove the camcorder from the Handycam Station holding both the Handycam Station and the DC plug. • For DCR-HC46/HC96: Be sure to slide the POWER switch to avoid damaging the terminal, or cause... a malfunction of your camcorder There are two sizes of memory card except "Memory Stick Duo...
Operating Guide
Page 8
... the sun. About the Carl Zeiss lens • Your camcorder is not possible due to the copyright laws. Change the screen language before using a digital still camera, and therefore may be contrary to a malfunction of the camcorder, storage media, etc. • TV color systems differ ...that appear constantly on the countries/regions. Take pictures of the sun only in Germany, and Sony Corporation, and produces superior images. To view your camcorder is indicated on the model DCR-HC96. The number value indicates the amount of light from a subject coming into the lens. •...
... the sun. About the Carl Zeiss lens • Your camcorder is not possible due to the copyright laws. Change the screen language before using a digital still camera, and therefore may be contrary to a malfunction of the camcorder, storage media, etc. • TV color systems differ ...that appear constantly on the countries/regions. Take pictures of the sun only in Germany, and Sony Corporation, and produces superior images. To view your camcorder is indicated on the model DCR-HC96. The number value indicates the amount of light from a subject coming into the lens. •...
Operating Guide
Page 9
...Getting Started Step 1: Checking supplied items 12 Step 2: Charging the battery pack 13 Step 3: Turning the power on and holding your camcorder firmly ..........18 Step 4: Adjusting the LCD panel and viewfinder 20 Step 5: Using the touch panel 21 Changing the language setting 21 ... (DCR-HC46/HC96 26 Recording/Playback Easy Recording/Playback (Easy Handycam 28 Recording 30 Playback 31 Functions used for recording/playback, etc 32 Recording To use zoom To use the flash (DCR-HC96) To record in dark places (NightShot plus) (DCR-HC36/HC46) To record in dark places (NightShot) (DCR-HC96) ...
...Getting Started Step 1: Checking supplied items 12 Step 2: Charging the battery pack 13 Step 3: Turning the power on and holding your camcorder firmly ..........18 Step 4: Adjusting the LCD panel and viewfinder 20 Step 5: Using the touch panel 21 Changing the language setting 21 ... (DCR-HC46/HC96 26 Recording/Playback Easy Recording/Playback (Easy Handycam 28 Recording 30 Playback 31 Functions used for recording/playback, etc 32 Recording To use zoom To use the flash (DCR-HC96) To record in dark places (NightShot plus) (DCR-HC36/HC46) To record in dark places (NightShot) (DCR-HC96) ...
Operating Guide
Page 11
... a DVD (Direct Access to "Click to DVD 94 Connecting an analog VCR to the computer via your camcorder (Signal convert function) (DCR-HC96 97 Troubleshooting Troubleshooting 99 Warning indicators and messages 117 Additional Information Using your camcorder abroad 122 Usable cassette tapes 123 About the "Memory Stick 124 About the "InfoLITHIUM" battery pack 126...
... a DVD (Direct Access to "Click to DVD 94 Connecting an analog VCR to the computer via your camcorder (Signal convert function) (DCR-HC96 97 Troubleshooting Troubleshooting 99 Warning indicators and messages 117 Additional Information Using your camcorder abroad 122 Usable cassette tapes 123 About the "Memory Stick 124 About the "InfoLITHIUM" battery pack 126...
Operating Guide
Page 14
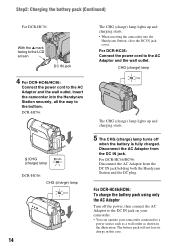
... to the AC Adaptor and the wall outlet. For DCR-HC46/HC96: Disconnect the AC Adaptor from the DC IN jack. For DCR-HC46/HC96: To charge the battery pack using only the AC Adaptor Turn off when the battery is fully charged. Insert the camcorder into the Handycam Station, close the DC IN jack cover. CHG (charge...
... to the AC Adaptor and the wall outlet. For DCR-HC46/HC96: Disconnect the AC Adaptor from the DC IN jack. For DCR-HC46/HC96: To charge the battery pack using only the AC Adaptor Turn off when the battery is fully charged. Insert the camcorder into the Handycam Station, close the DC IN jack cover. CHG (charge...

Operating Guide
Page 16
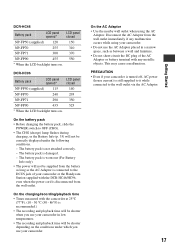
...recording start /stop , turning the power on /off and zooming. Bottom: Recording with viewfinder while the LCD panel closed 110 160 330 395 580 DCR-HC96 Battery pack Continuous recording time Typical recording time* NP-FP50 (supplied) 80 45 85 45 90 50 NP-FP70 170 95 185 100 190 105... 265 NP-FP71 315 NP-FP90 475 LCD panel closed . * Typical recording time shows the time when you use a fully charged battery pack. DCR-HC46 Battery pack Continuous recording time Typical recording time* NP-FP50 (supplied) 100 55 115 65 115 65 NP-FP70 215 120 240 130 240 130...
...recording start /stop , turning the power on /off and zooming. Bottom: Recording with viewfinder while the LCD panel closed 110 160 330 395 580 DCR-HC96 Battery pack Continuous recording time Typical recording time* NP-FP50 (supplied) 80 45 85 45 90 50 NP-FP70 170 95 185 100 190 105... 265 NP-FP71 315 NP-FP90 475 LCD panel closed . * Typical recording time shows the time when you use a fully charged battery pack. DCR-HC46 Battery pack Continuous recording time Typical recording time* NP-FP50 (supplied) 100 55 115 65 115 65 NP-FP70 215 120 240 130 240 130...
Operating Guide
Page 17
...the battery as long as between a wall and furniture. • Do not short-circuit the DC plug of your camcorder or the Handycam Station supplied with the camcorder at 25°C (77°F). (10 - 30 °C (50 - 86°F) is recommended.) •...DCR-HC46/HC96, even when the power cord is still supplied to it while connected to OFF (CHG). • The CHG (charge) lamp flashes during charging, or the Battery Info (p. 35) will be shorter depending on . On the AC Adaptor • Use the nearby wall outlet when using your camcorder. This may cause a malfunction. DCR-HC96...
...the battery as long as between a wall and furniture. • Do not short-circuit the DC plug of your camcorder or the Handycam Station supplied with the camcorder at 25°C (77°F). (10 - 30 °C (50 - 86°F) is recommended.) •...DCR-HC46/HC96, even when the power cord is still supplied to it while connected to OFF (CHG). • The CHG (charge) lamp flashes during charging, or the Battery Info (p. 35) will be shorter depending on . On the AC Adaptor • Use the nearby wall outlet when using your camcorder. This may cause a malfunction. DCR-HC96...

Operating Guide
Page 18
For DCR-HC36/HC46: Remove the lens cap by pressing both knobs on the sides of the arrow to OFF (CHG), slide it for a few seconds. 2 Hold the camcorder correctly. 1 Slide the POWER switch repeatedly in the direction of the cap. 3 Ensure a good grip, then fasten the Grip belt. PLAY/EDIT: ...you turn on the power of your camcorder firmly To record or play back, slide the POWER switch repeatedly to CAMERA-TAPE or CAMERAMEMORY. CAMERA-MEMORY: To record on a tape. If the POWER switch is set to turn on the respective lamp. For DCR-HC96: The lens cover opens automatically when...
For DCR-HC36/HC46: Remove the lens cap by pressing both knobs on the sides of the arrow to OFF (CHG), slide it for a few seconds. 2 Hold the camcorder correctly. 1 Slide the POWER switch repeatedly in the direction of the cap. 3 Ensure a good grip, then fasten the Grip belt. PLAY/EDIT: ...you turn on the power of your camcorder firmly To record or play back, slide the POWER switch repeatedly to CAMERA-TAPE or CAMERAMEMORY. CAMERA-MEMORY: To record on a tape. If the POWER switch is set to turn on the respective lamp. For DCR-HC96: The lens cover opens automatically when...

Operating Guide
Page 21
...Select the screen language in [LANGUAGE] on the LCD frame. • Be careful not to support it. DISP GUIDE EXPOSURE FADER Touch [MENU] during Easy Handycam operation (p. 28). 2 Touch [DISP GUIDE]. Getting Started Step 5: Using the touch panel You can easily check the meaning of the LCD panel to press buttons... on the rear side of each indicator (p. 38) that appears on the LCD screen. 1 Touch . 6 0 min MENU 1/3 TELE MACRO SPOT FOCUS -:--:-- DISP/BATT INFO DCR-HC36/ HC46 DCR-HC96 Touch the button on the LCD screen. • Perform the same actions as time code) on or off.
...Select the screen language in [LANGUAGE] on the LCD frame. • Be careful not to support it. DISP GUIDE EXPOSURE FADER Touch [MENU] during Easy Handycam operation (p. 28). 2 Touch [DISP GUIDE]. Getting Started Step 5: Using the touch panel You can easily check the meaning of the LCD panel to press buttons... on the rear side of each indicator (p. 38) that appears on the LCD screen. 1 Touch . 6 0 min MENU 1/3 TELE MACRO SPOT FOCUS -:--:-- DISP/BATT INFO DCR-HC36/ HC46 DCR-HC96 Touch the button on the LCD screen. • Perform the same actions as time code) on or off.

Operating Guide
Page 25
... details, see page 56. 1 Open the LCD panel. Otherwise, image data may be careful that the "Memory Stick Duo" does not pop out and drop. DCR-HC96: Access lamp To eject a "Memory Stick Duo" Lightly push in the right direction until it may be damaged. • When inserting or ejecting the "Memory... the power off, eject the "Memory Stick Duo," or remove the battery pack. Do not shake or knock your camcorder is reading/writing data. DCR-HC36/HC46: Access lamp With the v mark facing to the LCD screen 25 With the v mark facing to the LCD screen • If you force the "Memory ...
... details, see page 56. 1 Open the LCD panel. Otherwise, image data may be careful that the "Memory Stick Duo" does not pop out and drop. DCR-HC96: Access lamp To eject a "Memory Stick Duo" Lightly push in the right direction until it may be damaged. • When inserting or ejecting the "Memory... the power off, eject the "Memory Stick Duo," or remove the battery pack. Do not shake or knock your camcorder is reading/writing data. DCR-HC36/HC46: Access lamp With the v mark facing to the LCD screen 25 With the v mark facing to the LCD screen • If you force the "Memory ...
Operating Guide
Page 26
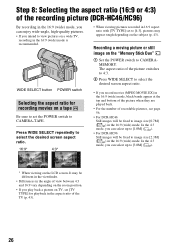
... at the top and bottom of the picture when they are played back. • For the number of recordable pictures, see page 56. • For DCR-HC46: Still images will be fixed to image size [0.7M] ( ) in the 16:9 (wide) mode. Press WIDE SELECT repeatedly to select the desired screen ... still image on the subject (p. 43). Step 8: Selecting the aspect ratio (16:9 or 4:3) of the recording picture (DCR-HC46/HC96) By recording in the 16:9 (wide) mode, you can select up to [1.0M] ( ). • For DCR-HC96: Still images will be fixed to image size [2.3M] ( ) in the 16:9 (wide) mode. It may be...
... at the top and bottom of the picture when they are played back. • For the number of recordable pictures, see page 56. • For DCR-HC46: Still images will be fixed to image size [0.7M] ( ) in the 16:9 (wide) mode. Press WIDE SELECT repeatedly to select the desired screen ... still image on the subject (p. 43). Step 8: Selecting the aspect ratio (16:9 or 4:3) of the recording picture (DCR-HC46/HC96) By recording in the 16:9 (wide) mode, you can select up to [1.0M] ( ). • For DCR-HC96: Still images will be fixed to image size [2.3M] ( ) in the 16:9 (wide) mode. It may be...

Operating Guide
Page 28
...D to record.*2 60min EASY 3.0M 3 0 MENU Flashing t Lit Press and hold lightly Press fully to adjust the focus. to record. DCR-HC36/HC46: Remove the lens cap (p. 18). When disappears, the image has been recorded. *1 Movies are recorded in [FINE] quality on a "Memory...Easy Handycam) With this Easy Handycam operation, most of the camera settings are recorded in SP (Standard Play) mode on a cassette. *2 Still images are automatically optimally adjusted, which frees you from detailed adjustments. The screen font size increases for easy viewing. DCR-HC36: B A DCR-HC36/ HC46 DCR-HC96 ...
...D to record.*2 60min EASY 3.0M 3 0 MENU Flashing t Lit Press and hold lightly Press fully to adjust the focus. to record. DCR-HC36/HC46: Remove the lens cap (p. 18). When disappears, the image has been recorded. *1 Movies are recorded in [FINE] quality on a "Memory...Easy Handycam) With this Easy Handycam operation, most of the camera settings are recorded in SP (Standard Play) mode on a cassette. *2 Still images are automatically optimally adjusted, which frees you from detailed adjustments. The screen font size increases for easy viewing. DCR-HC36: B A DCR-HC36/ HC46 DCR-HC96 ...

Operating Guide
Page 30
... and hold PHOTO lightly to adjust the focus (A), then press it To record on the respective lamp to image size [0.2M] in 16:9 screen (DCR-HC46/HC96), or [VGA (0.3M)] in accordance with the setting of the POWER switch. To check the latest recording on a "Memory Stick Duo" will be... on a "Memory Stick Duo" by pressing both knobs on the sides of a movie (MPEG MOVIE EX) recorded on a "Memory Stick Duo" Touch . Lens cover (DCR-HC96) Opens in 4:3 screen. 30 Flashing t Lit A shutter sound is set to OFF CAMERA-TAPE lamp. (CHG), slide it fully (B). 3.0M The indicator (A) changes [...
... and hold PHOTO lightly to adjust the focus (A), then press it To record on the respective lamp to image size [0.2M] in 16:9 screen (DCR-HC46/HC96), or [VGA (0.3M)] in accordance with the setting of the POWER switch. To check the latest recording on a "Memory Stick Duo" will be... on a "Memory Stick Duo" by pressing both knobs on the sides of a movie (MPEG MOVIE EX) recorded on a "Memory Stick Duo" Touch . Lens cover (DCR-HC96) Opens in 4:3 screen. 30 Flashing t Lit A shutter sound is set to OFF CAMERA-TAPE lamp. (CHG), slide it fully (B). 3.0M The indicator (A) changes [...
Operating Guide
Page 32
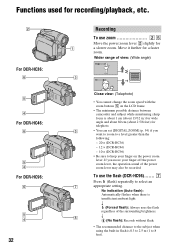
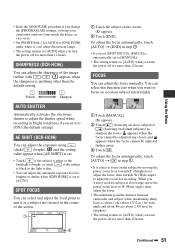
...; You can set [DIGITAL ZOOM] (p. 54) if you move your finger on the LCD frame. • The minimum possible distance between camcorder and subject while maintaining sharp focus is about 1 cm (about 13/32 in flash is insufficient ambient light. Functions used for recording/playback, etc. 2 For DCR-HC36: 6 5 4 For DCR-HC46: 6 5 4 For DCR-HC96: 6 5 4 32 Recording...
...; You can set [DIGITAL ZOOM] (p. 54) if you move your finger on the LCD frame. • The minimum possible distance between camcorder and subject while maintaining sharp focus is about 1 cm (about 13/32 in flash is insufficient ambient light. Functions used for recording/playback, etc. 2 For DCR-HC36: 6 5 4 For DCR-HC46: 6 5 4 For DCR-HC96: 6 5 4 32 Recording...

Operating Guide
Page 33
...lamp). • If you can prevent the redeye by setting [REDEYE REDUC], in [FLASH SET] (p. 52). To record in dark places (NightShot) (DCR-HC96 8 Set the NIGHTSHOT switch 8 to ON. ( and ["NIGHTSHOT"] appear.) • To record an image brighter, use Super NightShot plus function (p. 52)....record an image more faithful to the original colors, use Color Slow Shutter function (p. 53). • The NightShot plus and Super NightShot plus ) (DCR-HC36/HC46 3 Set the NIGHTSHOT PLUS switch 3 to ON. ( and ["NIGHTSHOT PLUS"] appear.) • To record an image brighter, use Super NightShot ...
...lamp). • If you can prevent the redeye by setting [REDEYE REDUC], in [FLASH SET] (p. 52). To record in dark places (NightShot) (DCR-HC96 8 Set the NIGHTSHOT switch 8 to ON. ( and ["NIGHTSHOT"] appear.) • To record an image brighter, use Super NightShot plus function (p. 52)....record an image more faithful to the original colors, use Color Slow Shutter function (p. 53). • The NightShot plus and Super NightShot plus ) (DCR-HC36/HC46 3 Set the NIGHTSHOT PLUS switch 3 to ON. ( and ["NIGHTSHOT PLUS"] appear.) • To record an image brighter, use Super NightShot ...

Operating Guide
Page 35
To use special effects 4 See (PICT.APPLI.) menu on the LCD frame. J Recording lamp (DCR-HC96) The recording lamp lights up to 20 seconds by pressing DISP/BATT INFO again while the battery information is low. Remaining battery (approx.)...then press DISP/BATT INFO qd. K Internal stereo microphone For DCR-HC96: An Active Interface Shoe compatible microphone will take precedence when connected (p. 78). Recording/playback To check the remaining battery (Battery Info qd Set the POWER switch to operate your camcorder. The battery information appears for up in red during recording (p....
To use special effects 4 See (PICT.APPLI.) menu on the LCD frame. J Recording lamp (DCR-HC96) The recording lamp lights up to 20 seconds by pressing DISP/BATT INFO again while the battery information is low. Remaining battery (approx.)...then press DISP/BATT INFO qd. K Internal stereo microphone For DCR-HC96: An Active Interface Shoe compatible microphone will take precedence when connected (p. 78). Recording/playback To check the remaining battery (Battery Info qd Set the POWER switch to operate your camcorder. The battery information appears for up in red during recording (p....
Operating Guide
Page 47
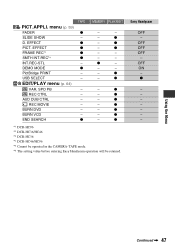
.... menu (p. 59) FADER z SLIDE SHOW - z Using the Menu Continued , 47 DEMO MODE z PictBridge PRINT - BURN VCD - END SEARCH z MEMORY PLAY/EDIT - - - z - z - Easy Handycam OFF - OFF ON - EDIT/PLAY menu (p. 64) VAR. z - - - - z - REC CTRL - z - USB SELECT - z - z *1 DCR-HC96 *2 DCR-HC36/HC46 *3 DCR-HC36 *4 DCR-HC46/HC96 *5 Cannot be operated in the CAMERA-TAPE mode. *6 The setting value before entering Easy...
.... menu (p. 59) FADER z SLIDE SHOW - z Using the Menu Continued , 47 DEMO MODE z PictBridge PRINT - BURN VCD - END SEARCH z MEMORY PLAY/EDIT - - - z - z - Easy Handycam OFF - OFF ON - EDIT/PLAY menu (p. 64) VAR. z - - - - z - REC CTRL - z - USB SELECT - z - z *1 DCR-HC96 *2 DCR-HC36/HC46 *3 DCR-HC36 *4 DCR-HC46/HC96 *5 Cannot be operated in the CAMERA-TAPE mode. *6 The setting value before entering Easy...

Operating Guide
Page 48
.../ - / NORMAL/ -*6 OFF -*6 -*6 OFF z OFF z AUTO ON ON z LCD PANEL - 5 min - menu (p. 69) CLOCK SET z z z WORLD TIME z z z LANGUAGE z z z *1 DCR-HC96 *2 DCR-HC36/HC46 *3 DCR-HC36 *4 DCR-HC46/HC96 *5 Cannot be operated in the CAMERA-TAPE mode. *6 The setting value before entering Easy Handycam operation will be retained. z -*6 -*6 48 z - BEEP z z z DISP OUTPUT z z z MENU ROTATE z z z A.SHUT OFF z z z CALIBRATION - - Menu items (Continued) TAPE...
.../ - / NORMAL/ -*6 OFF -*6 -*6 OFF z OFF z AUTO ON ON z LCD PANEL - 5 min - menu (p. 69) CLOCK SET z z z WORLD TIME z z z LANGUAGE z z z *1 DCR-HC96 *2 DCR-HC36/HC46 *3 DCR-HC36 *4 DCR-HC46/HC96 *5 Cannot be operated in the CAMERA-TAPE mode. *6 The setting value before entering Easy Handycam operation will be retained. z -*6 -*6 48 z - BEEP z z z DISP OUTPUT z z z MENU ROTATE z z z A.SHUT OFF z z z CALIBRATION - - Menu items (Continued) TAPE...
Operating Guide
Page 51
... AE] settings, or bring your camcorder outdoors from inside the house, or vice versa. • Set [WHITE BAL.] to [AUTO] or [ONE PUSH] under white or cool white fluorescent lamps. • The setting returns to [AUTO] when you turn the power off for recording. AE SHIFT (DCR-HC96) You can adjust the focus...
... AE] settings, or bring your camcorder outdoors from inside the house, or vice versa. • Set [WHITE BAL.] to [AUTO] or [ONE PUSH] under white or cool white fluorescent lamps. • The setting returns to [AUTO] when you turn the power off for recording. AE SHIFT (DCR-HC96) You can adjust the focus...


