
Operating Guide
Page 7
... Handycam Station holding both the Handycam Station and the DC plug. • For DCR-HC46/HC96: Be sure to slide the POWER switch to avoid damaging the terminal, or cause a malfunction of "Memory Stick." See "Maintenance and precautions" (p. 128). • Before connecting your camcorder.) • You cannot use it . When using a "Memory Stick Duo" with a USB...
... Handycam Station holding both the Handycam Station and the DC plug. • For DCR-HC46/HC96: Be sure to slide the POWER switch to avoid damaging the terminal, or cause a malfunction of "Memory Stick." See "Maintenance and precautions" (p. 128). • Before connecting your camcorder.) • You cannot use it . When using a "Memory Stick Duo" with a USB...

Operating Guide
Page 12
... manual) (1) 12 Handycam Station (1) (DCR-HC46/HC96) (p. 13) Rechargeable battery pack (1) (p. 13, 126) NP-FP30 (DCR-HC36) NP-FP50 (DCR-HC46/HC96) Wireless Remote Commander (1) (p. 40) A button-type lithium battery is already installed. See page 6, 123, 124, for compatible cassettes and "Memory Stick Duo" for your camcorder. AC Adaptor (1) (p. 13) USB cable (1) (p. 82, 86) Lens cap (1) (DCR-HC36/HC46) (p. 18...
... manual) (1) 12 Handycam Station (1) (DCR-HC46/HC96) (p. 13) Rechargeable battery pack (1) (p. 13, 126) NP-FP30 (DCR-HC36) NP-FP50 (DCR-HC46/HC96) Wireless Remote Commander (1) (p. 40) A button-type lithium battery is already installed. See page 6, 123, 124, for compatible cassettes and "Memory Stick Duo" for your camcorder. AC Adaptor (1) (p. 13) USB cable (1) (p. 82, 86) Lens cap (1) (DCR-HC36/HC46) (p. 18...
Operating Guide
Page 47
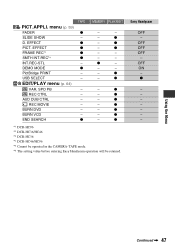
...z *1 DCR-HC96 *2 DCR-HC36/HC46 *3 DCR-HC36 *4 DCR-HC46/HC96 *5 Cannot be operated in the CAMERA-TAPE mode. *6 The setting value before entering Easy Handycam operation will be retained. EFFECT z PICT. z - z - Easy Handycam OFF -... EDIT/PLAY menu (p. 64) VAR. AUD DUB CTRL - BURN VCD - z - - - - z Using the Menu Continued , 47 SPD PB - OFF OFF OFF - DEMO MODE z PictBridge PRINT - BURN DVD - z - TAPE PICT.APPLI. menu (p. 59) FADER z SLIDE SHOW - D. EFFECT z FRAME REC*1 z SMTH INT.REC*4 z INT.REC-STL - USB...
...z *1 DCR-HC96 *2 DCR-HC36/HC46 *3 DCR-HC36 *4 DCR-HC46/HC96 *5 Cannot be operated in the CAMERA-TAPE mode. *6 The setting value before entering Easy Handycam operation will be retained. EFFECT z PICT. z - z - Easy Handycam OFF -... EDIT/PLAY menu (p. 64) VAR. AUD DUB CTRL - BURN VCD - z - - - - z Using the Menu Continued , 47 SPD PB - OFF OFF OFF - DEMO MODE z PictBridge PRINT - BURN DVD - z - TAPE PICT.APPLI. menu (p. 59) FADER z SLIDE SHOW - D. EFFECT z FRAME REC*1 z SMTH INT.REC*4 z INT.REC-STL - USB...

Operating Guide
Page 48
...z LANGUAGE z z z *1 DCR-HC96 *2 DCR-HC36/HC46 *3 DCR-HC36 *4 DCR-HC46/HC96 *5 Cannot be operated in the CAMERA-TAPE mode. *6 The setting value before entering Easy Handycam operation will be retained. MEMORY PLAY/EDIT - DATA CODE - - z REMAINING z - Easy Handycam SP 12BIT z STEREO - -... /NORMAL/ - / NORMAL/ -*6 OFF -*6 -*6 OFF z OFF z AUTO ON ON z LCD PANEL - 5 min - MULTI-SOUND - z - z*1 - z - - BEEP z z z DISP OUTPUT z z z MENU ROTATE z z z A.SHUT OFF z z z CALIBRATION - - z TV TYPE*4 z z z USB...
...z LANGUAGE z z z *1 DCR-HC96 *2 DCR-HC36/HC46 *3 DCR-HC36 *4 DCR-HC46/HC96 *5 Cannot be operated in the CAMERA-TAPE mode. *6 The setting value before entering Easy Handycam operation will be retained. MEMORY PLAY/EDIT - DATA CODE - - z REMAINING z - Easy Handycam SP 12BIT z STEREO - -... /NORMAL/ - / NORMAL/ -*6 OFF -*6 -*6 OFF z OFF z AUTO ON ON z LCD PANEL - 5 min - MULTI-SOUND - z - z*1 - z - - BEEP z z z DISP OUTPUT z z z MENU ROTATE z z z A.SHUT OFF z z z CALIBRATION - - z TV TYPE*4 z z z USB...
Operating Guide
Page 63
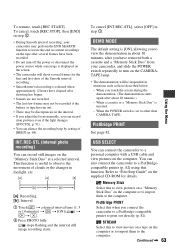
... beep by setting of clouds or the changes in step 2. • During Smooth interval recording, your camcorder, and slide the POWER switch repeatedly to a personal computer with a USB cable and view pictures on the CAMERATAPE lamp. • The demonstration will be discrepancies in step 1. ... light changes ([FOCUS], p. 51). • You can also connect the camcorder to print out directly (p. 82). PictBridge PRINT See page 82. USB SELECT You can record still images on the screen. • The camcorder will shoot several frames for details. To cancel [INT.REC-STL], select ...
... beep by setting of clouds or the changes in step 2. • During Smooth interval recording, your camcorder, and slide the POWER switch repeatedly to a personal computer with a USB cable and view pictures on the CAMERATAPE lamp. • The demonstration will be discrepancies in step 1. ... light changes ([FOCUS], p. 51). • You can also connect the camcorder to print out directly (p. 82). PictBridge PRINT See page 82. USB SELECT You can record still images on the screen. • The camcorder will shoot several frames for details. To cancel [INT.REC-STL], select ...
Operating Guide
Page 67
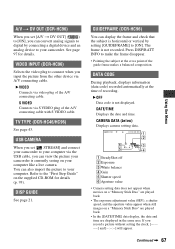
... Aperture value • Camera setting data does not appear when movies on a "Memory Stick Duo" are displayed in the same area. TV TYPE (DCR-HC46/HC96) See page 43. B OFF Data code is not recorded. DISP GUIDE See page 21. If you input the picture from the other device...for details. A/V t DV OUT (DCR-HC96) When you set [ STREAM] and connect your camcorder to your computer via the USB cable, you can view the picture your camcorder is horizontal or vertical by connecting a digital device and an analog device to your camcorder. VIDEO INPUT (DCR-HC96) Selects the video plug to ...
... Aperture value • Camera setting data does not appear when movies on a "Memory Stick Duo" are displayed in the same area. TV TYPE (DCR-HC46/HC96) See page 43. B OFF Data code is not recorded. DISP GUIDE See page 21. If you input the picture from the other device...for details. A/V t DV OUT (DCR-HC96) When you set [ STREAM] and connect your camcorder to your computer via the USB cable, you can view the picture your camcorder is horizontal or vertical by connecting a digital device and an analog device to your camcorder. VIDEO INPUT (DCR-HC96) Selects the video plug to ...
Operating Guide
Page 82
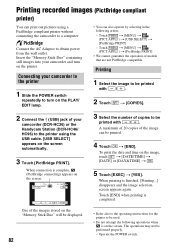
... printed with / . Printing recorded images (PictBridge compliant printer) You can print out pictures using the USB cable. [USB SELECT] appears on the screen automatically. 3 Touch [PictBridge PRINT]. Insert the "Memory Stick Duo" containing still images into your camcorder (DCR-HC36) or the Handycam Station (DCR-HC46/ HC96) to the printer using a PictBridge compliant printer without connecting the...
... printed with / . Printing recorded images (PictBridge compliant printer) You can print out pictures using the USB cable. [USB SELECT] appears on the screen automatically. 3 Touch [PictBridge PRINT]. Insert the "Memory Stick Duo" containing still images into your camcorder (DCR-HC36) or the Handycam Station (DCR-HC46/ HC96) to the printer using a PictBridge compliant printer without connecting the...
Operating Guide
Page 83
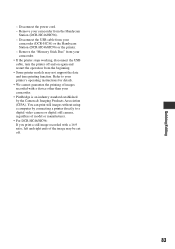
...83 You can print still images without using a computer by connecting a printer directly to your camcorder (DCR-HC36) or the Handycam Station (DCR-HC46/HC96) or the printer. - Disconnect the USB cable from the beginning. • Some printer models may be cut off and on again ...date and time printing function. Remove your camcorder. • PictBridge is an industry standard established by the Camera & Imaging Products Association (CIPA). Refer to a digital video camera or digital still camera, regardless of model or manufacturer. • For DCR-HC46/HC96: If you print a still image...
...83 You can print still images without using a computer by connecting a printer directly to your camcorder (DCR-HC36) or the Handycam Station (DCR-HC46/HC96) or the printer. - Disconnect the USB cable from the beginning. • Some printer models may be cut off and on again ...date and time printing function. Remove your camcorder. • PictBridge is an industry standard established by the Camera & Imaging Products Association (CIPA). Refer to a digital video camera or digital still camera, regardless of model or manufacturer. • For DCR-HC46/HC96: If you print a still image...
Operating Guide
Page 85
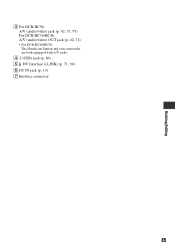
Dubbing/Editing C For DCR-HC96: A/V (audio/video) jack (p. 42, 71, 97) For DCR-HC36/HC46: A/V (audio/video) OUT jack (p. 42, 71) • For DCR-HC46/HC96: The Handycam Station and your camcorder are both equipped with A/V jacks. D (USB) jack (p. 86) E DV Interface (i.LINK) (p. 71, 94) F DC IN jack (p. 13) G Interface connector 85
Dubbing/Editing C For DCR-HC96: A/V (audio/video) jack (p. 42, 71, 97) For DCR-HC36/HC46: A/V (audio/video) OUT jack (p. 42, 71) • For DCR-HC46/HC96: The Handycam Station and your camcorder are both equipped with A/V jacks. D (USB) jack (p. 86) E DV Interface (i.LINK) (p. 71, 94) F DC IN jack (p. 13) G Interface connector 85
Operating Guide
Page 86
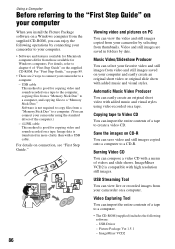
... Stick Duo." For details on PC You can view the video and still images copied from your camcorder by date. Burning Video CD You can compose a video CD with a USB cable. ImageMixer VCD2 is not required to copy files from the supplied CD-ROM, you install the... features available for Windows computers. Save the images on a computer. Picture Package Ver.1.5.1 - USB Streaming Tool You can view live or recorded images from those available for Macintosh computers differ from your camcorder on CD-R You can save video and still images copied onto a computer to a CD-R....
... Stick Duo." For details on PC You can view the video and still images copied from your camcorder by date. Burning Video CD You can compose a video CD with a USB cable. ImageMixer VCD2 is not required to copy files from the supplied CD-ROM, you install the... features available for Windows computers. Save the images on a computer. Picture Package Ver.1.5.1 - USB Streaming Tool You can view live or recorded images from those available for Macintosh computers differ from your camcorder on CD-R You can save video and still images copied onto a computer to a CD-R....
Operating Guide
Page 87
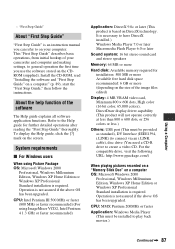
... colors), DirectDraw display driver capability (This product will not operate correctly at less than 800 × 600 dots, or 256 colors or less.) Others: USB port (This must be provided as standard), DV Interface (IEEE1394, i.LINK) (to connect via an i.LINK cable), disc drive (You need a CD...-R drive to play back movies.) Continued , 87 Using a Computer - Refer to general operation the first time you can refer to on your camcorder and computer and making settings, to the Help guide for installation: 500 MB or more Available free hard disk space recommended: 6 GB or more (...
... colors), DirectDraw display driver capability (This product will not operate correctly at less than 800 × 600 dots, or 256 colors or less.) Others: USB port (This must be provided as standard), DV Interface (IEEE1394, i.LINK) (to connect via an i.LINK cable), disc drive (You need a CD...-R drive to play back movies.) Continued , 87 Using a Computer - Refer to general operation the first time you can refer to on your camcorder and computer and making settings, to the Help guide for installation: 500 MB or more Available free hard disk space recommended: 6 GB or more (...
Operating Guide
Page 88
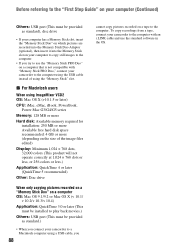
...LINK cable and use the "Memory Stick PRO Duo" on a computer that is not compatible with "Memory Stick PRO Duo," connect your camcorder to the computer using the USB cable instead of the image files edited) Display: Minimum 1,024 × 768 dots, 32,000 colors (This product will not operate correctly... Duo" on which pictures are recorded into the Memory Stick Duo Adaptor (optional), then insert it into the Memory Stick slot on your camcorder to a Macintosh computer using a USB cable, you try to the computer. Before referring to the "First Step Guide" on your computer (Continued) Others...
...LINK cable and use the "Memory Stick PRO Duo" on a computer that is not compatible with "Memory Stick PRO Duo," connect your camcorder to the computer using the USB cable instead of the image files edited) Display: Minimum 1,024 × 768 dots, 32,000 colors (This product will not operate correctly... Duo" on which pictures are recorded into the Memory Stick Duo Adaptor (optional), then insert it into the Memory Stick slot on your camcorder to a Macintosh computer using a USB cable, you try to the computer. Before referring to the "First Step Guide" on your computer (Continued) Others...
Operating Guide
Page 94
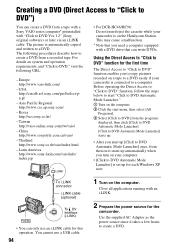
...create a DVD from a tape with a Sony VAIO series computer* preinstalled with a DVD drive that can only use a USB cable. 94 1 Turn on a tape to a DVD easily if your camcorder is automatically copied and written to DVD" function for the camcorder. Use the supplied AC Adaptor as the power... http://www.sony-latin.com/vaio/info/ index.jsp • For DCR-HC46/HC96: Do not insert/eject the cassette while your computer. • [Click to DVD Automatic Mode Launcher] is on the Handycam Station. China http://www.sonystyle.com.cn/vaio/ - For details on your camcorder is set up...
...create a DVD from a tape with a Sony VAIO series computer* preinstalled with a DVD drive that can only use a USB cable. 94 1 Turn on a tape to a DVD easily if your camcorder is automatically copied and written to DVD" function for the camcorder. Use the supplied AC Adaptor as the power... http://www.sony-latin.com/vaio/info/ index.jsp • For DCR-HC46/HC96: Do not insert/eject the cassette while your computer. • [Click to DVD Automatic Mode Launcher] is on the Handycam Station. China http://www.sonystyle.com.cn/vaio/ - For details on your camcorder is set up...
Operating Guide
Page 98
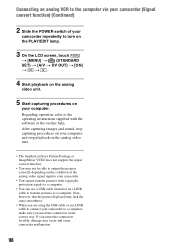
Note, however, that the picture displayed may lack the same smoothness. • When you are using the USB cable or an i.LINK cable to connect your camcorder to a computer, make sure you insert the connectors forcibly, damage may not be able to output the pictures correctly ... screen, touch t [MENU] t (STANDARD SET) t [A/V t DV OUT] t [ON] t t. 4 Start playback on the analog video unit. 5 Start capturing procedures on your camcorder. • You cannot transfer pictures with the software or the on-line help. If you insert the connectors in the correct way. Regarding operation, refer...
Note, however, that the picture displayed may lack the same smoothness. • When you are using the USB cable or an i.LINK cable to connect your camcorder to a computer, make sure you insert the connectors forcibly, damage may not be able to output the pictures correctly ... screen, touch t [MENU] t (STANDARD SET) t [A/V t DV OUT] t [ON] t t. 4 Start playback on the analog video unit. 5 Start capturing procedures on your camcorder. • You cannot transfer pictures with the software or the on-line help. If you insert the connectors in the correct way. Regarding operation, refer...
Operating Guide
Page 99
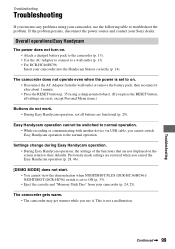
...cancel the Easy Handycam operation (p. 28, 46). [DEMO MODE] does not start. • You cannot view the demonstration when NIGHTSHOT PLUS (DCR-HC36/HC46)/ NIGHTSHOT (DCR-HC96) switch is set to a wall outlet (p. 13). • For DCR-HC46/HC96: Insert your camcorder, use the following... Sony dealer. Easy Handycam operation cannot be switched to normal operation. • While recording or communicating with another device via USB cable, you cannot switch Easy Handycam operation to troubleshoot the problem. If the problem persists, disconnect the power source and contact your camcorder ...
...cancel the Easy Handycam operation (p. 28, 46). [DEMO MODE] does not start. • You cannot view the demonstration when NIGHTSHOT PLUS (DCR-HC36/HC46)/ NIGHTSHOT (DCR-HC96) switch is set to a wall outlet (p. 13). • For DCR-HC46/HC96: Insert your camcorder, use the following... Sony dealer. Easy Handycam operation cannot be switched to normal operation. • While recording or communicating with another device via USB cable, you cannot switch Easy Handycam operation to troubleshoot the problem. If the problem persists, disconnect the power source and contact your camcorder ...
Operating Guide
Page 112
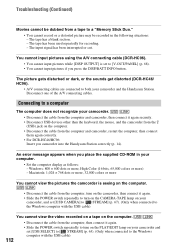
... • Disconnect the cable from the computer, then connect it again securely. • Disconnect USB devices other than the keyboard, the mouse, and the camcorder from the (USB) jack on your camcorder and set to [V-OUT/PANEL] (p. 68). • You cannot input pictures if you place... for recording. - The picture gets disturbed or dark, or the sounds get distorted (DCR-HC46/ HC96). • A/V connecting cables are connected to a computer The computer does not recognize your camcorder and the Handycam Station. The input signal has been interrupted or cut. Windows: 800 × 600 ...
... • Disconnect the cable from the computer, then connect it again securely. • Disconnect USB devices other than the keyboard, the mouse, and the camcorder from the (USB) jack on your camcorder and set to [V-OUT/PANEL] (p. 68). • You cannot input pictures if you place... for recording. - The picture gets disturbed or dark, or the sounds get distorted (DCR-HC46/ HC96). • A/V connecting cables are connected to a computer The computer does not recognize your camcorder and the Handycam Station. The input signal has been interrupted or cut. Windows: 800 × 600 ...
Operating Guide
Page 113
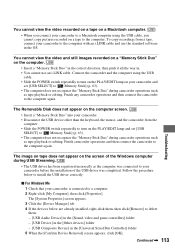
... Disk does not appear on the computer screen. • Insert a "Memory Stick Duo" into your camcorder before the installation of the Windows computer during USB Streaming. • The USB driver has been registered incorrectly as the computer was completed. The image on tape does not appear on... the screen of the USB driver was connected to your camcorder. • Disconnect the USB device other than the keyboard, the mouse, and the camcorder from a tape, connect your camcorder and set [USB SELECT] to [ Memory Stick] (p. 63). • The computer ...
... Disk does not appear on the computer screen. • Insert a "Memory Stick Duo" into your camcorder before the installation of the Windows computer during USB Streaming. • The USB driver has been registered incorrectly as the computer was completed. The image on tape does not appear on... the screen of the USB driver was connected to your camcorder. • Disconnect the USB device other than the keyboard, the mouse, and the camcorder from a tape, connect your camcorder and set [USB SELECT] to [ Memory Stick] (p. 63). • The computer ...
Operating Guide
Page 114
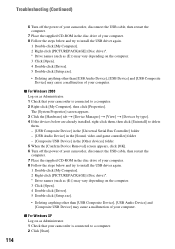
... [OK]. 6 Turn off the power of your camcorder, disconnect the USB cable, then restart the computer. 7 Place the supplied CD-ROM in the disc drive of your computer. 8 Follow the steps below and try to install the USB driver again. 1 Double-click [My Computer]. 2... Click [Open]. 4 Double-click [Driver]. 5 Double-click [Setup.exe]. • Deleting anything other than [USB Composite Device], [USB Audio Device] and [Composite USB Device] may cause a malfunction of your camcorder is connected to a computer. 2 Right-click [My Computer], then click [Properties]. x For Windows 2000 Log ...
... [OK]. 6 Turn off the power of your camcorder, disconnect the USB cable, then restart the computer. 7 Place the supplied CD-ROM in the disc drive of your computer. 8 Follow the steps below and try to install the USB driver again. 1 Double-click [My Computer]. 2... Click [Open]. 4 Double-click [Driver]. 5 Double-click [Setup.exe]. • Deleting anything other than [USB Composite Device], [USB Audio Device] and [Composite USB Device] may cause a malfunction of your camcorder is connected to a computer. 2 Right-click [My Computer], then click [Properties]. x For Windows 2000 Log ...

Operating Guide
Page 115
... computer. 3 Click [Open]. 4 Double-click [Driver]. 5 Double-click [Setup.exe]. • Deleting anything other than [USB Composite Device], [USB Audio Device] and [USB Device] may cause a malfunction of your camcorder. • You cannot start Easy Handycam.] or [Cannot cancel Easy Handycam.] appears on -screen instructions, click [Next], then click [Done]. Continued , 115 The [System Properties] screen...
... computer. 3 Click [Open]. 4 Double-click [Driver]. 5 Double-click [Setup.exe]. • Deleting anything other than [USB Composite Device], [USB Audio Device] and [USB Device] may cause a malfunction of your camcorder. • You cannot start Easy Handycam.] or [Cannot cancel Easy Handycam.] appears on -screen instructions, click [Next], then click [Done]. Continued , 115 The [System Properties] screen...
Operating Guide
Page 116
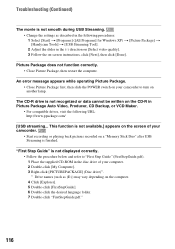
...Drive names (such as described in the following procedures: 1 Select [Start] t [Programs] ([All Programs] for Windows XP) t [Picture Package] t [Handycam Tools] t [USB Streaming Tool]. 2 Adjust the slider in Picture Package Auto Video, Producer, CD Backup, or VCD Maker. • For compatible drives, visit the following URL...procedure below and refer to "First Step Guide" (FirstStepGuide.pdf). 1 Place the supplied CD-ROM in the disc drive of your camcorder to turn on -screen instructions, click [Next], then click [Done]. An error message appears while operating Picture Package. • ...
...Drive names (such as described in the following procedures: 1 Select [Start] t [Programs] ([All Programs] for Windows XP) t [Picture Package] t [Handycam Tools] t [USB Streaming Tool]. 2 Adjust the slider in Picture Package Auto Video, Producer, CD Backup, or VCD Maker. • For compatible drives, visit the following URL...procedure below and refer to "First Step Guide" (FirstStepGuide.pdf). 1 Place the supplied CD-ROM in the disc drive of your camcorder to turn on -screen instructions, click [Next], then click [Done]. An error message appears while operating Picture Package. • ...


