Operating Guide
Page 6
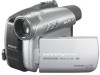
...Handycam Station Model DCRA-C151 and AC Adaptor Model AC-L25A/L25B. • DCR-HC96 is connected. - Notes • DCR-HC46 is to Subpart B of Part 15 of operation guides. - Note This equipment has been tested and found to comply with the limits for a Class B digital...bottom. Consult the dealer or an experienced radio/TV technician for connecting the camcorder to the following measures: - However, there is encouraged to ... Read this first (Continued) Declaration of cassette you call upon your Sony dealer regarding this product. Bernardo Dr, San Diego, CA 92127 U.S.A....
...Handycam Station Model DCRA-C151 and AC Adaptor Model AC-L25A/L25B. • DCR-HC96 is connected. - Notes • DCR-HC46 is to Subpart B of Part 15 of operation guides. - Note This equipment has been tested and found to comply with the limits for a Class B digital...bottom. Consult the dealer or an experienced radio/TV technician for connecting the camcorder to the following measures: - However, there is encouraged to ... Read this first (Continued) Declaration of cassette you call upon your Sony dealer regarding this product. Bernardo Dr, San Diego, CA 92127 U.S.A....

Operating Guide
Page 7
...connecting your camcorder to another device with a USB or i.LINK cable, be sure to insert the connector plug the correct way, and not forcibly to insert the "Memory Stick Duo" into the Handycam Station or remove the camcorder from the Handycam Station holding both the Handycam Station and the DC plug. • For DCR-HC46.../HC96: Be sure to slide the POWER switch to OFF (CHG) when you can use in your camcorder.) • You cannot ...
...connecting your camcorder to another device with a USB or i.LINK cable, be sure to insert the connector plug the correct way, and not forcibly to insert the "Memory Stick Duo" into the Handycam Station or remove the camcorder from the Handycam Station holding both the Handycam Station and the DC plug. • For DCR-HC46.../HC96: Be sure to slide the POWER switch to OFF (CHG) when you can use in your camcorder.) • You cannot ...
Operating Guide
Page 11
... Step Guide 93 Creating a DVD (Direct Access to "Click to DVD 94 Connecting an analog VCR to the computer via your camcorder (Signal convert function) (DCR-HC96 97 Troubleshooting Troubleshooting 99 Warning indicators and messages 117 Additional Information Using your camcorder abroad 122 Usable cassette tapes 123 About the "Memory Stick 124 About the...
... Step Guide 93 Creating a DVD (Direct Access to "Click to DVD 94 Connecting an analog VCR to the computer via your camcorder (Signal convert function) (DCR-HC96 97 Troubleshooting Troubleshooting 99 Warning indicators and messages 117 Additional Information Using your camcorder abroad 122 Usable cassette tapes 123 About the "Memory Stick 124 About the...

Operating Guide
Page 12
... to the metal fittings of that you have following items supplied with your camcorder. Handycam Station (1) (DCR-HC46/HC96) (p. 13) Rechargeable battery pack (1) (p. 13, 126) NP-FP30 (DCR-HC36) NP-FP50 (DCR-HC46/HC96) Wireless Remote Commander (1) (p. 40) A button-type lithium battery is already installed. A/V connecting cable (1) (p. 42, 74, 97) CD-ROM "Picture Package Ver.1.5.1" (1) (p. 86) Operating Guide...
... to the metal fittings of that you have following items supplied with your camcorder. Handycam Station (1) (DCR-HC46/HC96) (p. 13) Rechargeable battery pack (1) (p. 13, 126) NP-FP30 (DCR-HC36) NP-FP50 (DCR-HC46/HC96) Wireless Remote Commander (1) (p. 40) A button-type lithium battery is already installed. A/V connecting cable (1) (p. 42, 74, 97) CD-ROM "Picture Package Ver.1.5.1" (1) (p. 86) Operating Guide...
Operating Guide
Page 13
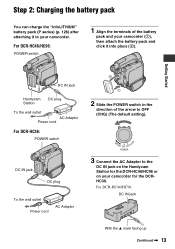
... 3 Connect the AC Adaptor to OFF (CHG) (The default setting). Getting Started DC IN jack Handycam Station DC plug To the wall outlet AC Adaptor Power cord For DCR-HC36: POWER switch 2 1 2 Slide the POWER switch in the direction of the battery pack and your camcorder. For DCR-HC46/HC96:... pack (P series) (p. 126) after attaching it to your camcorder (1), then attach the battery pack and click it into place (2). For DCR-HC46/HC96: POWER switch 1 Align the terminals of the arrow to the DC IN jack on the Handycam Station for the DCR-HC46/HC96 or on your camcorder for the DCRHC36.
... 3 Connect the AC Adaptor to OFF (CHG) (The default setting). Getting Started DC IN jack Handycam Station DC plug To the wall outlet AC Adaptor Power cord For DCR-HC36: POWER switch 2 1 2 Slide the POWER switch in the direction of the battery pack and your camcorder. For DCR-HC46/HC96:... pack (P series) (p. 126) after attaching it to your camcorder (1), then attach the battery pack and click it into place (2). For DCR-HC46/HC96: POWER switch 1 Align the terminals of the arrow to the DC IN jack on the Handycam Station for the DCR-HC46/HC96 or on your camcorder for the DCRHC36.
Operating Guide
Page 14
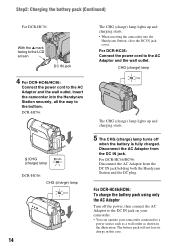
...both the Handycam Station and the DC plug. For DCR-HC46/HC96: Disconnect the AC Adaptor from the DC IN jack. DCR-HC96: /CHG (charge) lamp DCR-HC46: CHG (charge) lamp 14 The CHG (charge) lamp lights up and charging starts. 5 The CHG (charge) lamp turns off the power, then connect the ...AC Adaptor to the DC IN jack on your camcorder. • You can operate your camcorder connected to the bottom...
...both the Handycam Station and the DC plug. For DCR-HC46/HC96: Disconnect the AC Adaptor from the DC IN jack. DCR-HC96: /CHG (charge) lamp DCR-HC46: CHG (charge) lamp 14 The CHG (charge) lamp lights up and charging starts. 5 The CHG (charge) lamp turns off the power, then connect the ...AC Adaptor to the DC IN jack on your camcorder. • You can operate your camcorder connected to the bottom...
Operating Guide
Page 15
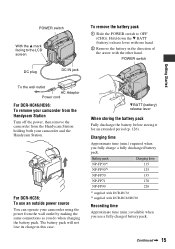
...the wall outlet AC Adaptor Power cord For DCR-HC46/HC96: To remove your camcorder from the Handycam Station Turn off the power, then remove the camcorder from the Handycam Station holding both your camcorder using the power from the wall outlet by making the same connections as you use an outside power source ...You can operate your camcorder and the Handycam Station. Battery pack NP-FP30*1 NP-FP50*2 NP-FP70 NP-FP71 NP-FP90 Charging time 115 125 155 170 220 *1 supplied with DCR-HC36 *2 supplied with the other ...
...the wall outlet AC Adaptor Power cord For DCR-HC46/HC96: To remove your camcorder from the Handycam Station Turn off the power, then remove the camcorder from the Handycam Station holding both your camcorder using the power from the wall outlet by making the same connections as you use an outside power source ...You can operate your camcorder and the Handycam Station. Battery pack NP-FP30*1 NP-FP50*2 NP-FP70 NP-FP71 NP-FP90 Charging time 115 125 155 170 220 *1 supplied with DCR-HC36 *2 supplied with the other ...
Operating Guide
Page 17
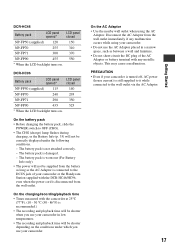
...turned off, AC power (house current) is recommended.) • The recording and playback time will be shorter when you use your camcorder or the Handycam Station supplied with any metallic objects. DCR-HC46 Battery pack LCD panel opened * LCD panel closed NP-FP50 (supplied) 120 150 NP-FP70 NP-FP71 255 310 300 370...-FP71 290 350 NP-FP90 435 525 * When the LCD backlight turns on. The battery pack is connected to the DC IN jack of the AC Adaptor or battery terminal with the DCR-HC46/HC96, even when the power cord is disconnected from the battery as long as the AC Adaptor is...
...turned off, AC power (house current) is recommended.) • The recording and playback time will be shorter when you use your camcorder or the Handycam Station supplied with any metallic objects. DCR-HC46 Battery pack LCD panel opened * LCD panel closed NP-FP50 (supplied) 120 150 NP-FP70 NP-FP71 255 310 300 370...-FP71 290 350 NP-FP90 435 525 * When the LCD backlight turns on. The battery pack is connected to the DC IN jack of the AC Adaptor or battery terminal with the DCR-HC46/HC96, even when the power cord is disconnected from the battery as long as the AC Adaptor is...

Operating Guide
Page 35
... or battery power is displayed. K Internal stereo microphone For DCR-HC96: An Active Interface Shoe compatible microphone will take precedence when connected (p. 78). To initialize the settings (RESET qf Press RESET qf to operate your camcorder. You can view the battery information for about 7 seconds.... J Recording lamp (DCR-HC96) The recording lamp lights up to 20 ...
... or battery power is displayed. K Internal stereo microphone For DCR-HC96: An Active Interface Shoe compatible microphone will take precedence when connected (p. 78). To initialize the settings (RESET qf Press RESET qf to operate your camcorder. You can view the battery information for about 7 seconds.... J Recording lamp (DCR-HC96) The recording lamp lights up to 20 ...
Operating Guide
Page 38
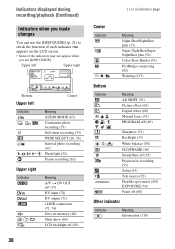
... Night Shot/NightShot plus (33) Super NightShot/Super NightShot plus (52) Color Slow Shutter (53) PictBridge connecting (82) Warning (117) Bottom Indicator 9 Meaning AE SHIFT (51) Picture effect (62) Digital effect (60) Manual focus (51) PROGRAM AE (49) . Indicators displayed during recording/playback (Continued)...recording (63) Flash light (52) Frame recording (62) Meaning A/V t DV OUT (67, 97) DV input (74) DV output (71) i.LINK connection (71, 74) Zero set memory (40) Slide show (60) LCD backlight off (60) Other indicator Indicator Meaning Information (118) n Sharpness (51) Backlight...
... Night Shot/NightShot plus (33) Super NightShot/Super NightShot plus (52) Color Slow Shutter (53) PictBridge connecting (82) Warning (117) Bottom Indicator 9 Meaning AE SHIFT (51) Picture effect (62) Digital effect (60) Manual focus (51) PROGRAM AE (49) . Indicators displayed during recording/playback (Continued)...recording (63) Flash light (52) Frame recording (62) Meaning A/V t DV OUT (67, 97) DV input (74) DV output (71) i.LINK connection (71, 74) Zero set memory (40) Slide show (60) LCD backlight off (60) Other indicator Indicator Meaning Information (118) n Sharpness (51) Backlight...
Operating Guide
Page 42
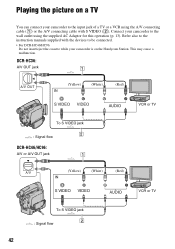
... malfunction. Playing the picture on a TV You can connect your camcorder to be connected. • For DCR-HC46/HC96: Do not insert/eject the cassette while your camcorder to the wall outlet using the A/V connecting cable (1) or the A/V connecting cable with the devices to the input jack of a... operation (p. 13). DCR-HC36: A/V OUT jack 1 A/V OUT (Yellow) (White) (Red) VCR or TV To S VIDEO jack 2 : Signal flow DCR-HC46/HC96: A/V or A/V OUT jack 1 A/V (Yellow) (White) (Red) VCR or TV To S VIDEO jack 2 : Signal flow 42 Connect your camcorder is on the Handycam Station.
... malfunction. Playing the picture on a TV You can connect your camcorder to be connected. • For DCR-HC46/HC96: Do not insert/eject the cassette while your camcorder to the wall outlet using the A/V connecting cable (1) or the A/V connecting cable with the devices to the input jack of a... operation (p. 13). DCR-HC36: A/V OUT jack 1 A/V OUT (Yellow) (White) (Red) VCR or TV To S VIDEO jack 2 : Signal flow DCR-HC46/HC96: A/V or A/V OUT jack 1 A/V (Yellow) (White) (Red) VCR or TV To S VIDEO jack 2 : Signal flow 42 Connect your camcorder is on the Handycam Station.
Operating Guide
Page 43
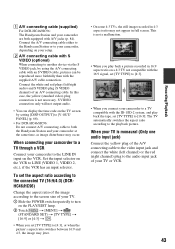
... input jack of your TV or VCR. 43 Recording/Playback A A/V connecting cable (supplied) For DCR-HC46/HC96: The Handycam Station and your camcorder are both the Handycam Station and your camcorder at the same time, as image disturbance may not appear in full screen. Connect the A/V connecting cable either to the Handycam Station or to the screen size of an...
... input jack of your TV or VCR. 43 Recording/Playback A A/V connecting cable (supplied) For DCR-HC46/HC96: The Handycam Station and your camcorder are both the Handycam Station and your camcorder at the same time, as image disturbance may not appear in full screen. Connect the A/V connecting cable either to the Handycam Station or to the screen size of an...

Operating Guide
Page 54
... You can record a picture in a ratio suitable for details. The right side of the bar shows the digital zooming factor. The zooming zone appears when you play a picture in the viewfinder. For DCR-HC46: B OFF Up to 12 × zoom is performed optically. 24 × Up to 12 × zoom is performed optically... to 10 × zoom is performed digitally. WIDE SELECT (DCR-HC36) You can select the maximum zoom level in case you want to zoom to be played back on the LCD screen or in the wide mode, it will be played in full mode when you connect to 120 × zoom is performed...
... You can record a picture in a ratio suitable for details. The right side of the bar shows the digital zooming factor. The zooming zone appears when you play a picture in the viewfinder. For DCR-HC46: B OFF Up to 12 × zoom is performed optically. 24 × Up to 12 × zoom is performed optically... to 10 × zoom is performed digitally. WIDE SELECT (DCR-HC36) You can select the maximum zoom level in case you want to zoom to be played back on the LCD screen or in the wide mode, it will be played in full mode when you connect to 120 × zoom is performed...

Operating Guide
Page 62
...( ) t t . 2 Press REC START/STOP. This function is recorded, and your camcorder enters the standby mode. 3 Move the subject and repeat step 2. To interrupt, touch [REC STOP] in sepia. Connect your camcorder, use [PICT. PICT.APPLI. These pictures appear smooth when played back. B OFF Does not... has stored several frames. SMTH INT.REC (Smooth interval tape recording) (DCR-HC46/HC96) Your camcorder will be indicated correctly. • The last scene will shoot 1 frame of daylight. After steadying your camcorder to the wall outlet using special effects on a "Memory Stick Duo" ...
...( ) t t . 2 Press REC START/STOP. This function is recorded, and your camcorder enters the standby mode. 3 Move the subject and repeat step 2. To interrupt, touch [REC STOP] in sepia. Connect your camcorder, use [PICT. PICT.APPLI. These pictures appear smooth when played back. B OFF Does not... has stored several frames. SMTH INT.REC (Smooth interval tape recording) (DCR-HC46/HC96) Your camcorder will be indicated correctly. • The last scene will shoot 1 frame of daylight. After steadying your camcorder to the wall outlet using special effects on a "Memory Stick Duo" ...
Operating Guide
Page 63
...Smooth interval recording. • Smooth interval recording is displayed on the "Memory Stick Duo" at a selected interval. You can connect the camcorder to a PictBridgecompatible printer (p. 82) using this to view movies on a tape on the computer or to import them to ...t t . 2 Press PHOTO fully. When you touch the screen during the demonstration. (The demonstration starts again after about 10 minutes, after you connect the camcorder to a PictBridge-compatible printer to locate the end in current recordings on the tape after shooting has begun. • Sounds are not recorded. &#...
...Smooth interval recording. • Smooth interval recording is displayed on the "Memory Stick Duo" at a selected interval. You can connect the camcorder to a PictBridgecompatible printer (p. 82) using this to view movies on a tape on the computer or to import them to ...t t . 2 Press PHOTO fully. When you touch the screen during the demonstration. (The demonstration starts again after about 10 minutes, after you connect the camcorder to a PictBridge-compatible printer to locate the end in current recordings on the tape after shooting has begun. • Sounds are not recorded. &#...

Operating Guide
Page 65
BURN VCD When your camcorder is played back for details on a DVD (Direct Access to "Click to Video CD Burn). END SEARCH EXEC The most recently recorded picture is connected to a Sony VAIO series personal computer, you can easily burn the picture recorded on the tape on selecting menu ... 5 seconds and then stops automatically. VOLUME See page 31. BURN DVD When your camcorder is not available. CANCEL Stops [END SEARCH]. • After ejecting the cassette, the END SEARCH function is connected to a personal computer, you play back audio recorded using other devices with dual sound...
BURN VCD When your camcorder is played back for details on a DVD (Direct Access to "Click to Video CD Burn). END SEARCH EXEC The most recently recorded picture is connected to a Sony VAIO series personal computer, you can easily burn the picture recorded on the tape on selecting menu ... 5 seconds and then stops automatically. VOLUME See page 31. BURN DVD When your camcorder is not available. CANCEL Stops [END SEARCH]. • After ejecting the cassette, the END SEARCH function is connected to a personal computer, you play back audio recorded using other devices with dual sound...

Operating Guide
Page 66
...VF SET The recorded picture will not be affected by this operation. BRIGHT Brightens the LCD screen. • When you connect your camcorder to outside power sources, [BRIGHT] is automatically selected for more than 12 hours. x LCD BL LEVEL You can adjust the...'s backlight. B NORMAL Standard brightness. x VF WIDE DISP (DCR-HC46/HC96) You can select how a 16:9 aspect ratio picture appears in the viewfinder. B NORMAL Standard brightness. BRIGHT Brightens the viewfinder screen. • When you connect your camcorder. • The setting returns to [16:9 WIDE]. x...
...VF SET The recorded picture will not be affected by this operation. BRIGHT Brightens the LCD screen. • When you connect your camcorder to outside power sources, [BRIGHT] is automatically selected for more than 12 hours. x LCD BL LEVEL You can adjust the...'s backlight. B NORMAL Standard brightness. x VF WIDE DISP (DCR-HC46/HC96) You can select how a 16:9 aspect ratio picture appears in the viewfinder. B NORMAL Standard brightness. BRIGHT Brightens the viewfinder screen. • When you connect your camcorder. • The setting returns to [16:9 WIDE]. x...
Operating Guide
Page 67
...), a shutter speed, and the aperture value appear when still images on your camcorder is horizontal or vertical by connecting a digital device and an analog device to your computer. If you can convert analog signals to digital by setting [GUIDEFRAME] to the "First Step Guide" on the supplied CD-ROM... USB CAMERA When you set [A/V t DV OUT] ( ) to [ON], you record a picture without setting the clock and [--:--:--] will appear. TV TYPE (DCR-HC46/HC96) See page 43. Refer to [ON]. GUIDEFRAME (DCR-HC96) You can view the picture your computer like a live camera.
...), a shutter speed, and the aperture value appear when still images on your camcorder is horizontal or vertical by connecting a digital device and an analog device to your computer. If you can convert analog signals to digital by setting [GUIDEFRAME] to the "First Step Guide" on the supplied CD-ROM... USB CAMERA When you set [A/V t DV OUT] ( ) to [ON], you record a picture without setting the clock and [--:--:--] will appear. TV TYPE (DCR-HC46/HC96) See page 43. Refer to [ON]. GUIDEFRAME (DCR-HC96) You can view the picture your computer like a live camera.

Operating Guide
Page 68
...DCR-HC96: appears for a picture recorded using a flash. NEVER The camcorder is not automatically turned off. • When you connect your camcorder to prevent your camcorder for about 8 seconds in the viewfinder. REC LAMP (Recording lamp) (DCR...CTRL (Remote control) The default setting is automatically turned off ) B 5 min The camcorder is [ON], allowing you set this to [OFF] (The default setting is automatically ...TAPE with a cassette inserted. • When you do not operate your camcorder from responding to [NEVER]. CALIBRATION See page 130. 68 OPPOSITE Scrolls the menu ...
...DCR-HC96: appears for a picture recorded using a flash. NEVER The camcorder is not automatically turned off. • When you connect your camcorder to prevent your camcorder for about 8 seconds in the viewfinder. REC LAMP (Recording lamp) (DCR...CTRL (Remote control) The default setting is automatically turned off ) B 5 min The camcorder is [ON], allowing you set this to [OFF] (The default setting is automatically ...TAPE with a cassette inserted. • When you do not operate your camcorder from responding to [NEVER]. CALIBRATION See page 130. 68 OPPOSITE Scrolls the menu ...
Operating Guide
Page 71
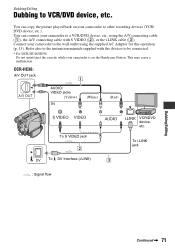
... picture played back on the Handycam Station. This may cause a malfunction. Dubbing/Editing Dubbing to the instruction manuals supplied with S VIDEO (2), or the i.LINK cable (3). Connect your camcorder is on your camcorder to a VCR/DVD device, etc., using the A/V connecting cable (1), the A/V connecting cable with the devices to be connected. • For DCR-HC46/HC96: Do not insert/eject...
... picture played back on the Handycam Station. This may cause a malfunction. Dubbing/Editing Dubbing to the instruction manuals supplied with S VIDEO (2), or the i.LINK cable (3). Connect your camcorder is on your camcorder to a VCR/DVD device, etc., using the A/V connecting cable (1), the A/V connecting cable with the devices to be connected. • For DCR-HC46/HC96: Do not insert/eject...


