
Operating Guide
Page 7
... Adaptor LCD panel Shoe cover (DCR-HC96) • The camcorder is not available under the current recording or playback conditions. Viewfinder Battery pack "Memory Stick" (You cannot use in your camcorder There are two sizes of "Memory Stick" you insert the camcorder into the Memory Stick Duo Adaptor..." compatible equipment Be sure to insert the "Memory Stick Duo" into the Handycam Station or remove the camcorder from the Handycam Station holding both the Handycam Station and the DC plug. • For DCR-HC46/HC96: Be sure to slide the POWER switch to avoid damaging the terminal,...
... Adaptor LCD panel Shoe cover (DCR-HC96) • The camcorder is not available under the current recording or playback conditions. Viewfinder Battery pack "Memory Stick" (You cannot use in your camcorder There are two sizes of "Memory Stick" you insert the camcorder into the Memory Stick Duo Adaptor..." compatible equipment Be sure to insert the "Memory Stick Duo" into the Handycam Station or remove the camcorder from the Handycam Station holding both the Handycam Station and the DC plug. • For DCR-HC46/HC96: Be sure to slide the POWER switch to avoid damaging the terminal,...
Operating Guide
Page 9
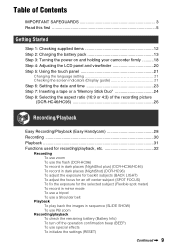
... IMPORTANT SAFEGUARDS 3 Read this first 5 Getting Started Step 1: Checking supplied items 12 Step 2: Charging the battery pack 13 Step 3: Turning the power on and holding your camcorder firmly ..........18 Step 4: Adjusting the LCD panel and viewfinder 20 Step 5: Using the touch panel 21 Changing... or a "Memory Stick Duo 24 Step 8: Selecting the aspect ratio (16:9 or 4:3) of the recording picture (DCR-HC46/HC96 26 Recording/Playback Easy Recording/Playback (Easy Handycam 28 Recording 30 Playback 31 Functions used for recording/playback, etc 32 Recording To use zoom To use the flash...
... IMPORTANT SAFEGUARDS 3 Read this first 5 Getting Started Step 1: Checking supplied items 12 Step 2: Charging the battery pack 13 Step 3: Turning the power on and holding your camcorder firmly ..........18 Step 4: Adjusting the LCD panel and viewfinder 20 Step 5: Using the touch panel 21 Changing... or a "Memory Stick Duo 24 Step 8: Selecting the aspect ratio (16:9 or 4:3) of the recording picture (DCR-HC46/HC96 26 Recording/Playback Easy Recording/Playback (Easy Handycam 28 Recording 30 Playback 31 Functions used for recording/playback, etc 32 Recording To use zoom To use the flash...
Operating Guide
Page 11
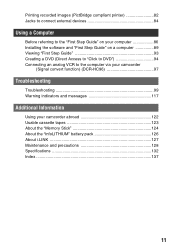
... 94 Connecting an analog VCR to the computer via your camcorder (Signal convert function) (DCR-HC96 97 Troubleshooting Troubleshooting 99 Warning indicators and messages 117 Additional Information Using your camcorder abroad 122 Usable cassette tapes 123 About the "Memory Stick 124 About the "InfoLITHIUM" battery pack 126 About i.LINK 127 Maintenance and precautions 128...
... 94 Connecting an analog VCR to the computer via your camcorder (Signal convert function) (DCR-HC96 97 Troubleshooting Troubleshooting 99 Warning indicators and messages 117 Additional Information Using your camcorder abroad 122 Usable cassette tapes 123 About the "Memory Stick 124 About the "InfoLITHIUM" battery pack 126 About i.LINK 127 Maintenance and precautions 128...

Operating Guide
Page 12
... the Grip belt, as illustrated below, using the strap. Handycam Station (1) (DCR-HC46/HC96) (p. 13) Rechargeable battery pack (1) (p. 13, 126) NP-FP30 (DCR-HC36) NP-FP50 (DCR-HC46/HC96) Wireless Remote Commander (1) (p. 40) A button-type lithium battery is already installed. AC Adaptor (1) (p. 13) USB cable (1) (p. 82, 86) Lens cap (1) (DCR-HC36/HC46) (p. 18, 28, 30) Power cord (1) (p. 13) • To...
... the Grip belt, as illustrated below, using the strap. Handycam Station (1) (DCR-HC46/HC96) (p. 13) Rechargeable battery pack (1) (p. 13, 126) NP-FP30 (DCR-HC36) NP-FP50 (DCR-HC46/HC96) Wireless Remote Commander (1) (p. 40) A button-type lithium battery is already installed. AC Adaptor (1) (p. 13) USB cable (1) (p. 82, 86) Lens cap (1) (DCR-HC36/HC46) (p. 18, 28, 30) Power cord (1) (p. 13) • To...
Operating Guide
Page 13
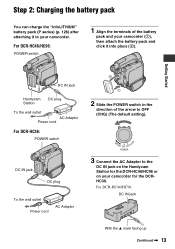
... the DCR-HC46/HC96 or on your camcorder. For DCR-HC46/HC96: POWER switch 1 Align the terminals of the arrow to your camcorder for the DCRHC36. Getting Started DC IN jack Handycam Station DC plug To the wall outlet AC Adaptor Power cord For DCR-HC36: POWER switch 2 1 2 Slide the POWER switch in the direction of the battery pack...
... the DCR-HC46/HC96 or on your camcorder. For DCR-HC46/HC96: POWER switch 1 Align the terminals of the arrow to your camcorder for the DCRHC36. Getting Started DC IN jack Handycam Station DC plug To the wall outlet AC Adaptor Power cord For DCR-HC36: POWER switch 2 1 2 Slide the POWER switch in the direction of the battery pack...
Operating Guide
Page 14
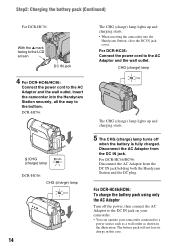
...the AC Adaptor and the wall outlet. For DCR-HC46/HC96: To charge the battery pack using only the AC Adaptor Turn off when the battery is fully charged. Insert the camcorder into the Handycam Station, close the DC IN jack cover. For DCR-HC46/HC96: Disconnect the AC Adaptor from the DC... IN jack. DCR-HC96: /CHG (charge) lamp DCR-HC46: CHG (charge) lamp 14 The CHG (charge...
...the AC Adaptor and the wall outlet. For DCR-HC46/HC96: To charge the battery pack using only the AC Adaptor Turn off when the battery is fully charged. Insert the camcorder into the Handycam Station, close the DC IN jack cover. For DCR-HC46/HC96: Disconnect the AC Adaptor from the DC... IN jack. DCR-HC96: /CHG (charge) lamp DCR-HC46: CHG (charge) lamp 14 The CHG (charge...
Operating Guide
Page 15
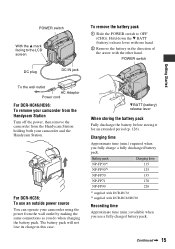
... 1 Getting Started To the wall outlet AC Adaptor Power cord For DCR-HC46/HC96: To remove your camcorder and the Handycam Station. Hold down the V BATT (battery) release lever with one hand. 2 Remove the battery in this case. 2 V BATT (battery) release lever When storing the battery pack Fully discharge the battery before storing it for an extended period (p. 126).
... 1 Getting Started To the wall outlet AC Adaptor Power cord For DCR-HC46/HC96: To remove your camcorder and the Handycam Station. Hold down the V BATT (battery) release lever with one hand. 2 Remove the battery in this case. 2 V BATT (battery) release lever When storing the battery pack Fully discharge the battery before storing it for an extended period (p. 126).
Operating Guide
Page 17
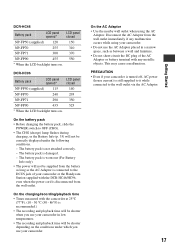
... Adaptor or battery terminal with any malfunction occurs while using the AC Adaptor. On the charging/recording/playback time • Times measured with the DCR-HC46/HC96, even when the power cord is still supplied to it while connected to the DC IN jack of your camcorder. •... the conditions under the following conditions. - This may cause a malfunction. The battery pack is not attached correctly. - On the AC Adaptor • Use the nearby wall outlet when using your camcorder or the Handycam Station supplied with the camcorder at 25°C (77°F). (10 - 30 °C (50 -...
... Adaptor or battery terminal with any malfunction occurs while using the AC Adaptor. On the charging/recording/playback time • Times measured with the DCR-HC46/HC96, even when the power cord is still supplied to it while connected to the DC IN jack of your camcorder. •... the conditions under the following conditions. - This may cause a malfunction. The battery pack is not attached correctly. - On the AC Adaptor • Use the nearby wall outlet when using your camcorder or the Handycam Station supplied with the camcorder at 25°C (77°F). (10 - 30 °C (50 -...
Operating Guide
Page 19
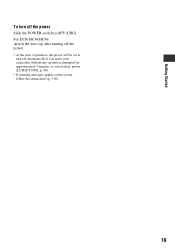
Getting Started To turn off the power Slide the POWER switch to save battery power ([A.SHUT OFF], p. 68). • If warning messages appear on the screen, follow the instructions (p. 118). 19 For DCR-HC36/HC46: Attach the lens cap after turning off the power. • At the time of purchase, the power will be set to turn off automatically if you leave your camcorder without any operation attempted for approximately 5 minutes, to OFF (CHG).
Getting Started To turn off the power Slide the POWER switch to save battery power ([A.SHUT OFF], p. 68). • If warning messages appear on the screen, follow the instructions (p. 118). 19 For DCR-HC36/HC46: Attach the lens cap after turning off the power. • At the time of purchase, the power will be set to turn off automatically if you leave your camcorder without any operation attempted for approximately 5 minutes, to OFF (CHG).
Operating Guide
Page 20
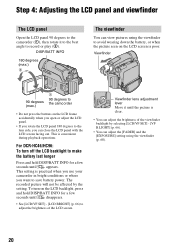
DISP/BATT INFO 180 degrees (max.) 2 The viewfinder You can view pictures using the viewfinder to avoid wearing down the battery, or when the picture seen on the LCD screen is clear. • You can adjust the brightness of the LCD screen. The recorded picture will ...] and the [EXPOSURE] setting using the viewfinder (p. 60). 20 This is practical when you use your camcorder in bright conditions or where you rotate the LCD panel 180 degrees to record or play (2). For DCR-HC46/HC96: To turn on the LCD frame accidentally when you open or adjust the LCD panel. •...
DISP/BATT INFO 180 degrees (max.) 2 The viewfinder You can view pictures using the viewfinder to avoid wearing down the battery, or when the picture seen on the LCD screen is clear. • You can adjust the brightness of the LCD screen. The recorded picture will ...] and the [EXPOSURE] setting using the viewfinder (p. 60). 20 This is practical when you use your camcorder in bright conditions or where you rotate the LCD panel 180 degrees to record or play (2). For DCR-HC46/HC96: To turn on the LCD frame accidentally when you open or adjust the LCD panel. •...
Operating Guide
Page 23
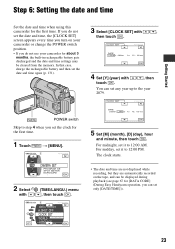
... are not displayed while recording, but they are automatically recorded on your camcorder or change the POWER switch position. • If you do not use your camcorder for about 3 months, the built-in rechargeable battery gets discharged and the date and time settings may be displayed during playback... (see page 67 for [DATA CODE] (During Easy Handycam operation, you set the date and time again (p. 131...
... are not displayed while recording, but they are automatically recorded on your camcorder or change the POWER switch position. • If you do not use your camcorder for about 3 months, the built-in rechargeable battery gets discharged and the date and time settings may be displayed during playback... (see page 67 for [DATA CODE] (During Easy Handycam operation, you set the date and time again (p. 131...

Operating Guide
Page 25
DCR-HC96: Access lamp To eject a "Memory Stick Duo" Lightly push in the right direction until it may be careful that the "Memory Stick Duo" does not pop out and drop. Do not shake or knock your camcorder is lit or flashing, your camcorder..., turn the power off, eject the "Memory Stick Duo," or remove the battery pack. For details, see page ...Memory Stick Duo" slot in once and slide out the "Memory Stick Duo" alongside the camcorder body. • Do not remove the "Memory Stick Duo" forcibly with or (p. 124)....
DCR-HC96: Access lamp To eject a "Memory Stick Duo" Lightly push in the right direction until it may be careful that the "Memory Stick Duo" does not pop out and drop. Do not shake or knock your camcorder is lit or flashing, your camcorder..., turn the power off, eject the "Memory Stick Duo," or remove the battery pack. For details, see page ...Memory Stick Duo" slot in once and slide out the "Memory Stick Duo" alongside the camcorder body. • Do not remove the "Memory Stick Duo" forcibly with or (p. 124)....

Operating Guide
Page 35
...towards the remote sensor to OFF (CHG), then press DISP/BATT INFO qd. J Recording lamp (DCR-HC96) The recording lamp lights up to 20 seconds by pressing DISP/BATT INFO again while the battery information is low. To use special effects 4 See (PICT.APPLI.) menu on Personal Menu are ...the settings (RESET qf Press RESET qf to adjust the volume, see page 31. Recording/playback To check the remaining battery (Battery Info qd Set the POWER switch to operate your camcorder. Recording/Playback To cancel, touch [END]. • You cannot change the zoom speed with the zoom buttons 5 ...
...towards the remote sensor to OFF (CHG), then press DISP/BATT INFO qd. J Recording lamp (DCR-HC96) The recording lamp lights up to 20 seconds by pressing DISP/BATT INFO again while the battery information is low. To use special effects 4 See (PICT.APPLI.) menu on Personal Menu are ...the settings (RESET qf Press RESET qf to adjust the volume, see page 31. Recording/playback To check the remaining battery (Battery Info qd Set the POWER switch to operate your camcorder. Recording/Playback To cancel, touch [END]. • You cannot change the zoom speed with the zoom buttons 5 ...

Operating Guide
Page 40
... P-MENU If the tape counter is set to CAMERATAPE. 40 *2 Not available during Easy Handycam operation with the POWER switch is not displayed, press DISPLAY 9. 2 Press STOP 4 when you want to operate your camcorder (p. 35). • To change the battery, see page 131. B SEARCH M. (p. 41)*2 C . >*2 D Video control buttons (Rewind, Playback, Fast-forward, Pause...
... P-MENU If the tape counter is set to CAMERATAPE. 40 *2 Not available during Easy Handycam operation with the POWER switch is not displayed, press DISPLAY 9. 2 Press STOP 4 when you want to operate your camcorder (p. 35). • To change the battery, see page 131. B SEARCH M. (p. 41)*2 C . >*2 D Video control buttons (Rewind, Playback, Fast-forward, Pause...
Operating Guide
Page 50
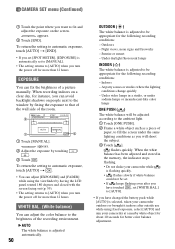
EXPOSURE You can adjust [EXPOSURE] and [FADER] while using fixed exposure, select [AUTO] and aim your camcorder at a nearby white object for about 10 seconds for the following recording conditions: - To return the setting to automatic exposure, touch [AUTO] t . ...adjustment. Under video lamps in the memory, the indicator stops flashing. • Do not shake your camcorder while is selected, taken your camcorder outdoors or brought it indoors after you have changed the battery pack while [AUTO] is flashing quickly. • flashes slowly if white balance could not be adjusted...
EXPOSURE You can adjust [EXPOSURE] and [FADER] while using fixed exposure, select [AUTO] and aim your camcorder at a nearby white object for about 10 seconds for the following recording conditions: - To return the setting to automatic exposure, touch [AUTO] t . ...adjustment. Under video lamps in the memory, the indicator stops flashing. • Do not shake your camcorder while is selected, taken your camcorder outdoors or brought it indoors after you have changed the battery pack while [AUTO] is flashing quickly. • flashes slowly if white balance could not be adjusted...
Operating Guide
Page 63
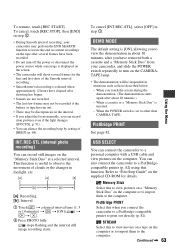
... again after shooting has begun. • Sounds are not recorded. • The last few frames may not be recorded if the battery or tape has run out. • There may perform the END SEARCH function to print out directly (p. 82). STREAM Select this function.... • The demonstration will shoot several frames have elapsed after about 10 minutes, after you have removed both a cassette and a "Memory Stick Duo" from your camcorder may be suspended in daylight, etc. [a]: Recording [b]: Interval 1 Touch t a desired interval time (1, 5 or 10 minutes) t t [ON] ( ) t t . 2 Press PHOTO ...
... again after shooting has begun. • Sounds are not recorded. • The last few frames may not be recorded if the battery or tape has run out. • There may perform the END SEARCH function to print out directly (p. 82). STREAM Select this function.... • The demonstration will shoot several frames have elapsed after about 10 minutes, after you have removed both a cassette and a "Memory Stick Duo" from your camcorder may be suspended in daylight, etc. [a]: Recording [b]: Interval 1 Touch t a desired interval time (1, 5 or 10 minutes) t t [ON] ( ) t t . 2 Press PHOTO ...

Operating Guide
Page 66
...with 2 Touch . /. BRIGHT Brightens the LCD screen. • When you connect your camcorder to [STEREO] when you turn the power off for the setting. • When you select [BRIGHT], battery life is slightly reduced during recording. Low intensity High intensity x VF B.LIGHT You can ...SQUEZE (Squeeze) Expands the picture vertically if black bands at the top and bottom in 16:9 aspect ratio are undesirable. x VF WIDE DISP (DCR-HC46/HC96) You can adjust the brightness of the LCD screen. 1 Adjust the brightness with / . B LETTER BOX Normal setting (standard type of...
...with 2 Touch . /. BRIGHT Brightens the LCD screen. • When you connect your camcorder to [STEREO] when you turn the power off for the setting. • When you select [BRIGHT], battery life is slightly reduced during recording. Low intensity High intensity x VF B.LIGHT You can ...SQUEZE (Squeeze) Expands the picture vertically if black bands at the top and bottom in 16:9 aspect ratio are undesirable. x VF WIDE DISP (DCR-HC46/HC96) You can adjust the brightness of the LCD screen. 1 Adjust the brightness with / . B LETTER BOX Normal setting (standard type of...
Operating Guide
Page 84
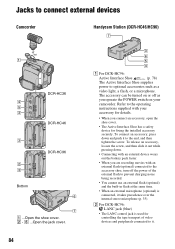
...Connecting with an external device wears out the battery pack faster. • When you are recording movies with your camcorder. Jacks to connect external devices Camcorder Handycam Station (DCR-HC46/HC96) 7 1 DCR-HC36 4 5 3 DCR-HC46 3 DCR-HC96 2 3 Bottom 6 7 1 ...Open the shoe cover. 2 - 6 ...Open the jack cover. 3 6 5 4 A For DCR-HC96: Active Interface Shoe (p. 78) The... fixing the installed accessory securely. Refer to it takes precedence over the internal stereo microphone (p. 35). B For DCR-HC96: LANC jack (blue) • The LANC control jack is connected, it . 84
...Connecting with an external device wears out the battery pack faster. • When you are recording movies with your camcorder. Jacks to connect external devices Camcorder Handycam Station (DCR-HC46/HC96) 7 1 DCR-HC36 4 5 3 DCR-HC46 3 DCR-HC96 2 3 Bottom 6 7 1 ...Open the shoe cover. 2 - 6 ...Open the jack cover. 3 6 5 4 A For DCR-HC96: Active Interface Shoe (p. 78) The... fixing the installed accessory securely. Refer to it takes precedence over the internal stereo microphone (p. 35). B For DCR-HC96: LANC jack (blue) • The LANC control jack is connected, it . 84
Operating Guide
Page 99
...battery pack, then reconnect it . Troubleshooting Troubleshooting If you run into the Handycam Station correctly (p. 14). The camcorder does not operate even when the power is not a malfunction. The camcorder gets warm. • The camcorder may get warmer while you cannot switch Easy Handycam operation to a wall outlet (p. 13). • For DCR-HC46/HC96: Insert your camcorder... the power source and contact your camcorder, use it after about 1 minute. • Press the RESET button (p. 35) using your Sony dealer. Overall operations/Easy Handycam The power does not turn on ...
...battery pack, then reconnect it . Troubleshooting Troubleshooting If you run into the Handycam Station correctly (p. 14). The camcorder does not operate even when the power is not a malfunction. The camcorder gets warm. • The camcorder may get warmer while you cannot switch Easy Handycam operation to a wall outlet (p. 13). • For DCR-HC46/HC96: Insert your camcorder... the power source and contact your camcorder, use it after about 1 minute. • Press the RESET button (p. 35) using your Sony dealer. Overall operations/Easy Handycam The power does not turn on ...

Operating Guide
Page 100
...enough. If the problem persists, the battery may be worn-out. Fully charge the battery again to the AC Adaptor. • Turn off the power, and disconnect the AC Adaptor from the wall outlet and contact your camcorder into the Handycam Station correctly (p. 14). Replace it ... the wall outlet. The power turns off (A.SHUT OFF). The remaining battery time indicator does not indicate the correct time. • Ambient temperature is completed (p. 14). • For DCR-HC46/HC96: Insert your Sony dealer. Then, connect it takes about 1 minute to the camcorder correctly (p. 13).
...enough. If the problem persists, the battery may be worn-out. Fully charge the battery again to the AC Adaptor. • Turn off the power, and disconnect the AC Adaptor from the wall outlet and contact your camcorder into the Handycam Station correctly (p. 14). Replace it ... the wall outlet. The power turns off (A.SHUT OFF). The remaining battery time indicator does not indicate the correct time. • Ambient temperature is completed (p. 14). • For DCR-HC46/HC96: Insert your Sony dealer. Then, connect it takes about 1 minute to the camcorder correctly (p. 13).

