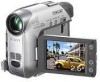
Operating Guide
Page 6
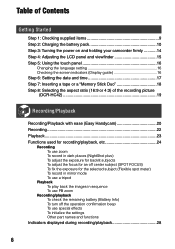
...camcorder firmly ...........14 Step 4: Adjusting the LCD panel and viewfinder 15 Step 5: Using the touch panel 16 Changing the language setting 16 Checking the screen... indicators (Display guide 16 Step 6: Setting the date and time 17 Step 7: Inserting a tape or a "Memory Stick Duo 18 Step 8: Selecting the aspect ratio (16:9 or 4:3) of the recording picture (DCR-HC42 19 Recording/Playback Recording/Playback with ease (Easy Handycam 20...images in sequence To use PB zoom Recording/playback To check the remaining...
...camcorder firmly ...........14 Step 4: Adjusting the LCD panel and viewfinder 15 Step 5: Using the touch panel 16 Changing the language setting 16 Checking the screen... indicators (Display guide 16 Step 6: Setting the date and time 17 Step 7: Inserting a tape or a "Memory Stick Duo 18 Step 8: Selecting the aspect ratio (16:9 or 4:3) of the recording picture (DCR-HC42 19 Recording/Playback Recording/Playback with ease (Easy Handycam 20...images in sequence To use PB zoom Recording/playback To check the remaining...

Operating Guide
Page 16
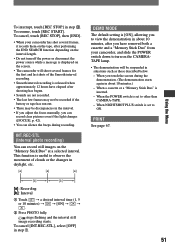
...: MANUAL PROGRAM AE: SPOTLIGHT WIDE SELECT: 16:9 WIDE END 4 Touch [END]. Select the screen language in the area are listed on -screen displays to the area selecting display. Step 5: Using the touch panel You can change the settings (p. 36) using the touch panel. Touch [MENU] during Easy Handycam operation. 6 0 min MENU 1/3 TELE MACRO SPOT FOCUS 0:00:00...
...: MANUAL PROGRAM AE: SPOTLIGHT WIDE SELECT: 16:9 WIDE END 4 Touch [END]. Select the screen language in the area are listed on -screen displays to the area selecting display. Step 5: Using the touch panel You can change the settings (p. 36) using the touch panel. Touch [MENU] during Easy Handycam operation. 6 0 min MENU 1/3 TELE MACRO SPOT FOCUS 0:00:00...

Operating Guide
Page 17
... [M] (month), [D] (day), hour and minute, then touch . For midnight, set the clock for the first time. 1 Touch 6 0 min [MENU]. -:--:-- In that case, charge the rechargeable battery and then set the date and time, the [CLOCK SET] screen appears every time you turn on your camcorder or change the POWER switch position. •...
... [M] (month), [D] (day), hour and minute, then touch . For midnight, set the clock for the first time. 1 Touch 6 0 min [MENU]. -:--:-- In that case, charge the rechargeable battery and then set the date and time, the [CLOCK SET] screen appears every time you turn on your camcorder or change the POWER switch position. •...
Operating Guide
Page 21
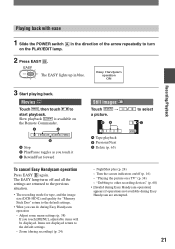
...Easy Handycam operation] appears if operations not available during Easy Handycam are returned to the previous situation. • The recording mode for tape, and the image size (DCR-HC42...you touch [MENU], adjustable items will be displayed. AB Tape playback Previous/Next Delete (p. 65) / to the default settings. - NightShot plus (p. 24) - Turn the screen indicators... MENU - Movies Touch , then touch to turn on /off and all the settings are attempted. 21 "Playing the picture on the Remote Commander. Zoom (during Easy Handycam operation - Slow ...
...Easy Handycam operation] appears if operations not available during Easy Handycam are returned to the previous situation. • The recording mode for tape, and the image size (DCR-HC42...you touch [MENU], adjustable items will be displayed. AB Tape playback Previous/Next Delete (p. 65) / to the default settings. - NightShot plus (p. 24) - Turn the screen indicators... MENU - Movies Touch , then touch to turn on /off and all the settings are attempted. 21 "Playing the picture on the Remote Commander. Zoom (during Easy Handycam operation - Slow ...

Operating Guide
Page 23
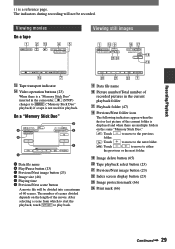
... rewinding the tape (Skip Scan). • You can delete unnecessary pictures in a "Memory Stick Duo" (p. 65). Movies On a Tape: Touch , then touch to the index screen. Movie icon 23 To display pictures on a "Memory Stick Duo" on the PLAY/EDIT lamp. AB C Tape playback ...back in various modes ([VAR. Playback 1 Slide the POWER switch in the direction of the arrow repeatedly to turn on the Index screen Still images Touch . To adjust the volume Touch [VOLUME], then / to adjust the volume. • If you want to display in the single display mode. B...
... rewinding the tape (Skip Scan). • You can delete unnecessary pictures in a "Memory Stick Duo" (p. 65). Movies On a Tape: Touch , then touch to the index screen. Movie icon 23 To display pictures on a "Memory Stick Duo" on the PLAY/EDIT lamp. AB C Tape playback ...back in various modes ([VAR. Playback 1 Slide the POWER switch in the direction of the arrow repeatedly to turn on the Index screen Still images Touch . To adjust the volume Touch [VOLUME], then / to adjust the volume. • If you want to display in the single display mode. B...
Operating Guide
Page 25
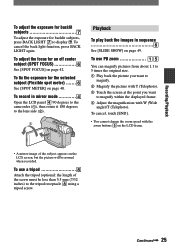
...58161; to the lens side (). 2 1 Playback To play back the images in mirror mode Open the LCD panel 90 degrees to the camcorder (), then rotate it 180 degrees to display . To use a tripod Attach the tripod (optional: the length of the subject appears on the... must be normal when recorded. To record in sequence See [SLIDE SHOW] on page 49. To cancel, touch [END]. • You cannot change the zoom speed with the zoom buttons on the LCD screen, but the picture will be less than 5.5 mm (7/32 inches) to magnify within the displayed frame. &#...
...58161; to the lens side (). 2 1 Playback To play back the images in mirror mode Open the LCD panel 90 degrees to the camcorder (), then rotate it 180 degrees to display . To use a tripod Attach the tripod (optional: the length of the subject appears on the... must be normal when recorded. To record in sequence See [SLIDE SHOW] on page 49. To cancel, touch [END]. • You cannot change the zoom speed with the zoom buttons on the LCD screen, but the picture will be less than 5.5 mm (7/32 inches) to magnify within the displayed frame. &#...
Operating Guide
Page 29
... a scene from which to start the playback, touch to either the previous or the next folder. Image delete button (65) Tape playback select button (23) Previous/Next image button (23) Index screen display button (23) Image protection mark...Playback folder (47) Previous/Next folder icon The following indicators appear when the first or last picture of recorded pictures in the camcorder, (STOP) changes to ("Memory Stick Duo" playback) if a tape is a reference page. The indicators during recording will be recorded. On ...
... a scene from which to start the playback, touch to either the previous or the next folder. Image delete button (65) Tape playback select button (23) Previous/Next image button (23) Index screen display button (23) Image protection mark...Playback folder (47) Previous/Next folder icon The following indicators appear when the first or last picture of recorded pictures in the camcorder, (STOP) changes to ("Memory Stick Duo" playback) if a tape is a reference page. The indicators during recording will be recorded. On ...
Operating Guide
Page 31
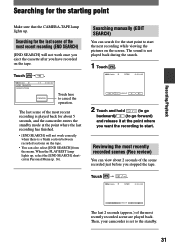
...will not work once you eject the cassette after you want the recording to the standby. 31 Then, your camcorder is not played back during the search. 1 Touch . 6 0 min STBY 0:00:00 EDIT 2 Touch and hold (to go backward)/ (to go forward) and release it at the point where the last recording...a blank section between recorded sections on the tape. • You can view about 5 seconds, and the camcorder enters the standby mode at the point where you have recorded on the screen. The sound is set to start the next recording while viewing the pictures on the tape. When the PLAY...
...will not work once you eject the cassette after you want the recording to the standby. 31 Then, your camcorder is not played back during the search. 1 Touch . 6 0 min STBY 0:00:00 EDIT 2 Touch and hold (to go backward)/ (to go forward) and release it at the point where the last recording...a blank section between recorded sections on the tape. • You can view about 5 seconds, and the camcorder enters the standby mode at the point where you have recorded on the screen. The sound is set to start the next recording while viewing the pictures on the tape. When the PLAY...

Operating Guide
Page 34
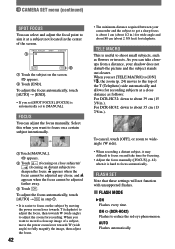
...the tape, set [TV TYPE] to [16:9]. In this operation (p. 10). For DCR-HC42: To set the aspect ratio according to the connected TV (16:9/4:3) Change the setting according to the screen size of an A/V connecting cable (optional). Refer also to the instruction manuals supplied with...] to the playback picture. Playing the picture on the PLAY/EDIT lamp. Touch [MENU] (STANDARD SET) [TV TYPE] [16:9] or [4:3] . • When you connect your camcorder to a TV compatible with the ID-1/ID-2 system, or via the S VIDEO jack...
...the tape, set [TV TYPE] to [16:9]. In this operation (p. 10). For DCR-HC42: To set the aspect ratio according to the connected TV (16:9/4:3) Change the setting according to the screen size of an A/V connecting cable (optional). Refer also to the instruction manuals supplied with...] to the playback picture. Playing the picture on the PLAY/EDIT lamp. Touch [MENU] (STANDARD SET) [TV TYPE] [16:9] or [4:3] . • When you connect your camcorder to a TV compatible with the ID-1/ID-2 system, or via the S VIDEO jack...
Operating Guide
Page 36
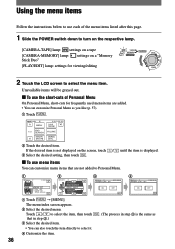
... switch down to turn on the respective lamp. [CAMERA-TAPE] lamp: settings on a tape [CAMERA-MEMORY] lamp: Stick Duo" settings on the screen, touch / until the item is displayed. Select the desired setting, then touch . To use the short-cuts of Personal Menu On Personal Menu, short-cuts for viewing/editing... 2 Touch the LCD screen to select the menu item. Unavailable items will be grayed out. To use menu items You can customize menu items that in step .) &#...
... switch down to turn on the respective lamp. [CAMERA-TAPE] lamp: settings on a tape [CAMERA-MEMORY] lamp: Stick Duo" settings on the screen, touch / until the item is displayed. Select the desired setting, then touch . To use the short-cuts of Personal Menu On Personal Menu, short-cuts for viewing/editing... 2 Touch the LCD screen to select the menu item. Unavailable items will be grayed out. To use menu items You can customize menu items that in step .) &#...

Operating Guide
Page 37
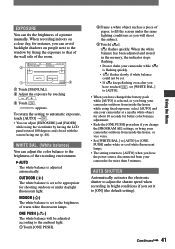
Using the Menu After finishing the settings, touch (close) to the previous screen. 37 If you decide not to change the setting, touch to return to hide the menu screen.
Using the Menu After finishing the settings, touch (close) to the previous screen. 37 If you decide not to change the setting, touch to return to hide the menu screen.
Operating Guide
Page 40
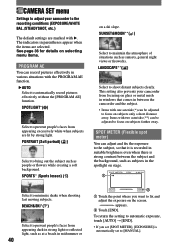
...flowers while creating a soft background. LANDSCAPE**( ) Select to fix and adjust the exposure on the screen. This setting also prevents your camcorder to the recording conditions (EXPOSURE/WHITE BAL./STEADYSHOT, etc.) The default settings are marked with the PROGRAM AE function....8226; Items with two asterisks (**) can record pictures effectively in the spotlight on a ski slope. appears. Touch [END]. The indicators in midsummer or 40 2 Touch the point where you set to minimize shake when shooting fast moving subjects. SPORTS* (Sports lesson) ( ) on...
...flowers while creating a soft background. LANDSCAPE**( ) Select to fix and adjust the exposure on the screen. This setting also prevents your camcorder to the recording conditions (EXPOSURE/WHITE BAL./STEADYSHOT, etc.) The default settings are marked with the PROGRAM AE function....8226; Items with two asterisks (**) can record pictures effectively in the spotlight on a ski slope. appears. Touch [END]. The indicators in midsummer or 40 2 Touch the point where you set to minimize shake when shooting fast moving subjects. SPORTS* (Sports lesson) ( ) on...
Operating Guide
Page 41
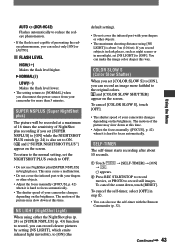
.... WHITE BAL. (White balance) You can adjust the color balance to automatic exposure, touch [AUTO] . • You can adjust [EXPOSURE] and [FADER] while using fixed exposure, select [AUTO] and aim your camcorder at a nearby white object for about 10 seconds for shooting outdoors or under daylight &#... from inside the house while using the viewfinder by having the LCD panel rotated 180 degrees and closed with the screen facing out (p. 48). AUTO SHUTTER Automatically activates the electronic shutter to [ON] (the default setting). EXPOSURE You can avoid backlight shadows...
.... WHITE BAL. (White balance) You can adjust the color balance to automatic exposure, touch [AUTO] . • You can adjust [EXPOSURE] and [FADER] while using fixed exposure, select [AUTO] and aim your camcorder at a nearby white object for about 10 seconds for shooting outdoors or under daylight &#... from inside the house while using the viewfinder by having the LCD panel rotated 180 degrees and closed with the screen facing out (p. 48). AUTO SHUTTER Automatically activates the electronic shutter to [ON] (the default setting). EXPOSURE You can avoid backlight shadows...
Operating Guide
Page 42
...screen. appears. Touch [END]. To adjust the focus automatically, touch [AUTO] [END]. • If you can adjust the focus manually. To cancel, touch [OFF], or zoom to wideangle (W side). • When recording a distant subject, it at a close distance as follows: For DCR-HC32: down to adjust the zoom... for recording. AUTO Flashes automatically. FOCUS You can take time for focusing. • Adjust the focus manually ([FOCUS], p. 42) when it is easier to focus on and take closeups from a distance, your camcorder and ...
...screen. appears. Touch [END]. To adjust the focus automatically, touch [AUTO] [END]. • If you can adjust the focus manually. To cancel, touch [OFF], or zoom to wideangle (W side). • When recording a distant subject, it at a close distance as follows: For DCR-HC32: down to adjust the zoom... for recording. AUTO Flashes automatically. FOCUS You can take time for focusing. • Adjust the focus manually ([FOCUS], p. 42) when it is easier to focus on and take closeups from a distance, your camcorder and ...
Operating Guide
Page 43
...return to the normal setting, set to ON. The motion of your camcorder changes depending on the brightness. You can also use NightShot plus/[SUPER NSPLUS] in bright places. and [COLOR SLOW SHUTTER] appear on the screen. SELF-TIMER The self-timer starts recording after about 3 m (... when it is hard to focus automatically. • The shutter speed of your camcorder changes depending on the brightness. This may slow down , touch [RESET]. To cancel the count down at this time. AUTO (DCR-HC42) Flashes automatically to reduce the redeye phenomenon. • If the flash...
...return to the normal setting, set to ON. The motion of your camcorder changes depending on the brightness. You can also use NightShot plus/[SUPER NSPLUS] in bright places. and [COLOR SLOW SHUTTER] appear on the screen. SELF-TIMER The self-timer starts recording after about 3 m (... when it is hard to focus automatically. • The shutter speed of your camcorder changes depending on the brightness. This may slow down , touch [RESET]. To cancel the count down at this time. AUTO (DCR-HC42) Flashes automatically to reduce the redeye phenomenon. • If the flash...
Operating Guide
Page 48
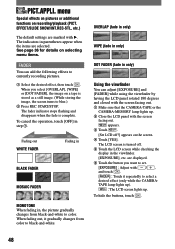
...still image. (While storing the image, the screen turns to currently recording pictures. Select the desired effect, then touch . TAPE lamp lights up). : The LCD screen lights up . Close the LCD panel with / , and touch . [FADER] : Touch it gradually changes from black-and-white to ...fade in only) DOT FADER (fade in the viewfinder. [EXPOSURE], etc. PICT.APPLI. appears. Touch . [Set LCD off . Touch the LCD screen while checking the display in only) Using the viewfinder You can add the following effects to blue.) ...
...still image. (While storing the image, the screen turns to currently recording pictures. Select the desired effect, then touch . TAPE lamp lights up). : The LCD screen lights up . Close the LCD panel with / , and touch . [FADER] : Touch it gradually changes from black-and-white to ...fade in only) DOT FADER (fade in the viewfinder. [EXPOSURE], etc. PICT.APPLI. appears. Touch . [Set LCD off . Touch the LCD screen while checking the display in only) Using the viewfinder You can add the following effects to blue.) ...
Operating Guide
Page 51
...the changes in about 10 minutes.) - stops flashing and the interval still image recording starts. To cancel, touch [REC STOP], then [END]. • When your camcorder, and slide the POWER switch down to observe the movement of the Smooth interval recording. • Smooth interval ...recording is set to ON. When the POWER switch is displayed on the screen. • The camcorder will shoot several frames, it records them on the tape, after shooting has begun. • Sounds are not recorded. •...
...the changes in about 10 minutes.) - stops flashing and the interval still image recording starts. To cancel, touch [REC STOP], then [END]. • When your camcorder, and slide the POWER switch down to observe the movement of the Smooth interval recording. • Smooth interval ...recording is set to ON. When the POWER switch is displayed on the screen. • The camcorder will shoot several frames, it records them on the tape, after shooting has begun. • Sounds are not recorded. •...

Operating Guide
Page 52
...from the DV Interface cannot be played back smoothly in various modes while viewing movies. Touch the following buttons during frame playback. * Horizontal lines may see mosaic-like images of the screen. To return to Video CD Burn) using this command. CANCEL Stops [END SEARCH]. EDIT/...sound. The indicators in various modes (VAR.SPD PB/END SEARCH, etc.) The default settings are selected. BURN DVD When your camcorder is connected to a Sony VAIO series personal computer, you can play back frame by frame (frame) during playback pause. AUD DUB CTRL (Audio dubbing) ...
...from the DV Interface cannot be played back smoothly in various modes while viewing movies. Touch the following buttons during frame playback. * Horizontal lines may see mosaic-like images of the screen. To return to Video CD Burn) using this command. CANCEL Stops [END SEARCH]. EDIT/...sound. The indicators in various modes (VAR.SPD PB/END SEARCH, etc.) The default settings are selected. BURN DVD When your camcorder is connected to a Sony VAIO series personal computer, you can play back frame by frame (frame) during playback pause. AUD DUB CTRL (Audio dubbing) ...
Operating Guide
Page 54
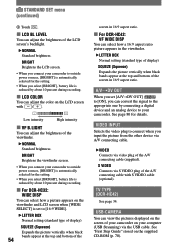
...screen's backlight. NORMAL Standard brightness. STANDARD SET menu (continued) Touch . LCD BL LEVEL You can adjust the brightness of the A/V connecting cable with / . Low intensity High intensity VF B.LIGHT You can adjust the brightness of the A/V connecting cable (supplied). USB-CAMERA You can adjust the color on your camcorder...USB cable. TV TYPE (DCR-HC42) See page 34. BRIGHT Brightens the LCD screen. • When you select [BRIGHT], battery life is reduced by about 10 percent during recording. For DCR-HC32: WIDE DISP You can...
...screen's backlight. NORMAL Standard brightness. STANDARD SET menu (continued) Touch . LCD BL LEVEL You can adjust the brightness of the A/V connecting cable with / . Low intensity High intensity VF B.LIGHT You can adjust the brightness of the A/V connecting cable (supplied). USB-CAMERA You can adjust the color on your camcorder...USB cable. TV TYPE (DCR-HC42) See page 34. BRIGHT Brightens the LCD screen. • When you select [BRIGHT], battery life is reduced by about 10 percent during recording. For DCR-HC32: WIDE DISP You can...

Operating Guide
Page 56
... [ENG[SIMP]] (simplified English) for when you start/stop recording, or operate the touch panel. MENU ROTATE NORMAL Scrolls the menu items downwards by touching . NEVER The camcorder is also available on the LCD screen. CALIBRATION See page 113. 56 TIME/LANGU. You can select from English, Simplified English...
... [ENG[SIMP]] (simplified English) for when you start/stop recording, or operate the touch panel. MENU ROTATE NORMAL Scrolls the menu items downwards by touching . NEVER The camcorder is also available on the LCD screen. CALIBRATION See page 113. 56 TIME/LANGU. You can select from English, Simplified English...


