Operating Guide
Page 2
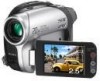
.... Read this first Before operating the unit, please read this product will increase eye hazard. Use of controls or adjustments or performance of rechargeable batteries, call : Sony Customer Information Center 1-800-222-SONY (7669). Refer to rain or moisture. DCR-DVD Serial No. AC-
.... Read this first Before operating the unit, please read this product will increase eye hazard. Use of controls or adjustments or performance of rechargeable batteries, call : Sony Customer Information Center 1-800-222-SONY (7669). Refer to rain or moisture. DCR-DVD Serial No. AC-
Operating Guide
Page 3
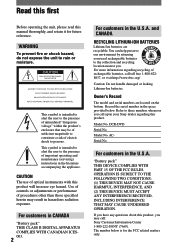
...any interference received, including interference that may cause undesired operation. View finder LCD screen Battery 3 Address: 16450 W. Address: 16450 W. Operation is connected. - However, there is ... with the limits for using the camcorder • Do not hold the camcorder by turning the equipment off and on use Your camcorder is subject to the following parts...-ROM)* * The DCR-DVD92/DVD602 do not include a "First Step Guide". Declaration of Conformity Declaration of Conformity Trade Name: SONY Model No.: DCR-DVD203 Responsible Party:Sony Electronics Inc. Reorient ...
...any interference received, including interference that may cause undesired operation. View finder LCD screen Battery 3 Address: 16450 W. Address: 16450 W. Operation is connected. - However, there is ... with the limits for using the camcorder • Do not hold the camcorder by turning the equipment off and on use Your camcorder is subject to the following parts...-ROM)* * The DCR-DVD92/DVD602 do not include a "First Step Guide". Declaration of Conformity Declaration of Conformity Trade Name: SONY Model No.: DCR-DVD203 Responsible Party:Sony Electronics Inc. Reorient ...
Operating Guide
Page 4
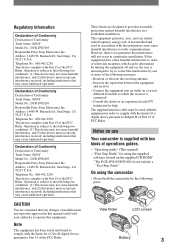
... cause a malfunction of your camcorder. These points are recorded without any problems. You cannot delete images once you record them on a DVD-R. 4 Use a DVD-RW/DVD+RW (not supplied) for trial... of the sun only in Germany, and Sony Corporation, and produces superior images. You cannot dub copyright protected software on the model DCR-DVD403. Read this first (continued)... − to remove the battery pack or AC Adaptor from the camcorder. − to apply mechanical shock or vibration to the camcorder. • Before connecting your camcorder to make sure the picture and...
... cause a malfunction of your camcorder. These points are recorded without any problems. You cannot delete images once you record them on a DVD-R. 4 Use a DVD-RW/DVD+RW (not supplied) for trial... of the sun only in Germany, and Sony Corporation, and produces superior images. You cannot dub copyright protected software on the model DCR-DVD403. Read this first (continued)... − to remove the battery pack or AC Adaptor from the camcorder. − to apply mechanical shock or vibration to the camcorder. • Before connecting your camcorder to make sure the picture and...
Operating Guide
Page 6
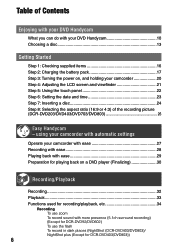
... or 4:3) of Contents Enjoying with your DVD Handycam What you can do with your DVD Handycam 10 Choosing a disc 13 Getting Started Step 1: Checking supplied items 16 Step 2: Charging the battery pack 17 Step 3: Turning the power on, and holding your camcorder with ease 27 Recording with ease 28...DVD player (Finalizing 30 Recording/Playback Recording 32 Playback 33 Functions used for recording/playback, etc 34 Recording To use zoom To record sound with more presence (5.1ch surround recording) (Except for DCR-DVD92/DVD602) To use the flash To record in dark places (NightShot (DCR-...
... or 4:3) of Contents Enjoying with your DVD Handycam What you can do with your DVD Handycam 10 Choosing a disc 13 Getting Started Step 1: Checking supplied items 16 Step 2: Charging the battery pack 17 Step 3: Turning the power on, and holding your camcorder with ease 27 Recording with ease 28...DVD player (Finalizing 30 Recording/Playback Recording 32 Playback 33 Functions used for recording/playback, etc 34 Recording To use zoom To record sound with more presence (5.1ch surround recording) (Except for DCR-DVD92/DVD602) To use the flash To record in dark places (NightShot (DCR-...
Operating Guide
Page 7
...battery To turn off the operation confirmation beep To initialize the settings Other part names and functions Checking/Deleting the last scene (Review/Review deleting 38 Indicators displayed during recording/playback 39 Remote Commander (Except for DCR-DVD92/DVD602 41 Playing the picture on a TV 42 Playback on DVD...the recorded disc (DVD-RW/DVD+RW) Recording additional scenes after finalizing 50 Deleting all of the scenes on the disc (Formatting 51 Using the Setup items Using the Setup items 52 Setup items 54 CAMERA SET 56 Settings to adjust your camcorder to the recording ...
...battery To turn off the operation confirmation beep To initialize the settings Other part names and functions Checking/Deleting the last scene (Review/Review deleting 38 Indicators displayed during recording/playback 39 Remote Commander (Except for DCR-DVD92/DVD602 41 Playing the picture on a TV 42 Playback on DVD...the recorded disc (DVD-RW/DVD+RW) Recording additional scenes after finalizing 50 Deleting all of the scenes on the disc (Formatting 51 Using the Setup items Using the Setup items 52 Setup items 54 CAMERA SET 56 Settings to adjust your camcorder to the recording ...
Operating Guide
Page 9
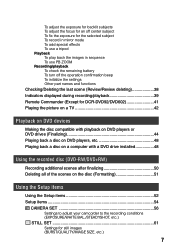
Troubleshooting Troubleshooting 87 Warning indicators and messages 101 Additional Information Using your camcorder abroad 105 About the "InfoLITHIUM" battery pack 107 Maintenance and precautions 109 Using the Strap Belt as a wrist strap 113 Attaching the Shoulder Strap 113 Specifications 114 Index...117 9
Troubleshooting Troubleshooting 87 Warning indicators and messages 101 Additional Information Using your camcorder abroad 105 About the "InfoLITHIUM" battery pack 107 Maintenance and precautions 109 Using the Strap Belt as a wrist strap 113 Attaching the Shoulder Strap 113 Specifications 114 Index...117 9
Operating Guide
Page 16
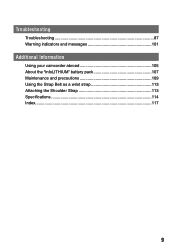
... DVD-R DMR30 (1) (p.13) (Except for DCR-DVD92/DVD602) AC Adaptor (1) (p.17) Power cord (1) (p.17) Cleaning cloth (1) Shoulder strap (1) (p.113) Shoe cover (1) (p.81) (Except for DCR-DVD92/DVD602) A button-type lithium battery is already installed. 16 The number in the parentheses indicates the number of that you have following items supplied with your camcorder. Lens cap (1) (p.20) (DCR-DVD92/DVD602...
... DVD-R DMR30 (1) (p.13) (Except for DCR-DVD92/DVD602) AC Adaptor (1) (p.17) Power cord (1) (p.17) Cleaning cloth (1) Shoulder strap (1) (p.113) Shoe cover (1) (p.81) (Except for DCR-DVD92/DVD602) A button-type lithium battery is already installed. 16 The number in the parentheses indicates the number of that you have following items supplied with your camcorder. Lens cap (1) (p.20) (DCR-DVD92/DVD602...
Operating Guide
Page 17
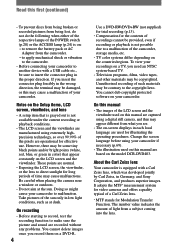
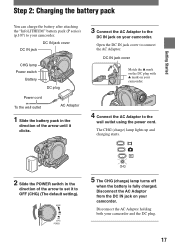
... the AC Adaptor to the wall outlet using the power cord. Getting Started Step 2: Charging the battery pack You can charge the battery after attaching the "InfoLITHIUM" battery pack (P series) (p.107) to your camcorder and the DC plug. 17 Open the DC IN jack cover to connect the AC Adaptor. MODE... ON OFF (CHG) POWER CHG 5 The CHG (charge) lamp turns off when the battery is fully charged. ...
... the AC Adaptor to the wall outlet using the power cord. Getting Started Step 2: Charging the battery pack You can charge the battery after attaching the "InfoLITHIUM" battery pack (P series) (p.107) to your camcorder and the DC plug. 17 Open the DC IN jack cover to connect the AC Adaptor. MODE... ON OFF (CHG) POWER CHG 5 The CHG (charge) lamp turns off when the battery is fully charged. ...
Operating Guide
Page 18
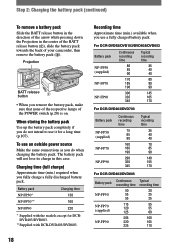
.../DVD803. **Supplied with DCR-DVD403/DVD803. For DCR-DVD92/DVD103/DVD602/DVD653 Battery pack NP-FP50 (supplied) NP-FP70 NP-FP90 Continuous recording time 80 85 90 170 185 190 300 335 345 Typical recording time 35 40 40 80 90 90 145 165 170 For DCR-DVD203/DVD703 Battery pack NP-FP50 (supplied...not intend to use an outside power source Make the same connections as you remove the battery pack, make sure that none of the respective lamps of your camcorder, then remove the battery pack (). The battery pack will not lose its charge in the center of the BATT release button (),...
.../DVD803. **Supplied with DCR-DVD403/DVD803. For DCR-DVD92/DVD103/DVD602/DVD653 Battery pack NP-FP50 (supplied) NP-FP70 NP-FP90 Continuous recording time 80 85 90 170 185 190 300 335 345 Typical recording time 35 40 40 80 90 90 145 165 170 For DCR-DVD203/DVD703 Battery pack NP-FP50 (supplied...not intend to use an outside power source Make the same connections as you remove the battery pack, make sure that none of the respective lamps of your camcorder, then remove the battery pack (). The battery pack will not lose its charge in the center of the BATT release button (),...
Operating Guide
Page 19
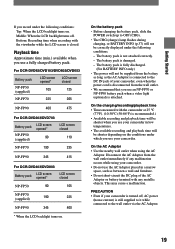
...DCR-DVD92/DVD103/DVD602/DVD653 Battery pack NP-FP50 (supplied) LCD screen opened* 105 LCD screen closed 125 NP-FP70 225 265 NP-FP90 400 475 For DCR-DVD203/DVD703 Battery pack LCD screen opened* LCD screen closed NP-FP50 (supplied) 90 110 NP-FP70 190 235 NP-FP90 345 415 For DCR-DVD403/DVD803 Battery...AC Adaptor • Use the nearby wall outlet when using your camcorder. PRECAUTION • Even if your camcorder is recommended.) • Available recording and playback time will be shorter when you use your camcorder. • Do not use the AC Adaptor placed in low ...
...DCR-DVD92/DVD103/DVD602/DVD653 Battery pack NP-FP50 (supplied) LCD screen opened* 105 LCD screen closed 125 NP-FP70 225 265 NP-FP90 400 475 For DCR-DVD203/DVD703 Battery pack LCD screen opened* LCD screen closed NP-FP50 (supplied) 90 110 NP-FP70 190 235 NP-FP90 345 415 For DCR-DVD403/DVD803 Battery...AC Adaptor • Use the nearby wall outlet when using your camcorder. PRECAUTION • Even if your camcorder is recommended.) • Available recording and playback time will be shorter when you use your camcorder. • Do not use the AC Adaptor placed in low ...
Operating Guide
Page 20
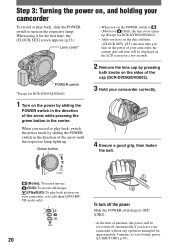
... sliding the POWER switch in the direction of the cap (DCR-DVD92/DVD602). 3 Hold your camcorder correctly. 1 Turn on the LCD screen for a few seconds. Green button MODE 4 Ensure a good grip, then fasten the belt. When you have set the POWER switch to save battery power. ([A.SHUT OFF], p.69). ON OFF (CHG) .../Edit): To play back pictures on the respective lamp. Step 3: Turning the power on, and holding your camcorder To record or play back, slide the POWER switch to turn on your camcorder, or to edit them (DVD-RW: VR mode only) CHG 20 To turn off automatically if you leave your...
... sliding the POWER switch in the direction of the cap (DCR-DVD92/DVD602). 3 Hold your camcorder correctly. 1 Turn on the LCD screen for a few seconds. Green button MODE 4 Ensure a good grip, then fasten the belt. When you have set the POWER switch to save battery power. ([A.SHUT OFF], p.69). ON OFF (CHG) .../Edit): To play back pictures on the respective lamp. Step 3: Turning the power on, and holding your camcorder To record or play back, slide the POWER switch to turn on your camcorder, or to edit them (DVD-RW: VR mode only) CHG 20 To turn off automatically if you leave your...
Operating Guide
Page 21
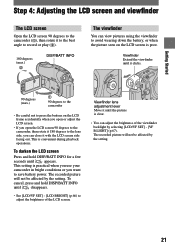
... or play (). 180 degrees (max.) DISP/BATT INFO The viewfinder You can view pictures using the viewfinder to save battery power. Viewfinder Extend the viewfinder until appears. To darken the LCD screen Press and hold DISP/BATT INFO until the picture... seen on the LCD frame accidentally when you open or adjust the LCD screen. • If you open the LCD screen 90 degrees to the camcorder, then rotate it with the LCD screen side facing out. This setting is convenient during playback operations. The recorded picture will not be affected by...
... or play (). 180 degrees (max.) DISP/BATT INFO The viewfinder You can view pictures using the viewfinder to save battery power. Viewfinder Extend the viewfinder until appears. To darken the LCD screen Press and hold DISP/BATT INFO until the picture... seen on the LCD frame accidentally when you open or adjust the LCD screen. • If you open the LCD screen 90 degrees to the camcorder, then rotate it with the LCD screen side facing out. This setting is convenient during playback operations. The recorded picture will not be affected by...

Operating Guide
Page 23
... area with / , then touch . 5 Set [DST] or [SUMMERTIME] to 12:00 AM. The clock starts. If you do not use your camcorder for the first time. In that case, charge the rechargeable battery and then set the date and time, the [CLOCK SET] screen appears every time you turn on your... JANM 1D 12: 00 AM OK 2 Select TIME/LANGU. Step 6: Setting the date and time Getting Started Set the date and time when using this camcorder for about 3 months, the built-in rechargeable battery gets discharged and the date and time settings may be cleared from the memory.
... area with / , then touch . 5 Set [DST] or [SUMMERTIME] to 12:00 AM. The clock starts. If you do not use your camcorder for the first time. In that case, charge the rechargeable battery and then set the date and time, the [CLOCK SET] screen appears every time you turn on your... JANM 1D 12: 00 AM OK 2 Select TIME/LANGU. Step 6: Setting the date and time Getting Started Set the date and time when using this camcorder for about 3 months, the built-in rechargeable battery gets discharged and the date and time settings may be cleared from the memory.
Operating Guide
Page 25
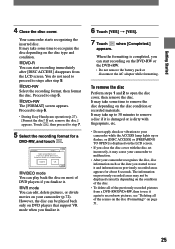
...recorded pictures from the LCD screen. Proceed to step 6. • During Easy Handycam operation (p.27), [Format the disc? Proceed to step 5. DVD+RW The [FORMAT] screen appears. Cannot edit in Camcorder VIDEO VR OK VIDEO mode You can play back the disc on most...[YES] [YES]. 7 Touch when [Completed.] appears. However, the disc can start recording on the DVD-RW or the DVD+RW. • Do not remove the battery pack or disconnect the AC adaptor while formatting. Getting Started 4 Close the disc cover. Your camcorder starts recognizing the inserted disc.
...recorded pictures from the LCD screen. Proceed to step 6. • During Easy Handycam operation (p.27), [Format the disc? Proceed to step 5. DVD+RW The [FORMAT] screen appears. Cannot edit in Camcorder VIDEO VR OK VIDEO mode You can play back the disc on most...[YES] [YES]. 7 Touch when [Completed.] appears. However, the disc can start recording on the DVD-RW or the DVD+RW. • Do not remove the battery pack or disconnect the AC adaptor while formatting. Getting Started 4 Close the disc cover. Your camcorder starts recognizing the inserted disc.
Operating Guide
Page 35
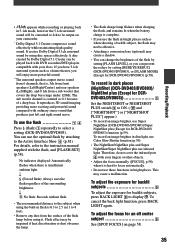
...ash charge lamp flickers when charging the flash, and remains lit when the battery charge is complete. • If you can be converted to 2ch to the instruction ...as a home theater, you will be played back with DVD recorders/DVD players compatible with your discs. To adjust the focus for DCR-DVD403/DVD803) (p.58). Therefore, do not cover the ...5.1ch surround sound by setting [REDEYE REDUC] (DCR-DVD403/DVD803), or [FLASH MODE] (Except for an off center subject See [SPOT FOCUS] on your camcorder. * Dolby Digital 5.1 Creater compresses sound effectively while...
...ash charge lamp flickers when charging the flash, and remains lit when the battery charge is complete. • If you can be converted to 2ch to the instruction ...as a home theater, you will be played back with DVD recorders/DVD players compatible with your discs. To adjust the focus for DCR-DVD403/DVD803) (p.58). Therefore, do not cover the ...5.1ch surround sound by setting [REDEYE REDUC] (DCR-DVD403/DVD803), or [FLASH MODE] (Except for an off center subject See [SPOT FOCUS] on your camcorder. * Dolby Digital 5.1 Creater compresses sound effectively while...
Operating Guide
Page 37
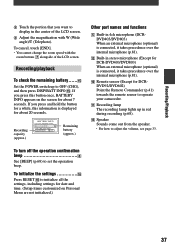
...; Speaker Sounds come out from the speaker. • For how to adjust the volume, see page 33. Recording capacity (approx.) Remaining battery (approx.) Other part names and functions Built-in 4ch microphone (DCRDVD403/DVD803) When an external microphone (optional) is connected, it...microphone (p.81). Built-in stereo microphone (Except for DCR-DVD403/DVD803) When an external microphone (optional) is displayed for DCRDVD92/DVD602) Point the Remote Commander (p.41) towards the remote sensor to operate your camcorder. Recording lamp The recording lamp lights up to ...
...; Speaker Sounds come out from the speaker. • For how to adjust the volume, see page 33. Recording capacity (approx.) Remaining battery (approx.) Other part names and functions Built-in 4ch microphone (DCRDVD403/DVD803) When an external microphone (optional) is connected, it...microphone (p.81). Built-in stereo microphone (Except for DCR-DVD403/DVD803) When an external microphone (optional) is displayed for DCRDVD92/DVD602) Point the Remote Commander (p.41) towards the remote sensor to operate your camcorder. Recording lamp The recording lamp lights up to ...
Operating Guide
Page 39
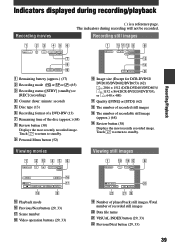
...to return to standby. Personal Menu button (52) Viewing movies Image size (Except for DCR-DVD92/ DVD103/DVD602/DVD653) (62) 2016 × 1512 (DCR-DVD403/DVD803)/ 1152 × 864(DCR-DVD203/DVD703), or 640 × 480) Quality ([FINE] or [STD]) (62) ...Playback Remaining battery (approx.) (37) Recording mode ( or or ) (65) Recording status ([STBY] (standby) or [REC] (recording) Counter (hour: minute: second) Disc type (13) Recording format of a DVD-RW (13) &#...
...to return to standby. Personal Menu button (52) Viewing movies Image size (Except for DCR-DVD92/ DVD103/DVD602/DVD653) (62) 2016 × 1512 (DCR-DVD403/DVD803)/ 1152 × 864(DCR-DVD203/DVD703), or 640 × 480) Quality ([FINE] or [STD]) (62) ...Playback Remaining battery (approx.) (37) Recording mode ( or or ) (65) Recording status ([STBY] (standby) or [REC] (recording) Counter (hour: minute: second) Disc type (13) Recording format of a DVD-RW (13) &#...
Operating Guide
Page 41
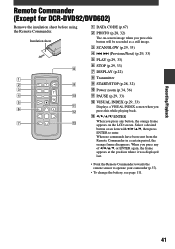
Recording/Playback Remote Commander (Except for DCR-DVD92/DVD602) Remove the insulation sheet before using the Remote Commander. Select a desired button or an item with then press ENTER to operate your camcorder (p.37). • To change the battery, see page 111. 41 Insulation sheet DATA CODE (p.67) PHOTO (p.28, 32) The on the...
Recording/Playback Remote Commander (Except for DCR-DVD92/DVD602) Remove the insulation sheet before using the Remote Commander. Select a desired button or an item with then press ENTER to operate your camcorder (p.37). • To change the battery, see page 111. 41 Insulation sheet DATA CODE (p.67) PHOTO (p.28, 32) The on the...
Operating Guide
Page 57
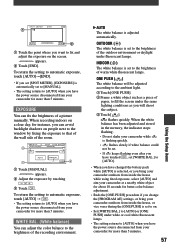
...xing the exposure to the brightness of paper, to fix and adjust the exposure on people next to [AUTO]. • When you bring your camcorder for more than 5 minutes. 57 Using the Setup items appears. Touch [END]. ONE PUSH ( ) The white balance will be set... set to [MANUAL]. • The setting returns to [AUTO] when you have changed the battery pack while [AUTO] is selected, or you have the power source disconnected from your camcorder outdoors from your camcorder for more than 5 minutes. OUTDOOR ( ) The white balance is set [SPOT METER], [...
...xing the exposure to the brightness of paper, to fix and adjust the exposure on people next to [AUTO]. • When you bring your camcorder for more than 5 minutes. 57 Using the Setup items appears. Touch [END]. ONE PUSH ( ) The white balance will be set... set to [MANUAL]. • The setting returns to [AUTO] when you have changed the battery pack while [AUTO] is selected, or you have the power source disconnected from your camcorder outdoors from your camcorder for more than 5 minutes. OUTDOOR ( ) The white balance is set [SPOT METER], [...
Operating Guide
Page 66
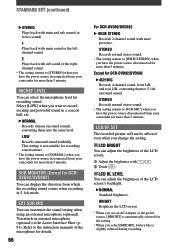
... exciting and powerful sound in 5.1ch mode. LCD/VF SET The recorded picture will not be affected even when you select [BRIGHT], battery life is not suitable for DCRDVD92/DVD602) You can adjust the brightness of the LCD screen. Adjust the brightness with ... from your camcorder for more than 5 minutes. This setting is slightly reduced during recording. Except for more than 5 minutes. LOW Records surround sound faithfully. You attach an external microphone (optional) to [WIDE STEREO] when you have the power source disconnected for DCR-DVD92/DVD602 ...
... exciting and powerful sound in 5.1ch mode. LCD/VF SET The recorded picture will not be affected even when you select [BRIGHT], battery life is not suitable for DCRDVD92/DVD602) You can adjust the brightness of the LCD screen. Adjust the brightness with ... from your camcorder for more than 5 minutes. This setting is slightly reduced during recording. Except for more than 5 minutes. LOW Records surround sound faithfully. You attach an external microphone (optional) to [WIDE STEREO] when you have the power source disconnected for DCR-DVD92/DVD602 ...


