Operating Guide
Page 1
Digital Video Camera Recorder Operating Guide DCR-DVD92/DVD103/DVD203/ DVD403/DVD602/DVD653/DVD703/ DVD803 2-587-622-13 (1) Enjoying with your DVD Handycam 10 Getting Started 16 Easy Handycam 27 Recording/ Playback 32 Playback on DVD devices 44 Using the Recorded disc 50 Using the Setup items 52 Editing on DVD Handycam 72 Dubbing 78 Using a Computer 82 Troubleshooting 87 Additional Information 105 © 2005 Sony Corporation
Digital Video Camera Recorder Operating Guide DCR-DVD92/DVD103/DVD203/ DVD403/DVD602/DVD653/DVD703/ DVD803 2-587-622-13 (1) Enjoying with your DVD Handycam 10 Getting Started 16 Easy Handycam 27 Recording/ Playback 32 Playback on DVD devices 44 Using the Recorded disc 50 Using the Setup items 52 Editing on DVD Handycam 72 Dubbing 78 Using a Computer 82 Troubleshooting 87 Additional Information 105 © 2005 Sony Corporation
Operating Guide
Page 27
... Operate your camcorder turns on in Easy Handycam operation automatically when you turn off . • If you set an invalid operation, [Invalid during Easy Handycam operation] appears. 27 Complete the preparations described in the direction of the camera settings are automatically adjusted optimally, which frees you cannot use the editing function (p.72). using a DVD-RW disc...
... Operate your camcorder turns on in Easy Handycam operation automatically when you turn off . • If you set an invalid operation, [Invalid during Easy Handycam operation] appears. 27 Complete the preparations described in the direction of the camera settings are automatically adjusted optimally, which frees you cannot use the editing function (p.72). using a DVD-RW disc...
Operating Guide
Page 54
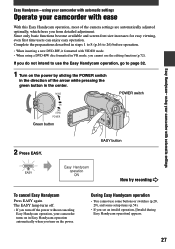
EFFECT PICT. EFFECT REC CTRL 3) SLIDE SHOW DEMO MODE Movie − − − Still Play/Edit − − − − − − − − − − − &#...8722; − 54 PICT.APPLI. (p.63) FADER D. Setup items Available setup items () vary depending on the position of lamp: CAMERA SET (p.56) PROGRAM AE SPOT METER EXPOSURE WHITE BAL. AUTO SHUTTER SPOT FOCUS FOCUS FLASH SET SUPER NS/SUPER NSPLUS NS LIGHT COLOR ...
EFFECT PICT. EFFECT REC CTRL 3) SLIDE SHOW DEMO MODE Movie − − − Still Play/Edit − − − − − − − − − − − &#...8722; − 54 PICT.APPLI. (p.63) FADER D. Setup items Available setup items () vary depending on the position of lamp: CAMERA SET (p.56) PROGRAM AE SPOT METER EXPOSURE WHITE BAL. AUTO SHUTTER SPOT FOCUS FOCUS FLASH SET SUPER NS/SUPER NSPLUS NS LIGHT COLOR ...
Operating Guide
Page 77
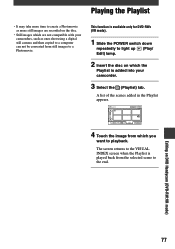
... the (Playlist) tab. The screen returns to the VISUAL INDEX screen when the Playlist is added into your camcorders, such as ones shot using a digital still camera and then copied to a computer can not be converted from the selected scene to a Photomovie. A list of the scenes added in ... images which you want to playback. Editing on which the Playlist is played back from still images to the end. This function is available only for DVD-RWs (VR mode). 1 Slide the POWER switch down repeatedly to light up (Play/ Edit) lamp. 2 Insert the disc on DVD Handycam (DVD-RW:VR mode) 77
... the (Playlist) tab. The screen returns to the VISUAL INDEX screen when the Playlist is added into your camcorders, such as ones shot using a digital still camera and then copied to a computer can not be converted from the selected scene to a Photomovie. A list of the scenes added in ... images which you want to playback. Editing on which the Playlist is played back from still images to the end. This function is available only for DVD-RWs (VR mode). 1 Slide the POWER switch down repeatedly to light up (Play/ Edit) lamp. 2 Insert the disc on DVD Handycam (DVD-RW:VR mode) 77
Operating Guide
Page 79
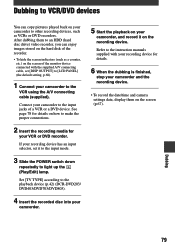
...the playback device (p.42) (DCR-DVD203/ DVD403/DVD703/DVD803). 4 Insert the recorded disc into your camcorder. 5 Start the playback on your camcorder, and record it to the input mode. 3 Slide the POWER switch down repeatedly to light up the (Play/Edit) lamp. After dubbing them ...DVD recorders. Refer to the instruction manuals supplied with the supplied A/V connecting cable, set it on how to make the proper connections. 2 Insert the recording media for details. 6 When the dubbing is finished, stop your camcorder and the recording device. • To record the date/time and camera...
...the playback device (p.42) (DCR-DVD203/ DVD403/DVD703/DVD803). 4 Insert the recorded disc into your camcorder. 5 Start the playback on your camcorder, and record it to the input mode. 3 Slide the POWER switch down repeatedly to light up the (Play/Edit) lamp. After dubbing them ...DVD recorders. Refer to the instruction manuals supplied with the supplied A/V connecting cable, set it on how to make the proper connections. 2 Insert the recording media for details. 6 When the dubbing is finished, stop your camcorder and the recording device. • To record the date/time and camera...

Operating Guide
Page 117
BRKTG 61 NORMAL 61 B&W 64 C CALIBRATION 110 CAMERA DATA 67 CAMERA SET 56 Charging the battery 17 Battery pack 18 Charging time 18 CHG (charge) lamp 17 Cleaning cloth 5 CLOCK SET 23 COLOR SLOW S (Color Slow ... Disc title 46, 65 DISP/BATT INFO.... 21, 22, 37 Display indicators .......... 39, 40 DISP OUTPUT 68 Dubbing 79 DVD menu 45 D.EFFECT (Digital effect 63 E EASY button 27 Easy Handycam operation ... 27 Edit 72 EXPOSURE 57, 94 EXT SUR MIC 66 F FADER 63, 95 FILE NO. (File number) ...... 62 Finalize 44 First...
BRKTG 61 NORMAL 61 B&W 64 C CALIBRATION 110 CAMERA DATA 67 CAMERA SET 56 Charging the battery 17 Battery pack 18 Charging time 18 CHG (charge) lamp 17 Cleaning cloth 5 CLOCK SET 23 COLOR SLOW S (Color Slow ... Disc title 46, 65 DISP/BATT INFO.... 21, 22, 37 Display indicators .......... 39, 40 DISP OUTPUT 68 Dubbing 79 DVD menu 45 D.EFFECT (Digital effect 63 E EASY button 27 Easy Handycam operation ... 27 Edit 72 EXPOSURE 57, 94 EXT SUR MIC 66 F FADER 63, 95 FILE NO. (File number) ...... 62 Finalize 44 First...


