Operating Guide
Page 16
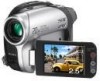
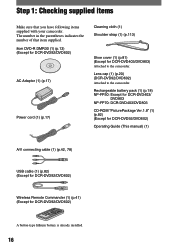
... manual) (1) A/V connecting cable (1) (p.42, 78) USB cable (1) (p.82) (Except for DCR-DVD92/DVD602) Wireless Remote Commander (1) (p.41) (Except for DCR-DVD403/DVD803) Attached to the camcorder. Step 1: Checking supplied items Make sure that item supplied. 8cm DVD-R DMR30 (1) (p.13) (Except for DCR-DVD92/DVD602) AC Adaptor (1) (p.17) Power cord (1) (p.17) Cleaning cloth (1) Shoulder strap (1) (p.113) Shoe cover (1) (p.81) (Except...
... manual) (1) A/V connecting cable (1) (p.42, 78) USB cable (1) (p.82) (Except for DCR-DVD92/DVD602) Wireless Remote Commander (1) (p.41) (Except for DCR-DVD403/DVD803) Attached to the camcorder. Step 1: Checking supplied items Make sure that item supplied. 8cm DVD-R DMR30 (1) (p.13) (Except for DCR-DVD92/DVD602) AC Adaptor (1) (p.17) Power cord (1) (p.17) Cleaning cloth (1) Shoulder strap (1) (p.113) Shoe cover (1) (p.81) (Except...
Operating Guide
Page 17
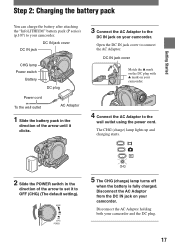
... the "InfoLITHIUM" battery pack (P series) (p.107) to your camcorder and the DC plug. 17 Open the DC IN jack cover to the wall outlet using the power cord. The CHG (charge) lamp lights up and charging starts. 2 Slide the POWER switch in the direction of the arrow to set it clicks.... 3 Connect the AC Adaptor to the DC IN jack on your camcorder. Disconnect the AC Adaptor holding both your camcorder. Disconnect the AC ...
... the "InfoLITHIUM" battery pack (P series) (p.107) to your camcorder and the DC plug. 17 Open the DC IN jack cover to the wall outlet using the power cord. The CHG (charge) lamp lights up and charging starts. 2 Slide the POWER switch in the direction of the arrow to set it clicks.... 3 Connect the AC Adaptor to the DC IN jack on your camcorder. Disconnect the AC Adaptor holding both your camcorder. Disconnect the AC ...
Operating Guide
Page 19
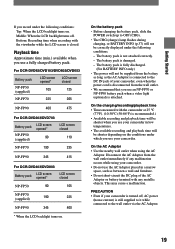
... changing the battery pack, slide the POWER switch up to OFF (CHG). • The CHG (charge) lamp flashes during charging, or BATTERY INFO (p.37) will be shorter depending on . PRECAUTION • Even if your camcorder. Getting Started If you use a fully charged battery pack. For DCR-DVD92/DVD103/DVD602/DVD653 Battery pack NP... time will not be supplied from the battery as long as between a wall and furniture. • Do not short-circuit the DC plug of your camcorder, even when the power cord is disconnected from the wall outlet immediately if any metallic objects.
... changing the battery pack, slide the POWER switch up to OFF (CHG). • The CHG (charge) lamp flashes during charging, or BATTERY INFO (p.37) will be shorter depending on . PRECAUTION • Even if your camcorder. Getting Started If you use a fully charged battery pack. For DCR-DVD92/DVD103/DVD602/DVD653 Battery pack NP... time will not be supplied from the battery as long as between a wall and furniture. • Do not short-circuit the DC plug of your camcorder, even when the power cord is disconnected from the wall outlet immediately if any metallic objects.
Operating Guide
Page 50
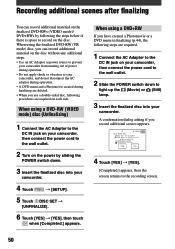
...) or (Still) lamp. 3 Insert the finalized disc into your camcorder. When using a DVD-RW (VIDEO mode) disc (Unfinalizing) 1 Connect the AC Adaptor to the DC IN jack on your camcorder, then connect the power cord to the wall outlet. 2 Turn on the power by following the steps below if there is space to...
...) or (Still) lamp. 3 Insert the finalized disc into your camcorder. When using a DVD-RW (VIDEO mode) disc (Unfinalizing) 1 Connect the AC Adaptor to the DC IN jack on your camcorder, then connect the power cord to the wall outlet. 2 Turn on the power by following the steps below if there is space to...
Operating Guide
Page 51
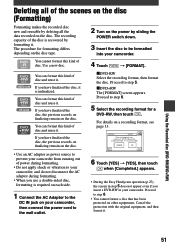
... 1 Connect the AC Adaptor to the DC IN jack on your camcorder, then connect the power cord to prevent your camcorder. Deleting all the data recorded on the disc. The recording capacity of disc and reuse it . The procedure for a DVD-RW, then touch . If you have finalized the disc,...For details on the disc. • Use an AC adaptor as power source to the wall outlet. 6 Touch [YES] [YES], then touch when [Completed.] appears. • During the Easy Handycam operation (p.27), the screen in your camcorder from running out of disc and reuse it . Using the Recorded ...
... 1 Connect the AC Adaptor to the DC IN jack on your camcorder, then connect the power cord to prevent your camcorder. Deleting all the data recorded on the disc. The recording capacity of disc and reuse it . The procedure for a DVD-RW, then touch . If you have finalized the disc,...For details on the disc. • Use an AC adaptor as power source to the wall outlet. 6 Touch [YES] [YES], then touch when [Completed.] appears. • During the Easy Handycam operation (p.27), the screen in your camcorder from running out of disc and reuse it . Using the Recorded ...
Operating Guide
Page 109
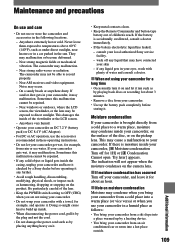
... the battery is moisture inside . • When disconnecting the power cord, pull it by the plug and not the cord. • Do not damage the power cord such as by a Sony dealer before storing it any solid object or liquid gets inside the casing, unplug your camcorder from an air conditioned car or room into a hot place...
... the battery is moisture inside . • When disconnecting the power cord, pull it by the plug and not the cord. • Do not damage the power cord such as by a Sony dealer before storing it any solid object or liquid gets inside the casing, unplug your camcorder from an air conditioned car or room into a hot place...
Operating Guide
Page 116
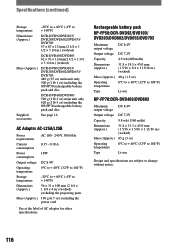
... subject to + 140°F) Dimensions (Approx.) DCR-DVD92/DVD103/ DVD203/DVD602/DVD653/ DVD703: 57 × 87 × 131mm (2 1/4 × 3 1/2 × 5 1/4 in.) (w×h×d) DCR-DVD403/DVD803 62 × 93 × 133mm(2 1/2 × 3 3/4 × 5 1/4 in .) (w×h×d) excluding the projecting parts Mass (Approx.) 190 g (6.7 oz) excluding the power cord * See at the label of AC adaptor...
... subject to + 140°F) Dimensions (Approx.) DCR-DVD92/DVD103/ DVD203/DVD602/DVD653/ DVD703: 57 × 87 × 131mm (2 1/4 × 3 1/2 × 5 1/4 in.) (w×h×d) DCR-DVD403/DVD803 62 × 93 × 133mm(2 1/2 × 3 3/4 × 5 1/4 in .) (w×h×d) excluding the projecting parts Mass (Approx.) 190 g (6.7 oz) excluding the power cord * See at the label of AC adaptor...
Operating Guide
Page 118
... (Picture effect 64 Pixela User Support Center.. 86 Playback 29, 33 118 Playlist ADD 74 DIVIDE 76 Erase 74 MOVE 75 PORTRAIT (Soft portrait) ... 56 Power cord 17 POWER switch 17 Previous/next button 39 PROGRAM AE 56, 94 Protect 4, 51 P.MENU .... Index (continued) N NightShot/NightShot plus ...... 59, 95 SUR MONITOR 66 S VIDEO...
... (Picture effect 64 Pixela User Support Center.. 86 Playback 29, 33 118 Playlist ADD 74 DIVIDE 76 Erase 74 MOVE 75 PORTRAIT (Soft portrait) ... 56 Power cord 17 POWER switch 17 Previous/next button 39 PROGRAM AE 56, 94 Protect 4, 51 P.MENU .... Index (continued) N NightShot/NightShot plus ...... 59, 95 SUR MONITOR 66 S VIDEO...


