

Operating Guide
Page 3
...to radio or television reception, which the receiver is supplied with 2 kinds of Conformity Trade Name: SONY Model No.: DCR-DVD7 Responsible Party: Sony Electronics Inc. Operation is subject to the camcorder. 3 However, there is on: − to remove the battery pack or AC Adaptor from the... camcorder. − to apply mechanical shock or vibration to the following when either of the respective lamps of ...
...to radio or television reception, which the receiver is supplied with 2 kinds of Conformity Trade Name: SONY Model No.: DCR-DVD7 Responsible Party: Sony Electronics Inc. Operation is subject to the camcorder. 3 However, there is on: − to remove the battery pack or AC Adaptor from the... camcorder. − to apply mechanical shock or vibration to the following when either of the respective lamps of ...
Operating Guide
Page 4
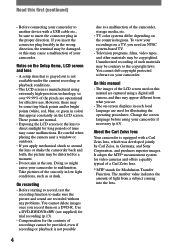
...camcorder, storage media, etc. • TV color systems differ depending on the countries/regions. Doing so might cause your camcorder... if necessary (p.63). Take pictures of recordings cannot be sure to insert the connector plug in the proper direction. Use a DVD-RW/DVD... camcorder to malfunction. Unauthorized recording of the LCD screen used on a DVD-R....to around the lens or shake the camcorder back and forth, the picture may be...constantly on your camcorder. About the Carl Zeiss lens Your camcorder is equipped ...camcorder to another device with a Carl Zeiss lens, which ...
...camcorder, storage media, etc. • TV color systems differ depending on the countries/regions. Doing so might cause your camcorder... if necessary (p.63). Take pictures of recordings cannot be sure to insert the connector plug in the proper direction. Use a DVD-RW/DVD... camcorder to malfunction. Unauthorized recording of the LCD screen used on a DVD-R....to around the lens or shake the camcorder back and forth, the picture may be...constantly on your camcorder. About the Carl Zeiss lens Your camcorder is equipped ...camcorder to another device with a Carl Zeiss lens, which ...
Operating Guide
Page 5
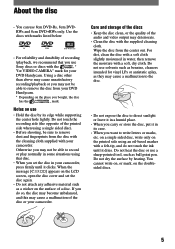
... sided disc). • Before shooting, be sure to remove the disc from your DVD Handycam. * Depending on use a sharp-pointed tool, such as a sticker on the LCD screen, open the disc cover and set the disc in your camcorder, press firmly until it in water, then remove the moisture with a soft...the disc with the supplied cleaning cloth. on a single sided disc, write only on the doublesided discs. 5 About the disc • You can use Sony discs or discs with the * "for VIDEO CAMERA" mark for vinyl LPs or antistatic splay, as they may not be able to remove dust and...
... sided disc). • Before shooting, be sure to remove the disc from your DVD Handycam. * Depending on use a sharp-pointed tool, such as a sticker on the LCD screen, open the disc cover and set the disc in your camcorder, press firmly until it in water, then remove the moisture with a soft...the disc with the supplied cleaning cloth. on a single sided disc, write only on the doublesided discs. 5 About the disc • You can use Sony discs or discs with the * "for VIDEO CAMERA" mark for vinyl LPs or antistatic splay, as they may not be able to remove dust and...
Operating Guide
Page 6
... 5: Setting the date and time 22 Step 6: Inserting a disc 23 Easy Handycam - using your camcorder with automatic settings Operate your camcorder with ease 25 Recording with ease 26 Playing back with your DVD Handycam 10 Choosing a disc 13 Getting Started Step 1: Checking supplied items 16 Step ...2: Charging the battery pack 17 Step 3: Turning the power on a DVD player (Finalizing 28 ...
... 5: Setting the date and time 22 Step 6: Inserting a disc 23 Easy Handycam - using your camcorder with automatic settings Operate your camcorder with ease 25 Recording with ease 26 Playing back with your DVD Handycam 10 Choosing a disc 13 Getting Started Step 1: Checking supplied items 16 Step ...2: Charging the battery pack 17 Step 3: Turning the power on a DVD player (Finalizing 28 ...

Operating Guide
Page 7
... picture on a TV 38 Playback on DVD devices Making the disc compatible with DVD players or DVD drives (Finalizing 40 Playing back a disc on DVD players, etc 44 Playing back a disc on a computer with a DVD drive installed 44 Using the recorded disc (DVD-RW/DVD+RW) Recording additional scenes after fi...nalizing 46 Deleting all of the scenes on the disc (Formatting 47 Using the Setup items Using the Setup items 48 Setup items 50 CAMERA SET 52 Settings to adjust your camcorder to the recording conditions...
... picture on a TV 38 Playback on DVD devices Making the disc compatible with DVD players or DVD drives (Finalizing 40 Playing back a disc on DVD players, etc 44 Playing back a disc on a computer with a DVD drive installed 44 Using the recorded disc (DVD-RW/DVD+RW) Recording additional scenes after fi...nalizing 46 Deleting all of the scenes on the disc (Formatting 47 Using the Setup items Using the Setup items 48 Setup items 50 CAMERA SET 52 Settings to adjust your camcorder to the recording conditions...

Operating Guide
Page 9
Troubleshooting Troubleshooting 80 Warning indicators and messages 93 Additional Information Using your camcorder abroad 97 About the "InfoLITHIUM" battery pack 99 Maintenance and precautions 101 Specifications 105 Index...107 9
Troubleshooting Troubleshooting 80 Warning indicators and messages 93 Additional Information Using your camcorder abroad 97 About the "InfoLITHIUM" battery pack 99 Maintenance and precautions 101 Specifications 105 Index...107 9

Operating Guide
Page 11
...camcorder (p. 75). * DVD (Digital Versatile Disc) is described as a "disc." **Finalizing means converting a recorded disc so that helps you to find the desired image quickly, from a list of a computer if you may not be played back on other DVD players or on the DVD drive of thumbnails (p. 28, 40). Enjoying your DVD Handycam... Playing back the recorded disc on other DVD devices You can play back a disc on other DVD playback equipment (p. 28, 40). You can also create a DVD menu ...
...camcorder (p. 75). * DVD (Digital Versatile Disc) is described as a "disc." **Finalizing means converting a recorded disc so that helps you to find the desired image quickly, from a list of a computer if you may not be played back on other DVD players or on the DVD drive of thumbnails (p. 28, 40). Enjoying your DVD Handycam... Playing back the recorded disc on other DVD devices You can play back a disc on other DVD playback equipment (p. 28, 40). You can also create a DVD menu ...
Operating Guide
Page 16
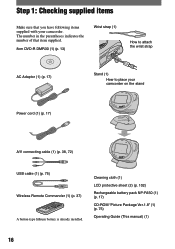
... (1) 16 Step 1: Checking supplied items Make sure that item supplied. 8cm DVD-R DMR30 (1) (p. 13) Wrist strap (1) How to attach the wrist strap AC Adaptor (1) (p. 17) Stand (1) How to place your camcorder. The number in the parentheses indicates the number of that you have following ...items supplied with your camcorder on the stand Power cord (1) (p. 17) A/V connecting cable (1) (p. 38, 72) USB cable ...
... (1) 16 Step 1: Checking supplied items Make sure that item supplied. 8cm DVD-R DMR30 (1) (p. 13) Wrist strap (1) How to attach the wrist strap AC Adaptor (1) (p. 17) Stand (1) How to place your camcorder. The number in the parentheses indicates the number of that you have following ...items supplied with your camcorder on the stand Power cord (1) (p. 17) A/V connecting cable (1) (p. 38, 72) USB cable ...

Operating Guide
Page 17
...jack cover DC IN jack 2 Insert a battery pack to the DC IN jack on your camcorder. Be sure to close the cover completely. 4 Slide the POWER switch in the direction of ...can charge the battery after inserting the "InfoLITHIUM" battery pack (A series) (p. 99) into your camcorder. Open the DC IN jack cover to connect the AC Adaptor. 2 Battery cover Match the mark on your... camcorder. Battery cover OPEN 1 switch 3 Close the battery cover. Getting Started DC plug POWER switch Power ...
...jack cover DC IN jack 2 Insert a battery pack to the DC IN jack on your camcorder. Be sure to close the cover completely. 4 Slide the POWER switch in the direction of ...can charge the battery after inserting the "InfoLITHIUM" battery pack (A series) (p. 99) into your camcorder. Open the DC IN jack cover to connect the AC Adaptor. 2 Battery cover Match the mark on your... camcorder. Battery cover OPEN 1 switch 3 Close the battery cover. Getting Started DC plug POWER switch Power ...
Operating Guide
Page 18
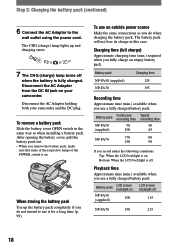
...it for a long time (p. 99). Disconnect the AC Adaptor from the DC IN jack on Bottom: When the LCD backlight is on your camcorder and the DC plug. To use an outside power source Make the same connections as when installing a battery pack. Battery pack NP-FA50 (supplied...fully charged battery pack. To remove a battery pack Slide the battery cover OPEN switch in this case. Disconnect the AC Adaptor holding both your camcorder. Battery pack NP-FA50 (supplied) NP-FA70 Charging time 125 155 Recording time Approximate time (min.) available when you fully charge an empty ...
...it for a long time (p. 99). Disconnect the AC Adaptor from the DC IN jack on Bottom: When the LCD backlight is on your camcorder and the DC plug. To use an outside power source Make the same connections as when installing a battery pack. Battery pack NP-FA50 (supplied...fully charged battery pack. To remove a battery pack Slide the battery cover OPEN switch in this case. Disconnect the AC Adaptor holding both your camcorder. Battery pack NP-FA50 (supplied) NP-FA70 Charging time 125 155 Recording time Approximate time (min.) available when you fully charge an empty ...
Operating Guide
Page 19
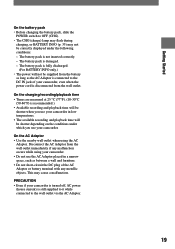
....) • The power will be supplied from the wall outlet. On the AC Adaptor • Use the nearby wall outlet when using your camcorder, even when the power cord is not inserted correctly. - The battery pack is disconnected from the battery as long as between a wall and ... Do not short-circuit the DC plug of your camcorder. • Do not use your camcorder is turned off, AC power (house current) is damaged. - PRECAUTION • Even if your camcorder. This may not be correctly displayed under which you use your camcorder in a narrow space, such as the AC Adaptor...
....) • The power will be supplied from the wall outlet. On the AC Adaptor • Use the nearby wall outlet when using your camcorder, even when the power cord is not inserted correctly. - The battery pack is disconnected from the battery as long as between a wall and ... Do not short-circuit the DC plug of your camcorder. • Do not use your camcorder is turned off, AC power (house current) is damaged. - PRECAUTION • Even if your camcorder. This may not be correctly displayed under which you use your camcorder in a narrow space, such as the AC Adaptor...
Operating Guide
Page 20
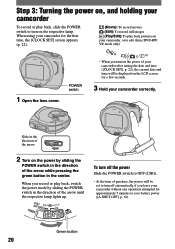
...set to turn on the respective lamp. To turn off the power Slide the POWER switch to OFF (CHG). • At the time of your camcorder after setting the date and time ([CLOCK SET], p. 22), the current date and time will be displayed on the LCD screen for approximately 5 ...attempted for a few seconds. 3 Hold your camcorder correctly. When using your camcorder for the first time, the [CLOCK SET] screen appears (p. 22). (Movie): To record movies (Still): To record still images (Play/Edit): To play back pictures on your camcorder, or to edit them (DVD-RW: VR mode only) 1 Open the ...
...set to turn on the respective lamp. To turn off the power Slide the POWER switch to OFF (CHG). • At the time of your camcorder after setting the date and time ([CLOCK SET], p. 22), the current date and time will be displayed on the LCD screen for approximately 5 ...attempted for a few seconds. 3 Hold your camcorder correctly. When using your camcorder for the first time, the [CLOCK SET] screen appears (p. 22). (Movie): To record movies (Still): To record still images (Play/Edit): To play back pictures on your camcorder, or to edit them (DVD-RW: VR mode only) 1 Open the ...
Operating Guide
Page 21
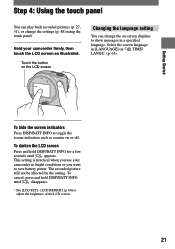
... Press and hold DISP/BATT INFO until appears. This setting is practical when you want to show messages in bright conditions or you use your camcorder firmly, then touch the LCD screen as counter on TIME/ LANGU. (p. 63). Step 4: Using the touch panel You can change the settings (p. 48) using...
... Press and hold DISP/BATT INFO until appears. This setting is practical when you want to show messages in bright conditions or you use your camcorder firmly, then touch the LCD screen as counter on TIME/ LANGU. (p. 63). Step 4: Using the touch panel You can change the settings (p. 48) using...
Operating Guide
Page 22
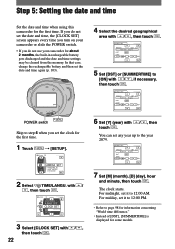
.... / , then You can set the date and time, the [CLOCK SET] screen appears every time you turn on your camcorder or slide the POWER switch. • If you do not use your camcorder for the first time. For midday, set the date and time again (p. 103). 4 Select the desired geographical area...the rechargeable battery and then set it to the year 2079. Step 5: Setting the date and time Set the date and time when using this camcorder for about 2 months, the built-in rechargeable battery gets discharged and the date and time settings may be cleared from the memory. The clock starts...
.... / , then You can set the date and time, the [CLOCK SET] screen appears every time you turn on your camcorder or slide the POWER switch. • If you do not use your camcorder for the first time. For midday, set the date and time again (p. 103). 4 Select the desired geographical area...the rechargeable battery and then set it to the year 2079. Step 5: Setting the date and time Set the date and time when using this camcorder for about 2 months, the built-in rechargeable battery gets discharged and the date and time settings may be cleared from the memory. The clock starts...
Operating Guide
Page 23
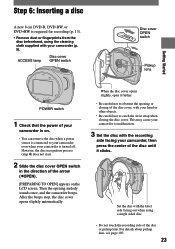
...with the recording side facing your hand or other objects. • Be careful not to obstruct the opening melody sounds once, and the camcorder beeps. However, the disc recognition process (step 4) does not start. 2 Slide the disc cover OPEN switch in the direction of the...when a power source is connected to malfunction. 3 Set the disc with your camcorder is turned off. This may cause your camcorder to your camcorder even when your camcorder (p. 5). Step 6: Inserting a disc A new 8 cm DVD-R, DVD-RW, or DVD+RW is required for recording (p. 13). • Remove dust or fi...
...with the recording side facing your hand or other objects. • Be careful not to obstruct the opening melody sounds once, and the camcorder beeps. However, the disc recognition process (step 4) does not start. 2 Slide the disc cover OPEN switch in the direction of the...when a power source is connected to malfunction. 3 Set the disc with your camcorder is turned off. This may cause your camcorder to your camcorder even when your camcorder (p. 5). Step 6: Inserting a disc A new 8 cm DVD-R, DVD-RW, or DVD+RW is required for recording (p. 13). • Remove dust or fi...
Operating Guide
Page 24
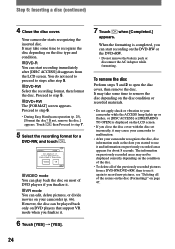
... from a DVD-RW/DVD+RW, then to record new pictures, see "Deleting all of DVD players if you can start recording immediately after step 5. DVD-RW Select the recording format, then format the disc. Your camcorder starts recognizing the...DVD+RW. • Do not remove the battery pack or disconnect the AC Adaptor while formatting. To remove the disc Perform steps 1 and 2 to step 6. • During Easy Handycam operation (p. 25), [Format the disc? Step 6: Inserting a disc (continued) 4 Close the disc cover. The information on previously recorded areas may cause your camcorder...
... from a DVD-RW/DVD+RW, then to record new pictures, see "Deleting all of DVD players if you can start recording immediately after step 5. DVD-RW Select the recording format, then format the disc. Your camcorder starts recognizing the...DVD+RW. • Do not remove the battery pack or disconnect the AC Adaptor while formatting. To remove the disc Perform steps 1 and 2 to step 6. • During Easy Handycam operation (p. 25), [Format the disc? Step 6: Inserting a disc (continued) 4 Close the disc cover. The information on previously recorded areas may cause your camcorder...
Operating Guide
Page 25
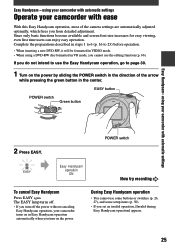
.... If you do not intend to use the Easy Handycam operation, go to 23) before operation. • When inserting a new DVD-RW, it will be formatted in VIDEO mode. • When using your camcorder with automatic settings Operate your camcorder with ease With this Easy Handycam operation, most of the arrow while pressing the green...
.... If you do not intend to use the Easy Handycam operation, go to 23) before operation. • When inserting a new DVD-RW, it will be formatted in VIDEO mode. • When using your camcorder with automatic settings Operate your camcorder with ease With this Easy Handycam operation, most of the arrow while pressing the green...

Operating Guide
Page 26
... movies To record still images REC START/STOP (PHOTO) 2 Start recording. you cannot use following functions: - you remove a disc from your camcorder with automatic settings (continued) Recording with ease During Easy Handycam operation, the [REC MODE] of movies and the [QUALITY] of the LCD screen (p. 21) - Turning off the power, then turn...
... movies To record still images REC START/STOP (PHOTO) 2 Start recording. you cannot use following functions: - you remove a disc from your camcorder with automatic settings (continued) Recording with ease During Easy Handycam operation, the [REC MODE] of movies and the [QUALITY] of the LCD screen (p. 21) - Turning off the power, then turn...

Operating Guide
Page 27
...Toggles Play or scene/previous Pause as you cannot use following functions: - Previous/Next Go to the VISUAL INDEX screen • Touch / during Easy Handycam operation, you Next scene touch scene JAN 12 2005 PM Still Images Touch the Still image tab, then the still image to play it up... (p. 25). If not, press EASY to be played back. using your camcorder with automatic settings 1 Slide the POWER switch repeatedly to the VISUAL INDEX screen. Recording date/time JAN 15 2005 AM Stop (go to ...
...Toggles Play or scene/previous Pause as you cannot use following functions: - Previous/Next Go to the VISUAL INDEX screen • Touch / during Easy Handycam operation, you Next scene touch scene JAN 12 2005 PM Still Images Touch the Still image tab, then the still image to play it up... (p. 25). If not, press EASY to be played back. using your camcorder with automatic settings 1 Slide the POWER switch repeatedly to the VISUAL INDEX screen. Recording date/time JAN 15 2005 AM Stop (go to ...
Operating Guide
Page 28
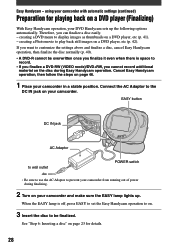
using your DVD Handycam sets up . See "Step 6: Inserting a disc" on a DVD player (Finalizing) With Easy Handycam operation, your camcorder with automatic settings (continued) Preparation for playing back on page 23 for details. 28 Easy Handycam - creating a Photomovie to display images as thumbnails on a DVD player, etc (p. 42). Therefore, you cannot record additional material on your camcorder from running...
using your DVD Handycam sets up . See "Step 6: Inserting a disc" on a DVD player (Finalizing) With Easy Handycam operation, your camcorder with automatic settings (continued) Preparation for playing back on page 23 for details. 28 Easy Handycam - creating a Photomovie to display images as thumbnails on a DVD player, etc (p. 42). Therefore, you cannot record additional material on your camcorder from running...


