
Operating Guide
Page 2
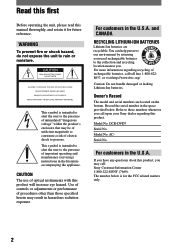
...electric shock to these numbers whenever you may result in the U.S.A. Owner's Record The model and serial numbers are recyclable. DCR-DVD7 Serial No. For customers in the space provided below is intended to alert the user to the presence of uninsulated "dangerous.../ Caution: Do not handle damaged or leaking Lithium-Ion batteries. Model No. You can help preserve our environment by returning your Sony dealer regarding recycling of rechargeable batteries, call : Sony Customer Information Center 1-800-222-SONY (7669). CAUTION The use of important operating and maintenance ...
...electric shock to these numbers whenever you may result in the U.S.A. Owner's Record The model and serial numbers are recyclable. DCR-DVD7 Serial No. For customers in the space provided below is intended to alert the user to the presence of uninsulated "dangerous.../ Caution: Do not handle damaged or leaking Lithium-Ion batteries. Model No. You can help preserve our environment by returning your Sony dealer regarding recycling of rechargeable batteries, call : Sony Customer Information Center 1-800-222-SONY (7669). CAUTION The use of important operating and maintenance ...

Operating Guide
Page 3
..., there is connected. - Connect the equipment into an outlet on : − to remove the battery pack or AC Adaptor from the camcorder. − to apply mechanical shock or vibration to radio communications. Operation is subject to the following when...Battery cover Disc cover • When you operate your authority to provide reasonable protection against harmful interference in a particular installation. Notes on the supplied CD-ROM) On using the camcorder • Do not hold the camcorder by one or more of Conformity Trade Name: SONY Model No.: DCR-DVD7 Responsible Party: Sony...
..., there is connected. - Connect the equipment into an outlet on : − to remove the battery pack or AC Adaptor from the camcorder. − to apply mechanical shock or vibration to radio communications. Operation is subject to the following when...Battery cover Disc cover • When you operate your authority to provide reasonable protection against harmful interference in a particular installation. Notes on the supplied CD-ROM) On using the camcorder • Do not hold the camcorder by one or more of Conformity Trade Name: SONY Model No.: DCR-DVD7 Responsible Party: Sony...
Operating Guide
Page 6
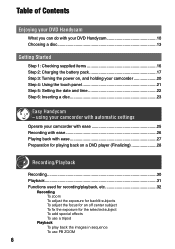
... settings Operate your camcorder with ease 25 Recording with ease 26 Playing back with your DVD Handycam 10 Choosing a disc 13 Getting Started Step 1: Checking supplied items 16 Step 2: Charging the battery pack 17 Step 3: Turning the power on, and holding your DVD Handycam What you can ...do with ease 27 Preparation for playing back on a DVD player (Finalizing 28 Recording/Playback Recording 30 Playback 31 Functions used ...
... settings Operate your camcorder with ease 25 Recording with ease 26 Playing back with your DVD Handycam 10 Choosing a disc 13 Getting Started Step 1: Checking supplied items 16 Step 2: Charging the battery pack 17 Step 3: Turning the power on, and holding your DVD Handycam What you can ...do with ease 27 Preparation for playing back on a DVD player (Finalizing 28 Recording/Playback Recording 30 Playback 31 Functions used ...

Operating Guide
Page 7
...remaining battery To turn off the operation confirmation beep To initialize the settings Other part names and functions Checking/Deleting the last scene (Review/Review deleting 34 Indicators displayed during recording/playback 35 Remote Commander 37 Playing the picture on a TV 38 Playback on DVD ...Using the recorded disc (DVD-RW/DVD+RW) Recording additional scenes after finalizing 46 Deleting all of the scenes on the disc (Formatting 47 Using the Setup items Using the Setup items 48 Setup items 50 CAMERA SET 52 Settings to adjust your camcorder to the recording conditions ...
...remaining battery To turn off the operation confirmation beep To initialize the settings Other part names and functions Checking/Deleting the last scene (Review/Review deleting 34 Indicators displayed during recording/playback 35 Remote Commander 37 Playing the picture on a TV 38 Playback on DVD ...Using the recorded disc (DVD-RW/DVD+RW) Recording additional scenes after finalizing 46 Deleting all of the scenes on the disc (Formatting 47 Using the Setup items Using the Setup items 48 Setup items 50 CAMERA SET 52 Settings to adjust your camcorder to the recording conditions ...

Operating Guide
Page 9
Troubleshooting Troubleshooting 80 Warning indicators and messages 93 Additional Information Using your camcorder abroad 97 About the "InfoLITHIUM" battery pack 99 Maintenance and precautions 101 Specifications 105 Index...107 9
Troubleshooting Troubleshooting 80 Warning indicators and messages 93 Additional Information Using your camcorder abroad 97 About the "InfoLITHIUM" battery pack 99 Maintenance and precautions 101 Specifications 105 Index...107 9
Operating Guide
Page 16
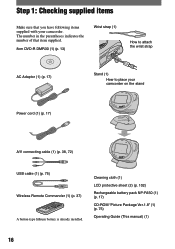
... sheet (2) (p. 102) Rechargeable battery pack NP-FA50 (1) (p. 17) CD-ROM "Picture Package Ver.1.8" (1) (p. 75) Operating Guide (This manual) (1) 16 Step 1: Checking supplied items Make sure that item supplied. 8cm DVD-R DMR30 (1) (p. 13) Wrist strap (1) How to attach the wrist strap AC Adaptor (1) (p. 17) Stand (1) How to place your camcorder. The number in the...
... sheet (2) (p. 102) Rechargeable battery pack NP-FA50 (1) (p. 17) CD-ROM "Picture Package Ver.1.8" (1) (p. 75) Operating Guide (This manual) (1) 16 Step 1: Checking supplied items Make sure that item supplied. 8cm DVD-R DMR30 (1) (p. 13) Wrist strap (1) How to attach the wrist strap AC Adaptor (1) (p. 17) Stand (1) How to place your camcorder. The number in the...

Operating Guide
Page 17
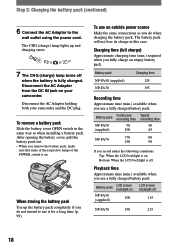
...default setting). 5 Connect the AC Adaptor to the end with mark on your camcorder. Then open the cover . Battery cover OPEN 1 switch 3 Close the battery cover. Be sure to connect the AC Adaptor. 2 Battery cover Match the mark on the DC plug with the mark facing out.... DC IN jack cover DC IN jack 2 Insert a battery pack to the DC IN jack on your camcorder. Getting Started DC plug POWER switch Power cord To the wall outlet AC Adaptor 1 While sliding the battery cover OPEN switch in the direction of the arrow . DC...
...default setting). 5 Connect the AC Adaptor to the end with mark on your camcorder. Then open the cover . Battery cover OPEN 1 switch 3 Close the battery cover. Be sure to connect the AC Adaptor. 2 Battery cover Match the mark on the DC plug with the mark facing out.... DC IN jack cover DC IN jack 2 Insert a battery pack to the DC IN jack on your camcorder. Getting Started DC plug POWER switch Power cord To the wall outlet AC Adaptor 1 While sliding the battery cover OPEN switch in the direction of the arrow . DC...
Operating Guide
Page 18
...in the same way as you fully charge an empty battery pack. Battery pack LCD screen backlight on your camcorder and the DC plug. After opening the battery cover, pull the battery pack out. • When you remove the battery pack, make sure that none of the respective lamps ...record under the following conditions: Top: When the LCD backlight is fully charged. Disconnect the AC Adaptor holding both your camcorder. To remove a battery pack Slide the battery cover OPEN switch in this case. Charging time (full charge) Approximate charging time (min.) required when you do not ...
...in the same way as you fully charge an empty battery pack. Battery pack LCD screen backlight on your camcorder and the DC plug. After opening the battery cover, pull the battery pack out. • When you remove the battery pack, make sure that none of the respective lamps ...record under the following conditions: Top: When the LCD backlight is fully charged. Disconnect the AC Adaptor holding both your camcorder. To remove a battery pack Slide the battery cover OPEN switch in this case. Charging time (full charge) Approximate charging time (min.) required when you do not ...
Operating Guide
Page 19
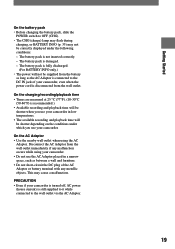
... under the following conditions: - This may not be shorter when you use your camcorder, even when the power cord is still supplied to it while connected to the wall outlet via the AC Adaptor. 19 The battery pack is damaged. - On the charging/recording/playback time • Times are ...be supplied from the wall outlet. PRECAUTION • Even if your camcorder. • Do not use your camcorder in a narrow space, such as the AC Adaptor is connected to the DC IN jack of the AC Adaptor or battery terminal with any malfunction occurs while using the AC Adaptor. Getting Started...
... under the following conditions: - This may not be shorter when you use your camcorder, even when the power cord is still supplied to it while connected to the wall outlet via the AC Adaptor. 19 The battery pack is damaged. - On the charging/recording/playback time • Times are ...be supplied from the wall outlet. PRECAUTION • Even if your camcorder. • Do not use your camcorder in a narrow space, such as the AC Adaptor is connected to the DC IN jack of the AC Adaptor or battery terminal with any malfunction occurs while using the AC Adaptor. Getting Started...
Operating Guide
Page 20
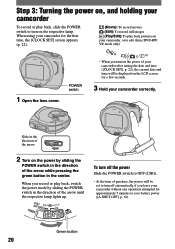
... LCD screen for approximately 5 minutes to edit them (DVD-RW: VR mode only) 1 Open the lens cover. Slide in the direction of purchase, the power will be displayed on the respective lamp. When you leave your camcorder, or to save battery power ([A.SHUT OFF], p. 62). To turn off ...automatically if you record or play back, switch the power mode by sliding the POWER switch in the direction of the arrow. 2 Turn on your camcorder without any operation attempted for a...
... LCD screen for approximately 5 minutes to edit them (DVD-RW: VR mode only) 1 Open the lens cover. Slide in the direction of purchase, the power will be displayed on the respective lamp. When you leave your camcorder, or to save battery power ([A.SHUT OFF], p. 62). To turn off ...automatically if you record or play back, switch the power mode by sliding the POWER switch in the direction of the arrow. 2 Turn on your camcorder without any operation attempted for a...
Operating Guide
Page 21
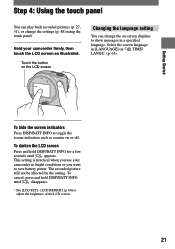
... for a few seconds until disappears. • See [LCD SET] - [LCD BRIGHT] (p. 60) to adjust the brightness of the LCD screen. 21 Hold your camcorder in [LANGUAGE] on the LCD screen Changing the language setting You can play back recorded pictures (p. 27, 31), or change the on-screen displays to.... The recorded picture will not be affected by the setting. This setting is practical when you want to save battery power. Select the screen language in bright conditions or you use your camcorder firmly, then touch the LCD screen as counter on or off. Touch the button on TIME/ LANGU. ...
... for a few seconds until disappears. • See [LCD SET] - [LCD BRIGHT] (p. 60) to adjust the brightness of the LCD screen. 21 Hold your camcorder in [LANGUAGE] on the LCD screen Changing the language setting You can play back recorded pictures (p. 27, 31), or change the on-screen displays to.... The recorded picture will not be affected by the setting. This setting is practical when you want to save battery power. Select the screen language in bright conditions or you use your camcorder firmly, then touch the LCD screen as counter on or off. Touch the button on TIME/ LANGU. ...
Operating Guide
Page 22
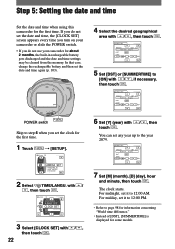
.... • Refer to 12:00 AM. For midnight, set the date and time, the [CLOCK SET] screen appears every time you turn on your camcorder or slide the POWER switch. • If you set it to page 98 for information concerning "World time difference." • Instead of [DST], [...LANGU. Step 5: Setting the date and time Set the date and time when using this camcorder for the first time. 1 Touch [SETUP]. 6 Set [Y] (year) with / , if necessary, then touch . In that case, charge the rechargeable battery and then set any year up to [ON] with touch . / , then You...
.... • Refer to 12:00 AM. For midnight, set the date and time, the [CLOCK SET] screen appears every time you turn on your camcorder or slide the POWER switch. • If you set it to page 98 for information concerning "World time difference." • Instead of [DST], [...LANGU. Step 5: Setting the date and time Set the date and time when using this camcorder for the first time. 1 Touch [SETUP]. 6 Set [Y] (year) with / , if necessary, then touch . In that case, charge the rechargeable battery and then set any year up to [ON] with touch . / , then You...
Operating Guide
Page 24
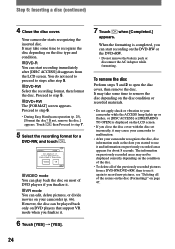
... to proceed to steps after [DISC ACCESS] disappears from a DVD-RW/DVD+RW, then to use it again to use it and information on the DVD-RW or the DVD+RW. • Do not remove the battery pack or disconnect the AC Adaptor while formatting. However, the ... [YES]. 7 Touch when [Completed.] appears. Your camcorder starts recognizing the inserted disc. Step 6: Inserting a disc (continued) 4 Close the disc cover. If not, remove the disc.] appears. It may take some time to step 6. • During Easy Handycam operation (p. 25), [Format the disc? Proceed to recognize the...
... to proceed to steps after [DISC ACCESS] disappears from a DVD-RW/DVD+RW, then to use it again to use it and information on the DVD-RW or the DVD+RW. • Do not remove the battery pack or disconnect the AC Adaptor while formatting. However, the ... [YES]. 7 Touch when [Completed.] appears. Your camcorder starts recognizing the inserted disc. Step 6: Inserting a disc (continued) 4 Close the disc cover. If not, remove the disc.] appears. It may take some time to step 6. • During Easy Handycam operation (p. 25), [Format the disc? Proceed to recognize the...
Operating Guide
Page 33
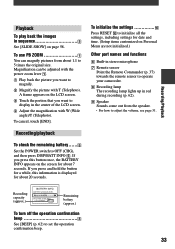
... To cancel, touch [END]. If you want to magnify. Magnify the picture with W (Wide angle)/T (Telephoto). Recording capacity (approx.) Remaining battery (approx.) To turn off the operation confirmation beep See [BEEP] (p. 62) to OFF (CHG), and then press DISP/BATT INFO ...names and functions Built-in stereo microphone Remote sensor Point the Remote Commander (p. 37) towards the remote sensor to operate your camcorder. Recording lamp The recording lamp lights up in the center of the LCD screen. Adjust the magnification with T...
... To cancel, touch [END]. If you want to magnify. Magnify the picture with W (Wide angle)/T (Telephoto). Recording capacity (approx.) Remaining battery (approx.) To turn off the operation confirmation beep See [BEEP] (p. 62) to OFF (CHG), and then press DISP/BATT INFO ...names and functions Built-in stereo microphone Remote sensor Point the Remote Commander (p. 37) towards the remote sensor to operate your camcorder. Recording lamp The recording lamp lights up in the center of the LCD screen. Adjust the magnification with T...
Operating Guide
Page 35
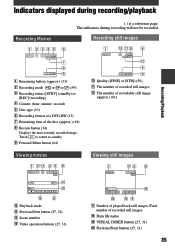
...60min qj 5 12/30 VIDEO 6 100-0001 P-MENU qk w; Recording Movies 1 2345 6 60min REC 0:00:00 [30min] VIDEO P-MENU 7 8 9 Remaining battery (approx.) (33) Recording mode ( or or ) (59) Recording status ([STBY] (standby) or [REC]... (recording) Counter (hour: minute: second) Disc type (13) Recording format of a DVD-RW (13) Remaining time of the disc (approx.) (61) Review button (34) Displays the most recently recorded image. The indicators ...
...60min qj 5 12/30 VIDEO 6 100-0001 P-MENU qk w; Recording Movies 1 2345 6 60min REC 0:00:00 [30min] VIDEO P-MENU 7 8 9 Remaining battery (approx.) (33) Recording mode ( or or ) (59) Recording status ([STBY] (standby) or [REC]... (recording) Counter (hour: minute: second) Disc type (13) Recording format of a DVD-RW (13) Remaining time of the disc (approx.) (61) Review button (34) Displays the most recently recorded image. The indicators ...

Operating Guide
Page 37
Select a desired button or an item with then press ENTER to operate your camcorder (p. 33). • To change the battery, see page 104. 37 When no commands have been sent from the Remote Commander in a certain period, the orange frame disappears. When you press any ...
Select a desired button or an item with then press ENTER to operate your camcorder (p. 33). • To change the battery, see page 104. 37 When no commands have been sent from the Remote Commander in a certain period, the orange frame disappears. When you press any ...

Operating Guide
Page 53
... or daylight under the same lighting conditions as subjects in the memory, the indicator stops flashing. • Do not shake your camcorder at a nearby white object for about 10 seconds for more than 5 minutes. EXPOSURE You can fix the brightness of the recording environment...white balance will be set. • If keeps flashing even after you have the power source disconnected from your camcorder for instance, you have changed the battery pack while [AUTO] is set to the brightness of warm white fluorescent lamps. SPOT METER (Flexible spot meter)...
... or daylight under the same lighting conditions as subjects in the memory, the indicator stops flashing. • Do not shake your camcorder at a nearby white object for about 10 seconds for more than 5 minutes. EXPOSURE You can fix the brightness of the recording environment...white balance will be set. • If keeps flashing even after you have the power source disconnected from your camcorder for instance, you have changed the battery pack while [AUTO] is set to the brightness of warm white fluorescent lamps. SPOT METER (Flexible spot meter)...
Operating Guide
Page 60
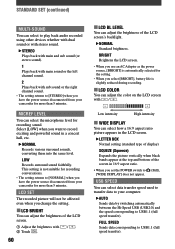
... for recording conversations. • The setting returns to [NORMAL] when you have the power source disconnected from your camcorder for the setting. • When you select [BRIGHT], battery life is slightly reduced during recording. LCD COLOR You can adjust the color on the LCD screen with ... with sub sound or the right channel sound. • The setting returns to [STEREO] when you have the power source disconnected from your camcorder for recording sound. Select [LOW] when you want to USB1.1 (full speed transfer). USB SPEED You can select data transfer speed used to...
... for recording conversations. • The setting returns to [NORMAL] when you have the power source disconnected from your camcorder for the setting. • When you select [BRIGHT], battery life is slightly reduced during recording. LCD COLOR You can adjust the color on the LCD screen with ... with sub sound or the right channel sound. • The setting returns to [STEREO] when you have the power source disconnected from your camcorder for recording sound. Select [LOW] when you want to USB1.1 (full speed transfer). USB SPEED You can select data transfer speed used to...
Operating Guide
Page 68
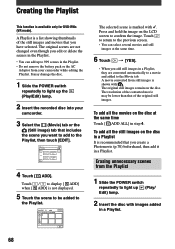
...It may be added to 999 scenes in the Playlist. • Do not remove the battery pack or the AC Adaptor from still images is a list showing thumbnails of the original ...Touch [YES]. • When you add still images in a Playlist. A movie converted from your camcorder. 3 Select the (Movie) tab or the (Still image) tab that you create a Photomovie (p.70) beforehand...the Playlist 1 Slide the POWER switch repeatedly to display [ ADD] when [ ADD] is available only for DVD-RWs (VR mode). The original scenes are converted automatically to a movie and added to light up (Play/...
...It may be added to 999 scenes in the Playlist. • Do not remove the battery pack or the AC Adaptor from still images is a list showing thumbnails of the original ...Touch [YES]. • When you add still images in a Playlist. A movie converted from your camcorder. 3 Select the (Movie) tab or the (Still image) tab that you create a Photomovie (p.70) beforehand...the Playlist 1 Slide the POWER switch repeatedly to display [ ADD] when [ ADD] is available only for DVD-RWs (VR mode). The original scenes are converted automatically to a movie and added to light up (Play/...
Operating Guide
Page 80
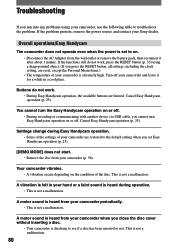
... motor sound is heard from the wall outlet or remove the battery pack, then reconnect it for a while in your hand or a faint sound is heard during Easy Handycam operation. • Some of the settings of your camcorder, use the following table to troubleshoot the problem. If the ...close the disc cover without inserting a disc. • Your camcorder is checking to see if a disc has been inserted or not. Your camcorder vibrates. • A vibration occurs depending on . • Disconnect the AC Adaptor from your Sony dealer. If the problem persists, remove the power source and ...
... motor sound is heard from the wall outlet or remove the battery pack, then reconnect it for a while in your hand or a faint sound is heard during Easy Handycam operation. • Some of the settings of your camcorder, use the following table to troubleshoot the problem. If the ...close the disc cover without inserting a disc. • Your camcorder is checking to see if a disc has been inserted or not. Your camcorder vibrates. • A vibration occurs depending on . • Disconnect the AC Adaptor from your Sony dealer. If the problem persists, remove the power source and ...


