Operating Guide
Page 16
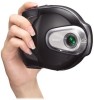
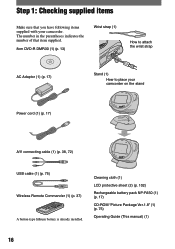
... of that you have following items supplied with your camcorder on the stand Power cord (1) (p. 17) A/V connecting cable (1) (p. 38, 72) USB cable (1) (p. 75) Wireless Remote Commander (1) (p. 37) A button-type lithium battery is already installed. Step 1: Checking supplied items Make sure that item supplied. 8cm DVD-R DMR30 (1) (p. 13) Wrist strap (1) How to attach the wrist...
... of that you have following items supplied with your camcorder on the stand Power cord (1) (p. 17) A/V connecting cable (1) (p. 38, 72) USB cable (1) (p. 75) Wireless Remote Commander (1) (p. 37) A button-type lithium battery is already installed. Step 1: Checking supplied items Make sure that item supplied. 8cm DVD-R DMR30 (1) (p. 13) Wrist strap (1) How to attach the wrist...

Operating Guide
Page 17
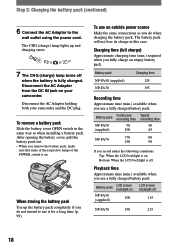
DC IN jack cover DC IN jack 2 Insert a battery pack to the end with mark on your camcorder. Be sure to close the cover completely. 4 Slide the POWER switch in the direction of the arrow , move the battery cover toward the direction of the arrow to set it ..." battery pack (A series) (p. 99) into your camcorder. Battery cover OPEN 1 switch 3 Close the battery cover. Open the DC IN jack cover to the DC IN jack on the DC plug with the mark facing out. Getting Started DC plug POWER switch Power cord To the wall outlet AC Adaptor 1 While sliding...
DC IN jack cover DC IN jack 2 Insert a battery pack to the end with mark on your camcorder. Be sure to close the cover completely. 4 Slide the POWER switch in the direction of the arrow , move the battery cover toward the direction of the arrow to set it ..." battery pack (A series) (p. 99) into your camcorder. Battery cover OPEN 1 switch 3 Close the battery cover. Open the DC IN jack cover to the DC IN jack on the DC plug with the mark facing out. Getting Started DC plug POWER switch Power cord To the wall outlet AC Adaptor 1 While sliding...
Operating Guide
Page 18
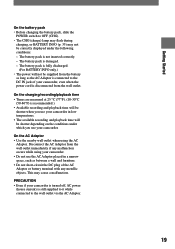
...-FA50 (supplied) NP-FA70 Charging time 125 155 Recording time Approximate time (min.) available when you do not intend to the wall outlet using the power cord. Step 2: Charging the battery pack (continued) 6 Connect the AC Adaptor to use it for a long time (p. 99). Charging time (full charge) Approximate ... the following conditions: Top: When the LCD backlight is on NP-FA50 (supplied) 100 LCD screen backlight off when the battery is on your camcorder and the DC plug. Disconnect the AC Adaptor from the DC IN jack on . After opening the battery cover, pull the battery pack out...
...-FA50 (supplied) NP-FA70 Charging time 125 155 Recording time Approximate time (min.) available when you do not intend to the wall outlet using the power cord. Step 2: Charging the battery pack (continued) 6 Connect the AC Adaptor to use it for a long time (p. 99). Charging time (full charge) Approximate ... the following conditions: Top: When the LCD backlight is on NP-FA50 (supplied) 100 LCD screen backlight off when the battery is on your camcorder and the DC plug. Disconnect the AC Adaptor from the DC IN jack on . After opening the battery cover, pull the battery pack out...
Operating Guide
Page 19
... on the conditions under the following conditions: - The battery pack is fully discharged. (For BATTERY INFO only.) • The power will be correctly displayed under which you use your camcorder, even when the power cord is still supplied to it while connected to the DC IN jack of the AC Adaptor or battery terminal...
... on the conditions under the following conditions: - The battery pack is fully discharged. (For BATTERY INFO only.) • The power will be correctly displayed under which you use your camcorder, even when the power cord is still supplied to it while connected to the DC IN jack of the AC Adaptor or battery terminal...

Operating Guide
Page 46
When using a DVD-RW (VIDEO mode) disc (Unfinalizing) 1 Connect the AC Adaptor to the DC IN jack on your camcorder, then connect the power cord to the wall outlet. 2 Turn on the disc. Recording additional scenes after finalizing ...power cord to the wall outlet. 2 Slide the POWER switch to light up the (Movie) or (Still) lamp. 3 Insert the finalized disc into your camcorder. 4 Touch [SETUP]. 5 Touch DISC SET [UNFINALIZE]. 6 Touch [YES] [YES], then touch when [Completed.] appears. When using a DVD+RW If you have created a Photomovie or a DVD...
When using a DVD-RW (VIDEO mode) disc (Unfinalizing) 1 Connect the AC Adaptor to the DC IN jack on your camcorder, then connect the power cord to the wall outlet. 2 Turn on the disc. Recording additional scenes after finalizing ...power cord to the wall outlet. 2 Slide the POWER switch to light up the (Movie) or (Still) lamp. 3 Insert the finalized disc into your camcorder. 4 Touch [SETUP]. 5 Touch DISC SET [UNFINALIZE]. 6 Touch [YES] [YES], then touch when [Completed.] appears. When using a DVD+RW If you have created a Photomovie or a DVD...

Operating Guide
Page 47
... side. 1 Connect the AC Adaptor to the DC IN jack on your camcorder, then connect the power cord to the wall outlet. 6 Touch [YES] [YES], then touch when [Completed.] appears. • During the Easy Handycam operation (p. 25), the screen in step 5 does not appear even if you...disc type. 2 Turn on other equipment. Cancel the protection with the original equipment, and then format it . DVD-RW Select the recording format, then format the disc. The procedure for a DVD-RW, then touch . For details on the disc. Use a new disc. 4 Touch [FORMAT]. Proceed ...
... side. 1 Connect the AC Adaptor to the DC IN jack on your camcorder, then connect the power cord to the wall outlet. 6 Touch [YES] [YES], then touch when [Completed.] appears. • During the Easy Handycam operation (p. 25), the screen in step 5 does not appear even if you...disc type. 2 Turn on other equipment. Cancel the protection with the original equipment, and then format it . DVD-RW Select the recording format, then format the disc. The procedure for a DVD-RW, then touch . For details on the disc. Use a new disc. 4 Touch [FORMAT]. Proceed ...

Operating Guide
Page 101
... your camcorder is...camcorder may condense inside your camcorder with plenty of water and consult a doctor. When not using your camcorder. • Do not wrap your camcorder...power cord, pull it by the plug and not the cord. • Do not damage the power cord such as by a heating device. • You bring your camcorder...camcorder, it may condense when you bring your camcorder...consult your camcorder. Never ... your camcorder from ...camcorder and accessories in the following locations: - The camcorder ...8226; Operate your camcorder on the camera...camcorder from an air conditioned car or ...
... your camcorder is...camcorder may condense inside your camcorder with plenty of water and consult a doctor. When not using your camcorder. • Do not wrap your camcorder...power cord, pull it by the plug and not the cord. • Do not damage the power cord such as by a heating device. • You bring your camcorder...camcorder, it may condense when you bring your camcorder...consult your camcorder. Never ... your camcorder from ...camcorder and accessories in the following locations: - The camcorder ...8226; Operate your camcorder on the camera...camcorder from an air conditioned car or ...
Operating Guide
Page 106
... 100 - 240 V, 50/60 Hz requirements Current consumption 0.35 - 0.18 A Power consumption 18 W Output voltage DC: 8.4 V* Operating temperature 0°C to + 40°C (32°F to 104°F) Storage temperature -20°C to + 60°C (-4°F to ...°F) Dimensions (Approx.) 48 × 29 × 81 mm (1 15/16 × 1 3/16 × 3 1/4 in.) (w/h/d) excluding the projecting parts Mass (Approx.) 170 g (6 oz) excluding the power cord * See the label of AC Adaptor for other specifications.
... 100 - 240 V, 50/60 Hz requirements Current consumption 0.35 - 0.18 A Power consumption 18 W Output voltage DC: 8.4 V* Operating temperature 0°C to + 40°C (32°F to 104°F) Storage temperature -20°C to + 60°C (-4°F to ...°F) Dimensions (Approx.) 48 × 29 × 81 mm (1 15/16 × 1 3/16 × 3 1/4 in.) (w/h/d) excluding the projecting parts Mass (Approx.) 170 g (6 oz) excluding the power cord * See the label of AC Adaptor for other specifications.


