
Operating Guide
Page 1
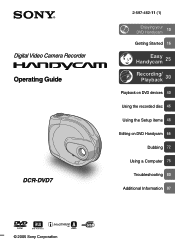
Digital Video Camera Recorder Operating Guide DCR-DVD7 2-597-462-11 (1) Enjoying your DVD Handycam 10 Getting Started 16 Easy Handycam 25 Recording/ Playback 30 Playback on DVD devices 40 Using the recorded disc 46 Using the Setup items 48 Editing on DVD Handycam 66 Dubbing 72 Using a Computer 75 Troubleshooting 80 Additional Information 97 © 2005 Sony Corporation
Digital Video Camera Recorder Operating Guide DCR-DVD7 2-597-462-11 (1) Enjoying your DVD Handycam 10 Getting Started 16 Easy Handycam 25 Recording/ Playback 30 Playback on DVD devices 40 Using the recorded disc 46 Using the Setup items 48 Editing on DVD Handycam 66 Dubbing 72 Using a Computer 75 Troubleshooting 80 Additional Information 97 © 2005 Sony Corporation
Operating Guide
Page 5
...such as benzine, cleaners intended for your camcorder. When the message [C:13:] appears on the LCD screen, open the disc cover and set the disc in some situations using that you may not be able to remove the disc from your DVD Handycam. * Depending on the surface of ...while supporting the center hole lightly. Do not use Sony discs or discs with marks listed below. • For reliability and durability of the disc or your camcorder, press firmly until it in water, then remove the moisture with your DVD Handycam. If you carry or store the disc, put ...
...such as benzine, cleaners intended for your camcorder. When the message [C:13:] appears on the LCD screen, open the disc cover and set the disc in some situations using that you may not be able to remove the disc from your DVD Handycam. * Depending on the surface of ...while supporting the center hole lightly. Do not use Sony discs or discs with marks listed below. • For reliability and durability of the disc or your camcorder, press firmly until it in water, then remove the moisture with your DVD Handycam. If you carry or store the disc, put ...
Operating Guide
Page 6
... with your camcorder 20 Step 4: Using the touch panel 21 Step 5: Setting the date and time 22 Step 6: Inserting a disc 23 Easy Handycam - Table of Contents Enjoying your DVD Handycam What you can do with ease 27 Preparation for playing back on , and holding your DVD Handycam 10 Choosing... a disc 13 Getting Started Step 1: Checking supplied items 16 Step 2: Charging the battery pack 17 Step 3: Turning the power on a DVD player (Finalizing 28 Recording/Playback Recording 30 Playback 31 Functions ...
... with your camcorder 20 Step 4: Using the touch panel 21 Step 5: Setting the date and time 22 Step 6: Inserting a disc 23 Easy Handycam - Table of Contents Enjoying your DVD Handycam What you can do with ease 27 Preparation for playing back on , and holding your DVD Handycam 10 Choosing... a disc 13 Getting Started Step 1: Checking supplied items 16 Step 2: Charging the battery pack 17 Step 3: Turning the power on a DVD player (Finalizing 28 Recording/Playback Recording 30 Playback 31 Functions ...
Operating Guide
Page 8
...basic settings (REC MODE/LCD SET/USB SPEED, etc.) TIME/LANGU 63 (CLOCK SET/AREA SET/LANGUAGE, etc.) Customizing Personal Menu 64 Editing on DVD Handycam (DVD-RW: VR mode) Editing the original data 66 Creating the Playlist 68 Playing the Playlist 71 Dubbing Connecting to a VCR or TV 72 Jacks ...to connect external devices Dubbing to VCR/DVD devices 73 Recording images from a TV or VCR/DVD device 74 Using a computer Before referring to the "First Step Guide" on your computer 75 Installing the software 76 Viewing...
...basic settings (REC MODE/LCD SET/USB SPEED, etc.) TIME/LANGU 63 (CLOCK SET/AREA SET/LANGUAGE, etc.) Customizing Personal Menu 64 Editing on DVD Handycam (DVD-RW: VR mode) Editing the original data 66 Creating the Playlist 68 Playing the Playlist 71 Dubbing Connecting to a VCR or TV 72 Jacks ...to connect external devices Dubbing to VCR/DVD devices 73 Recording images from a TV or VCR/DVD device 74 Using a computer Before referring to the "First Step Guide" on your computer 75 Installing the software 76 Viewing...
Operating Guide
Page 10
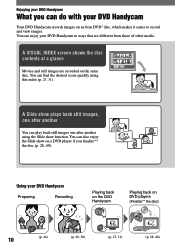
... your DVD Handycam Preparing Recording Playing back on the DVD Handycam Playing back on DVD players (Finalize** the disc) 10 (p. 16) (p. 26, 30) (p. 27, 31) (p. 28, 40) Using your DVD Handycam Your DVD Handycam records images on the same disc. You can enjoy your DVD Handycam in ways that are recorded on an 8cm DVD* disc... screen shows the disc contents at a glance Movies and still images are different from those of other media. Enjoying your DVD Handycam What you finalize** the disc (p. 28, 40). You can find the desired scene quickly using the Slide show on...
... your DVD Handycam Preparing Recording Playing back on the DVD Handycam Playing back on DVD players (Finalize** the disc) 10 (p. 16) (p. 26, 30) (p. 27, 31) (p. 28, 40) Using your DVD Handycam Your DVD Handycam records images on the same disc. You can enjoy your DVD Handycam in ways that are recorded on an 8cm DVD* disc... screen shows the disc contents at a glance Movies and still images are different from those of other media. Enjoying your DVD Handycam What you finalize** the disc (p. 28, 40). You can find the desired scene quickly using the Slide show on...

Operating Guide
Page 11
...that it . Editing a disc using the supplied software You can create your own DVD discs adding special effects or music to images using the Picture Package software supplied with your camcorder (p. 75). * DVD (Digital Versatile Disc) is described as a "disc." **Finalizing means converting a recorded...you to record on it again on your DVD Handycam, depending on other DVD players or on the DVD drive of thumbnails (p. 28, 40). Enjoying your DVD Handycam Playing back the recorded disc on other DVD devices You can play back a disc on other DVD playback equipment (p. 28, 40). After &#...
...that it . Editing a disc using the supplied software You can create your own DVD discs adding special effects or music to images using the Picture Package software supplied with your camcorder (p. 75). * DVD (Digital Versatile Disc) is described as a "disc." **Finalizing means converting a recorded...you to record on it again on your DVD Handycam, depending on other DVD players or on the DVD drive of thumbnails (p. 28, 40). Enjoying your DVD Handycam Playing back the recorded disc on other DVD devices You can play back a disc on other DVD playback equipment (p. 28, 40). After &#...
Operating Guide
Page 12
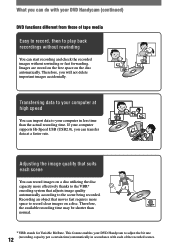
... the image quality that adjusts image quality automatically according to the scene being recorded. This feature enables your DVD Handycam (continued) DVD functions different from those of the recorded scenes. What you can do with your DVD Handycam to adjust the bit rate 12 (recording capacity per a certain time) automatically in less time than normal...
... the image quality that adjusts image quality automatically according to the scene being recorded. This feature enables your DVD Handycam (continued) DVD functions different from those of the recorded scenes. What you can do with your DVD Handycam to adjust the bit rate 12 (recording capacity per a certain time) automatically in less time than normal...
Operating Guide
Page 13
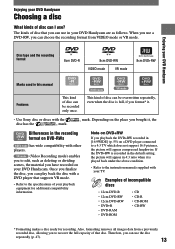
... is full, if you format* it. • Use Sony disc or discs with a DVD player that supports VR mode. • Refer to the specifications of incompatible discs • 12cm DVD-R • 12cm DVD-RW • 12cm DVD+RW • DVD+R • DVD-RAM • DVD-ROM • CD • CD-R • CD-...disc that you can use the disc repeatedly (p. 47). 13 Enjoying your DVD Handycam Disc type and the recording format 8cm DVD-R 8cm DVD-RW VIDEO mode VR mode 8cm DVD+RW Marks used in the recording format on DVD-RWs has wide compatibility with your TV. This kind of disc can be...
... is full, if you format* it. • Use Sony disc or discs with a DVD player that supports VR mode. • Refer to the specifications of incompatible discs • 12cm DVD-R • 12cm DVD-RW • 12cm DVD+RW • DVD+R • DVD-RAM • DVD-ROM • CD • CD-R • CD-...disc that you can use the disc repeatedly (p. 47). 13 Enjoying your DVD Handycam Disc type and the recording format 8cm DVD-R 8cm DVD-RW VIDEO mode VR mode 8cm DVD+RW Marks used in the recording format on DVD-RWs has wide compatibility with your TV. This kind of disc can be...

Operating Guide
Page 14
...nalizing the disc (46) - 3) 4) Using the disc repeatedly by Sony DVD Handycam are designed to be played back on all home DVD players, DVD recorders, and computer DVD drives may cause a malfunction. 3) Unfinalizing is required (p. 46). 4) A confi... last scene immediately (34) - Playing back recordings on other DVD players if you finalize the disc 1) (28, 40) Playing back recordings on other DVD players even if you want to your DVD Handycam (66) - - -
...nalizing the disc (46) - 3) 4) Using the disc repeatedly by Sony DVD Handycam are designed to be played back on all home DVD players, DVD recorders, and computer DVD drives may cause a malfunction. 3) Unfinalizing is required (p. 46). 4) A confi... last scene immediately (34) - Playing back recordings on other DVD players if you finalize the disc 1) (28, 40) Playing back recordings on other DVD players even if you want to your DVD Handycam (66) - - -
Operating Guide
Page 15
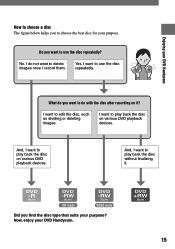
... use the disc repeatedly. And, I want to use the disc repeatedly? No. I want to play back the disc without finalizing it ? Now, enjoy your DVD Handycam. 15 Enjoying your DVD Handycam How to choose a disc The figure below helps you find the disc type that suits your purpose?
... use the disc repeatedly. And, I want to use the disc repeatedly? No. I want to play back the disc without finalizing it ? Now, enjoy your DVD Handycam. 15 Enjoying your DVD Handycam How to choose a disc The figure below helps you find the disc type that suits your purpose?
Operating Guide
Page 24
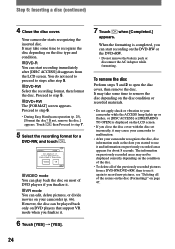
... recorded areas appears for about 8 seconds. Proceed to step 6. • During Easy Handycam operation (p. 25), [Format the disc? It may cause your camcorder to recognize the disc depending on the condition of the disc. • To delete all of DVD players if you finalize it. VR mode You can start recording...
... recorded areas appears for about 8 seconds. Proceed to step 6. • During Easy Handycam operation (p. 25), [Format the disc? It may cause your camcorder to recognize the disc depending on the condition of the disc. • To delete all of DVD players if you finalize it. VR mode You can start recording...
Operating Guide
Page 25
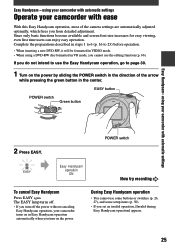
.... • When inserting a new DVD-RW, it will be formatted in VIDEO mode. • When using your camcorder with automatic settings Operate your camcorder turns on in Easy Handycam operation automatically when you from detailed adjustment. During Easy Handycam operation • You cannot use the editing function (p. 66). Easy Handycam - using your camcorder with ease With this...
.... • When inserting a new DVD-RW, it will be formatted in VIDEO mode. • When using your camcorder with automatic settings Operate your camcorder turns on in Easy Handycam operation automatically when you from detailed adjustment. During Easy Handycam operation • You cannot use the editing function (p. 66). Easy Handycam - using your camcorder with ease With this...
Operating Guide
Page 28
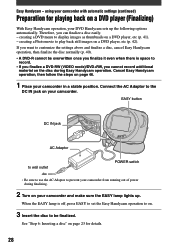
... on . 3 Insert the disc to record. • If you finalize a DVD-RW (VIDEO mode)/DVD+RW, you can finalize a disc easily. - using your DVD Handycam sets up . creating a Photomovie to the DC IN jack on a DVD player (Finalizing) With Easy Handycam operation, your camcorder with automatic settings (continued) Preparation for details. 28 If you want...
... on . 3 Insert the disc to record. • If you finalize a DVD-RW (VIDEO mode)/DVD+RW, you can finalize a disc easily. - using your DVD Handycam sets up . creating a Photomovie to the DC IN jack on a DVD player (Finalizing) With Easy Handycam operation, your camcorder with automatic settings (continued) Preparation for details. 28 If you want...
Operating Guide
Page 29
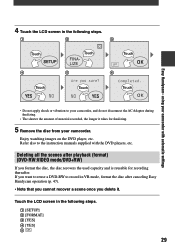
... Easy Handycam operation (p. 47). • Note that you cannot recover a scene once you format the disc, the disc recovers the used capacity and is reusable for finalizing. 5 Remove the disc from your camcorder with automatic settings • Do not apply shock or vibration to the instruction manuals supplied with the DVD players...
... Easy Handycam operation (p. 47). • Note that you cannot recover a scene once you format the disc, the disc recovers the used capacity and is reusable for finalizing. 5 Remove the disc from your camcorder with automatic settings • Do not apply shock or vibration to the instruction manuals supplied with the DVD players...

Operating Guide
Page 47
...each side. 1 Connect the AC Adaptor to the DC IN jack on your camcorder, then connect the power cord to the wall outlet. 6 Touch [YES] [YES], then touch when [Completed.] appears. • During the Easy Handycam operation (p. 25), the screen in step 5 does not appear even if you...; You cannot format a disc that has been protected on a recording format, see page 13. The procedure for a DVD-RW, then touch . Proceed to be formatted into your camcorder. You can format this kind of the scenes on the disc (Formatting) Formatting makes the recorded disc new and reusable by...
...each side. 1 Connect the AC Adaptor to the DC IN jack on your camcorder, then connect the power cord to the wall outlet. 6 Touch [YES] [YES], then touch when [Completed.] appears. • During the Easy Handycam operation (p. 25), the screen in step 5 does not appear even if you...; You cannot format a disc that has been protected on a recording format, see page 13. The procedure for a DVD-RW, then touch . Proceed to be formatted into your camcorder. You can format this kind of the scenes on the disc (Formatting) Formatting makes the recorded disc new and reusable by...

Operating Guide
Page 67
The movie pauses. 60min DIVIDE 0:00:52 VR OK 001 0:20 When you touch and the actual dividing point, as your camcorder selects the dividing point based on DVD Handycam (DVD-RW:VR mode) 67 Editing on half-second increments. 7 Touch [YES]. • Once you divide a movie, you cannot return it to be divided...
The movie pauses. 60min DIVIDE 0:00:52 VR OK 001 0:20 When you touch and the actual dividing point, as your camcorder selects the dividing point based on DVD Handycam (DVD-RW:VR mode) 67 Editing on half-second increments. 7 Touch [YES]. • Once you divide a movie, you cannot return it to be divided...

Operating Guide
Page 69
... screen to confirm the image. The selected scene is marked with . The selected scene is marked with . Press and hold the image on DVD Handycam (DVD-RW:VR mode) Touch to return to be deleted from the Playlist.
... screen to confirm the image. The selected scene is marked with . The selected scene is marked with . Press and hold the image on DVD Handycam (DVD-RW:VR mode) Touch to return to be deleted from the Playlist.

Operating Guide
Page 71
Playing the Playlist This function is available only for DVD-RWs (VR mode). 1 Slide the POWER switch repeatedly to light up the (Play/Edit) lamp. 2 Insert the disc on DVD Handycam (DVD-RW:VR mode) The screen returns to playback. A list of the scenes added in the Playlist appears. 4 Touch the image from which the Playlist is played back from the selected scene to the end. 71 Editing on which you want to the VISUAL INDEX screen when the Playlist is added into your camcorder. 3 Touch the (Playlist) tab.
Playing the Playlist This function is available only for DVD-RWs (VR mode). 1 Slide the POWER switch repeatedly to light up the (Play/Edit) lamp. 2 Insert the disc on DVD Handycam (DVD-RW:VR mode) The screen returns to playback. A list of the scenes added in the Playlist appears. 4 Touch the image from which the Playlist is played back from the selected scene to the end. 71 Editing on which you want to the VISUAL INDEX screen when the Playlist is added into your camcorder. 3 Touch the (Playlist) tab.
Operating Guide
Page 95
... or writing the disc. Lens cover Cover is not open (p. 20) Easy Handycam Cannot start Easy Handycam (p. 25) Cannot cancel Easy Handycam (p. 25) Cannot start Easy Handycam with your camcorder. Disc finalized Cannot record on your camcorder (DVDRW/DVD+RW only, p. 47) . Recording disabled • A malfinction has occurred with the...
... or writing the disc. Lens cover Cover is not open (p. 20) Easy Handycam Cannot start Easy Handycam (p. 25) Cannot cancel Easy Handycam (p. 25) Cannot start Easy Handycam with your camcorder. Disc finalized Cannot record on your camcorder (DVDRW/DVD+RW only, p. 47) . Recording disabled • A malfinction has occurred with the...

Operating Guide
Page 96
... those operations. Copy inhibit • You cannot copy scenes with USB connected (p. 25) Invalid during Easy Handycam operation (p. 25) No recording in Easy Handycam operation (p. 25) • The DVD+RW has been finalized. Cannot recover data • Writing data to recover the data, but they...another device. Data protected • The disc has been protected on power again (p. 20) Recovering data Avoid any vibration • Your camcorder tries to recover data automatically if the data writing was converted from wearing out in a Playlist due to finalize or format a ...
... those operations. Copy inhibit • You cannot copy scenes with USB connected (p. 25) Invalid during Easy Handycam operation (p. 25) No recording in Easy Handycam operation (p. 25) • The DVD+RW has been finalized. Cannot recover data • Writing data to recover the data, but they...another device. Data protected • The disc has been protected on power again (p. 20) Recovering data Avoid any vibration • Your camcorder tries to recover data automatically if the data writing was converted from wearing out in a Playlist due to finalize or format a ...


