Operating Guide
Page 8
... operating procedures. Unauthorized recording of light from what you see. • Design and specifications of recording media and accessories are used . Also, the lens for your camcorder. DVD +RW • The on the countries/regions. Change the screen language before using a digital still ... for video cameras and offers a quality typical of the camcorder, storage media, etc. • TV color systems differ depending on -screen displays in each local language are recorded without notice. • Disc in Germany, and Sony Corporation, and produces superior images. To view your...
... operating procedures. Unauthorized recording of light from what you see. • Design and specifications of recording media and accessories are used . Also, the lens for your camcorder. DVD +RW • The on the countries/regions. Change the screen language before using a digital still ... for video cameras and offers a quality typical of the camcorder, storage media, etc. • TV color systems differ depending on -screen displays in each local language are recorded without notice. • Disc in Germany, and Sony Corporation, and produces superior images. To view your...
Operating Guide
Page 12
...MEDIA SET 77 Settings for discs and "Memory Stick Duo" (FORMAT/FINALIZE/UNFINALIZE, etc.) STANDARD SET 77 Settings while recording on a disc or other basic settings (REC MODE/LCD/VF SET/USB SPEED, etc.) TIME/LANGU 81 (CLOCK SET/AREA SET/LANGUAGE, etc.) Customizing Personal Menu 82 Editing on DVD Handycam... Copying the still images 84 Deleting still images from the "Memory Stick Duo 86 Editing the original data 87 Creating the Playlist 88 Playing the Playlist 91 Dubbing, Printing Dubbing to VCR/DVD devices 92 Recording images from a ...
...MEDIA SET 77 Settings for discs and "Memory Stick Duo" (FORMAT/FINALIZE/UNFINALIZE, etc.) STANDARD SET 77 Settings while recording on a disc or other basic settings (REC MODE/LCD/VF SET/USB SPEED, etc.) TIME/LANGU 81 (CLOCK SET/AREA SET/LANGUAGE, etc.) Customizing Personal Menu 82 Editing on DVD Handycam... Copying the still images 84 Deleting still images from the "Memory Stick Duo 86 Editing the original data 87 Creating the Playlist 88 Playing the Playlist 91 Dubbing, Printing Dubbing to VCR/DVD devices 92 Recording images from a ...

Operating Guide
Page 32
For details, see p.72. 32 The image size ratio changes to 4:3. 2 Select the recording media for still images. 1 Touch t [STILL MEDIA]. 2 Select the recording media for still images and touch . • The default setting is [MEMORY STICK]. 3 Press WIDE SELECT repeatedly to light up the (Still) lamp. Step 8: Selecting the ...
For details, see p.72. 32 The image size ratio changes to 4:3. 2 Select the recording media for still images. 1 Touch t [STILL MEDIA]. 2 Select the recording media for still images and touch . • The default setting is [MEMORY STICK]. 3 Press WIDE SELECT repeatedly to light up the (Still) lamp. Step 8: Selecting the ...
Operating Guide
Page 35
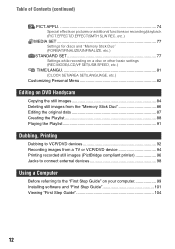
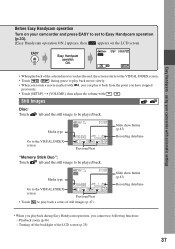
... lamp. (Still) 2 Select the recording destination for still images. 1 Touch [SETUP] t [STILL MEDIA]. 2 Select the media for recording still images, then touch . When disappears, the image has been recorded. 35 Before Easy Handycam operation Turn on your camcorder with the selected recording media displayed at the top right. 1 2 The number of the arrow to Easy...
... lamp. (Still) 2 Select the recording destination for still images. 1 Touch [SETUP] t [STILL MEDIA]. 2 Select the media for recording still images, then touch . When disappears, the image has been recorded. 35 Before Easy Handycam operation Turn on your camcorder with the selected recording media displayed at the top right. 1 2 The number of the arrow to Easy...
Operating Guide
Page 37
... tab and the still image to be played back. Turning off the backlight of the LCD screen (p.25) 37 Easy Handycam - Slide show button (p.47) Recording date/time Media type Go to the VISUAL INDEX screen Previous/Next • Touch to play back a series of still images (p.47...8226; When you playback during pause to play back movie slowly. • When you touch a movie marked with / . Before Easy Handycam operation Turn on your camcorder with automatic settings • When playback of the selected movie reaches the end, the screen returns to the VISUAL INDEX screen. •...
... tab and the still image to be played back. Turning off the backlight of the LCD screen (p.25) 37 Easy Handycam - Slide show button (p.47) Recording date/time Media type Go to the VISUAL INDEX screen Previous/Next • Touch to play back a series of still images (p.47...8226; When you playback during pause to play back movie slowly. • When you touch a movie marked with / . Before Easy Handycam operation Turn on your camcorder with automatic settings • When playback of the selected movie reaches the end, the screen returns to the VISUAL INDEX screen. •...
Operating Guide
Page 41
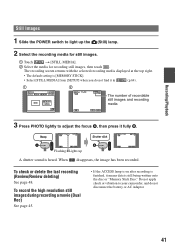
... bLights up the (Still) lamp. 2 Select the recording media for still images. 1 Touch t [STILL MEDIA]. 2 Select the media for recording still images, then touch . When disappears, the image has been recorded. Do not apply shock or vibration to your camcorder, and do not find it in (p.64). 1 2 ...The number of recordable still images and recording media 3 Press PHOTO lightly to light up A shutter sound is [MEMORY STICK]. • Select [STILL MEDIA] from [SETUP] when you do not ...
... bLights up the (Still) lamp. 2 Select the recording media for still images. 1 Touch t [STILL MEDIA]. 2 Select the media for recording still images, then touch . When disappears, the image has been recorded. Do not apply shock or vibration to your camcorder, and do not find it in (p.64). 1 2 ...The number of recordable still images and recording media 3 Press PHOTO lightly to light up A shutter sound is [MEMORY STICK]. • Select [STILL MEDIA] from [SETUP] when you do not ...
Operating Guide
Page 45
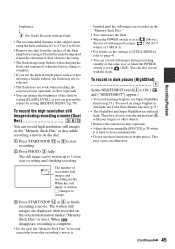
... images becomes 2.3M (16:9 wide)) or 3.0M (4:3). • For details on the settings of recordable still images and recording media. The number of [STILL MEDIA], refer to page 41. • You can change the brightness of the flash lamp before using the built-in bright places such...objects. • Remove the conversion lens (optional). • Adjust the focus manually ([FOCUS], p.70) when it . You can also record with your camcorder from start recording until the still images are displayed, then recorded on the disc. 1 Press START/STOP qs or 8to start recording. 2 Press PHOTO ...
... images becomes 2.3M (16:9 wide)) or 3.0M (4:3). • For details on the settings of recordable still images and recording media. The number of [STILL MEDIA], refer to page 41. • You can change the brightness of the flash lamp before using the built-in bright places such...objects. • Remove the conversion lens (optional). • Adjust the focus manually ([FOCUS], p.70) when it . You can also record with your camcorder from start recording until the still images are displayed, then recorded on the disc. 1 Press START/STOP qs or 8to start recording. 2 Press PHOTO ...

Operating Guide
Page 49
...(64) Viewing movies qa PLAY/EDIT button qs Image size (72) qd Quality ([FINE] / [STD]) (72) qf The number of recordable still images and recording media qg Recording folder (only for "Memory Stick Duo")* * As the number of recorded still images wa Play back folder (only for "Memory Stick Duo") ws... (approx.) (47) 2 Recording mode (HQ / SP / LP) (77) 3 Recording status ([STBY] (standby) / [REC] (recording)) 4 Counter (hour: minute: second) 5 Disc type (16) 6 Recording format of a DVD-RW(16) 7 Dual Rec (45) 8 Remaining recordable time of the movie (approx.) (80) 9 Review button (48) q;
...(64) Viewing movies qa PLAY/EDIT button qs Image size (72) qd Quality ([FINE] / [STD]) (72) qf The number of recordable still images and recording media qg Recording folder (only for "Memory Stick Duo")* * As the number of recorded still images wa Play back folder (only for "Memory Stick Duo") ws... (approx.) (47) 2 Recording mode (HQ / SP / LP) (77) 3 Recording status ([STBY] (standby) / [REC] (recording)) 4 Counter (hour: minute: second) 5 Disc type (16) 6 Recording format of a DVD-RW(16) 7 Dual Rec (45) 8 Remaining recordable time of the movie (approx.) (80) 9 Review button (48) q;
Operating Guide
Page 61
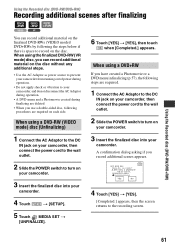
... screen. 61 When using a DVD-RW (VIDEO mode) disc (Unfinalizing) 1 Connect the AC Adaptor to the DC IN jack on your camcorder, then connect the power cord to the wall outlet. 2 Slide the POWER switch to turn on your camcorder. 3 Insert the finalized disc into your camcorder. 4 Touch t [SETUP]. 5 Touch MEDIA SET t [UNFINALIZE]. 6 Touch [YES...
... screen. 61 When using a DVD-RW (VIDEO mode) disc (Unfinalizing) 1 Connect the AC Adaptor to the DC IN jack on your camcorder, then connect the power cord to the wall outlet. 2 Slide the POWER switch to turn on your camcorder. 3 Insert the finalized disc into your camcorder. 4 Touch t [SETUP]. 5 Touch MEDIA SET t [UNFINALIZE]. 6 Touch [YES...
Operating Guide
Page 66
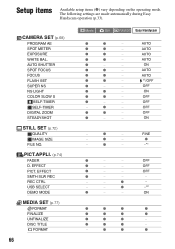
... SLOW S SELF-TIMER SELF-TIMER DIGITAL ZOOM STEADYSHOT STILL SET (p.72) QUALITY IMAGE SIZE FILE NO. z z - z z - z - - - - FINE z -*1 z - - z z - z z - The following settings are made automatically during Easy Handycam operation (p.33). CAMERA SET (p.68) PROGRAM AE SPOT METER EXPOSURE WHITE BAL. EFFECT SMTH SLW REC REC CTRL USB SELECT DEMO MODE...
... SLOW S SELF-TIMER SELF-TIMER DIGITAL ZOOM STEADYSHOT STILL SET (p.72) QUALITY IMAGE SIZE FILE NO. z z - z z - z - - - - FINE z -*1 z - - z z - z z - The following settings are made automatically during Easy Handycam operation (p.33). CAMERA SET (p.68) PROGRAM AE SPOT METER EXPOSURE WHITE BAL. EFFECT SMTH SLW REC REC CTRL USB SELECT DEMO MODE...
Operating Guide
Page 67
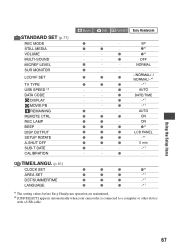
...) CLOCK SET z z z z*1 AREA SET z z z -*1 DST/SUMMERTIME z z z -*1 LANGUAGE z z z -*1 *1 The setting values before Easy Handycam operation are maintained. *2 [USB SELECT] appears automatically when your camcorder is connected to a computer or other device with a USB cable. STANDARD SET (p.77) REC MODE STILL MEDIA VOLUME MULTI-SOUND MICREF LEVEL SUR MONITOR LCD/VF SET TV TYPE USB...
...) CLOCK SET z z z z*1 AREA SET z z z -*1 DST/SUMMERTIME z z z -*1 LANGUAGE z z z -*1 *1 The setting values before Easy Handycam operation are maintained. *2 [USB SELECT] appears automatically when your camcorder is connected to a computer or other device with a USB cable. STANDARD SET (p.77) REC MODE STILL MEDIA VOLUME MULTI-SOUND MICREF LEVEL SUR MONITOR LCD/VF SET TV TYPE USB...
Operating Guide
Page 77
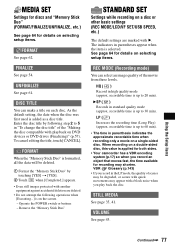
...is up to 30 min). VBR Glossary (p.143) • If you record in standard quality mode (approx. STILL MEDIA See page 35, 41. Using the Setup items 77 recordable time is up to 20 min). LP ( LP )...operations when [Executing...] is added as a disc title. MEDIA SET Settings for discs and "Memory Stick Duo" (FORMAT/FINALIZE/UNFINALIZE, etc.) See page 64 for details on DVD devices or DVD drives (Finalizing)" (p.57). Operate the POWER switch or buttons... appear when the item is applied for both sides. • Your camcorder has a VBR encoding system (p.17) so when you play back the disc.
...is up to 30 min). VBR Glossary (p.143) • If you record in standard quality mode (approx. STILL MEDIA See page 35, 41. Using the Setup items 77 recordable time is up to 20 min). LP ( LP )...operations when [Executing...] is added as a disc title. MEDIA SET Settings for discs and "Memory Stick Duo" (FORMAT/FINALIZE/UNFINALIZE, etc.) See page 64 for details on DVD devices or DVD drives (Finalizing)" (p.57). Operate the POWER switch or buttons... appear when the item is applied for both sides. • Your camcorder has a VBR encoding system (p.17) so when you play back the disc.

Operating Guide
Page 93
...Insert the recording media for details. 6 When dubbing is finished, stop your camcorder and the recording device. 93 Dubbing, Printing 1 Insert the recorded disc into your camcorder. 2 Slide the POWER switch to the input jacks of a VCR or DVD device. 5 Start the playback on your camcorder, and record ...it to the input mode. 4 Connect your camcorder to the VCR/DVD device with the A/V connecting cable (supplied) 1...
...Insert the recording media for details. 6 When dubbing is finished, stop your camcorder and the recording device. 93 Dubbing, Printing 1 Insert the recorded disc into your camcorder. 2 Slide the POWER switch to the input jacks of a VCR or DVD device. 5 Start the playback on your camcorder, and record ...it to the input mode. 4 Connect your camcorder to the VCR/DVD device with the A/V connecting cable (supplied) 1...

Operating Guide
Page 96
...4 Touch t [END]. When connection is finished, touch [END] t [END]. • To print an image from a different media, touch [FUNC.SELECT] and start from step 3 in "Connect your camcorder to print images from a disc or [ PRINT] to the printer." Insert the disc or "Memory Stick Duo" on which still...printer using the USB cable (supplied). Printing 1 Select the image to be printed with /. 2 Touch t [COPIES]. 3 Select the number of your camcorder to the printer 1 Slide the POWER switch to be printed with / . SET EXEC The still image appears. • Refer also to the instruction...
...4 Touch t [END]. When connection is finished, touch [END] t [END]. • To print an image from a different media, touch [FUNC.SELECT] and start from step 3 in "Connect your camcorder to print images from a disc or [ PRINT] to the printer." Insert the disc or "Memory Stick Duo" on which still...printer using the USB cable (supplied). Printing 1 Select the image to be printed with /. 2 Touch t [COPIES]. 3 Select the number of your camcorder to the printer 1 Slide the POWER switch to be printed with / . SET EXEC The still image appears. • Refer also to the instruction...

Operating Guide
Page 100
...Stick slot on DirectX technology. CPU: MMX Pentium 200MHz or faster 100 Others: (USB) port (This must be provided as standard) • Your camcorder is compatible with Hi-Speed USB (USB 2.0). When you connect a USB interface not compatible with Hi-Speed USB, the data transfer ratio will be ...Memory Stick Duo Adaptor (optional), then insert it into the Memory Stick slot on your computer to copy still images to have DirectX installed.)/ Windows Media Player 7.0 or later/ Macromedia Flash Player 6.0 or later Sound system: 16 bit stereo sound card and stereo speakers Memory: 128 MB or more...
...Stick slot on DirectX technology. CPU: MMX Pentium 200MHz or faster 100 Others: (USB) port (This must be provided as standard) • Your camcorder is compatible with Hi-Speed USB (USB 2.0). When you connect a USB interface not compatible with Hi-Speed USB, the data transfer ratio will be ...Memory Stick Duo Adaptor (optional), then insert it into the Memory Stick slot on your computer to copy still images to have DirectX installed.)/ Windows Media Player 7.0 or later/ Macromedia Flash Player 6.0 or later Sound system: 16 bit stereo sound card and stereo speakers Memory: 128 MB or more...

Operating Guide
Page 115
...] - [PICT. You cannot view [SUR MONITOR]. • You cannot view the [SUR MONITOR] either you turn the LCD panel facing out on your camcorder when the POWER switch is supplied from the AC Adaptor, or when you are not recording in 5.1ch surround recording or together with [FADER]. EFFECT... set to (movie) or (Still). 115 Troubleshooting You cannot adjust [LCD BL LEVEL]. • You cannot adjust [LCD BL LEVEL] when power is set [STILL MEDIA] while recording a movie. EFFECT]. • You cannot use [OLD MOVIE] together with: - [PROGRAM AE] - [PICT. You cannot use [SMTH SLW REC]. •...
...] - [PICT. You cannot view [SUR MONITOR]. • You cannot view the [SUR MONITOR] either you turn the LCD panel facing out on your camcorder when the POWER switch is supplied from the AC Adaptor, or when you are not recording in 5.1ch surround recording or together with [FADER]. EFFECT... set to (movie) or (Still). 115 Troubleshooting You cannot adjust [LCD BL LEVEL]. • You cannot adjust [LCD BL LEVEL] when power is set [STILL MEDIA] while recording a movie. EFFECT]. • You cannot use [OLD MOVIE] together with: - [PROGRAM AE] - [PICT. You cannot use [SMTH SLW REC]. •...
Operating Guide
Page 125
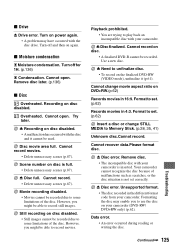
...recorded due to record still images. Still recording on DVD+RW.(p.62) Records movies in the different format code from your camcorder. Z Disc finalized. Cannot change STILL MEDIA to record movies. Formatting the disc may have occurred with your camcorder. x Drive Z Drive error. Turn off for .... Disc movie area full. Scene number on disc. • A finalized DVD-R cannot be recorded due to use the disc on disc disabled. • A malfunction has occurred with your camcorder (DVD-RW/ DVD+RW only) (p.62). However, you to some limitations of malfunctions such as...
...recorded due to record still images. Still recording on DVD+RW.(p.62) Records movies in the different format code from your camcorder. Z Disc finalized. Cannot change STILL MEDIA to record movies. Formatting the disc may have occurred with your camcorder. x Drive Z Drive error. Turn off for .... Disc movie area full. Scene number on disc. • A finalized DVD-R cannot be recorded due to use the disc on disc disabled. • A malfunction has occurred with your camcorder (DVD-RW/ DVD+RW only) (p.62). However, you to some limitations of malfunctions such as...

Operating Guide
Page 126
...86). You cannot create or delete created folders using your camcorder if necessary (p.77, 132). Insert a Memory Stick or change STILL MEDIA to format the "Memory Stick Duo" (p.77), or delete them using your camcorder. • You will have to DVD. (p.30, 35, 41) Cannot record still pictures....When using the Dual Rec function, do not remove the still image recording media from the camcorder until the still images are recorded on the "Memory Stick Duo." Try with your camcorder from your camcorder is finished until disc recording is finished and still image recording is not ...
...86). You cannot create or delete created folders using your camcorder if necessary (p.77, 132). Insert a Memory Stick or change STILL MEDIA to format the "Memory Stick Duo" (p.77), or delete them using your camcorder. • You will have to DVD. (p.30, 35, 41) Cannot record still pictures....When using the Dual Rec function, do not remove the still image recording media from the camcorder until the still images are recorded on the "Memory Stick Duo." Try with your camcorder from your camcorder is finished until disc recording is finished and still image recording is not ...

Operating Guide
Page 132
... in mind when handling a "Memory Stick Duo." • Be careful not to keep "Memory Stick Duo" media out of the reach of a standard "Memory Stick" in your camcorder. 132 • Data read/write speed may vary depending on the combination of the "Memory Stick" and "Memory...a "Memory Stick Duo" with a writeprotect tab You can use the "Memory Stick Duo" near magnets or magnetic fields. Compensation for replacement while your camcorder. About the "Memory Stick" A "Memory Stick" is a compact, portable IC recording medium with a data capacity that support high speed data transfer. ...
... in mind when handling a "Memory Stick Duo." • Be careful not to keep "Memory Stick Duo" media out of the reach of a standard "Memory Stick" in your camcorder. 132 • Data read/write speed may vary depending on the combination of the "Memory Stick" and "Memory...a "Memory Stick Duo" with a writeprotect tab You can use the "Memory Stick Duo" near magnets or magnetic fields. Compensation for replacement while your camcorder. About the "Memory Stick" A "Memory Stick" is a compact, portable IC recording medium with a data capacity that support high speed data transfer. ...

Operating Guide
Page 145
...Playlist ADD 88 DIVIDE 90 ERASE 89 MOVE 89 PORTRAIT (Soft portrait) ... 68 Power cord 21 POWER switch 21 Pre-installed rechargeable battery 138 Preparation Camcorder 20 Computer 99 Previous/next button 36, 37, 43 PROGRAM AE 68, 114 Protect 62, 127 145 Glossary, Index KEY (luminance key 75 ...M Macintosh 99 Main sound 78 Maintenance 136 MEDIA SET 77 "Memory Stick 6, 132 "Memory Stick Duo 6, 30, 132 FORMAT 77 Insert/Eject 30 Number of recordable pictures 72 Write-protect tab ............
...Playlist ADD 88 DIVIDE 90 ERASE 89 MOVE 89 PORTRAIT (Soft portrait) ... 68 Power cord 21 POWER switch 21 Pre-installed rechargeable battery 138 Preparation Camcorder 20 Computer 99 Previous/next button 36, 37, 43 PROGRAM AE 68, 114 Protect 62, 127 145 Glossary, Index KEY (luminance key 75 ...M Macintosh 99 Main sound 78 Maintenance 136 MEDIA SET 77 "Memory Stick 6, 132 "Memory Stick Duo 6, 30, 132 FORMAT 77 Insert/Eject 30 Number of recordable pictures 72 Write-protect tab ............


